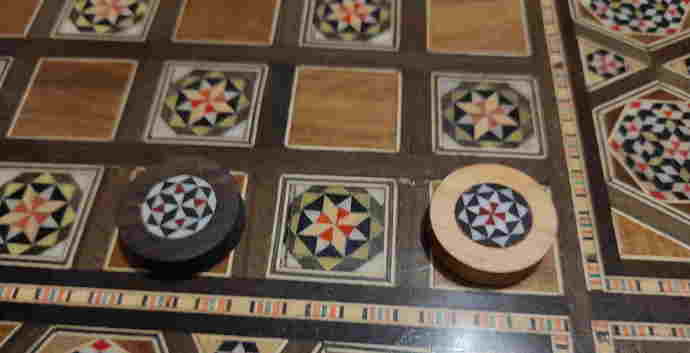
I’ve got a couple different sizes of these Middle Eastern backgammon sets, but only one has the correct tiles. As you can see here the two correct tiles have a circular inlay built up from lots of little triangles and diamonds. My visualization has a bundle of these cemented together to form a cylinder, then sections are cut off and glued into round tokens with a circular packet cut into them. I would likely do it by cutting the pockets into two different colored woods, place the inlay with a black epoxy, filling in the outer ring, then milling out each tile . Note that these tiles have just blank wood on the back, so the inlaid part doesn’t have to be too deep. Anyone know where I could find the long thin pieces that make up the centers? I’ve seen the technique used elsewhere, so I figure they have to be available. The ones shown here seem to be plastic pieces, but I’ve also seen them in dyed wood.
You could try pocketing the wood piece, fill it with epoxy, mill one color of triangles in the the epoxy, epoxy again, and so on.
I can’t find the video at the moment, but I watched a Japanese masters sort of thing a while back, and they made their own long strips by slicing wood along the grain from different species, then planed and glued them up. If I remember correctly, they had this tool that looked like a knife run up through a table that they used to do the slicing. I’d tilt the table on my band saw for a small run. EDIT - nope, it was a pull saw.
The process was to plane the edge of the larger stock, cut off the strip, plane the cut edge of the strip then plane the edge of the large stock again. This way you only have to plane one side of the strip once it’s cut off.
OK, I’m seeing red/white diamonds (red and white triangles), black diamonds (2x black triangles), white diamonds (2x white triangles), and black/white squares (back and white triangles2). Outside black and white material could be added to the glue-up, or poured epoxy when applying inlay to the wooden puck. If you add oversized material to the glue-up, you could turn the whole thing down to the proper diameter on a lathe, then cut out the recess in the pucks. Otherwise, you could carefully pour resin/epoxy into the gaps after you set the inlays, and sand them down to the proper thickness.
If you’re not finding the material pre-made, you might be able to cast it yourself in resin using a form made of aluminum rails or some such, and then use a band/scrollsaw or some other method to shape the whole strip.
There are two different sized triangles, one that makes up the diamonds (78.75°, 78.75°, 22.5°) and the ones that make up the squares (45°, 45°, 90°)
But this is all just the musings of someone who is really just trying to avoid dealing the the creeping features of the issue that was tossed in my lap on Monday… 
That’s not quite what he’s looking for. That would work great for the decorative edging around the sides of the board, but for the pieces themselves, what he needs to do is more of a long, cylindrical edge-grain cutting board that he can slice thin to apply to wooden blanks for the pieces. And I’ll bet any number of internet points that what Tom is thinking is the basic skills used for creating the originals (or at least, what it’s based on).
Found a link for Hakone Wood Mosaic (also called Yosegi Marquetry) which includes the video, and even shows some of the wood species used to get the colors. In this case, they glue up the patterned material then plane off a shaving to use as veneer to wrap boxes and other items, but it seems to me the process would be the same for the inlays @billsey is looking to recreate, although an addition step to get from square/triangle to round inlay stock may be required.
Have you considered just drawing on them with a permanent marker?
I’ll see myself out…
And here’s an example from Pask Makes youtube channel as he works through the process himself and shares what he learns.
Just watched a video while chasing the rabbit that sparked another idea. Once you have the design glued up, put the whole thing into a length of PVC, and pour resin around it in that, and it’ll already be round! Then you could even jimmy up a poor man’s lathe with a power drill and just sand it down to diameter.
My mistake. I was responding to the
where I could find the long thin pieces that make up the centers
fully thinking about the center of the board not the center of the tokens…
Yeah, I’m still hoping someone makes the strips in either wood or plastic (more likely plastic, I’d think) that I could then bundle up to form the basis for the center inlays… That Japanese video was awesome, but it looks like a lot of work. 
Any thought to 3D printing the individual triangles and having a glue up session? Setting those into a milled out circle? Epoxy the entire thing.
I suppose I could lay the strip out such that I would print it. Do it several times in different colors, then glue and bundle. I’m not usure I wouldn’t end up with little voids though, even at 100% infill. I really believe there is a source for these somewhere, I just need to find the right search phrase. 
