Hello everyone, I’m very visual when it comes down to setting things up, although I can follow directions but I get lost fairly quickly.
Can someone help me with the following:
How to wire the router to the board using a Solid State Relay Single Phase Semi-Conductor Relay for auto on/off?
Which fan pin? Where to change the Gcode? if someone can include screen shots of it it’ll be great.
(I will not be leaving the CNC machine alone while working, I just want it fully automated)
The same question for installing a laser engraver machine. (also a recommended laser will be much appreciated)
The goal is to all the wiring done prior to installing the wire tracks.
EDIT: I’m suing a RAMBO 1.4 with dual endstop Firmware.
It will vary by controller, but you’ll connect the signal input pin/connector on the relay to a “spindle enable” output pin on the control board. Depending on the pin you use and the firmware you’re using, different gcode commands can be used to enable or disable the relay.
My Burly is configured to use M3 to turn the router on, and M5 to turn it off through a 100V AC relay. I have additional relays for “flood coolant” with M7, “flood coolant” with M8, and “all coolant off” with M9. These accessories are wired to 110V AC outlets, so work for shop vac (dust collection or hold-down), aquarium air pump for laser air-assist, or anything else that uses mains power.
What tools you will be using for your CAM and g-code sending
And even with this info, you probably have some choices to make.
Personally, I run Marlin with a Rambo control board. I use an IOT relay instead of standalone SSR. I purchased this one.
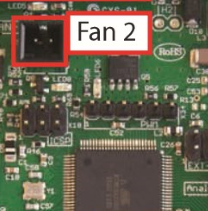
I wired my IOT relay to the Fan2 port on my Rambo board:
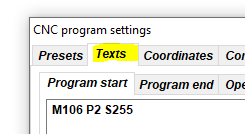
I control my IOT Relay by sending M106 and M107 g-codes. To start my router/laser:
M106 P2 S255
And to turn it off:
M107
All CAM software that I’m aware of have a way of automatically inserting g-code at the beginning and end of a script. For example, in EstlCAM, it is under Setup/CNC Programs/Marlin and is in the ‘Texts’ tab:
If you are using Marlin, there are choices beyond using fan pins to control the relay. The M42 g-code can be used to set the state of arbitrary pins.
The same question for installing a laser engraver machine.
We need to know what control board you have, and what laser module you have. The “big” issue with laser modules is making sure PWM output of your control board can be used by your laser module. For laser cutting, I purchased NEJE A40640, and it does a good job of the materials I’m cutting (mostly 5mm plywood). And this module is plug and play on both the Rambo and the SKR Pro boards. @dkj4linux posts a lot of laser engravings and claims he gets his best work out a much smaller (and cheaper) laser module.
I have said this numerous times wrt to the engraving – not cutting – I’ve done on wood, chipboard, ceramic tile, and glass. I believe my 2.3W Banggood/Eleksmaker laser modules do a better job than most of my higher-powered lasers because they focus to a much nicer spot… and I suspect the smaller die/geometry and/or a better lens is probably the reason.
That said, I also have the Neje A40640 dual-diode laser module that I’ve used to engrave and cut a fair amount of 3mm plywood. It is the only higher-powered laser I own that I think “competes” with my 2.3W lasers for engraving purposes because of the “square” spot geometry it features… and it, of course, cuts far, far better.
I’ve used various GRBL-based (Grbl 1.1f and 1.1h) controller boards and use GRBL almost exclusively now because I believe it to be better and safer for most laser operations (about all I do nowadays) than Marlin… primarily for its M4 dynamic power adjust and near-instantaneous pause/resume. The recent Laser danger! discussion also seems to bear that out.