The one that is running on mine is 20 and 20.2. The rest are about the same, out of 6 total. I have one that is 20.4 and 20.3, I will build with that one next (tomorrow?) to see if it makes a huge difference on mine. I am a bit surprised it stretches that much, but I suppose it might.
Are your M5 screws tight in the hole? Maybe run them with a power driver for a couple seconds to loosen up the holes a bit, mine can pretty much slip right in.
They were, I did loosen them when I adjusted the tension, but was worried about crushing the bearing ridges, so I only gave them a couple extra turns with the hand driver. There are gaps between the bearing edges and the ridges around all of the wheels.
I mean like without a nut or wheel drive it all the way in and then spin it to make sure it kinda reams out the hole a bit. Then assemble it correctly.
1 Like
Okay a smidge looser and you were right, no effect. I did find a bit of schmoo on both my smooth idlers, that actually seemed to help a bit. I am watching the pulleys, and they seem pretty good. I will try a few test cubes at 90 and 45 to try and narrow this down a bit as soon as this moutn finishes.
1 Like
I was looking at the trucks, ad while they’re adequate, some of the detail didn’t print as well as I’d like. So if I’m going to replace the hub, I’ll replace these at the same time, since I have to remove the CF rail, which exposes all of the screws for the trucks.
The corners from before are very good, and don’t need replacement. The Z axis is okay, though I cracked one of the mounts, it wasn’t structural. I’ll replace that eventually, I suppose.
Anything to delay when I have to actually tackle the wiring, looks like.
2 Likes
That looks like heat warping to me. It looks like the nozzle was spending too much time in that area causing the entire thing to heat up and warp.
Note to self. When you go to sleep leaving the printer printing… Make sure that it has enough filament. 
Well, run that job again, but I guess I’m out of Jolly Rancher Blue.
3 Likes
Ok. No big surprise, but…
3/4" is too small. I can’t close the gap enough to bring all of the wheels in contact. It’s sooooo close. I am actually kind of curious if I could pull something off like wrap it in heat-shrink tube, but that would introduce some anomalies, since heat shrink is far from guaranteed to be uniform in thickness.
So anyway, that’s obviously not going to work. The hub is tight but not that tight, even if it looked like it was.
I put the new hub together with wheels, the M5 screws are much looser now, Still tight, but I can just finger thread them in, and I can flex the joint open and closed a bit with a bit of finger pressure. I think that it will result in improvement. All of the screws are currently engaged just tot he point where they touch the nylon ring, so nothing is under any tension whatsoever, so I can tension them on the rail.
I printed a set of the trucks in silver… But I don’t really want to use them.  I did print hte tool mount and fan shroud in solid blue, and not the transparent blue I used for the rest of the printer, but the silver ended up looking too out of place. Maybe if I’d used the solid blue… The transparent blue is $8 more per spool than the last time I bought it. I suppose that it’s still not outrageous, but …
For the largest part, I’m quite happy with this printer build. It’s better than what I already had, faster and with a larger build volume. I still want to triple check calibration, but so far, it all looks great.
I do need to re-do the TFT firmware though, I want to enable the wifi port. Currently it’s disabled, so although I can connect to the wifi, I’m not able to upload files, or see the printer status. (Might work if I connected the wifi to the board, but I wanted it on the TFT) I have a configuration file for the TFT, but not the whole source. I can see in the configuration that the wifi port was disabled. I need to read up on reflashing the TFT, since I haven’t needed to do that with either of mine yet.
I think we need to enable the second port to get the wifi. There is an outstanding pull request for the firmware builder to enable it, but I had not gotten around to testing it yet.
1 Like
From the config.ini file:
#   - Serial port P1 is the primary serial connection to the printer and cannot be disabled.
#   - A baudrate of 250000 works in most cases, but you might try a lower speed if you
#     commonly experience drop-outs during host printing.
#     You may try up to 1000000 to speed up SD file transfer.
#
#   Format: [serial_port: P1:<baudrate> P2:<baudrate> P3:<baudrate> P4:<baudrate>
#   Target port: P1: Printer
#                P2: WIFI    (e.g. ESP3D)
#                P3: UART 3  (e.g. OctoPrint)
#                P4: UART 4
#   Value range: P1: [min: 1, max: 9]
#                P2: [min: 0, max: 9]
#                P3: [min: 0, max: 9]
#                P4: [min: 0, max: 9]
#   Options: [OFF (port disabled): 0, 2400: 1, 9600: 2, 19200: 3, 38400: 4, 57600: 5, 115200: 6, 250000: 7, 500000: 8, 1000000: 9]
serial_port:P1:7 P2:0 P3:0 P4:0
If I’m reading that right, changing that line so that P2 has a nonzero value will enable the serial port. It’s enabled at 250000 on the CNC mode screen that I’m using for the LR2.
The ESP01 firmware that I have insists on 8.3 filenames though, which is kind of crappy, so I’ve been looking for an update that can deal with long filename support. Without that, I can’t see myself using it extensively, which is too bad, because wifi is SO much more convenient to get files to the printer versus SD card, particularly when the machines aren’t anywhere even remotely close to each other.
1 Like
Well shoot I am not sure.
This, https://github.com/V1EngineeringInc/MarlinBuilder/pull/55/files, shows editing the boards’ firmware. If we can just edit the screen that is a win win. I will have to check my Zen, I don’t know if it has the filename limitation or not.
My Zen and my laser both are able to deal with long filenames on the Bart Dring ESP32 controller. The firmware on the ESP01 (8266?) that I installed doesn’t seem to allow long filenames, so that probably means that I need to get updated versions. I just grabbed the files listed on the TeachingTech Youtube video, as I assumed that it needed the right hooks to deal with the storage on the BTT board, including the on-board SD, TFT SD and USB ports.
The good news is that it seems to allow it, the less good is the 8.3 restictions.
For those of you who are following along, I don’t think I’ve gone into much about this.
I am adding an ESP01 module to the TFT35 E3. There is an 8 port header on the board. This Teaching Tech video details getting wifi connectivity to the SKR board.
You can connect the module to the SKR Pro board, it’s (IIRC) right next to the USB port, or you can connect it onto the TFT35 E3 screen. If you connect it to the main board, you have to alter the Marlin firmware to enable that port, and it probably means that you will lose one of the other ports. This might no longer be true with more recent releases On the other hand, if you use the port on the TFT, it communicates with Marlin over the same serial connection as the TFT, and you don’t have to lose any other connection. IN addition, if it’s connected to the TFT, on boot up, the TFT will display the IP address when the wifi connects, which is a nice-to-have.
For these reasons, I am hoping to have the wifi module on the TFT.
On my LowRider, I modified the V1 TFT case to have an extra slot for the wifi antenna. It didn’t need much modification, really. (Still working on the .STL version, I modified mine with a dremmel, lol.) For the printer, no modification was needed, simply because of how I have the TFT mounted to the front of the frame.
The ESP01 modules are cheap. If you’re willing to wait, they can cost as little as $2. I was impatient for my second one, and it was closer to $15 for next day delivery, which I still thought was cheap. You will need a USB to serial adapter, but those are also cheap.
So this still needs a little help, but I’m willing to put in some legwork in order to get wifi file management and print monitoring for my printer.
1 Like
Ryan is talking about the wifi port on the board. Dan is talking about the wifi port on the lcd.
2 Likes
Okay, playing around with the 35 LCD…
It turns out that I can enable the serial port within the TFT menu structure. doing so makes the web UI able to see files on the TFT SD card, though it converts them to 8.3 format.I can. however start files that I can see that way.The web UI has settings where I can enable .GCO/.gco file extensions. Still not ideal, but enough to be useful.
One thing to be aware of is that wifi ONLY works when you’re in touchscreen mode, not while in Marlin mode, but that’s OK. Also, forcing long filename enable on the TFT breaks the file support for the SD card. Maybe a new firmware will fix that…
The TFT doesn’t show me the IP address on boot though. It’s still hung up on
echo:Unknown command: "M211"
Looking at the G34 info, I guess I’ve got my flags about as close as I can reasonably get:
G34 Iteration: 1
Z2-Z1=0.12 Z3-Z2=0.58 Z3-Z1=0.70
I don’t get the G34 implementation.Sometimes it takes very few iterations, as few as 3. Sometimes it takes 9. Makes me want to speed up the XY Probe speed to unreasonable levels, but then the noise bugs me even more.
All told, it’s getting closer. I’m going to try swapping out the hub part tonight.
Edit: Broke a belt tugger swapping out the hub. Cross threaded the M5 nut. I managed to get it out without destroying the hub at least, so there’s that… Printing new belt tuggers, but they’ll be pretty much the same as the old ones, since I have to do it on the old printer. Just not in the same transparent colour.
1 Like
I read somewhere (I think the klipper manual?) that switching between quiet step and spread cycle causes problems. I don’t like the sound of the switching, so I chose to believe it ![]() . I disabled hybrid and it is quiet all the time. On the cnc versions, it is always spreadcycle.
. I disabled hybrid and it is quiet all the time. On the cnc versions, it is always spreadcycle.
1 Like
Yeah that is pretty good.
Just lower the final goal. It is set to within 0.03 across the whole bed. That is near the limit of accuracy of the switches. I bet you could do 0.06-0.1 and hit it in 2 tries and never notice a difference in a print, especially if you are going to the run bilinear on top of it.
Good point. On the larger bed, the same error is a smaller angle, too. With the bilinear, I’d probably be OK without the G34 at all, but I still want to do it. (0.7mm over the span from Z3 to Z1 is about 0.13 degrees. Practically nothing that I print would notice that deflection from square.)
Got the new belt tugger on, tried a print, and now I’ve got some pretty bad overshoot on the corners… I’ll have to tighten the belt and try again.
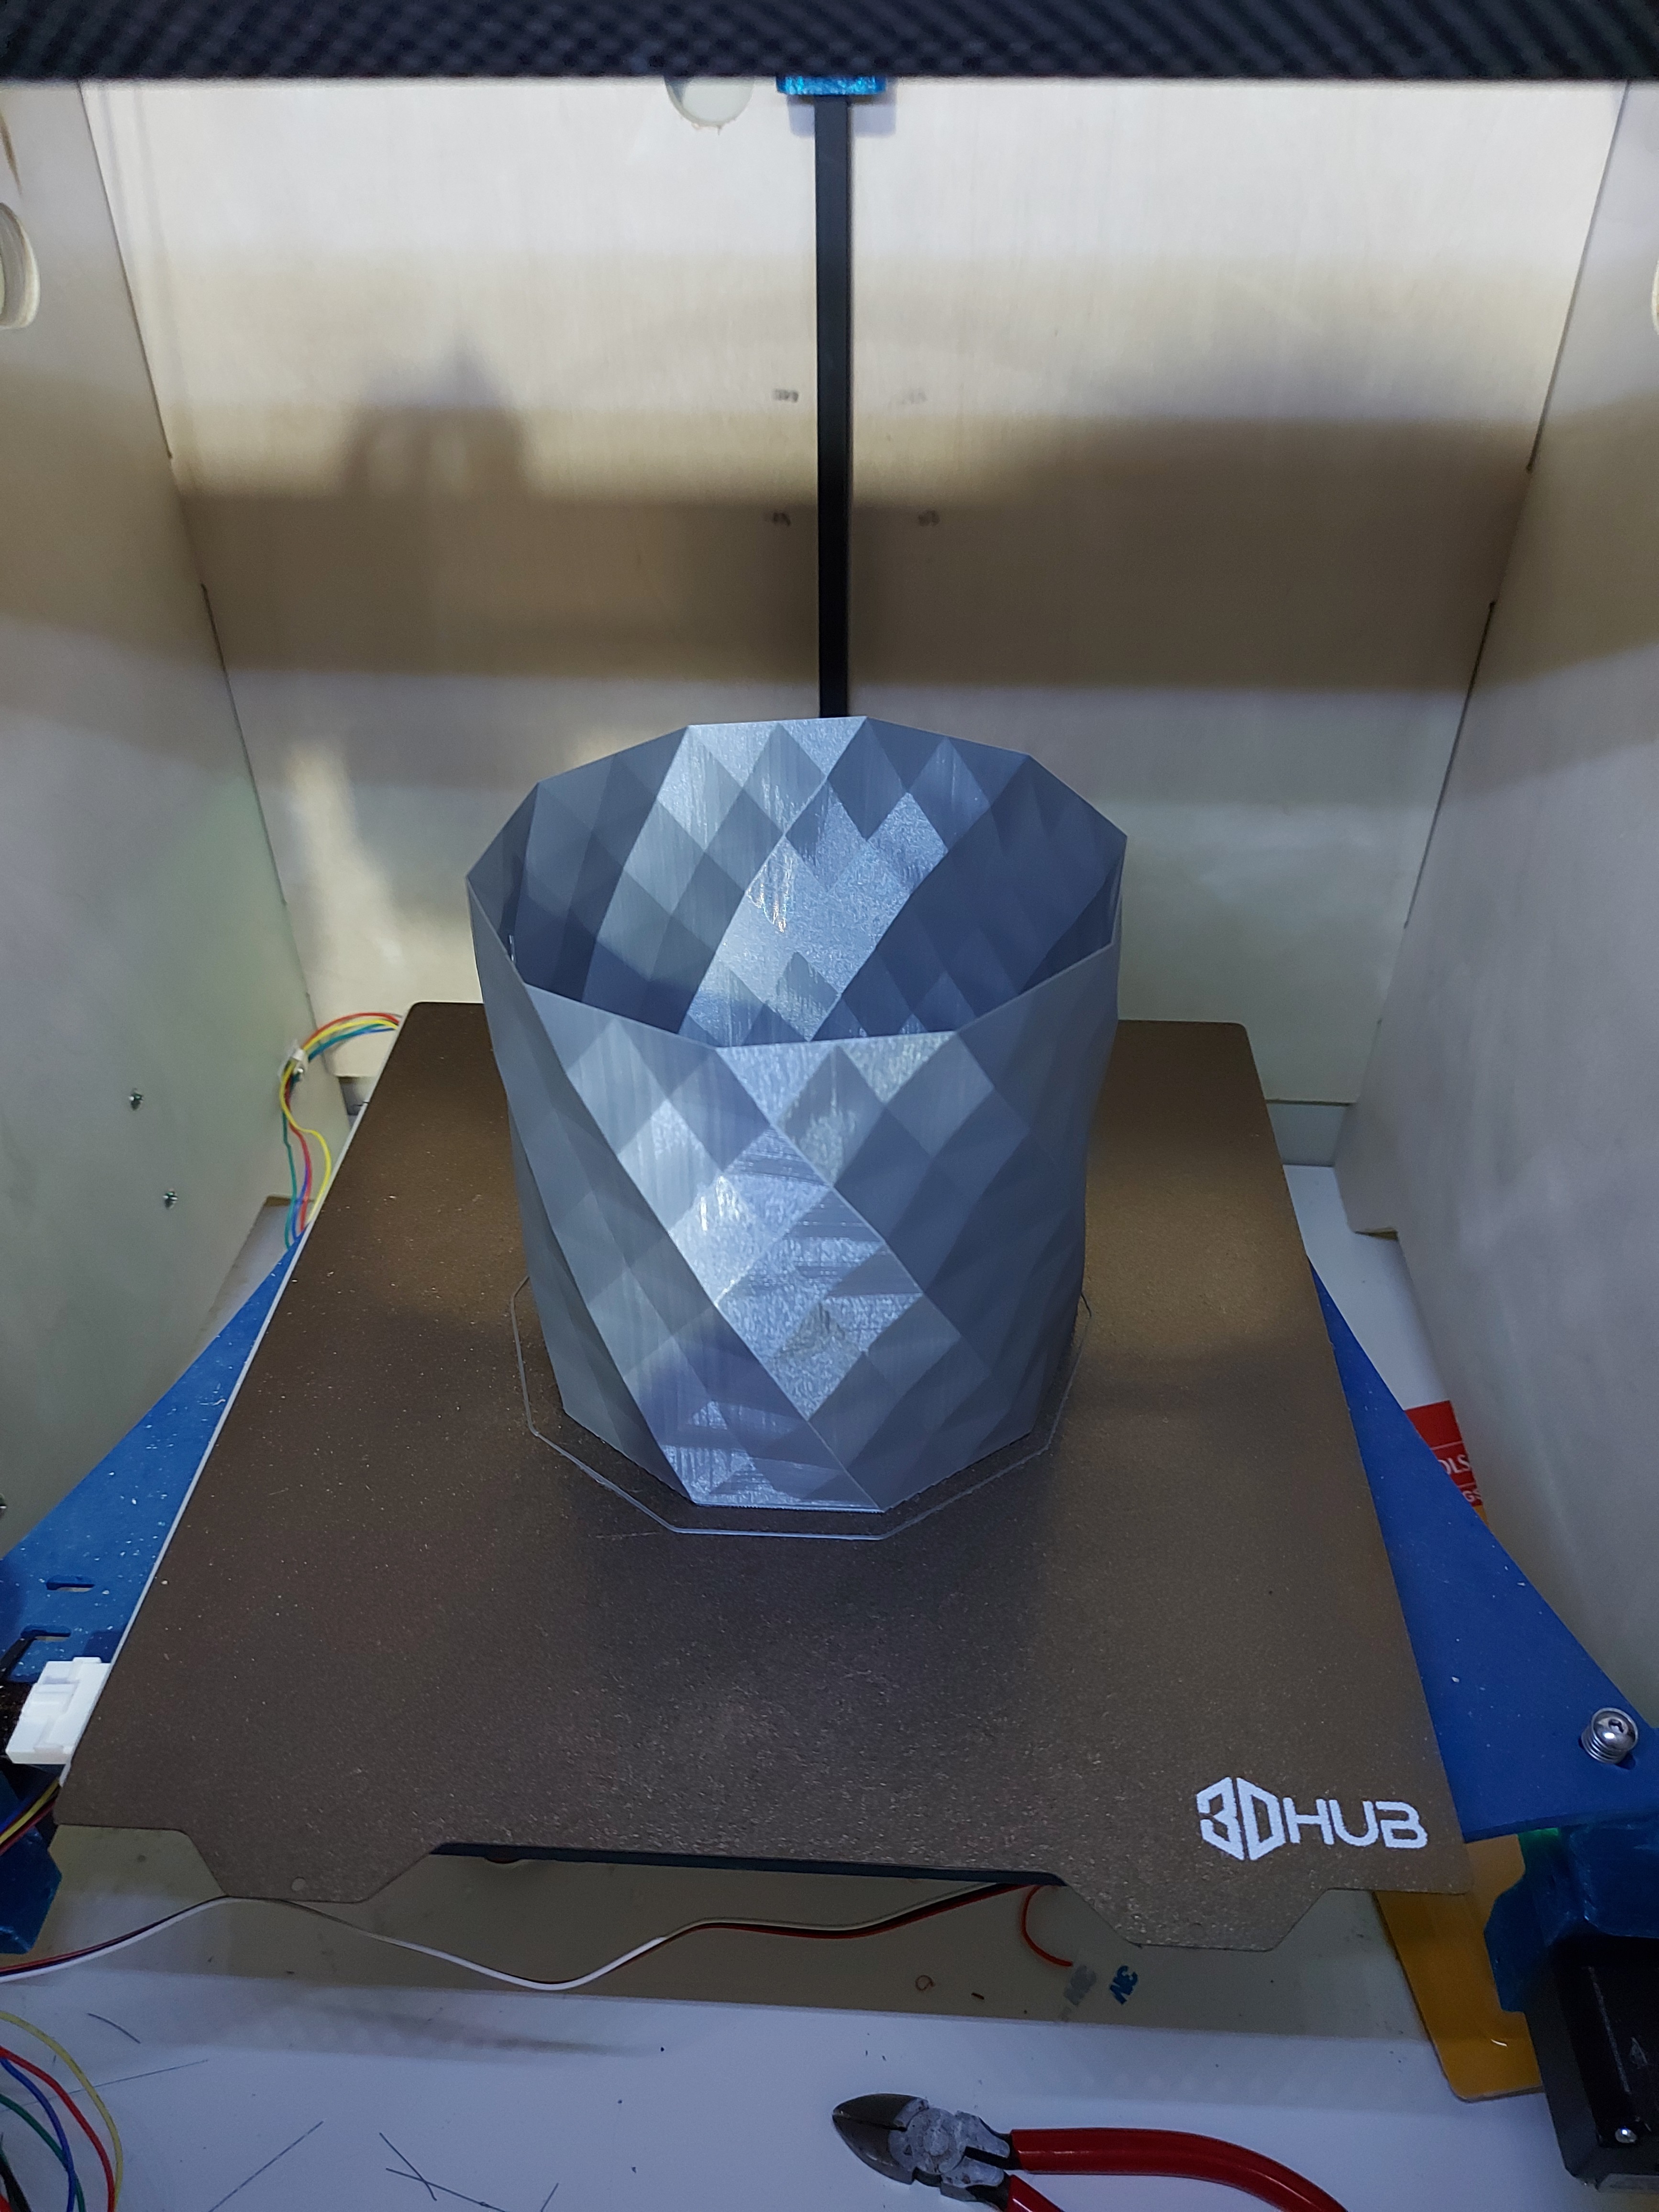
So I finished a large vase mode print with lots of flat facets. Looked great without any of the overshoot that was evident in my first post-hub replacement print… looked like tightening the belts solved it…
There is still a hint of the ripple pattern left behind, and it does seem linked to X position. It is more subtle than the previous pattern, which I attribute to reduced tension on the CF rod, but it’s still pretty tight.
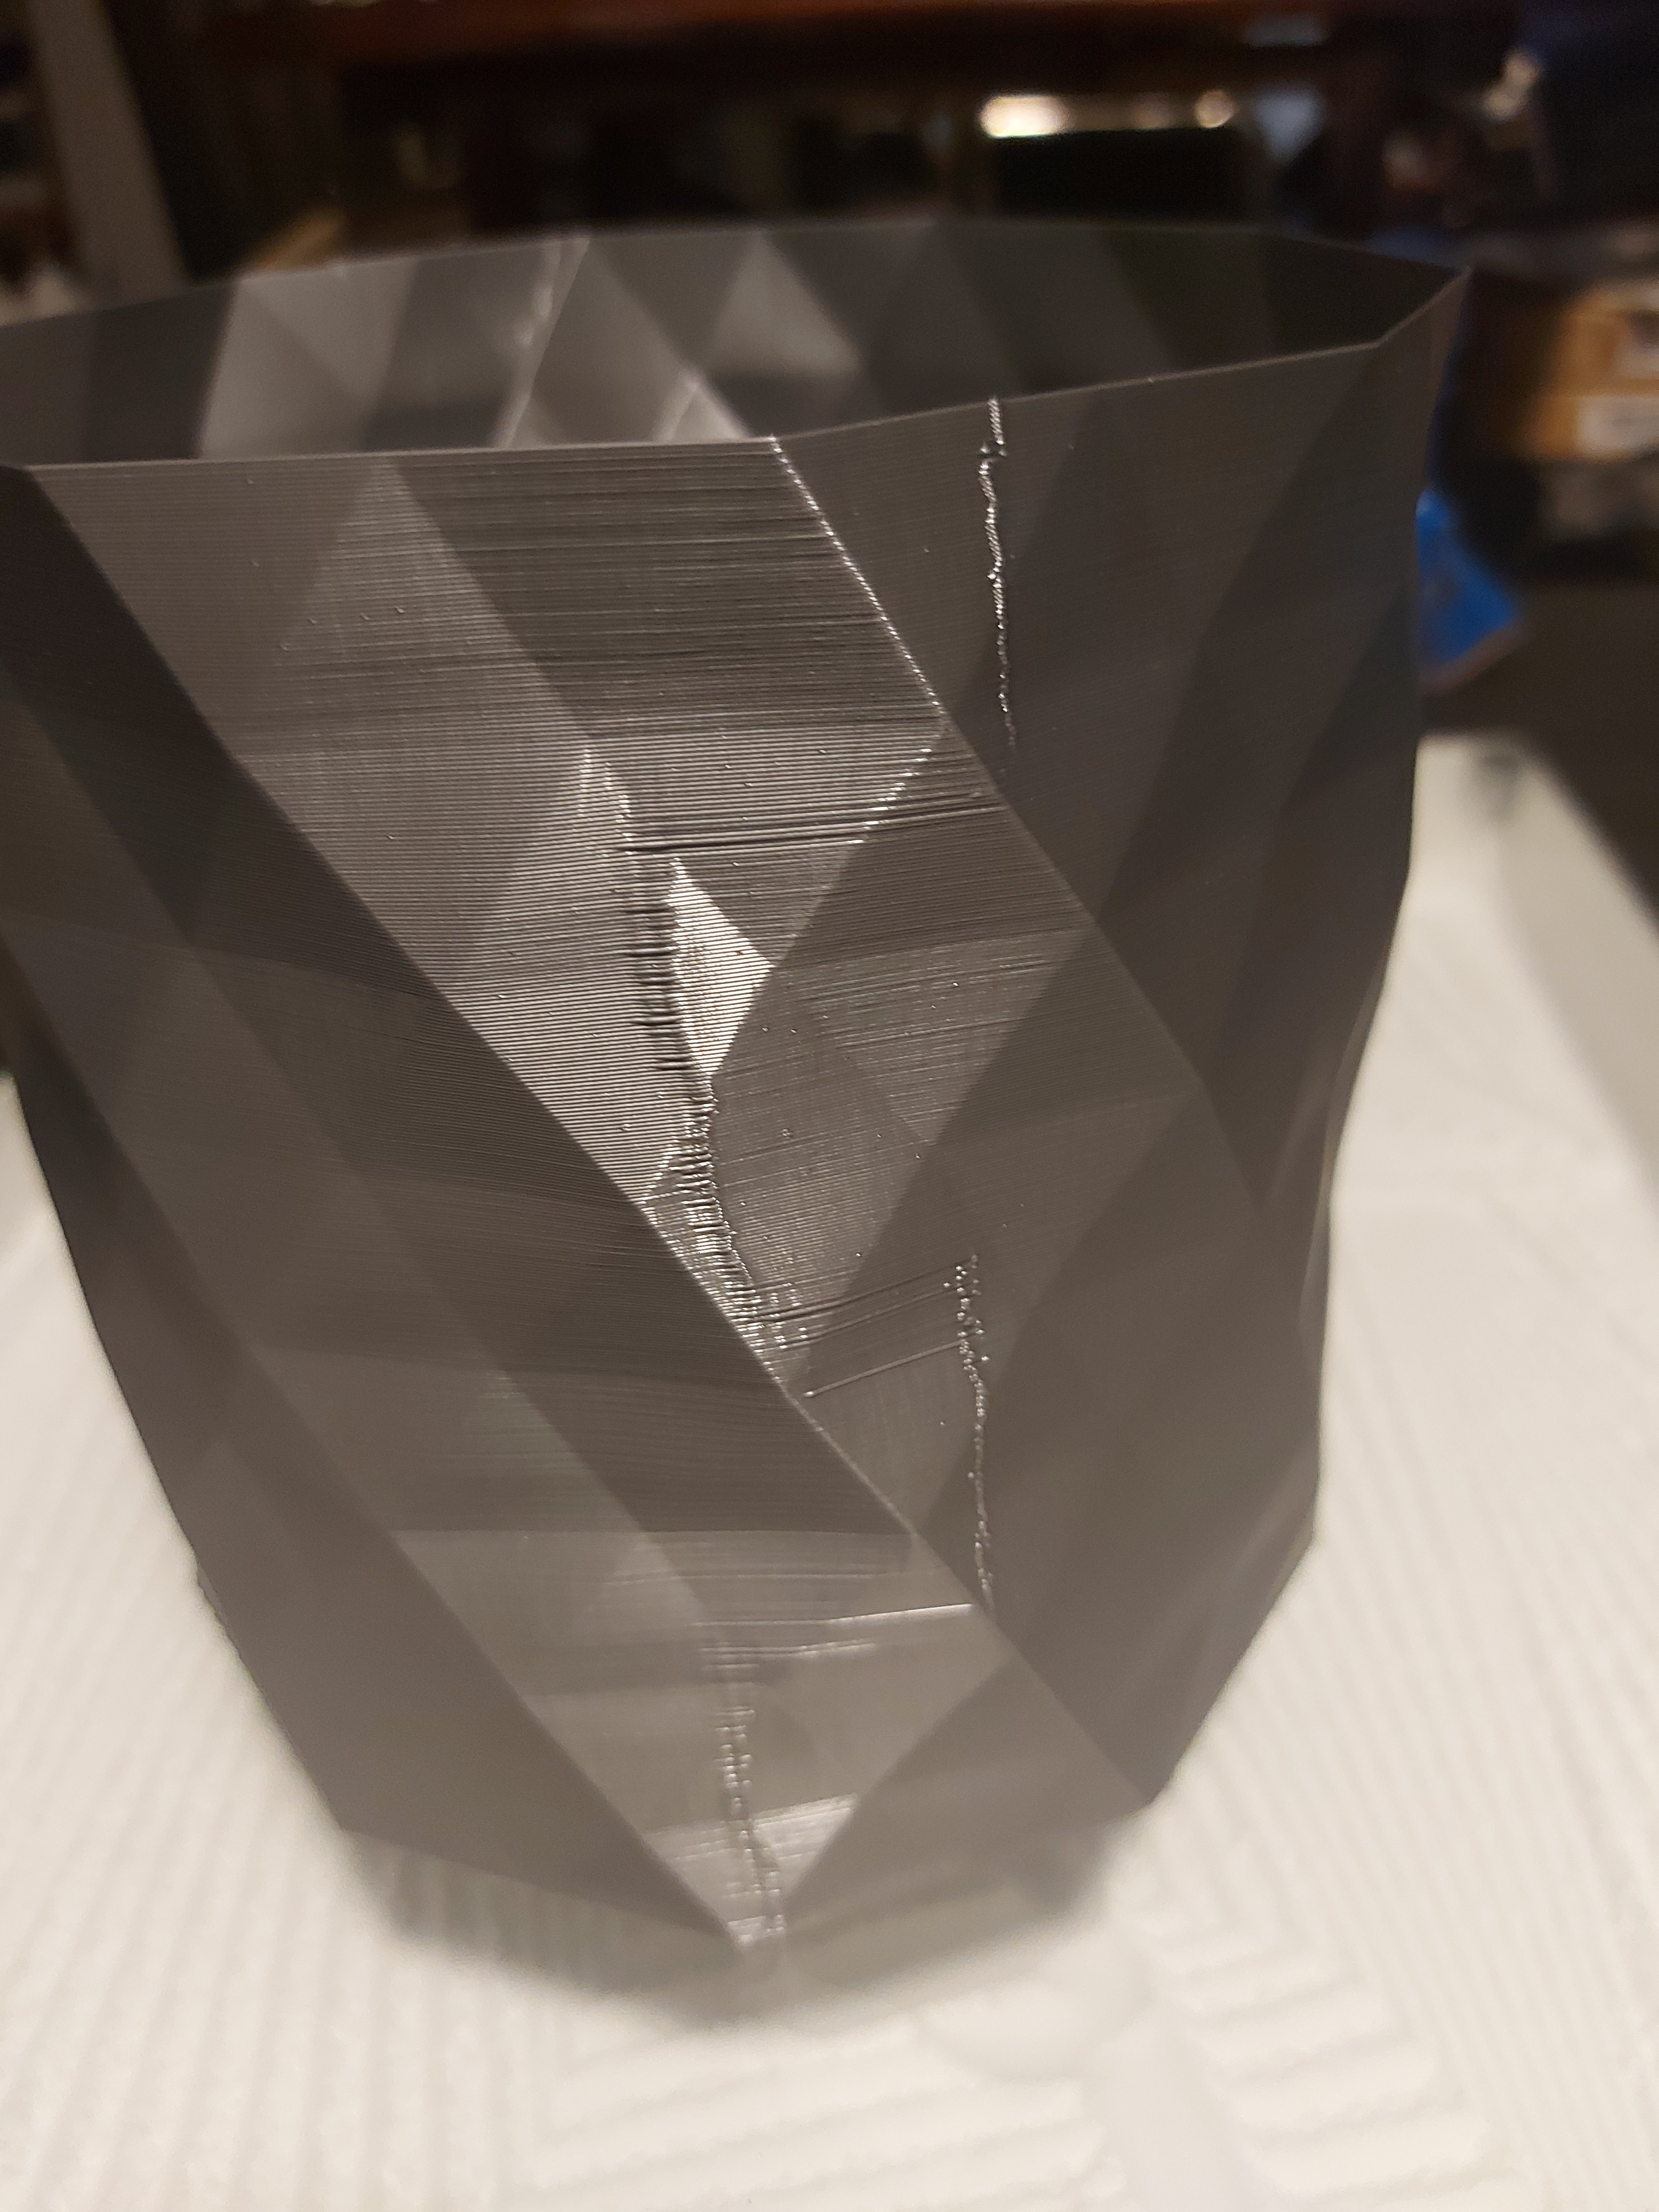
But then I saw this. Not sure what caused this, but it doesn’t look right. This is very nearly parallel to the Y axis. There is a similar but (quite a bit) less extreme counterpart on the other side of the print. I’m a bit stymied by this phenomenon, I just don’t know what is the cause. The belts are tight, the rails move smoothly, and the kinematics seem to be correct. Something changed when I changed the hub part?
That looks like a seam. Did you set vase mode in the slicer settings?