Hi everyone, I have built a primo mpcnc and I have a Bosch Colt router, but I’m not sure if the holder in the link is exclusively for the Burly build.
Is it usable on both versions?
Hi everyone, I have built a primo mpcnc and I have a Bosch Colt router, but I’m not sure if the holder in the link is exclusively for the Burly build.
Is it usable on both versions?
This is a Burly mount, but there are ways of using Burly mounts on the Primo. The tube hole spacing is the same for both machines, so you can attach the Burly tool mount plate to the tubes and then use any Burly designed tool mounts . There are two ways of attaching the plate. You can either use the nut traps designed for the Burly or you can drill out the holes on the mount plate a small amount and use the nut traps designed for the Primo. The machine screws on the Primo are larger than the ones used on the Burly. If you plan on drilling out the holes, consider adding extra perimeters when 3D printing the mount.
There are a couple of minor down sides to using a Burly mount plate on the Primo. First, it adds a bit of mass to the Z axis and second, over the more minimal Primo tool mounts, the Burly mount cantilevers the router/tool a bit more from the z axis than a Primo mount would. Note both of these minor downsides were true on the Burly, so the situation is no worse than a Burly build.
Thanks a lot! guess I’ll try my had at designing a Colt mount specifically for the primo.
Ryan provides some information on mounts including some .STEP files here: https://github.com/V1EngineeringInc/MPCNC_Primo_Tool_Mounts/tree/master/Blank%20Mounts
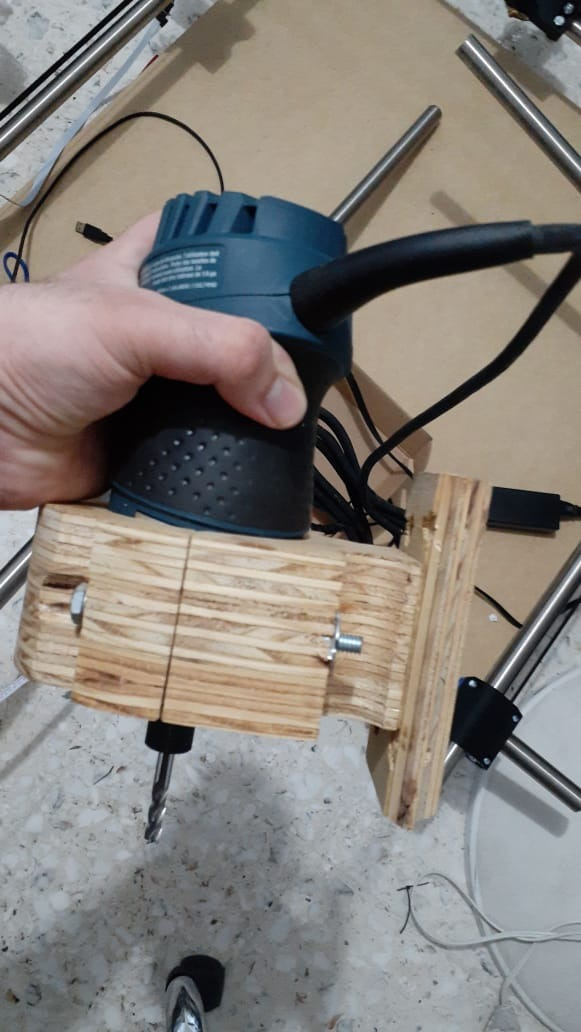
I just made a 1pc bosch colt 1hp router mount for a primo I am building. I remixed with the burly 25.4mm tool mount, and the results feel very stiff. It uses real bolts no quick release. The clamp also barely clears the bearing bolts. So the router is as close to the rods as possible. Waiting on tubing before I can test it and share.
That’s awesome! Please do share it when its available
I posted my design on tv here:
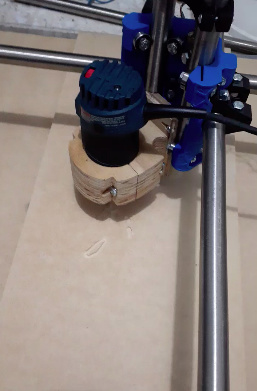
The included photo gives you the idea of how it fits. I tried to get the router as close to the core as possible without hitting the core bearing bolts. I have since added my z tubing and verified it clears them. So it’s safe to go ahead and print to test on a primo. Note I had issues with Freecad not wanting to make the tube bolt holes larger. So they will need to be drilled a tad to fit M5 bolts.
Please share and let me know how it works if you get to using it before I do. If there are any changes that could make it better please feel free to suggest.
Awesome! I’ll print it, test it, and will let you know how it goes this weekend.
So I ran out of Pet g and made a quick prototype of your design with leftover wood I had laying around. Tbh it works great, it’s light, and most importantly, I didn’t spend a buck haha. This will do until I restock on filament.
Hey guys, I was wondering if anyone had a chance to test out this mount and if its good to go? Amazon has a good price on the Colt router right now which I just ordered, I am hoping it will work with my Primo build
Hey David, I just tested it out and it was good enough to use… but I revised the design to fix some minor issues I found during my testing. The new version is now uploaded to TV, and replaces the older version.
The new one has a shorter clamp protrusion, so it won’t hit the corner when homing at certain Z heights. I also rotated the spindle lock button hole so it lines up better when the router is rotated with the wire strain relief aligned parallel to the x axis. This orientation provides max range without interference, but bare in mind the 90* power cord exit on the colt can still crash into the corner at certain heights (there is no way around this other than modding the cord strain relief so it is more parallel to the z axis). Last but not least, I fixed the stl file for the Burly J mount. That allowed me to do mesh differences on the plate, and properly size the mounting holes and counterbores for the Primo.
I am guessing the broken STL is the reason nobody has made a true Primo/burly mount (one that doesn’t require drilling the holes out). So while I was at it, I also posted a remix of the Burly mount that fits perfectly on the primo J. So no more drilling Burly mounts for the primo!
I would also like to add a vacuum attachment to mine somehow… but not sure how to go about it. I considered making another revision of the mount with flanges for it, but then thought there is enough gap in the clamp to use the clamp screws to hold something on? Any feedback on this subject would be helpful.
Cheers,
Kevin
Wow LOL! So how well did that thing work? …and where do you get your microlam scraps from?
Thanks Kevin, I will give it a shot, I appreciate you sharing this.
I happen to have like 4 colts already for another quad head cnc (use them for small carvings) so i can give this a try once my mpcnc is finished being built
Just FYI I recently made more design improvements to the vacuum flange version. I beefed up the structure that holds the vac attachment bolts.
I didn’t have much luck with the vacuum mount version, I think the casting of my colt might be a bit big/misaligned but I had a job getting it inserted, it expanded the clamp piece to the point where it was deforming the vacuum piece. I ended up sawing off the vacuum bit and then it worked fine as it could flex open with no issues. Thanks for all your work though 
Do you have the link to the remixed burly mount? Couldn’t find it under your profile.
Thanks
Here is a link to the remixed burly mount (larger holes for the primo).
https://www.thingiverse.com/thing:4650761
FWIW, my Colt mount was remixed from another Colt mount, which had the same issue of being a tad too small near the bottom. I did try to adjust the model and add a slot, but the original stl was non-manifold so mesh edits were very limited.
So instead I just cut a relief slot in the bottom plate with wire cutters, to allow the clamp to open up down there. I found this does not create issues with dust getting in to the Colt through the slot. You still do need to slightly open the clamp with a flathead or something for it to slide in, but after cutting the plate it will slide down easily and tighten down nicely. I thought I put a note in the summary about that, but maybe I forgot.
Hmm - that link is throwing a 404 for me, and yeah a relief slot would have done the trick as opposed to me hacking the whole thing off I need to print a new one anyway as I overtightened the bottom screw and the nut trap split to the access hole.
Verified it works as of this post anyways… then I realized I was logged in and hadn’t published it yet lol.