Cardboard templates for spray paint marking EV parking spaces (for client) made on LR3

Cardboard templates for spray paint marking EV parking spaces (for client) made on LR3
Well now you need a laser, just in case you need to do that again. 
@vicious1
Yep, although I do have a laser. Powerful too. 100w CO2. Standalone unit. But I was not sure if the project would fit, and did not want to bother with doing a multi-phase set of cuts with registration issues.
Seems like cardboard would turn to fire and smoke with a laser.
Diode lasers do pretty good with cardboard, fire is always a risk though.
Air assist helps to blow out any flame ups, and my big CO2 laser has air assist. Generally, things that are easier to cut (like cardboard) do pretty well, with minimal scorching/charring. Things that are thick/harder to cut, like 1/2" MDF or thick plywood, will display more charring. I can cut some 1/2" stuff with my 100w laser, but the result is not pretty. Considerable charring. It’s at the max range of thickness of my laser.
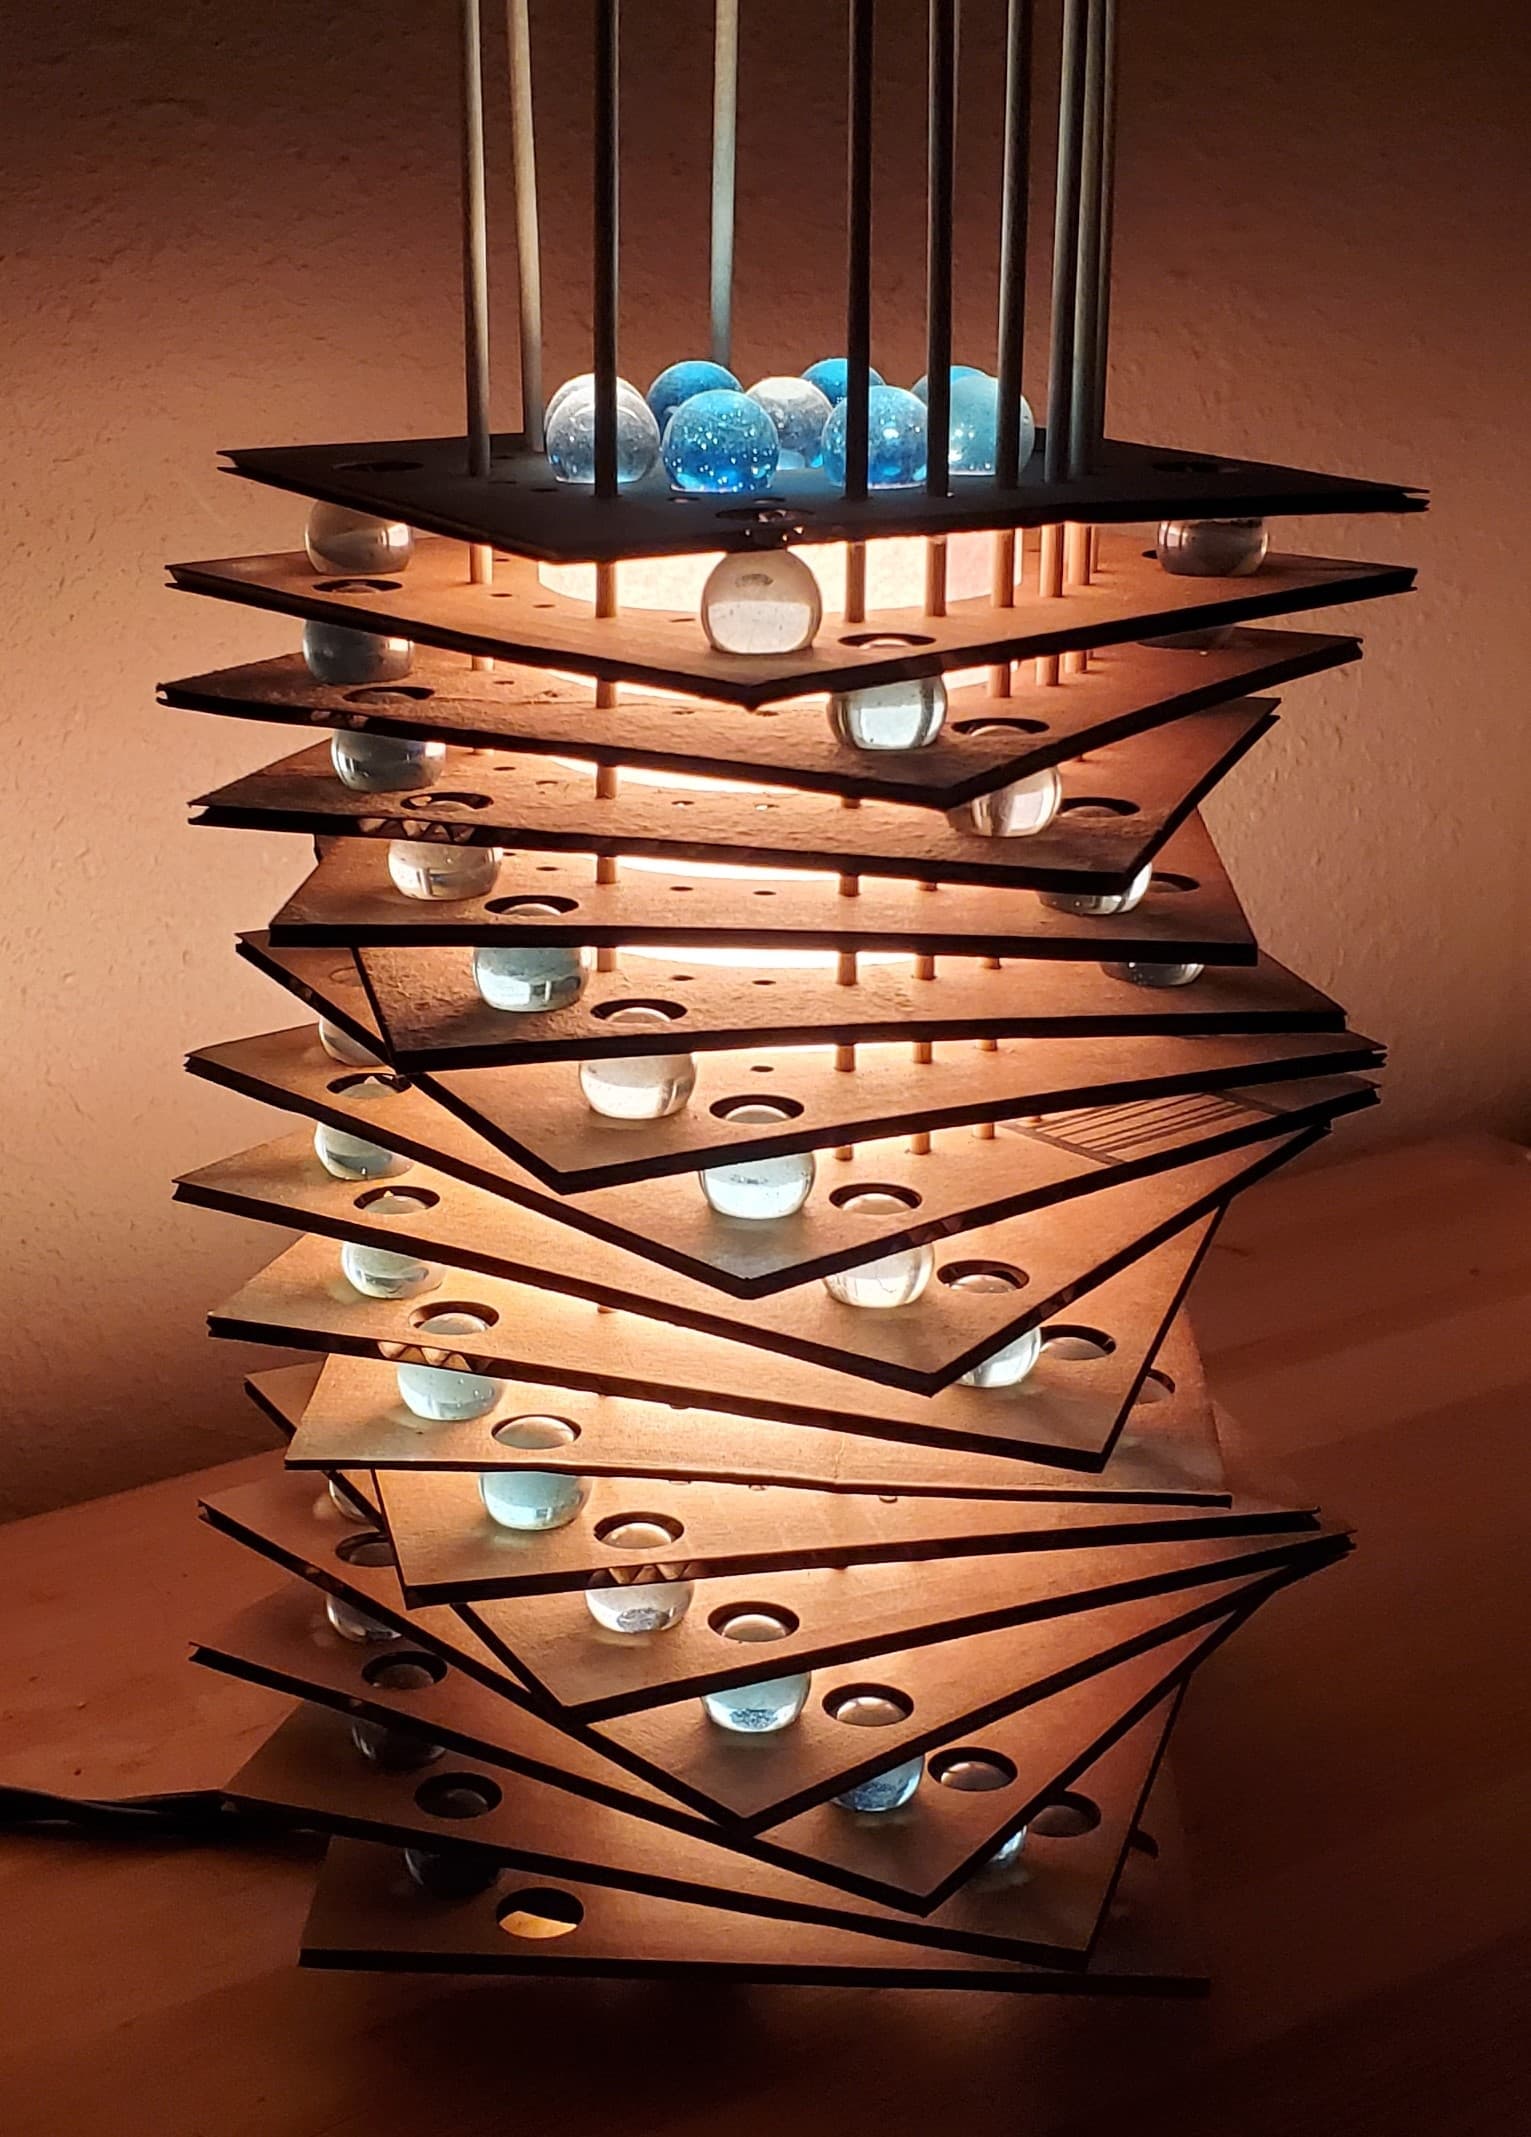
I have an NEJE diode laser module on my Primo, and I do a substantial amount of cardboard cutting for prototyping projects. So far, I’ve never had a fire from cutting cardboard. I do have air assist. Here is an example of something I’m currently prototyping in cardboard:
It is interesting to me that emotionally I’m willing to tackle projects like these with “free” prototyping materials and quick setup that I likely would not have tried with a router, though, if I don’t like the blackened edges, I may cut the final lamp with a router.
It was interesting to see Doug cutting cardboard with a router. I would love a way of cutting cardboard with a router that leaves clean edges so I could use cardboard for router prototypes.
One moral of the story is: just like you don’t leave CNC machines unattended, don’t leave laser cutters unattended.
Hmm, do tell. This implies you did have a fire, just not from cardboard!
Tidbit: I used a straight cut bit (as opposed to up cut or down cut bit) as I was hoping to minimize tear out. My result was… OK. It got compliments from a local business man who was relaying the templates to the client in a delivery (of other items) from the local store to the job site.
I’ve had a couple of things catch fire. For example, I was cutting Halloween luminary bags like this one:
The air assist line got tangled and disconnected, and the bag started burning. The fire melted the air assist nozzle and cracked the laser lens. I had to wait for a new lens out of China.
Tidbit: I used a straight cut bit (as opposed to up cut or down cut (aka compression) bit) as I was hoping to minimize tear out.
Thanks for the suggestion. I’ll give it a try. Also, I might try a burr bit to see what that would do.
That is some impressive looking work!
Wow. Laser nightmare.
Early on with my big cabinet for my 100w CO2, I was getting horrific vibration and could not figure out why. Turned out my little compressor (for air assist) in the back lower cabinet, was not tied down right, and was just walking all over the metal base of the cabinet. Naturally the air assist hose eventually came loose, and I started seeing flare ups, which led to me discovering not only that the hose was loose, but that the compressor was not tied down. I promise you it’s tied down now (to it’s rubber footed things). Vibration issue solved.
Hey, do you mind letting us know which NEJE diode laser you have? I’m interested. Also are any pics posted here on the forum about how you have it mounted etc?
A compression bit has a section of upcut and a section of downcut. Compressing toward the middle of the bit. They leave clean edges, but need to be full depth.
Cardboard prototyping is amazing. Cuts fast, sticks together with tape, uses materials we usually recycle or compost, trims with scissors for easy iteration,spray glues together for various thicknesses…
I have the NEJE A40640 laser module. There are a number of people on this forum using this module. This was my first module, but others who have upgraded to this laser were impressed. If all you to do is cut thinner materials like cardboard, then the NEJE A40630 might be a good choice. It is only a third the cost but is over half as powerful as the more expensive module.
The NEJE laser modules are plug-and-play with the Rambo board and recent V1 firmware, and I think the SKR Pro boards as well. Other control boards usually require a firmware update.
As for mounting, I wanted to be able to quickly switch between the laser and the router, so I designed a mount that fits inside the Primo Makita mount. I don’t know if this will fit the new LR3 or not.
A ZIP file of this mount can be found on this topic. I think the ZIP contains STEP as well as STL files. I don’t know if this mount will fit the new LR3 as is. If you want this mount, and it requires changes for the LR3, I’d be glad to work on it.
A couple of different people have done air assist nozzles for this laser as well.
When I purchased this module last September, it was the best one I could confirm. The specs for laser modules are a cesspool of lies, so it is hard to sort out “best.”
Since last September I’ve spotted a couple of other interesting modules. One has similar optical power to the NEJE, but it focuses to a smaller point, making the cutting power greater. And in the last week, I spotted a laser with four beams (the NEJE A40640 has two beams).
Well, it does, but I’m still looking for an alternative mount.
Ah, yes. Sleepy brain. Not sure how I forgot that.