I am a total novice who bought a used lowrider 2 about 2 years ago and I am only getting ready to start using it now, but have no idea how to start, tried auto home but get a homing failed message, and when I try homing each axis separately when it comes to the end of its travel it keeps trying move even though its only banging against the brackets
is there an idiots guide available feel it would have been much easier if I had built it all from scratch myself
Any help or guidance is appreciated
Could be because your LR doesn’t have endstops, most LR2 don’t have it
Do not worry about it, manualy home your machine at the bottom left, verify the gantry is in contact with the stop blocks, keep the position and power on your controller.
Motors will be engaged and your machine will be homed at X 0 Y 0.
The answer to those questions are all: “it depends”. A few photos of your existing hardware would help identify what you have, how it is currently wired and what it would take to change.
As mentioned further up endstops are not strictly necessary on a LowRider or an MPCNC so you can certainly get along without them (and many here do).
Also most LowRiders were wired in series. Look at your control board, if there are 5 motor wires plugged in there, or 3. (Most were set up for 3.) This is fine, but doesn’t make use of the biggest advantage to the endstops, which is making sure that everything is square. IMO, homing is less useful on a CNC machine. (I say that, but my LR2 had endstops, as does my Primo, and the beta LR3.)
There are several designs on Thingiverse, and I suppose Printables for LR2 endstops. The V1 maintained firmware is all endstop friendly in current forms, you can look at the Marlinbuilder Releases page for firmware.
You CAN add endstops with serial wiring, and it will help you home the machine, but it really isn’t needed for a LR2, and in fact, I’d say that some things are more difficult with the endstops than they need to be, like getting the Z motors level. Much easier to just start with the gantry supported in 2 places at an equal height than to adjust the endstops. (I spent a LOT of time trying to get that leel, and in the end, never managed to get it better than placing a couple of blocks under the rails.)
I have had 3 V1 CNCs, for maybe 5 years? 6 Years? Who can tell anymore.
I haven’t added endstops to any of them. CNC is different than 3D printing because the zero is based on the work you’re trying to cut into, not the machine you’re trying to print on. Once the machine is moving on it’s own, the two motors always move in lock step. So the only thing you need to do to keep it square is to start it square. I have some blocks on mine that I hold the gantry against, and I give each Z leadscrew a small twist to lift them up and let them fall back down level. Then the machine moves from there and holds it square.
It is a weird leap of faith, but learn the machine without them, and then learn about firmware/endstops when your machine is behaving and you are confident what it’s doing.
It sounds like you are at the stage where you should run the test crown premade gcode. You can run it in the air, or attach a pen and paper. The premade crown starts with G92 X0 Y0 Z0 (you can open it in any text editor). That forces the location you start the gcode to be 0,0,0. So you just put the pen on the paper in the lower left corner, play the gcode file (“print” it) and it will draw from that spot.
There’s more information in the docs, starting at estlcam basics.
Have fun! If there is anything strange about the machine, post about it. Obviously a lot of people here interested in helping. The previous owner may have made a mistake and hit a snag. Hopefully it will work for you, but if not, it’s probably an easy fix.
home the machine manually this morning all axis moved normally, forgot to zero then tried a the crown test cut which I stopped due to not zeroing after homing and bumped the y axis since then when trying to move the y axis just shudders and the z axis goes up one side and down the other side,
Could this be why the guy sold this machine, and how do you suggest I fix it should I reflash the marlin firmware or just start fresh with a new board
I know I am new at this but seems very glichy ad could be the reason buddy sold it
The X axis shuddering spulds like wiring. A poor contact to the motor will do that.
The Z axes should work together. Bad contact to one motor can affect it so that it basically only goes down (kind of the same as the X axis problem above.)
Let’s see some pictures, we might be able to see some areas where the machine can be improved.
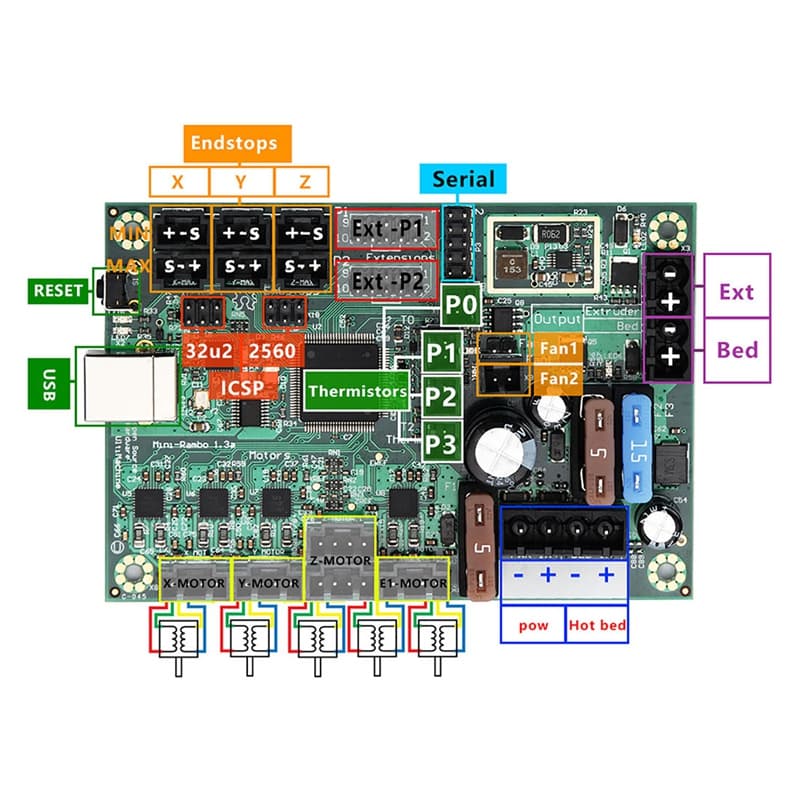
Ok, yes, that is series wiring, that looks like a mini RAMBo to me, with 4 drivers, so it is not suitable for dual endstops.
I would check that those wiring harnesses are i good condition and that the ends where the wires connect to the motors are tight.
Does the Z axis always work opposite, or only sometimes? If it is always opposing, reverse the plug to the motor on the one that moves in the wrong direction.
This is the board and how it was wired I did buy another board cant remember what it is probably a chinese clone with end stops off amazon that I was going to use for the lowrider but have an SKR v 1.4 with TMC2208 drivers that I have for a frankenstein anycubic chiron build I have on the back burner at the moment
it is currently the y axis not moving only shudders and the z axis sides working opposite to each other, tried swapping the connector on the z stepper motor but had no difference, could I have blown the driver or stepper motor on the y axis when I bumped into the gantry with the power on
Just so we’re clear… the Y axis is the one that runs with the wheels on the table, and has 2 motors, right?
For the Z axis, if you reverse the plug at the board. Both motors will reverse direction, so they will still be opposite, just the other one will move in the commanded direction.
Change the plug for just the one motor where it connects to the extension harness. Change the one that goes down when you try to move Z towards more positive.
Not likely you blew the driver. More likely you jostled and loosened a motor wire.
yes the y axis with wheels is the one that just shudders and there is a join in the harness from control side to other side that is where I tried swapped the plug for the z stepper motor ad it didnt change anything
For the Y axis, for both motors to stop responding, it practically must be wiring. Something got knocked loose.
For the Z axis, there will be 3 sets of wires. One plugs into the board with a 5 pin F plug, and will have 2 4 pin M plugs on it. Each motor will have wire with F plugs that connect to the main harness. If you reverse the direction of one of those connections, the motor will go in the opposite direction. That is just to unug the one motor and reverse the connection direction (from 1234 to 4321) that must work with 4 wire stepper motors.
For the Y axis, check that all of the connectors are properly seated and that the wiring plugs are in good condition and fully seated in the connector
Thanks everyone I will venture back into the dungeon in a little while and check all the connections to everything, I will update once it is checked wish me luck
OK I think I am getting somewhere, I removed all the connections one by one blew out so no dust is present then reconnected and when I reconnected the power all seems well x-y and z axis’ all working as they should gonna now watch the videos again to make sure I home it correctly before trying a cut in some scrap ply
this is frustrating but fun
You should really try the test crown. It sounds like you downloaded the crown file and used CAM to make your own gcode file.
Before trying that, use the gcode file you can download from this link:
Test crown
You should get the gcode file from that site. And run it. That has checked out hundreds if not thousands of machines. It will work if your machine is in good shape.
It includes the G92 at the beginning. So wherever you start it is where the origin is. Put the pen on the paper at the lower left of where you want to draw and play that file.
I found a neat file on Thingiverse for a clip-thing that goes over the Z-SS tube. Slap one on each side, lower them until they touch and engage steppers.