Yes I’m trying to say the x y speed for the tool cut is slower than the move between cuts sorry. It sounds Ike it is not using the move speed just the cut speed
The only thing different that jumps out at me is the switch from X,Y travel to a drilling operation, But sure saw nothing abut setting a speed for it and the one it apparently defaulted to was glacial.
1 Like
I think it is using the same speed for everything. Try to do each hole.seperat to see what it does.
I hope I’m helping my explanations are not always up to what I’m thinking
So I think I’ve made more kindling, I cut the piece below:
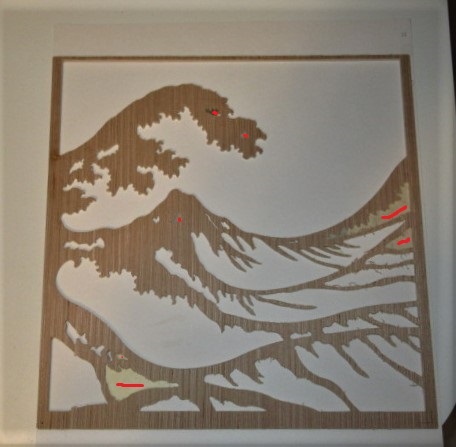
and, they all should have been thru cuts but the areas I’ve marked in red only cut ~2.25mm DOC when there should have been two passes of 3mm each as the rest of the areas are. Once again I’m lost, with everything else near those areas cut correctly, I have no idea why those areas are not.
And this cut on thin (5mm) material had its problems with holding down the pieces if cut as holes and when I used pocket it worked well but was time consuming. Got me thinking if I want to get more involved with intricate cuts like this looking into a laser may be the way to go. It seems like many posts I read about lasers contain things like flash this, solder that, reconfigure over there, etc. I’m curious if my interest is cutting material and maybe some engraving and not some of the very nice half-tone printing of photos I’ve seen here, how close can one come to a plug & play type unit for cutting 5-6mm ply and engraving and what ower level would that require?
Have you checked your gcode? Maybe they were set to be shallower?
I only set it at the end when saving it and Estlcam requested a number. But in pocket, hole, and part modes there were examples of each cut correctly but, when I tried to open the gcode in RH I got the following message: 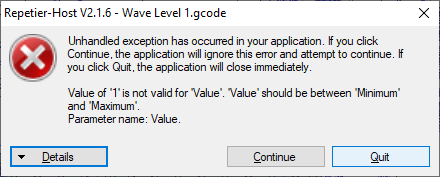
I tried another file and had no problem opening the code editor.
Uh, NOW the gcode opens fine, it’ll take me a bit to go thru it.
OK, I found four ‘hole’ segments so far where Z never got lower than -3.0 so I’m guessing I’d find that in every one of the areas in question. I don’t understand.
Did you save the estlcam project file? I wonder if you accidentally set the depth on those pockets before finishing. You just have to click that box for it to choose a value. Or maybe something else is funky, like the starting height for those tool paths.
Unfortunately I only saved the gcode but I’m sure I didn’t click on that box the multiple times I had the issue with. SInce I wanted the same DOC I just thought I’d set it once when asked. I’m going to try it again, at least I’ll know to look at the gcode first. If I find something off when looking at the gcode in RH, do I simply change the number or is there some step(s) necessary to change the number and save it?
I never changed the starting height for any segments so who knows? At any rate, I cut another layer, set the DOC for each segment and it did what I needed but. Yeah, I know, it seems there’s often a but. I found some 2.7mm ply at HD that at $11 for a 4’ x 8’ sheet seems pretty decent for this type of project. Like some thin material I’ve worked with it has a little ‘belly’ when cut into smaller pieces and holding down thin material yet being able to free it undamaged when cut into narrow sections can be a challenge so it’s got me thinking laser. I’m already down the rabbit hole, may as well tour the entire warren and get the whole show while I’m here. ![]() I’ve been searching the forums for basic info as well as some sites. I have a basic understanding of how lasers work but if anyone has favorite sites for learning the nuts and bolts of obtaining/installing/using one I’d appreciate the info.
I’ve been searching the forums for basic info as well as some sites. I have a basic understanding of how lasers work but if anyone has favorite sites for learning the nuts and bolts of obtaining/installing/using one I’d appreciate the info.
2 Likes
I’m probably going to be committing heresy, but I found it easier to purchase a separate machine for running a laser. I bought one of the cheap x-y gantry kits from banggood. The controller runs grbl.
One nice benefit is I can burn one item while cutting a separate one on the mpcnc.
1 Like
I’ve considered that, here comes that ‘but’ again ![]()
I haven’t measured it exactly but my burly has a work area about 17" x 17" and is easily expandable. Am I wrong in thinking most of the cheap x-y gantry kits are smaller?
Do the cheaper kits have enough power to cut at least 3mm ply, preferably 5-6mm?
I’d really like to settle on one CAD program and spend the time to learn it, using Estlcam for CAM. To be honest, I don’t know where grbl would fit in to that scenario? I’m reasonably comfortable with mechanical things but when it comes to rewiring, reconfiguring boards, flashing this, editing that, I admittedly get a bit intimidated.
You can make a shortcuts for estlcam with different settings i have one for laser and one for cnc
How does one find these things? My ‘training’ with Estlcam so far is pretty much trying things and seeing if it does what I thought it would do. Good thing there’s foam and some relatively cheap material. ![]()
I’ll see if I can answer all your questions.
As far as the size. My laser engraver is 65cm x 50cm. If I do the math right, that’s more than enough to meet the needs of your 17"x17" CNC size.
My engraver did not come with a laser that is powerful enough to burn through 3mm plywood. My engraver came with a 3.5w laser. I found you really want a laser closer to 7w. I ended up purchasing a NEJE “30w” laser (7.5w actual) and adding it to the engraver. I had two drill an extra hole to make it work and extend some of the wiring on the new laser so it’ll reach the gantry.
Neje does sell an engraver with the 30w laser on it. Their engraver platform is slightly smaller than mine, but the one axis would almost reach your 17" requirement
I’m not sure how ESTLcam would fit in to the laser engraver. I started using lightburn for creating my laser files and haven’t gone back to anything else since. Lightburn has the ability to control grbl controllers directly, or you can do like I did and put cnc.js onto a raspberry pi for remote control.
I’m by no means an expert when it comes to lasers. I do get good enough results for what I want to do with it.
1 Like
Thanks much for the input! I hope I didn’t appear unappreciative of your first post here, it’s just like most I’m looking for the most bang for the buck and have to say I’m pretty pleased with the MPCNC. I’m just probably a bit cautious about lasers as at least to me the danger level seems higher than with mechanical things I’m more comfortable with.
To get started I’d likely want to cut material and probably etch some things. Am I off base to think that could mostly be done in Inkscape or another 2D CAD program and the CAM done with Estlcam? I’m a little confused with where grbl fits in, is it CAD? CAM? firmware? This can be as confusing as going to the candy store with a silver quarter in your pocket and trying to decide what to do with it. And I’m still a bit in the dark with things like “you can do like I did and put cnc.js onto a raspberry pi for remote control” but am certainly willing to learn, beats watching the news. ![]()
Support is also a concern, I know it’s here and well done for the MPCNC so the temptation is buying an American made laser and having ready support all around. I’ve been looking at the L-Cheapo site, maybe a little deeper than I was planning to go but if the numbers are close between an entire machine and adding a laser to the MPCNC, a possibility. I’d also like to fool with some furniture ideas so might well lean towards an LR2 for another machine if I can make room somewhere in the garage.
This is all very preliminary on my part, just trying to learn the good, the bad, and the ugly of different possibilities. If nothing else it’ll keep me away from golf courses. ![]()
I love it… absolutely better to tour the warren than watch news these days lol!
I hear you on wanting to keep the mpcnc size for the laser. I have also done some research in to the same idea, and a lot of folks suggest that larger machines often have too much planar error for lasers to work well across the whole work area. That said, there are modern features like bed leveling that may fix those issues, but I haven’t looked into bed leveling beyond what I do with my printer.
Also, I have a buddy (the guy who got me in to mpcnc… he tends to be right about these kind of things) who is adamant when he says laser diodes are a waste if I want to cut stuff like 3mm ply. He says even the powerful ones pretty much only do “burn art” and can barely cut thin materials. He also advised that if I am really interested in making rc aircraft kits out of stuff like 3-6mm ply or balsa, that I would have to step up to at least a CO2 laser. When I looked into those… yeah that would full on require a special machine as I couldn’t imagine ghetto rigging the mirrors and such on my mpcnc. I would totally be down to build a co2 laser rig to go along side my mpcnc, but right now I’m still having fun in the router rabbit hole (and garage starage has waned to non-existence since adding the cnc).
I’m curious how you get along on this. It seems there hasn’t been much discussion about really cutting stuff with laser on an mpcnc. I really do hope a cheap 7W output diode from like amazon could cut say 1/8ply decently. Also my wife wants me to get one anyways to do burn art lol… so either way I will likely join you on the big laser rig thing soon.
1 Like
Exactly why I thought I’d take enough time to ask questions. I was looking at L-Cheapo lasers, in their favor is made in the US and lifetime warranty, I just reviewed their site again and though it says it’ll cut wood, no mention of thickness. Guess who’s gonna get an Email from me? ![]()
I’m in no rush, just figured I’d line up some reading material and try to gain some understanding of what I’m looking at. So much more difficult than being in the candy store where I knew if it had chocolate it was likely good, or would do 'til something better came along. ![]()
Not at all. That was more of a warning from me to you that I might miss something you asked ![]()
Regarding of the capabilities of the 7w laser… I’d say 1/8" or 3mm plywood is about the thickest it will do for plywood. It can go thicker on regular wood. It has more to do with the layers of glue than cutting through the wood.
CO2 laser are definitely more capable for both thicker cuts as well as different materials. Diode lasers have issues cutting some materials due to the wavelength of the light.
But to say that a 7w laser can’t cut plywood would be wrong. It takes a few trips around the design, but it’ll get through. Trying to cut through the thicker materials is sometimes possible, but what you find is that it takes more practice to get the setup correct for those thicknesses.
GRBL is the firmware that runs on the controller. Just like Marlin on most of the MPCNC machines. The difference is GRBL doesn’t support LCDs and simply takes the gcode commands direct from the USB port and turns them into movement on the machine. CNC.js is just a web-based app that can run on a computer and sends the gcode commands out to the grbl or marlin based controller.
You would still use inkscape or some 2d design software to create a vector drawing (typically svg). Then you’d import that 2d design into estlcam to create the gcode (CAM part) that then gets sent to the machine. An alternative to ESTLCam for the CAM software is lightburn. Lightburn has the positive in that it is designed specifically for lasers. It provides other functions that allow you to import raster (jpg) images and to do greyscale burns with the laser to engrave images instead of just line art. There’s others on this forum doing a TON with the cheap little diode lasers.
My link and another post on the same forum with a lot of examples:
and this is the one that inspired me to get the more powerful laser:
My laser thread has a link to one of my youtube videos of my cheap laser. From there you can find some of my other laser videos. One is a time-lapse of the build of the machine itself.
Feel free to ask more questions. I enjoy talking about this stuff. If you ask a question I don’t know, I’ll tell you, or research it and then tell you what I find ![]()
4 Likes