Doug, I’m looking forward to getting back to my cnc project but need to get some more pressing projects done right now. My latest issue was related to this error message “no printer attached” or something to that effect. I worked for countless hours on that problem and finally walked away. I’m using the SKR 2.0 rev B. Matching baud rates didn’t resolve it nor did port assignments. One day I will return and refresh my memory so I can talk more intelligently.
Nice update! I have not changed my Marlin version on my lowrider since I posted my notes. I know there are a few new features that may make some of my changes unnecessary. I may look into updating once I get a few other projects out of the way. Thanks for posting your experience.
1 Like
The following will probably not be anything new for you. Just trying to be helpful.
That message is of course a reference to the need of a connection between the touchscreen and the main board. The connection requires three cables, all plugged in correctly. If the message lingers, there is an issue. (It always shows at bootup for a few seconds, but should go away.)
Possible causes / issues include:
- Cables not all present.
- One or more cables plugged into wrong place (the two that look alike could be incorrectly swapped).
- One or more cables defective.
- Firmware issue on either the touchscreen or main board.
- Faulty equipment (either the touchscreen or main board).
There might be some other cause I’m not thinking of.
Doug, Thank you for all your input and for your suggestions as to my “no printer attached” issue. I’ve ruled out the first three but not the last two. I’m leaning towards the next to last one. Need to free up some time to get back to it. Thank you!
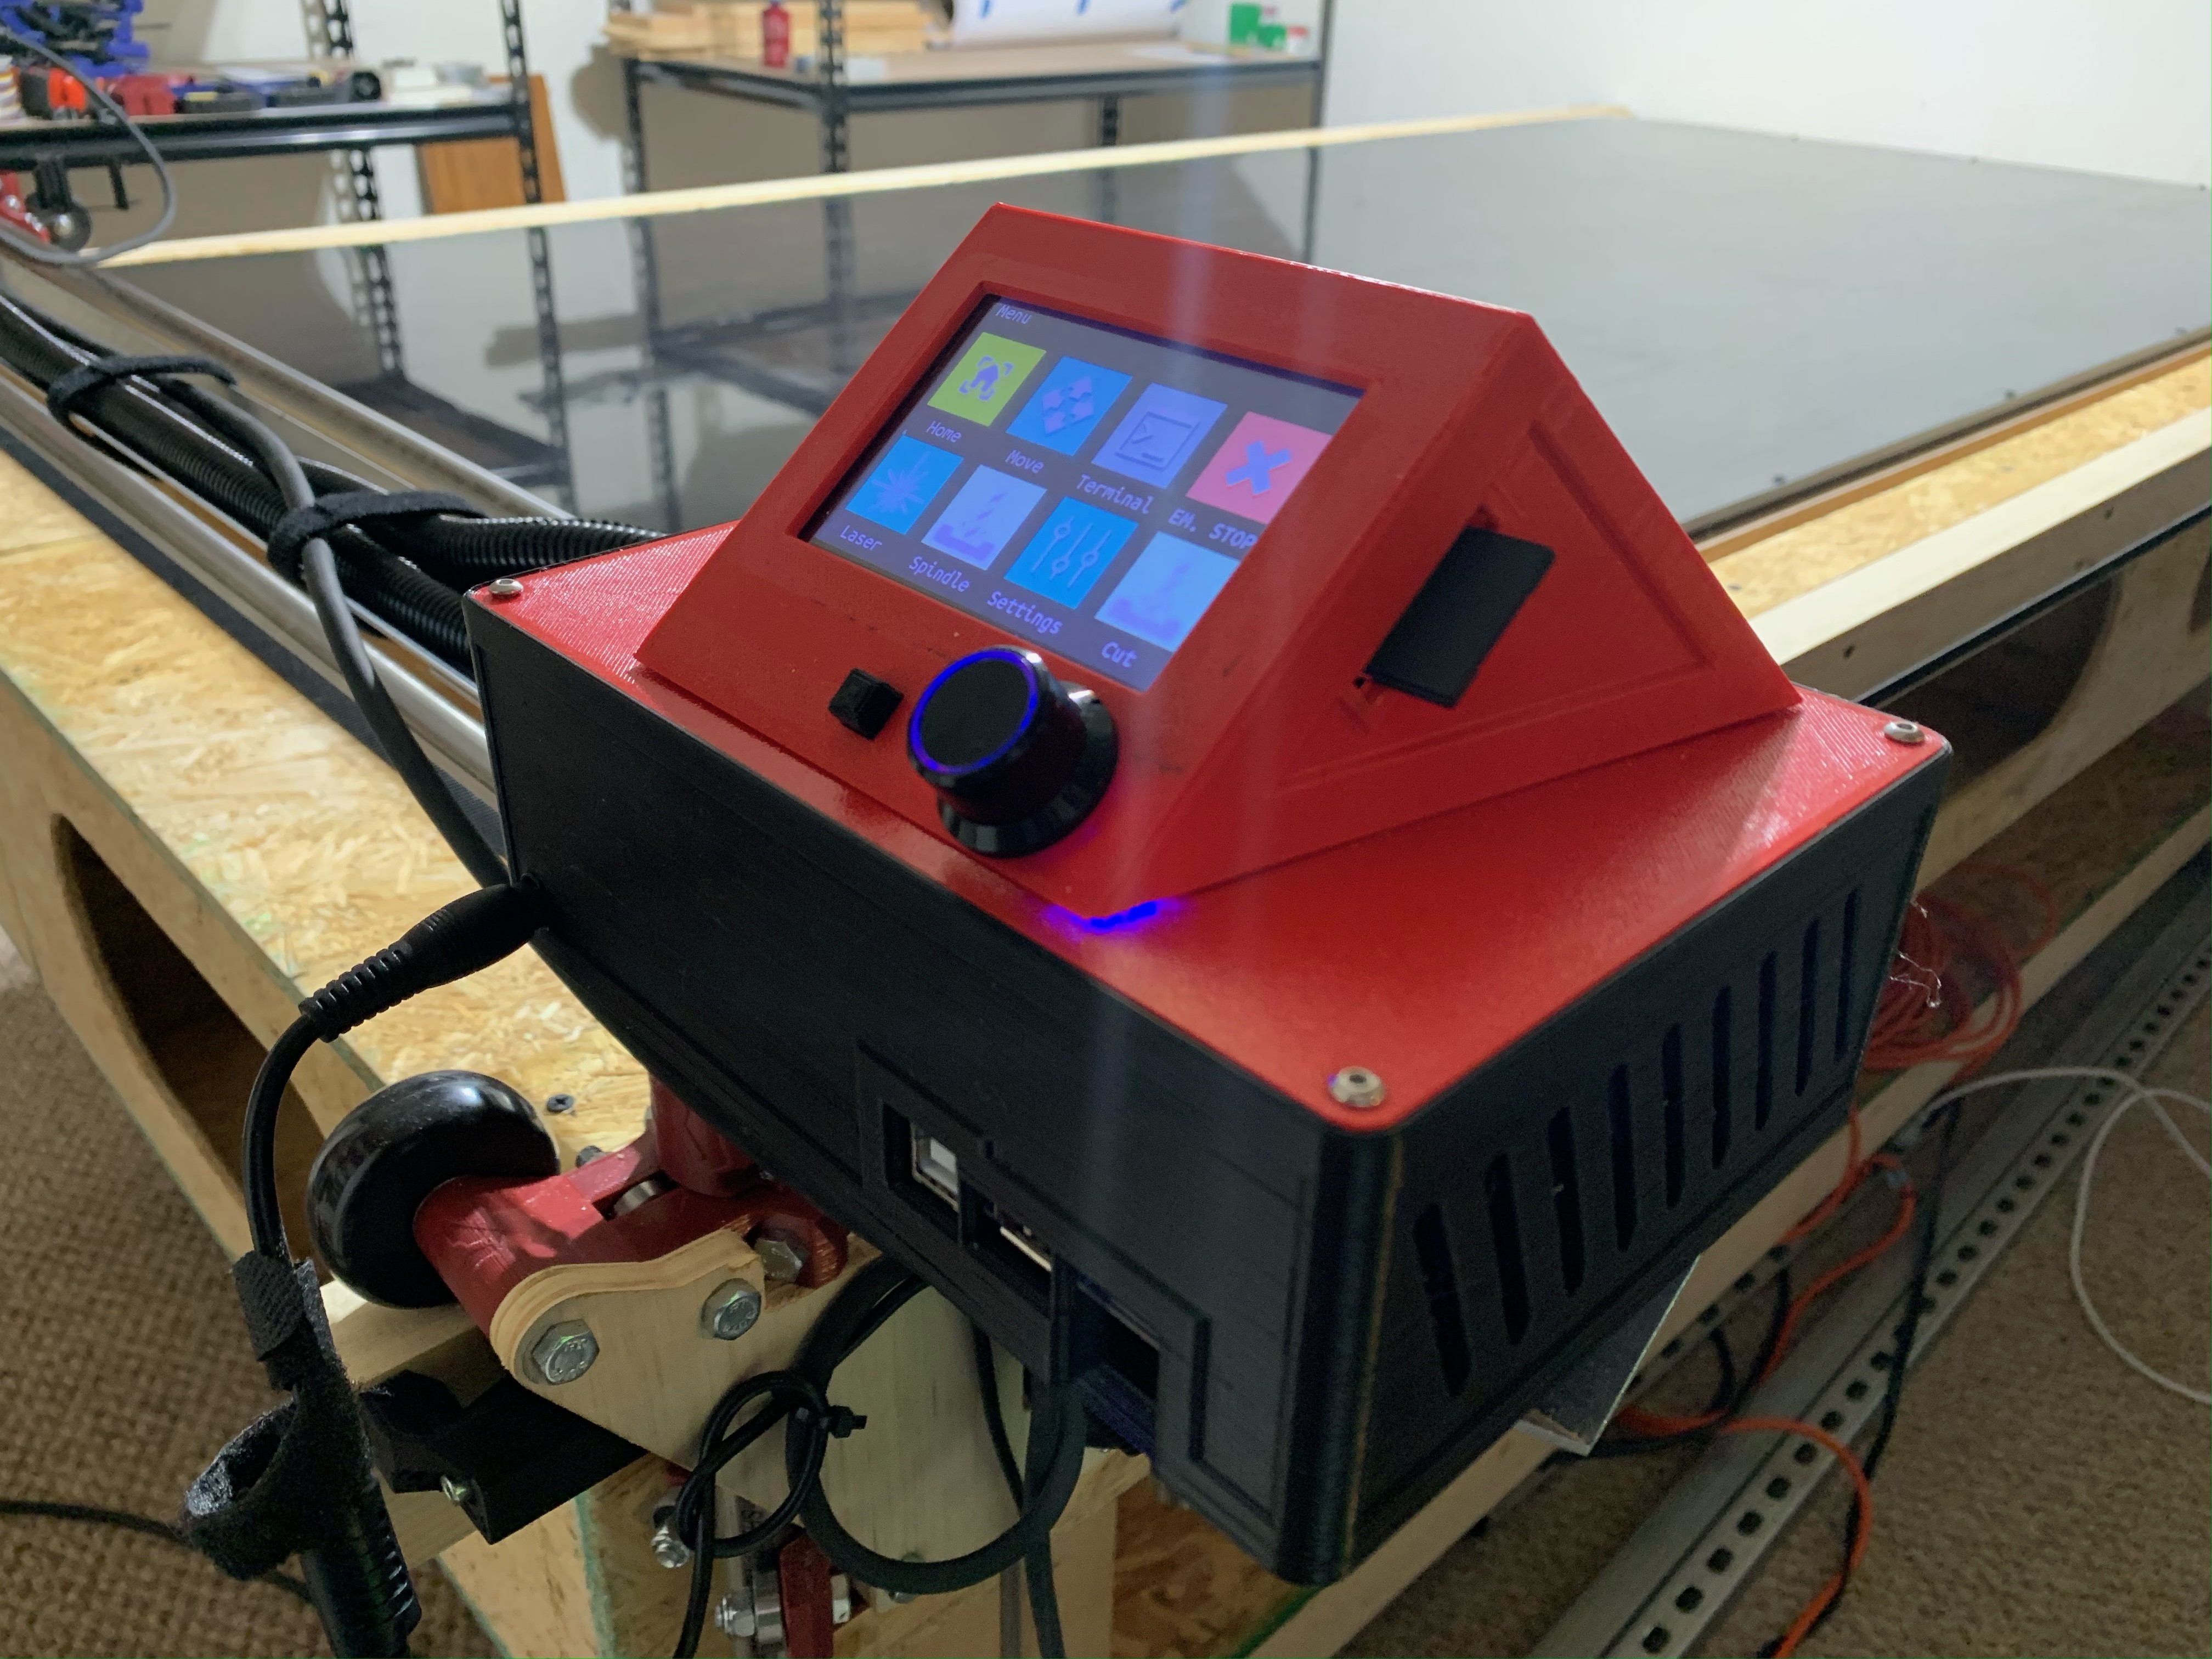
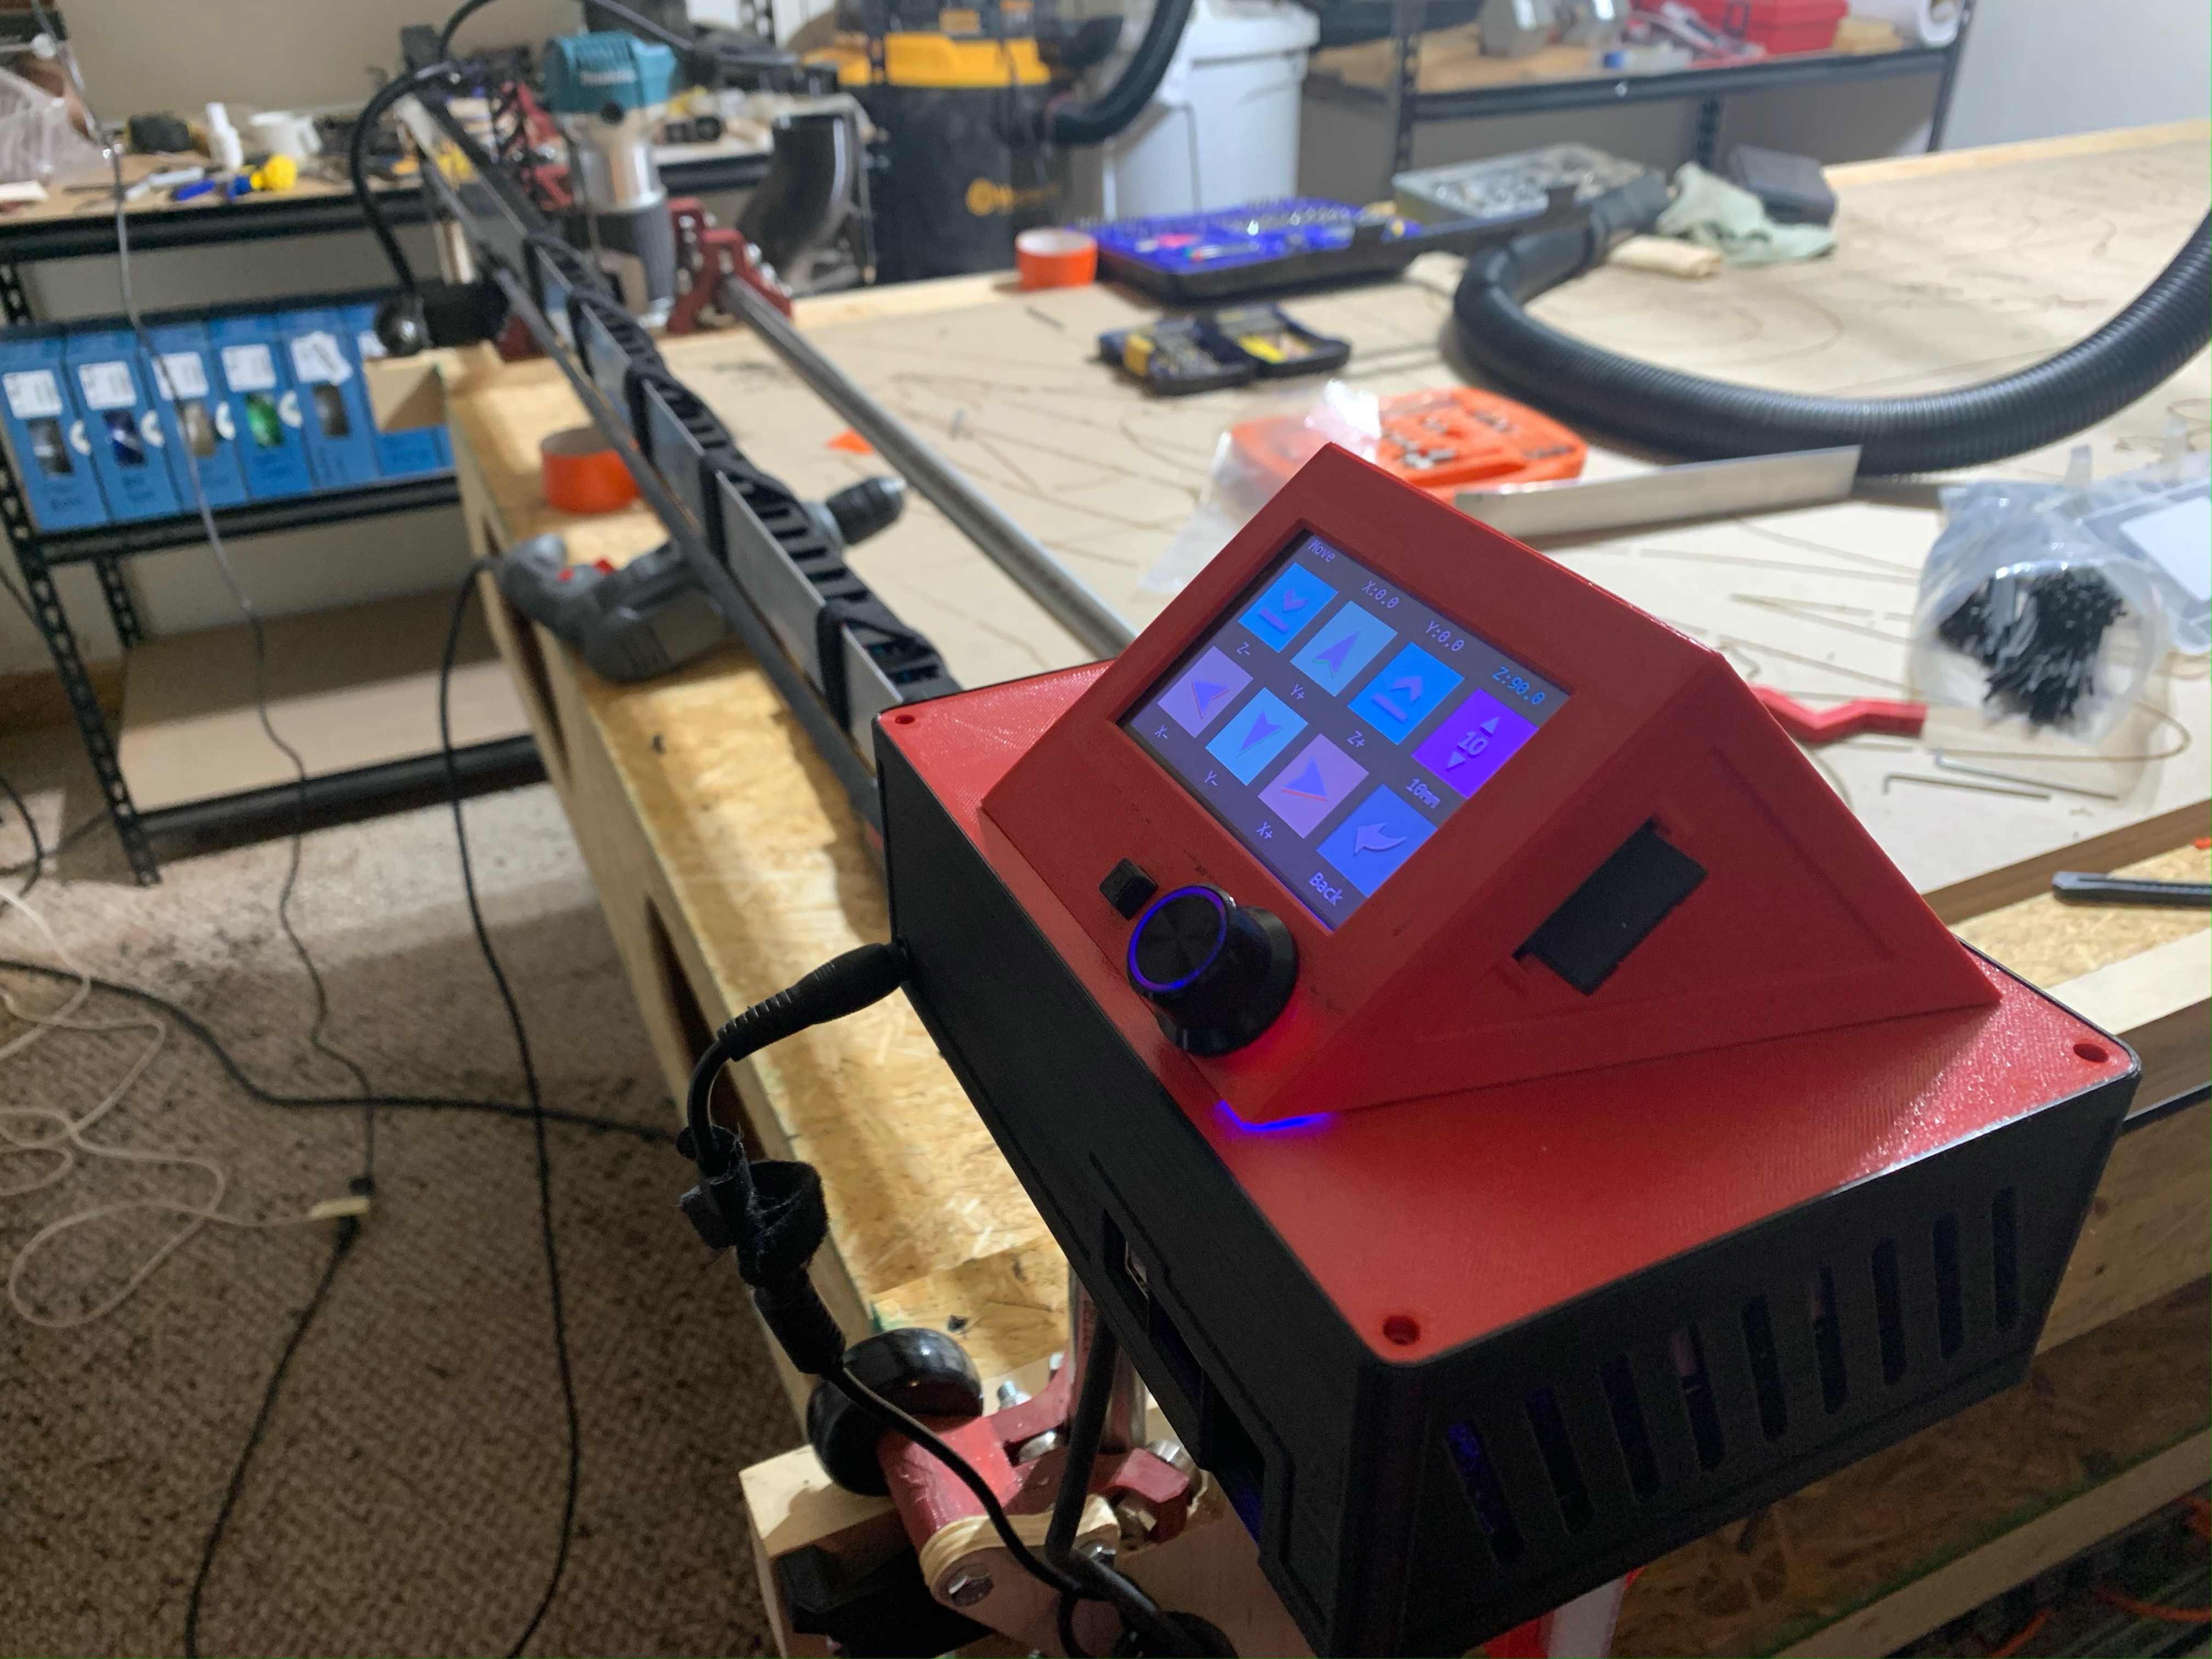
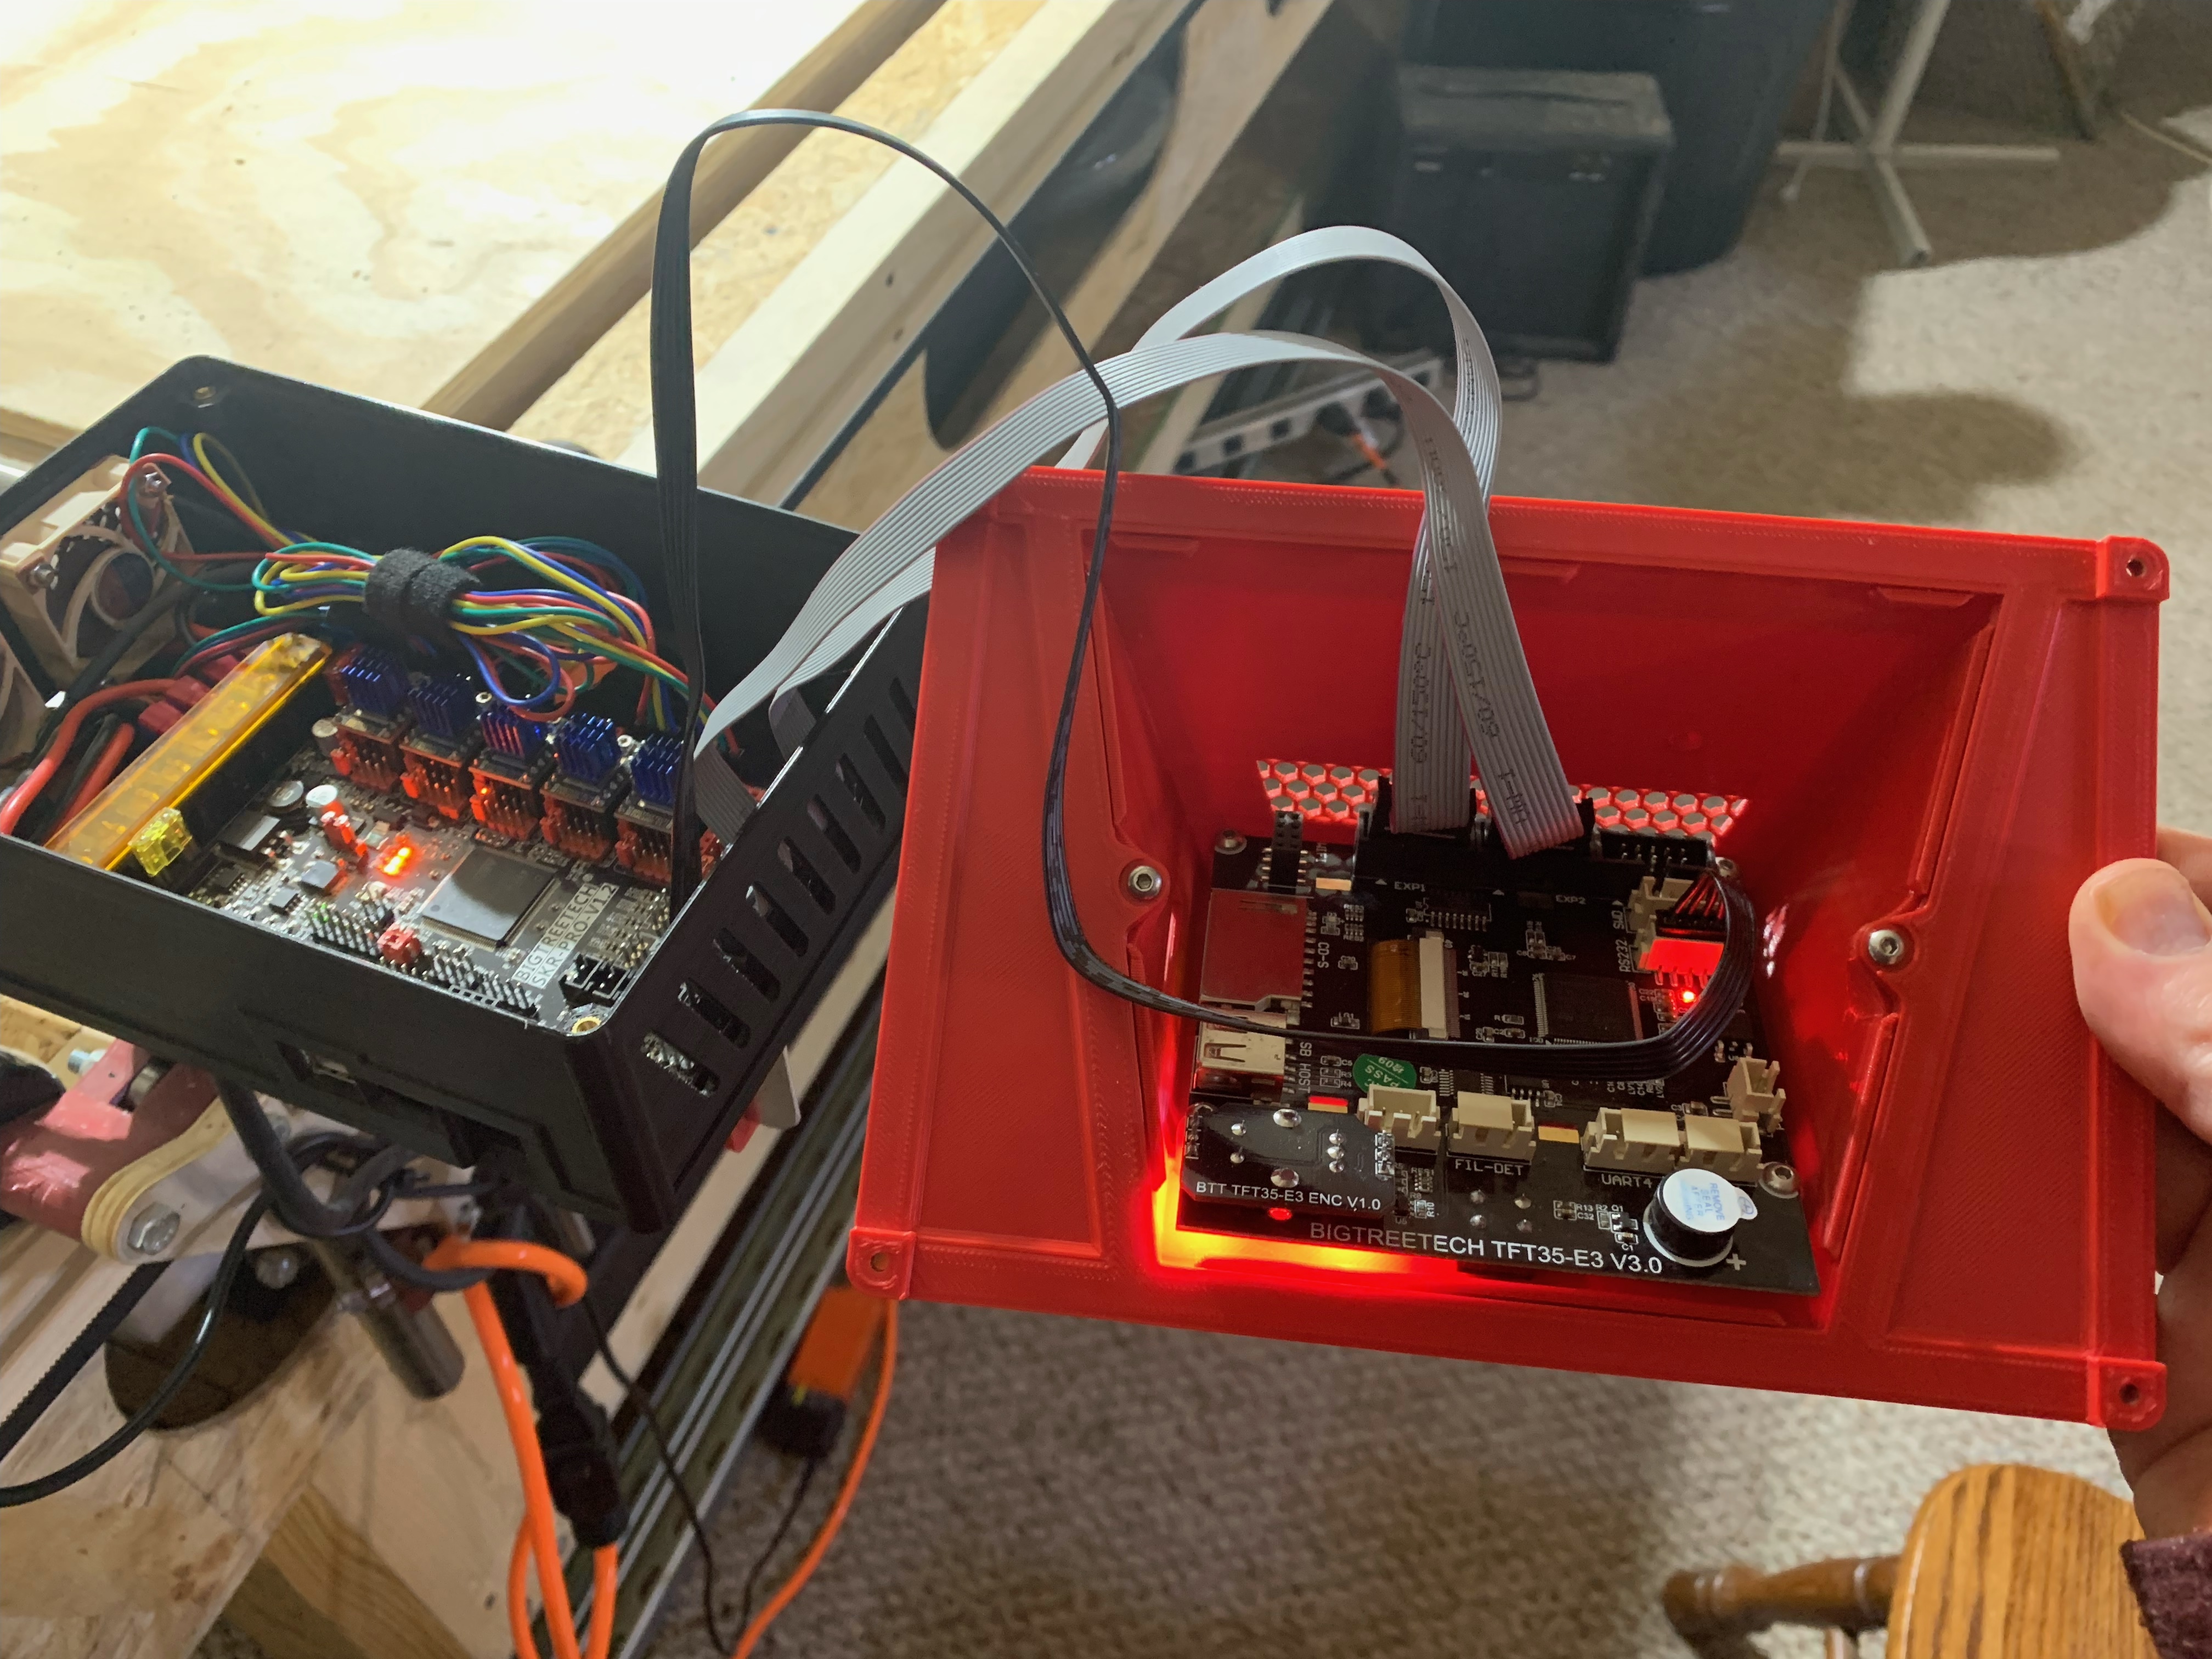
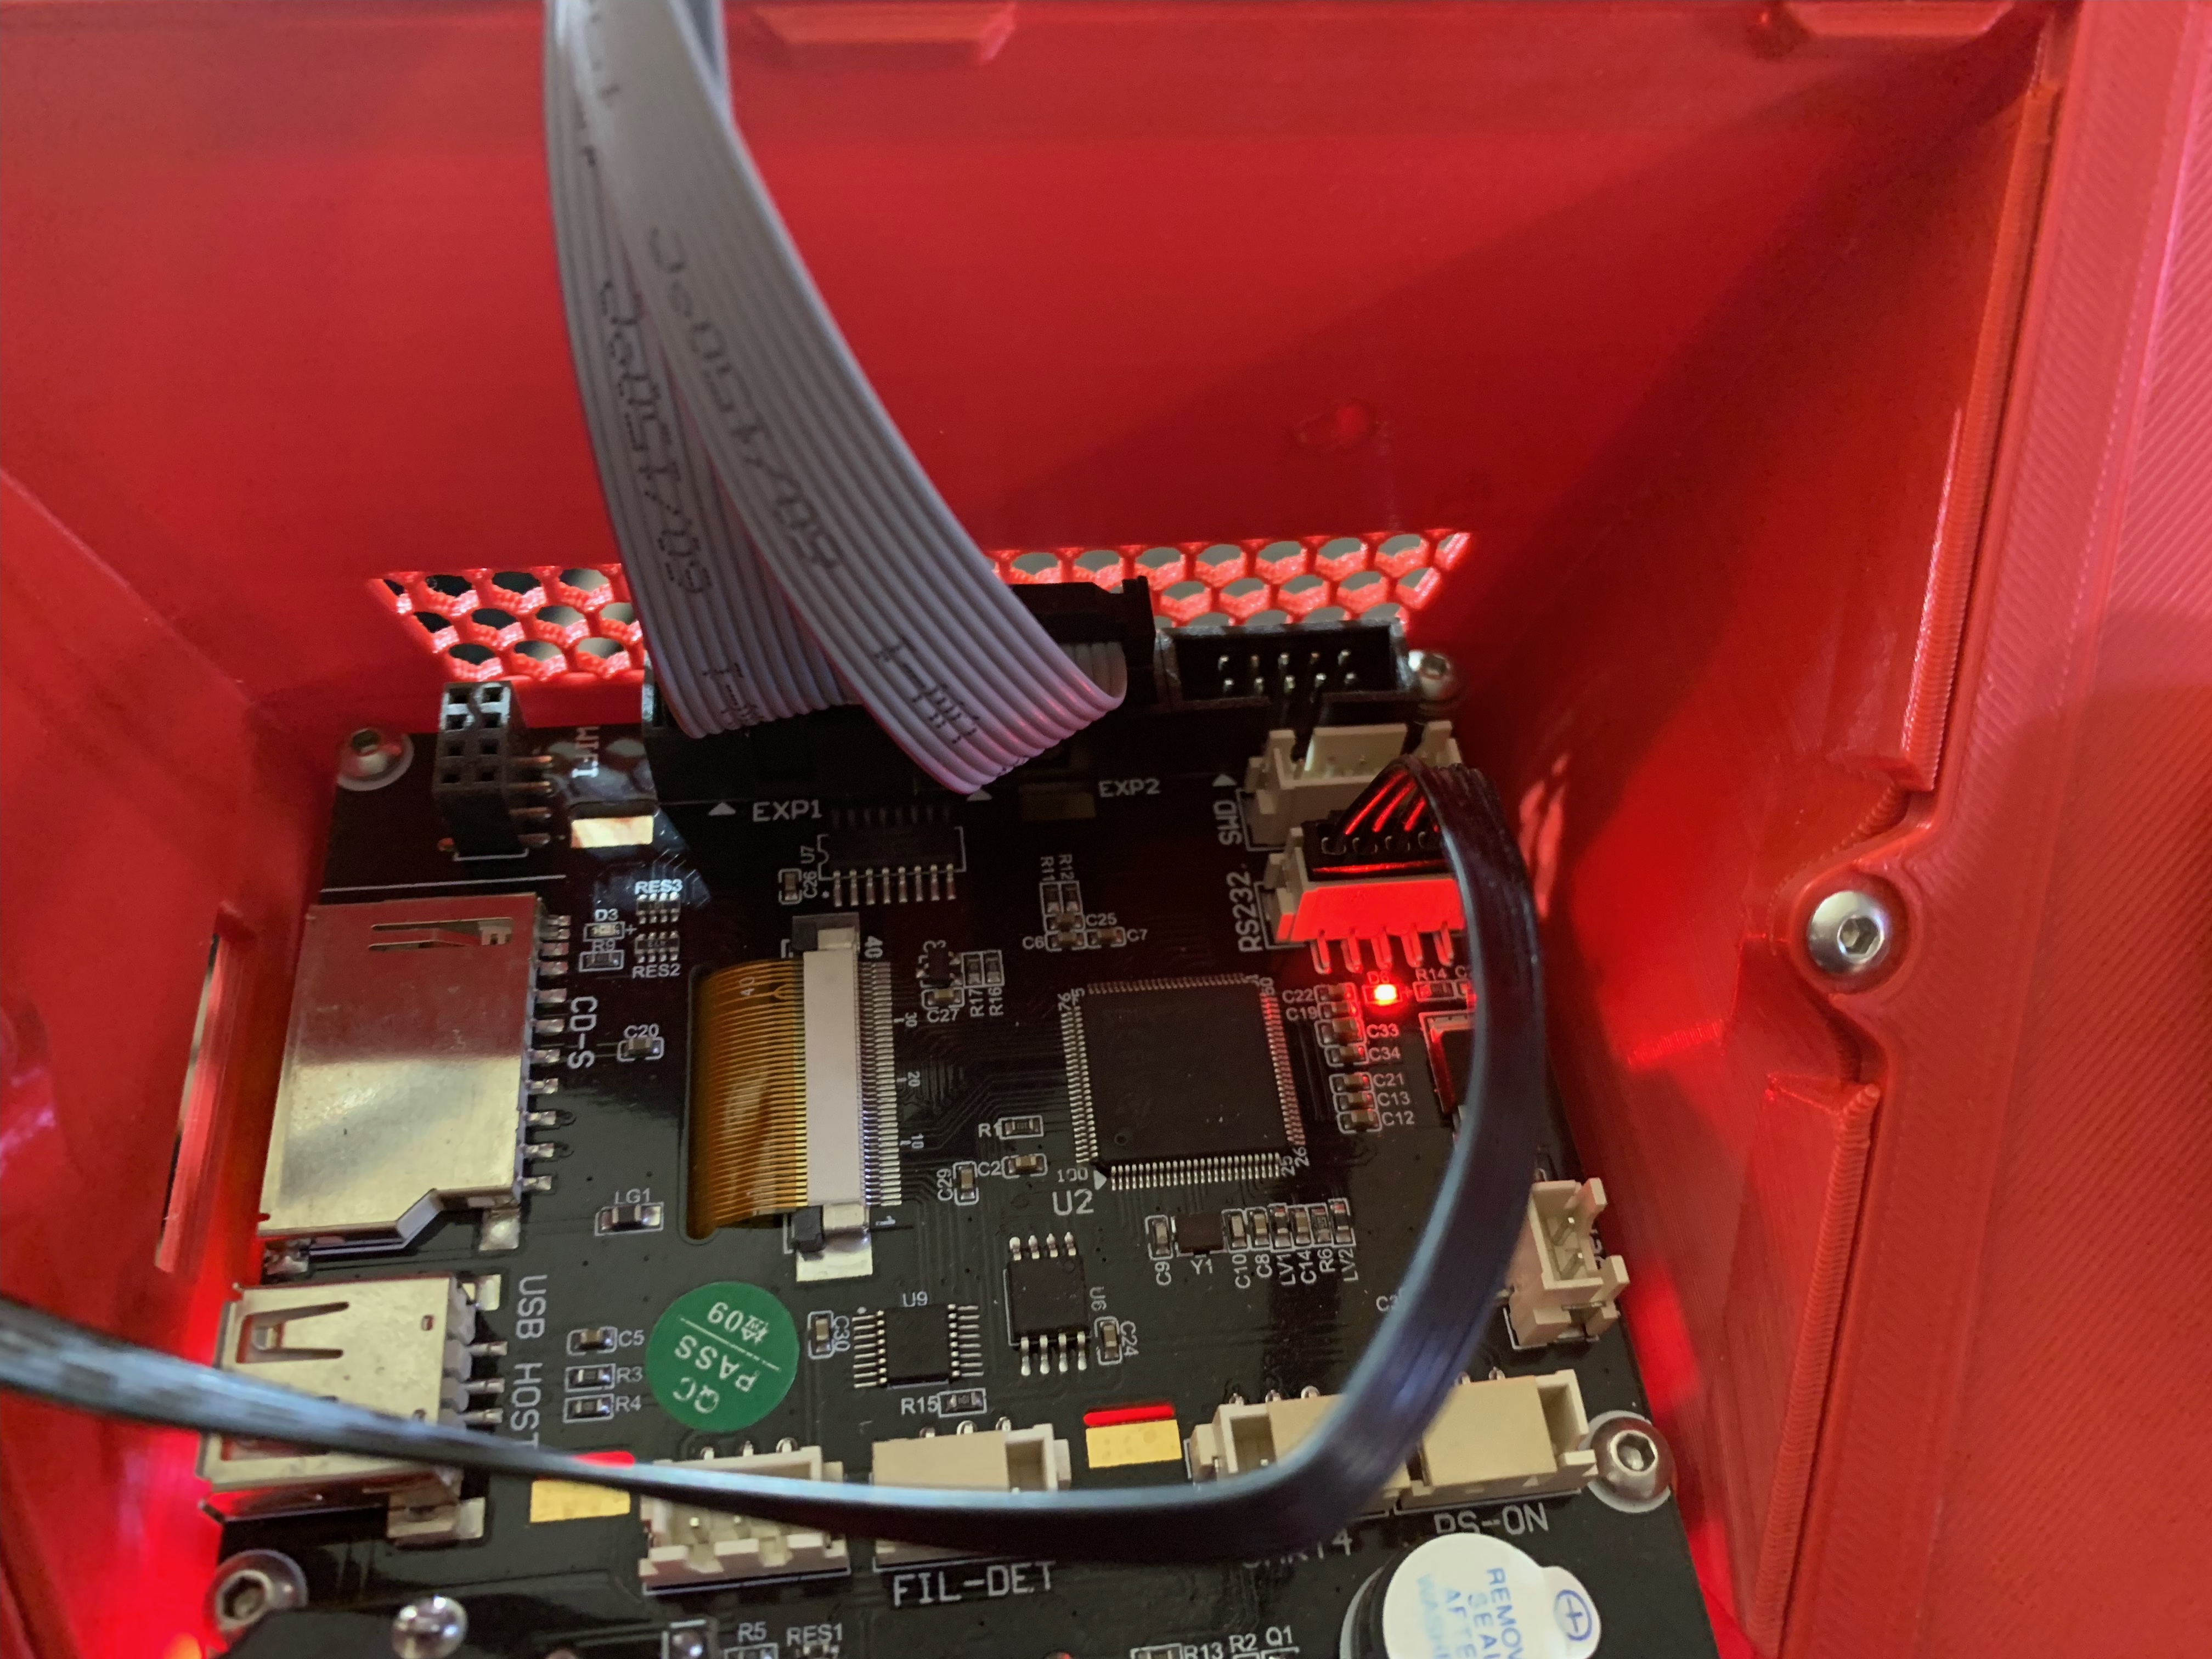
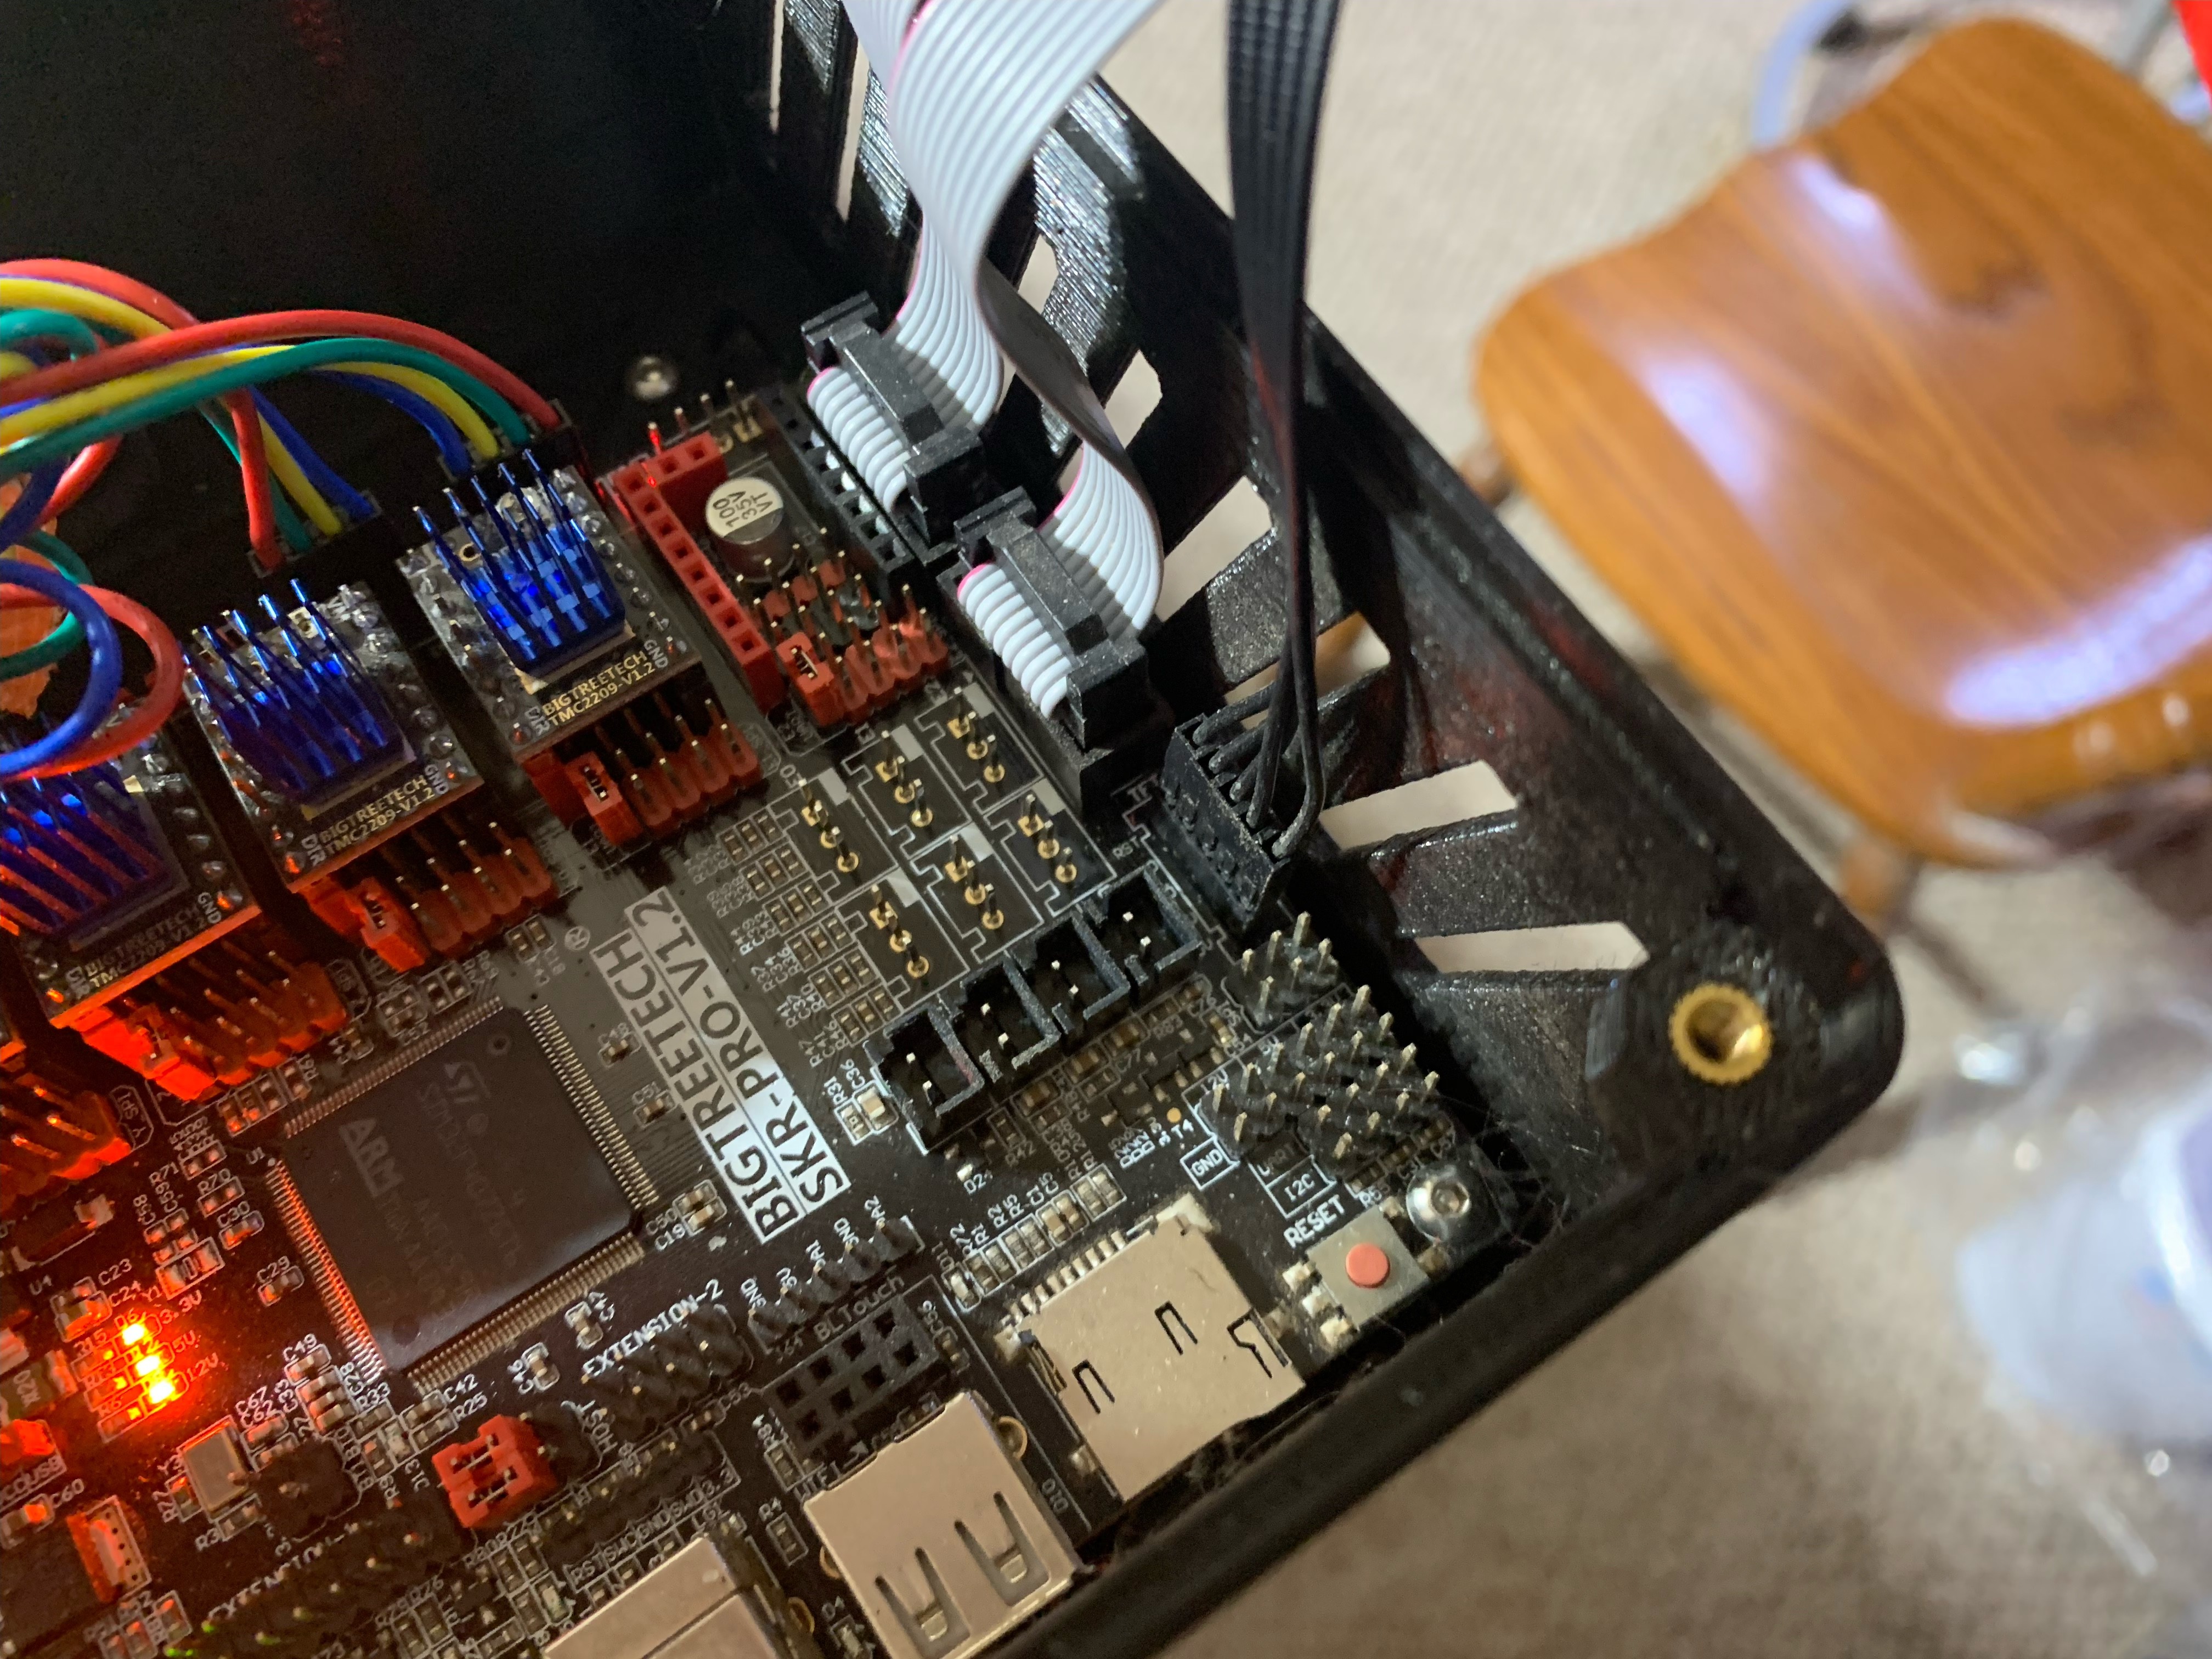
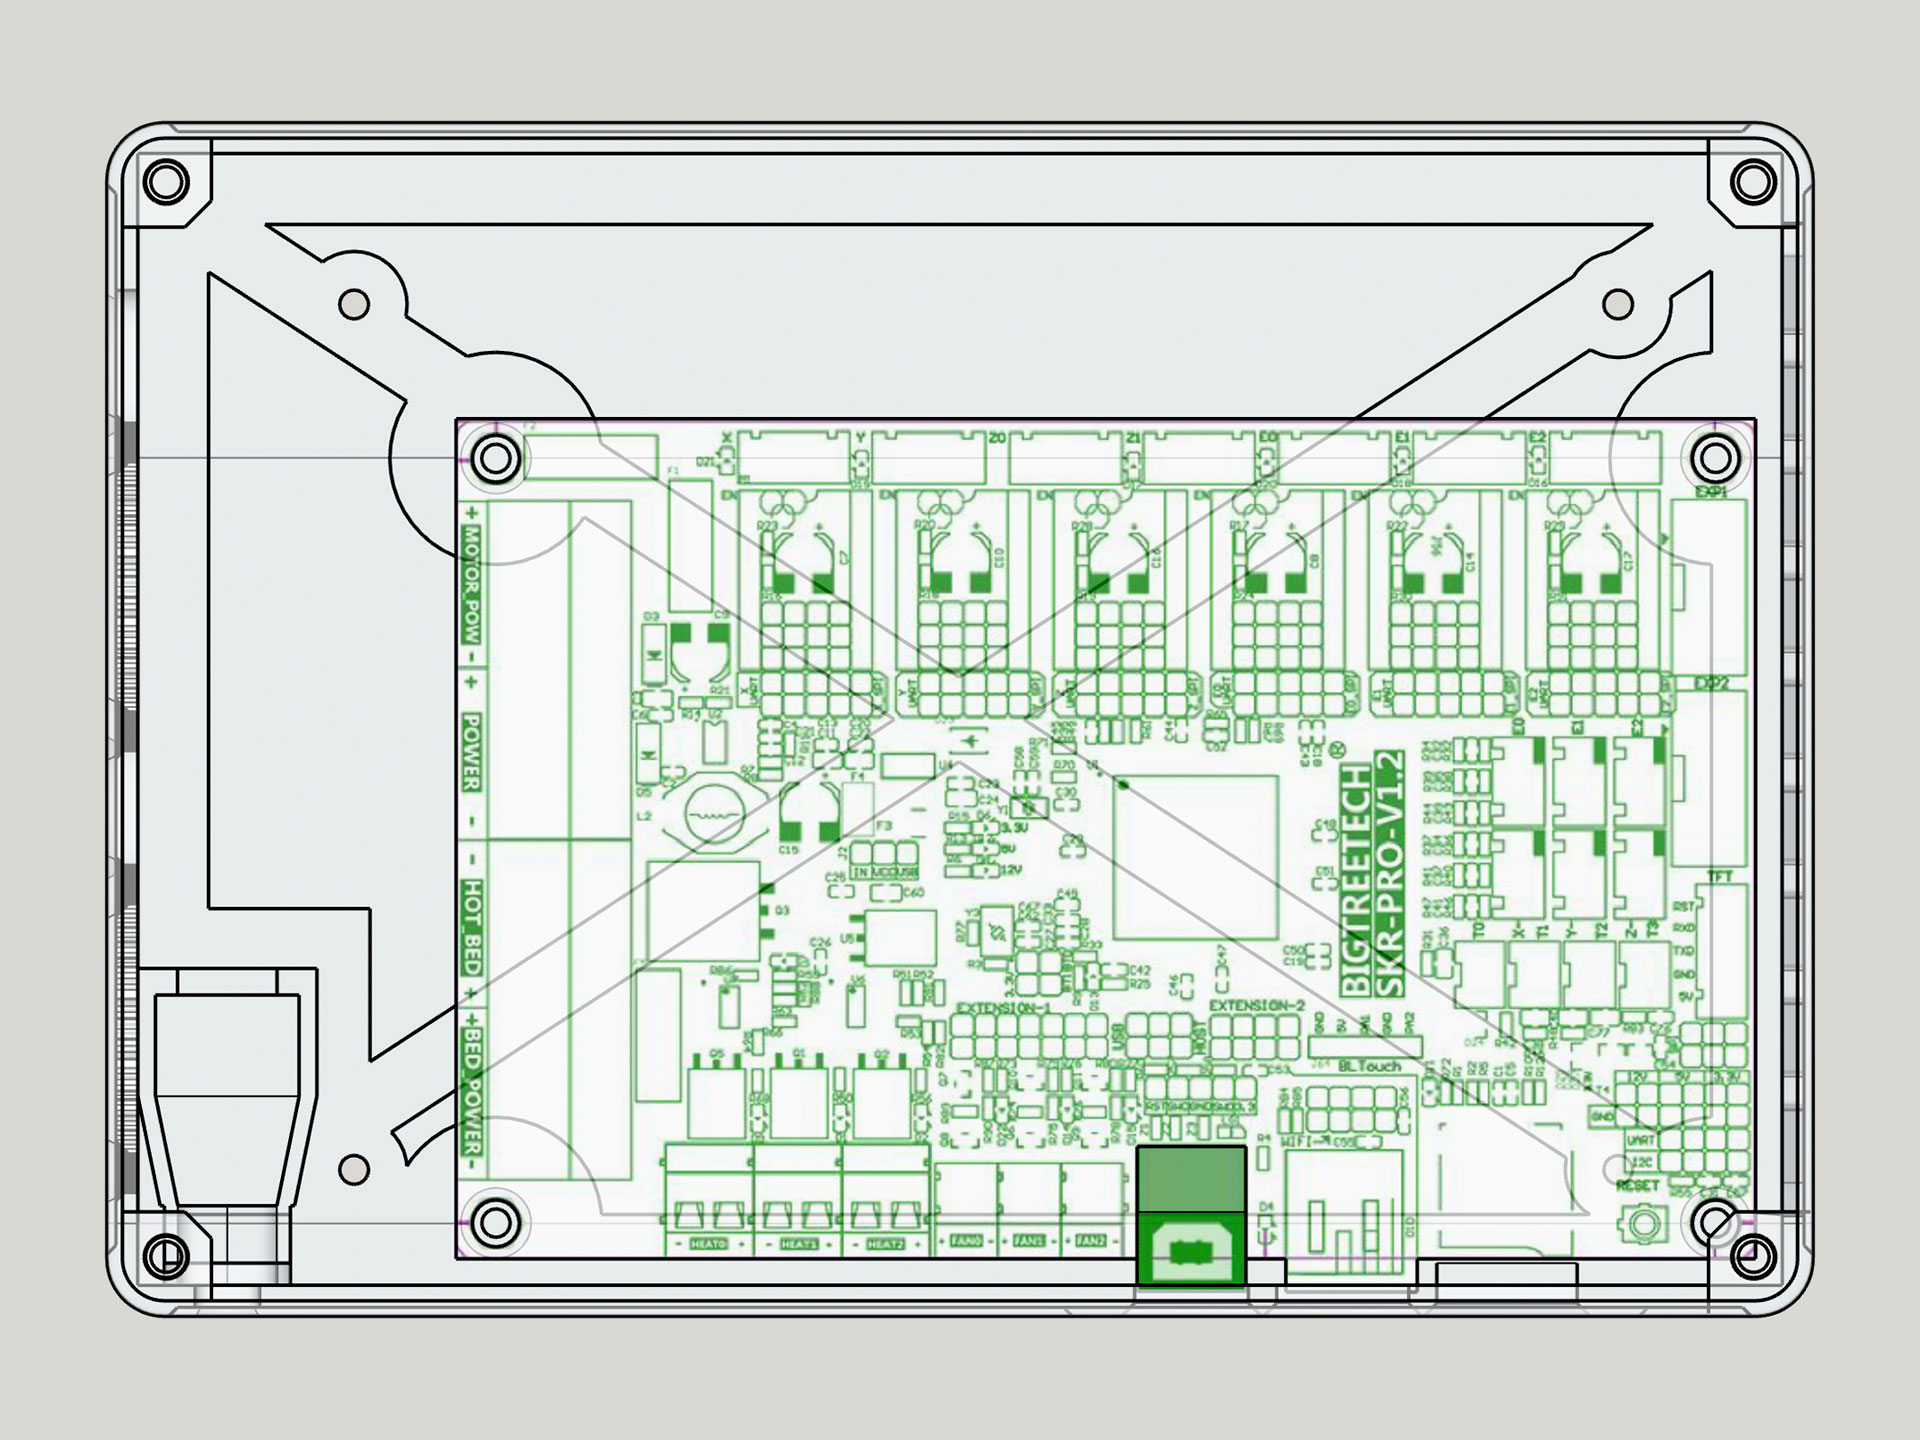
As a continuation of trying to post some pics of my build, here are some showing my case/control box with touchscreen for SKR Pro 1.2 and TFT35.
The first is an older pic, from before I had the dust control setup I have now and before my cable chain was installed. The last three pics are from today, but mainly show the inside of the 3D-printed control box, and the cable connections of the touchscreen.
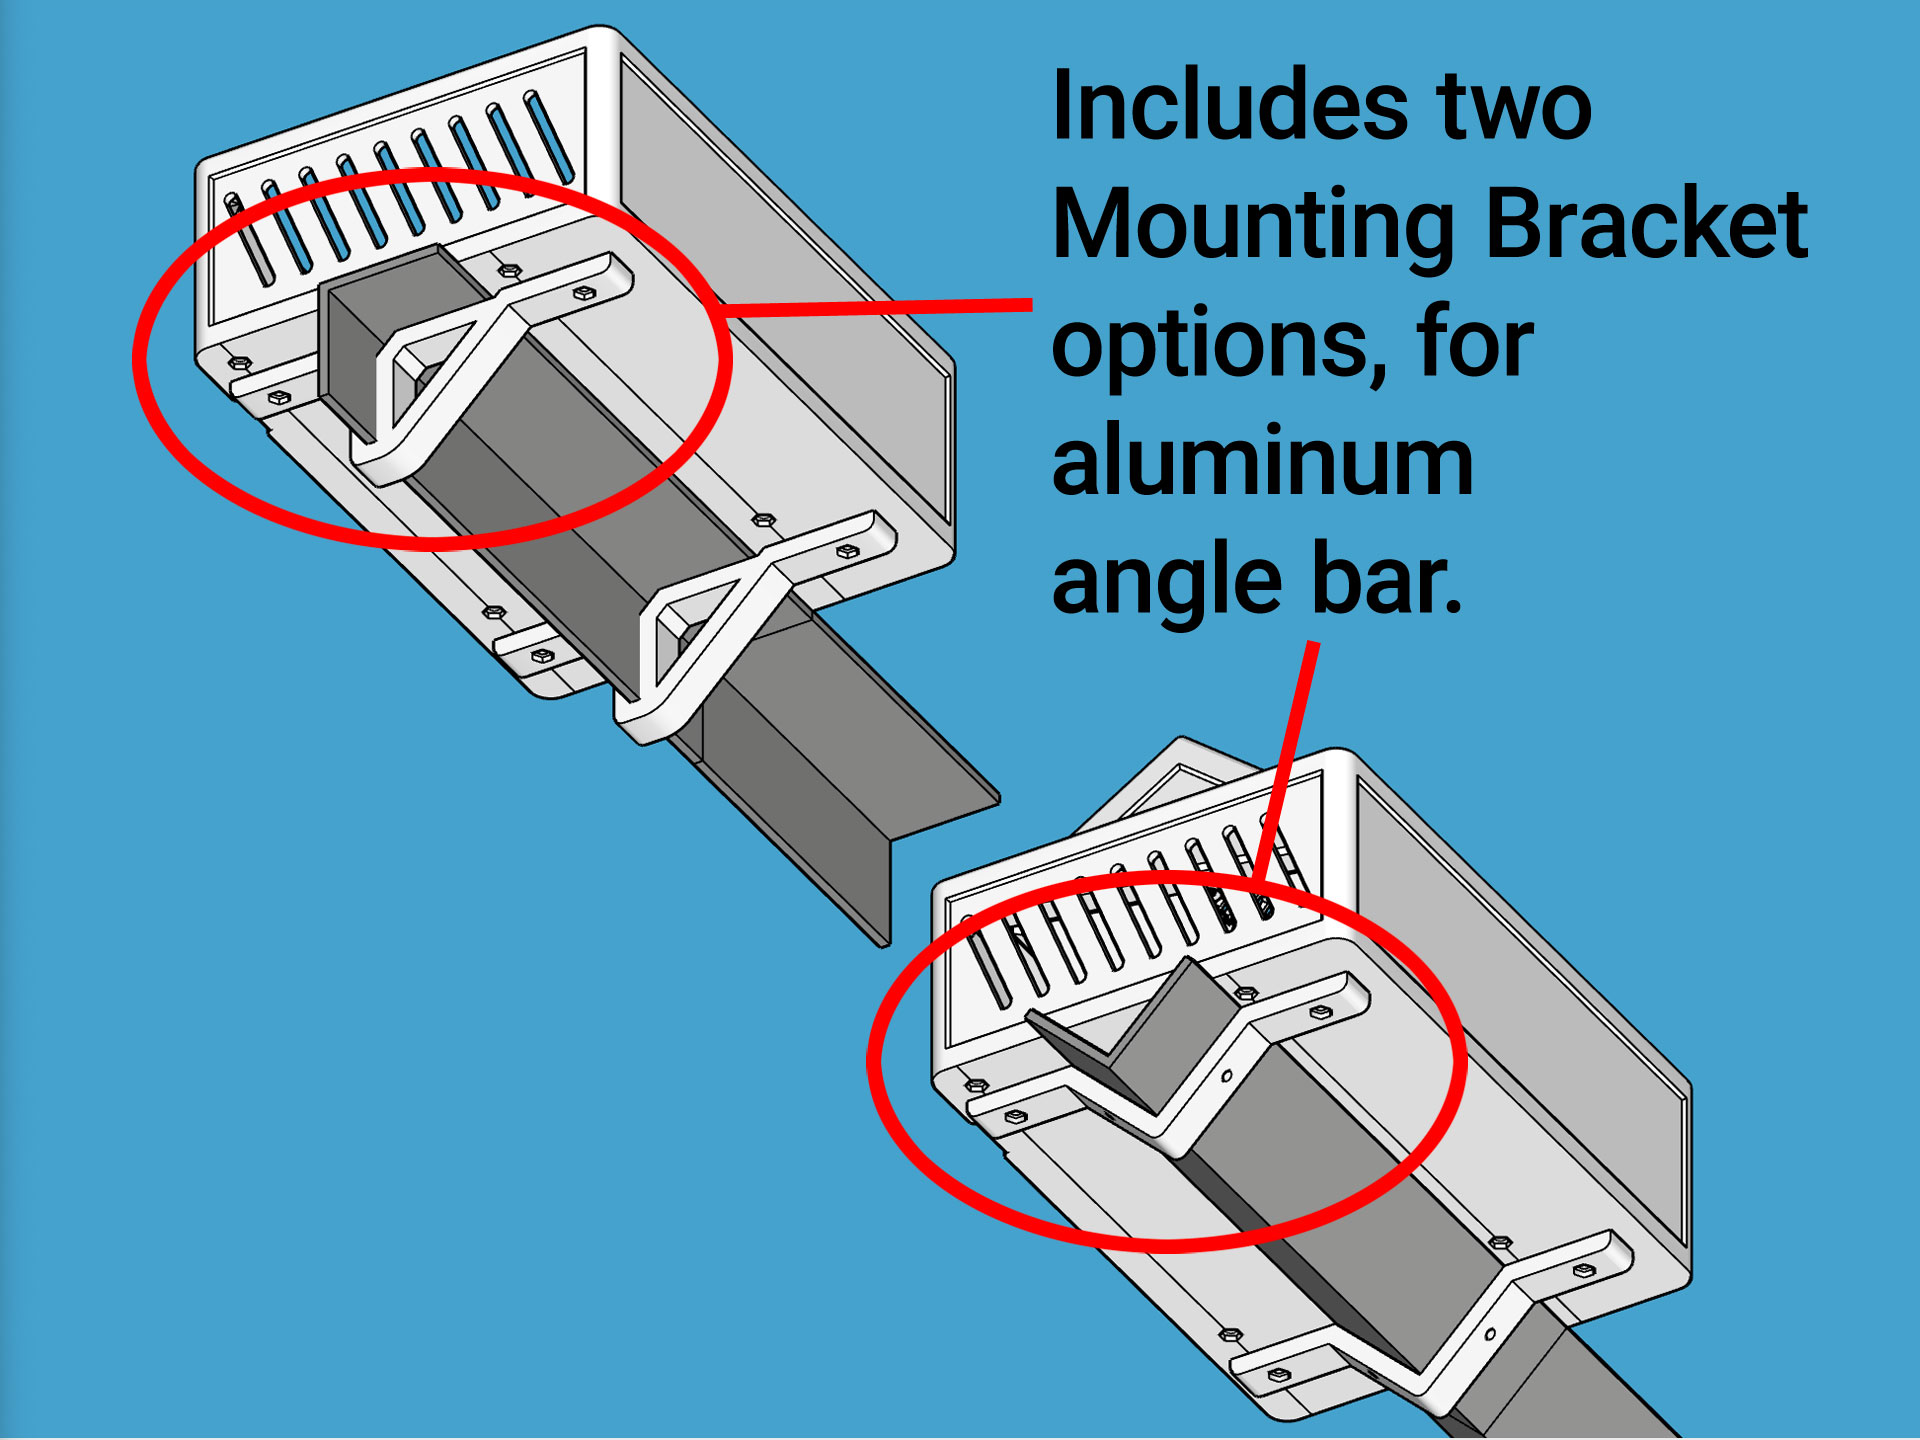
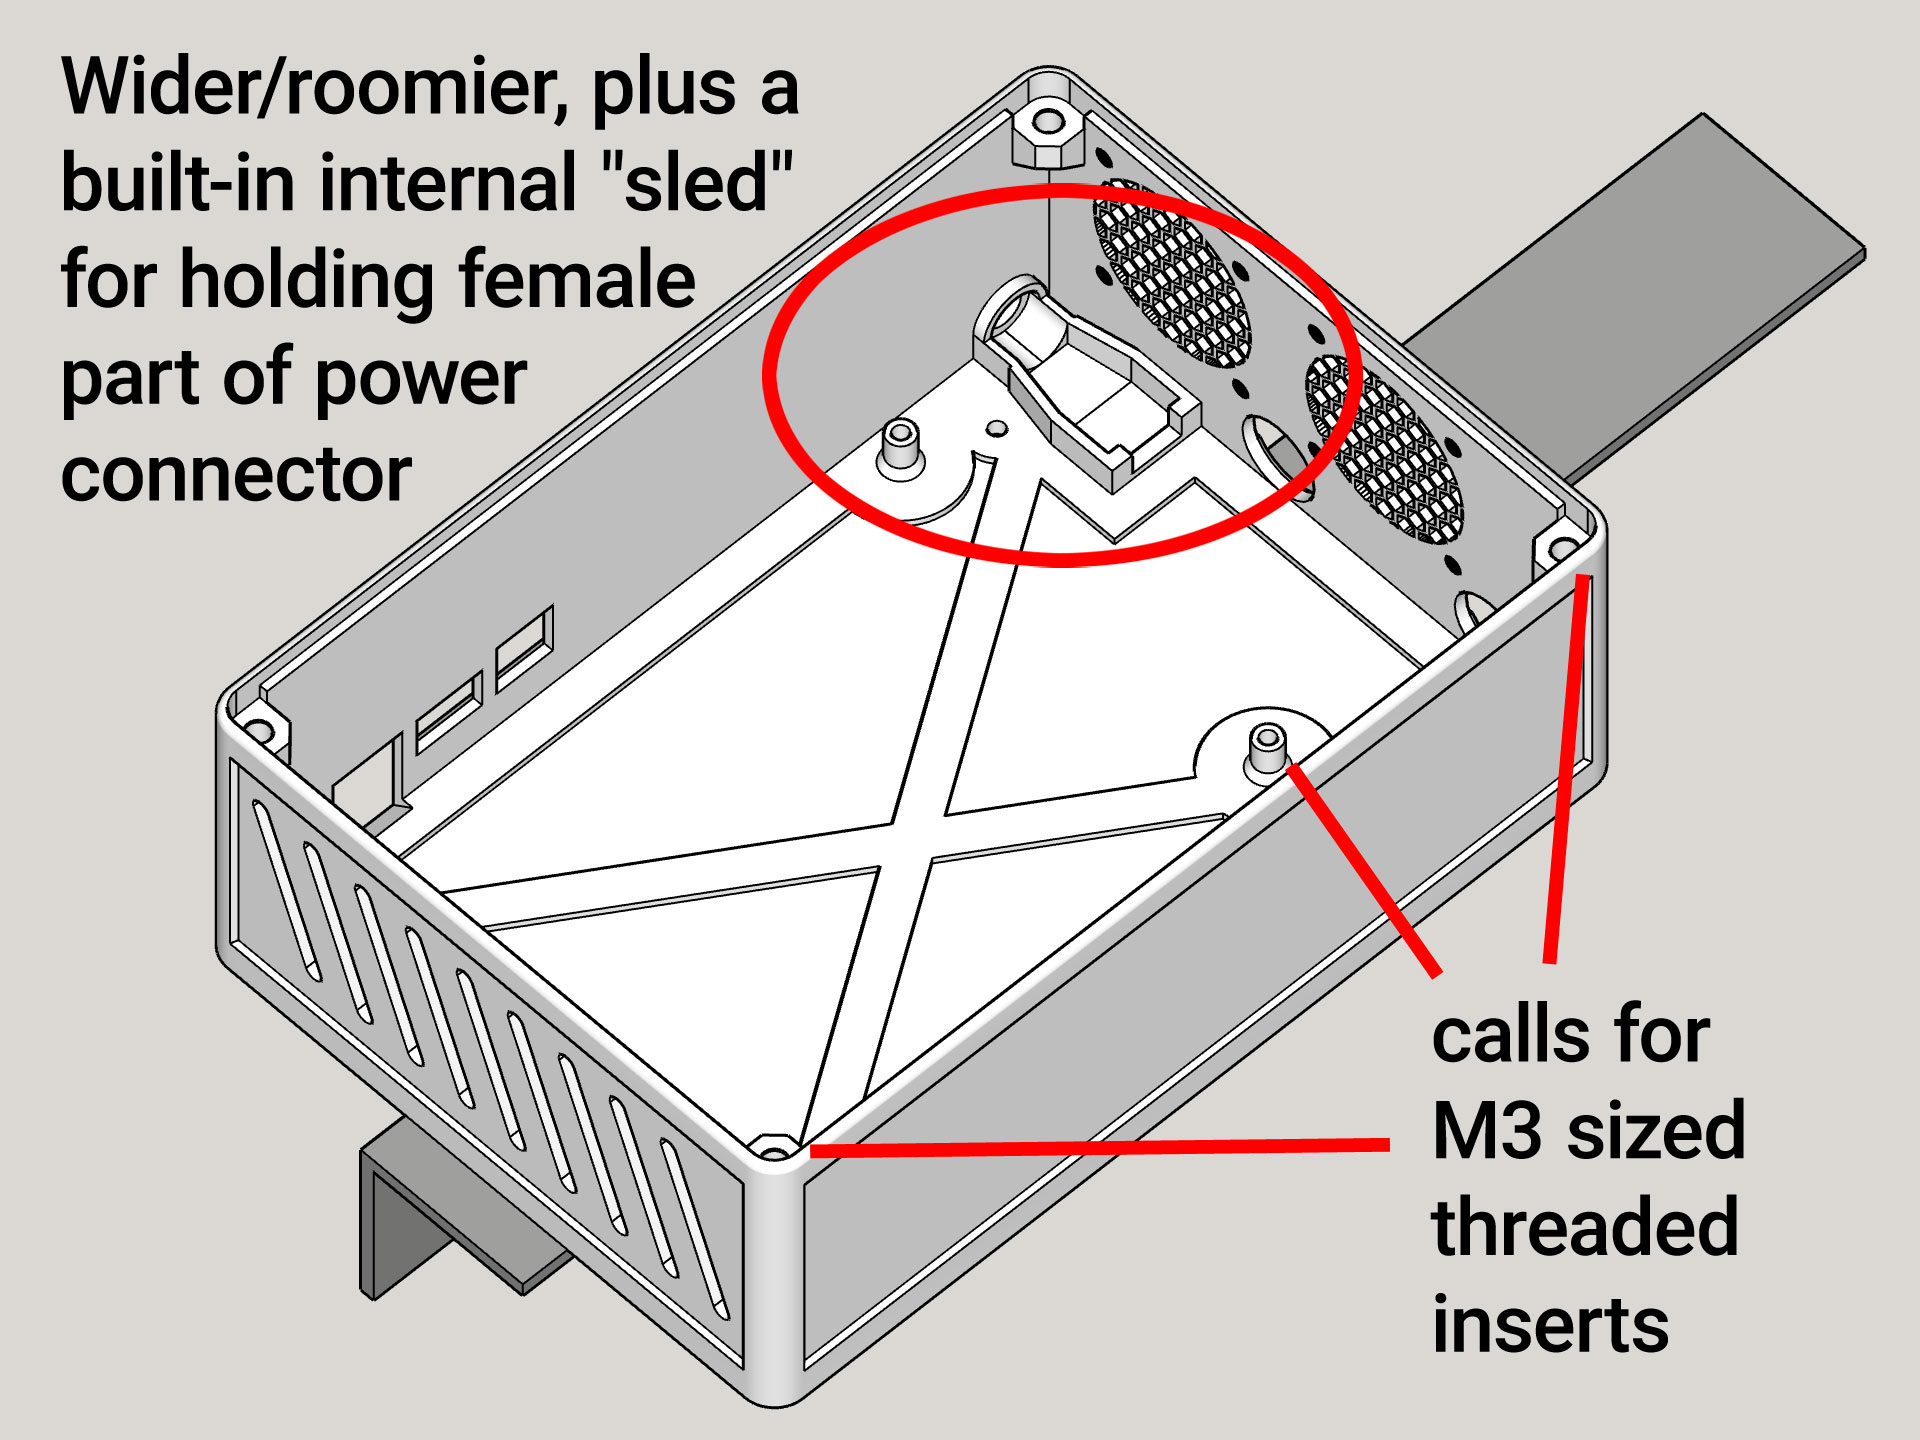
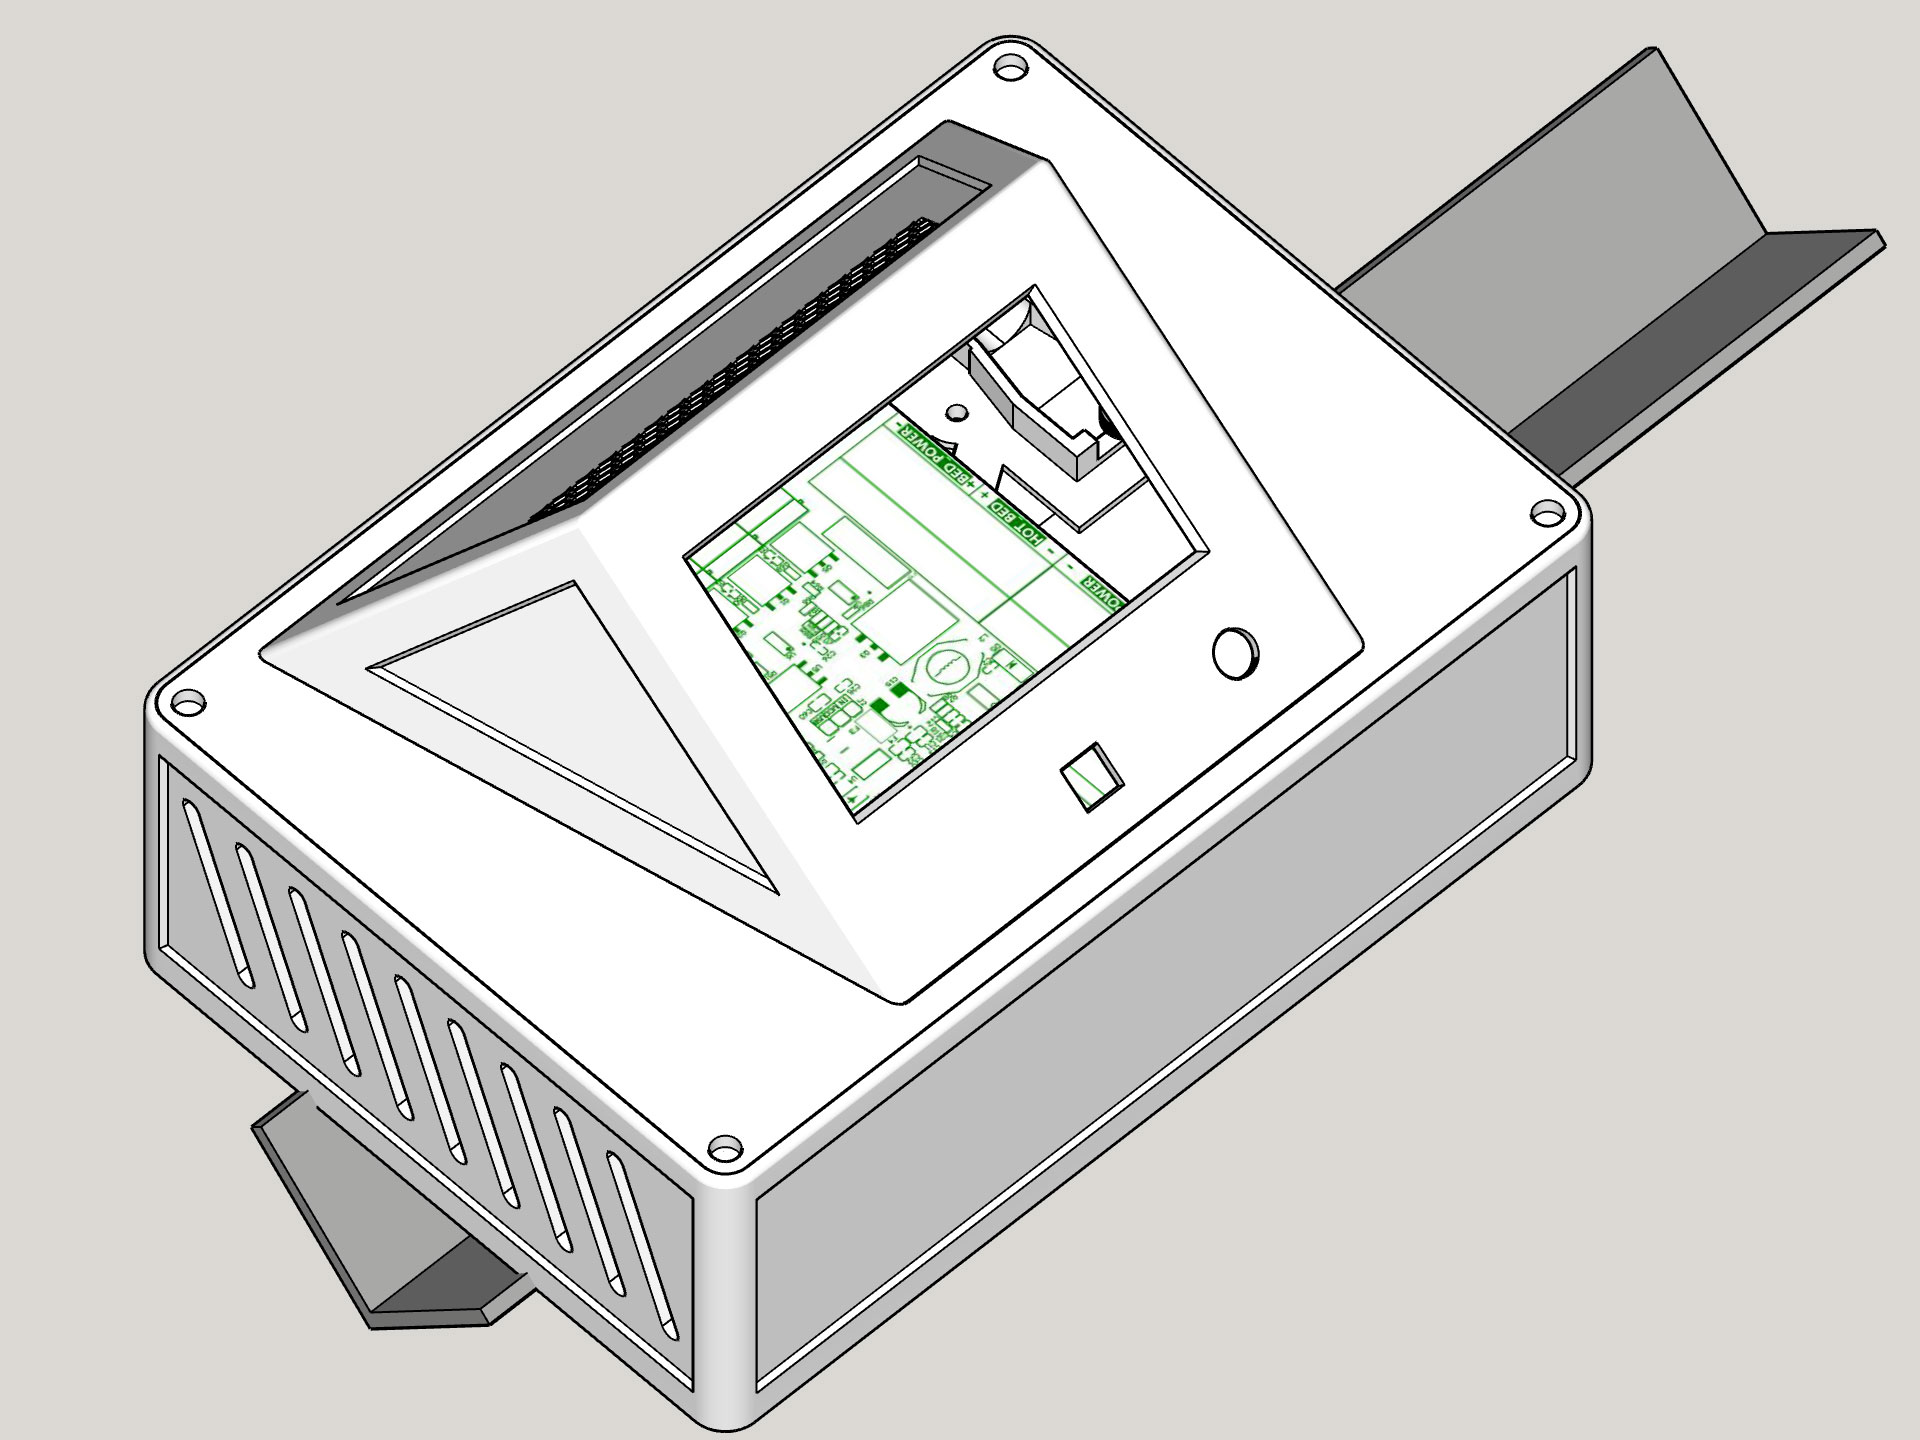
My case/control box is a remixed, customized version of the one from the main site here. I remixed it to make it wider and roomier, to build in a sled for holding the female part of the power connector, and to relocate the cooling fans, in trying to get better airflow for both the TFT and the main board.
I have posted the STL’s to Thingiverse in case anyone is interested: SKR Pro v1.2 and TFT E3 v3.0 Case (remix) (threaded inserts) by Design8Studio - Thingiverse
2 Likes
OK, so a quick plug for two software tools, and another compliment and thanks to Ryan @vicious1 for the LowRider 2. I’m loving it more every time I use it. My only frustrations, really, are due to my table being so not flat.
Here are the two software tools I’m really pleased with:
-
GWizard (feeds and speeds calculator + more) from CNCCookbook: G-Wizard CNC Speeds and Feeds Calculator for Milling Machines - CNCCookbook: Be A Better CNC'er
-
Estlcam (toolpath and gcode generator): Estlcam: 2D / 3D CAM und CNC Steuerung...
I just used Estlcam for the first time on a project. I had to watch a few minutes of how-to on YouTube to adjust to the way of using it, which is somewhat different from Easel, the only other CNC g-code output tool I’ve used. Although Easel is easier to use out of the box, I don’t care for their resulting G-code, especially the super slow non-cut motion rates. Bottom line is that (for a litany of other reasons as well, not just the location speeds), I like Estlcam way better than Easel.
Also, that same project was my first time to get my speeds and feeds settings from GWizard. I was also using a brand new, shiny, sharp CMT 1/4" 2-flute, up-cut bit. The job was through-cutting profiles and through-drilling holes on 3/4" MDF. This job went great, fast, smooth, and I am so pleased with the results.
Based on the recommendations from GWizard (with me nudging things toward conservative a bit, like moving the “slider” settings from about halfway to only about 30% of the way or so), I set my router speed at 17000 RPM (#3 on my Makita variable speed router), and I upped the Z step-down (depth per pass) to 4.39 mm, and I upped the feed rate to 34.5 mm/s, and increased the plunge rate to 23.2 mm/s. Again I’m really, really pleased with the results.
I also used the LowRider with a 1/8" 2-flute up-cut bit to drill an array of 1/8" holes, since it needed to be precise and it would be way easier and faster to do them all with the CNC. Again, I used GWizard to get my speeds and feeds for that phase too.
I will try to (sometime soon) edit some video of the CNC work itself and the final product once it’s finished. This CNC work was for the base for my adaptation of the “$10,000 Camera Arm” featured in this video: 3d Printing a $10,000 Camera Arm - YouTube

3 Likes
Nice looking setup. 
Thanks for all the links too, very helpful.
Andrew
1 Like
Here are some pics of a couple recent projects I CNC cut out of MDF using my LowRider 2:
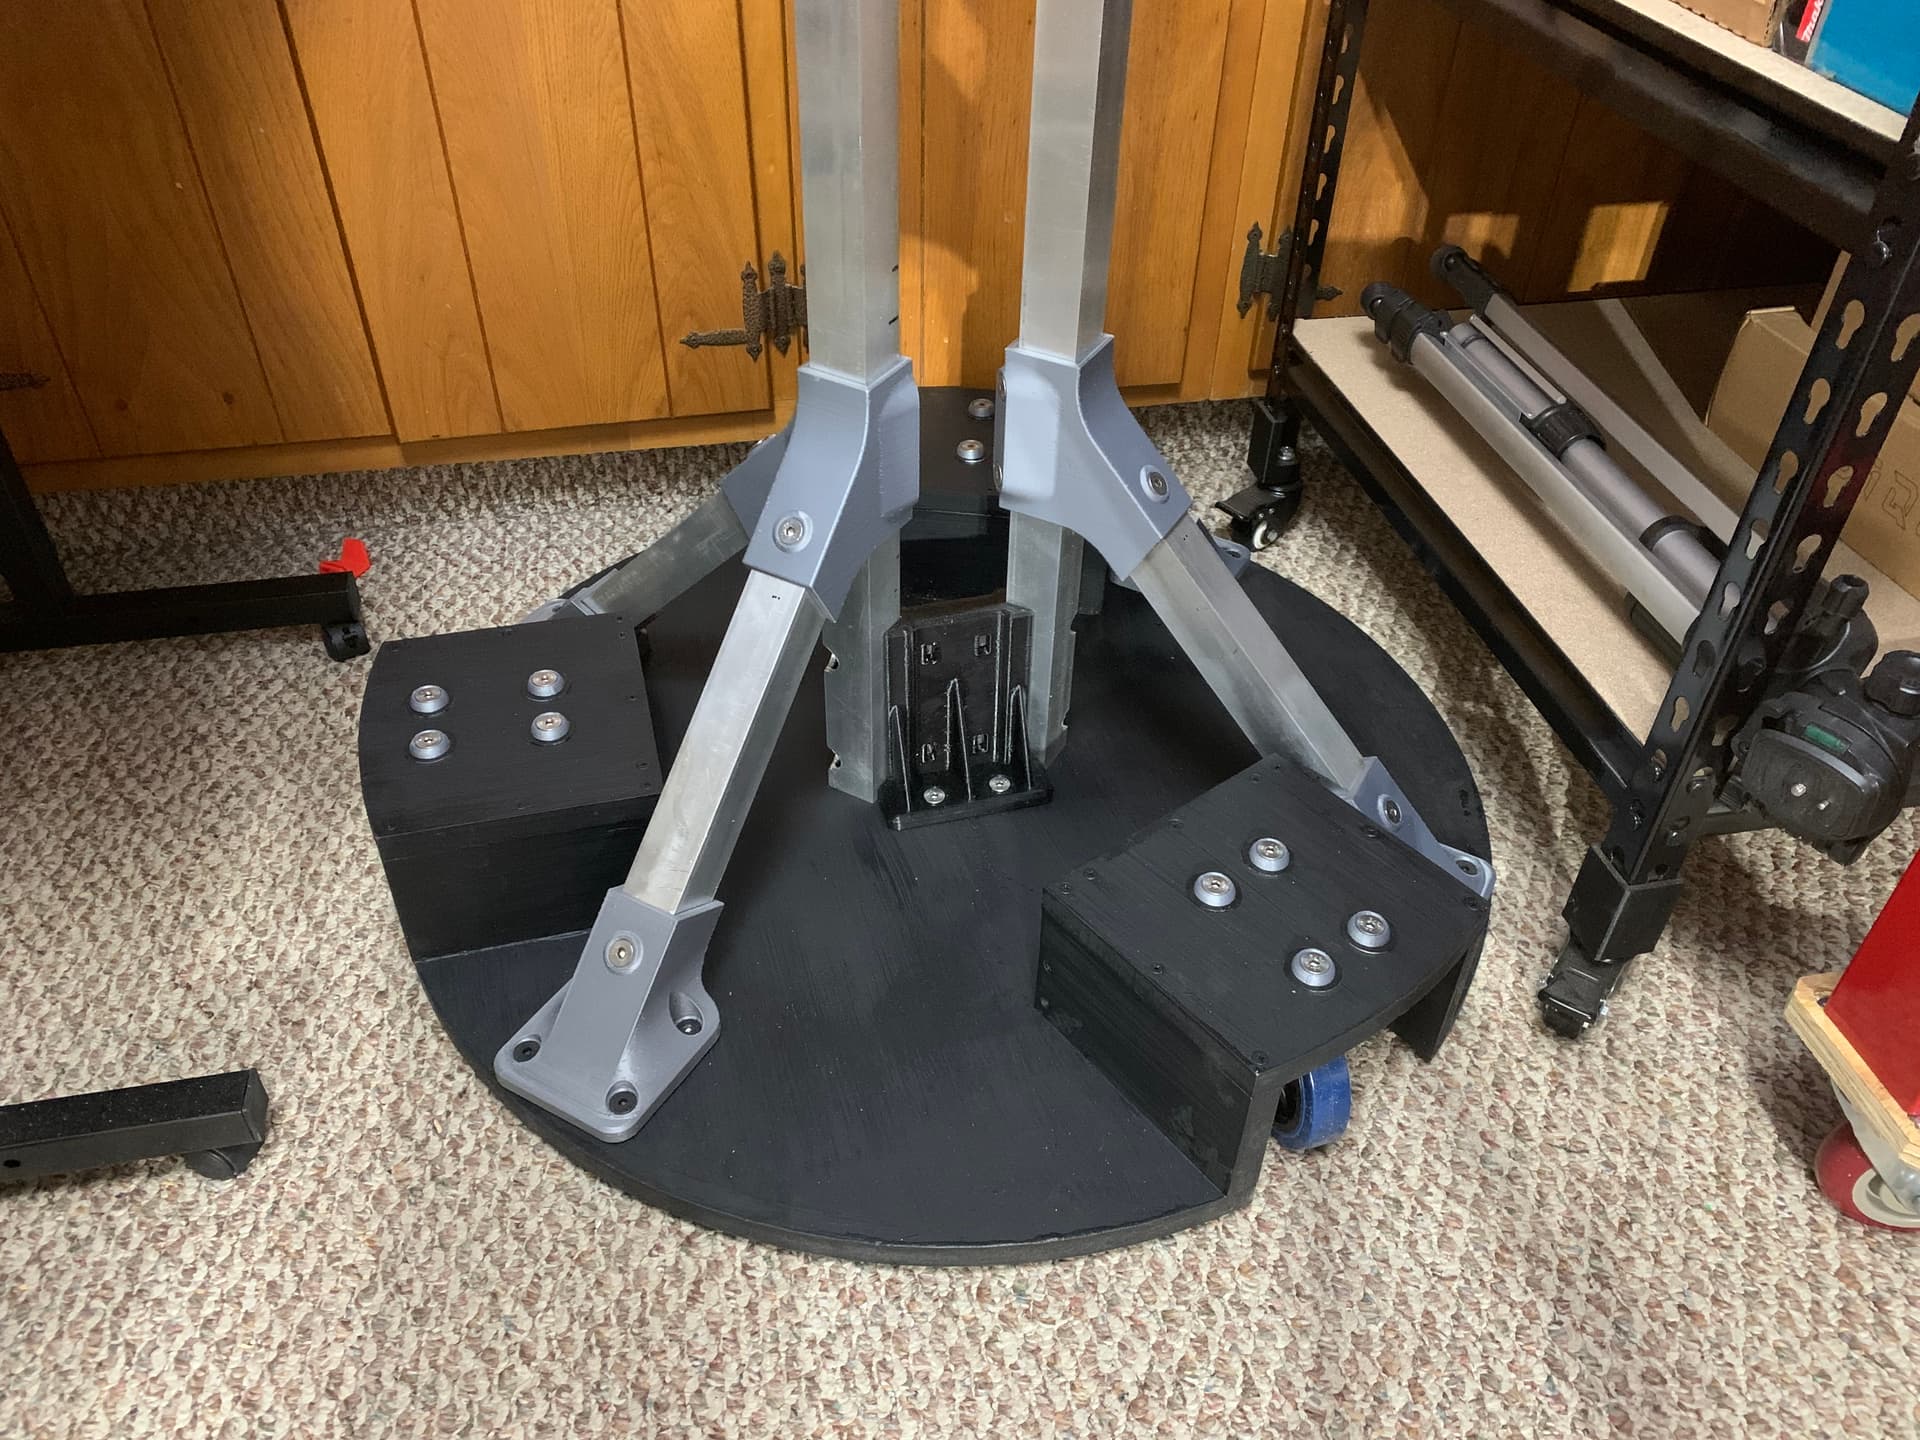
This one is a rolling base for a camera arm that I built out of aluminum square tubes and 3D-printed parts (my own modifications were made to original plan by Alexandre Chappel). The MDF base is shown here after it’s been painted. I still have yet to install the base-ballast weights I created, as well as the vertical weight that counterbalances the main arm. I have almost all the parts ready to go, except one more 3D-printed part that needs a design tweak, and the metal round bar I am planning for the vertical weight, has yet to arrive (is late but they say it’s on the way).
This is a 2-sided board for a fun, popular game. It has my own adaption and design tweaks. One side is for 6-players, and the other side is for 4 players. I plan on selling these (as many as I can) as a fundraiser. This one has not yet been painted with the “player” colors in key spots, and it has not yet been sealed (to be done with oil-based poly), but I positioned the color-coded dice and marbles to illustrate.
The “divots” for the marbles were machined with this “cove box” router bit (7/8"): https://amzn.to/3pvvArW
The design accents were cut with this 1/8" 2-flute up-cut end mill bit: https://amzn.to/3sCDqSO
The profiles were through-cut with this 1/4" 2-flute up-cut bit: Amazon.com
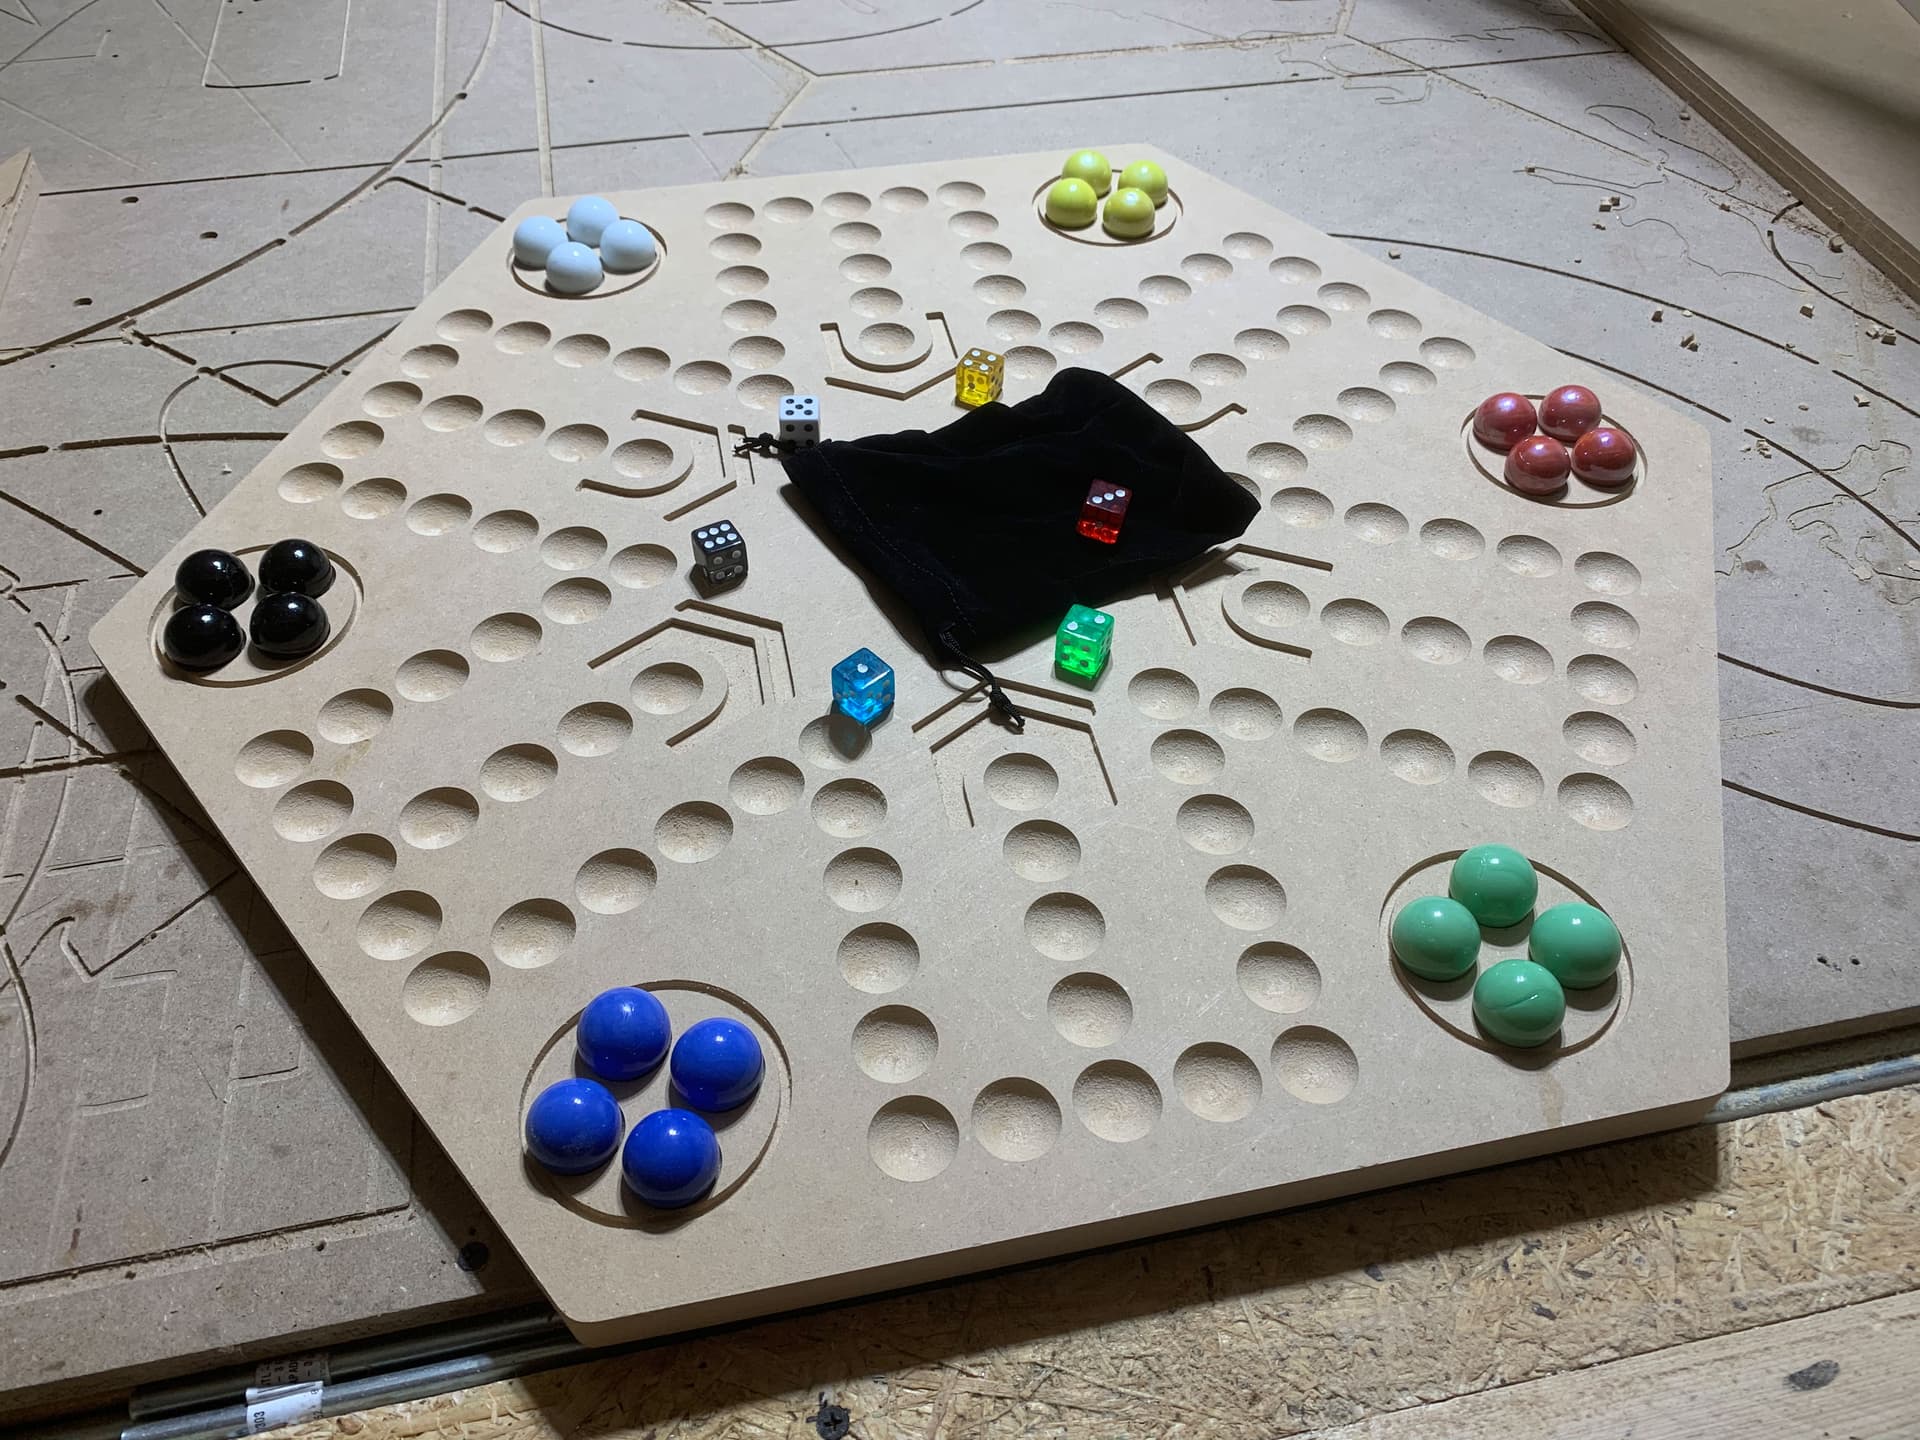
Note: urls are affiliate links.
4 Likes
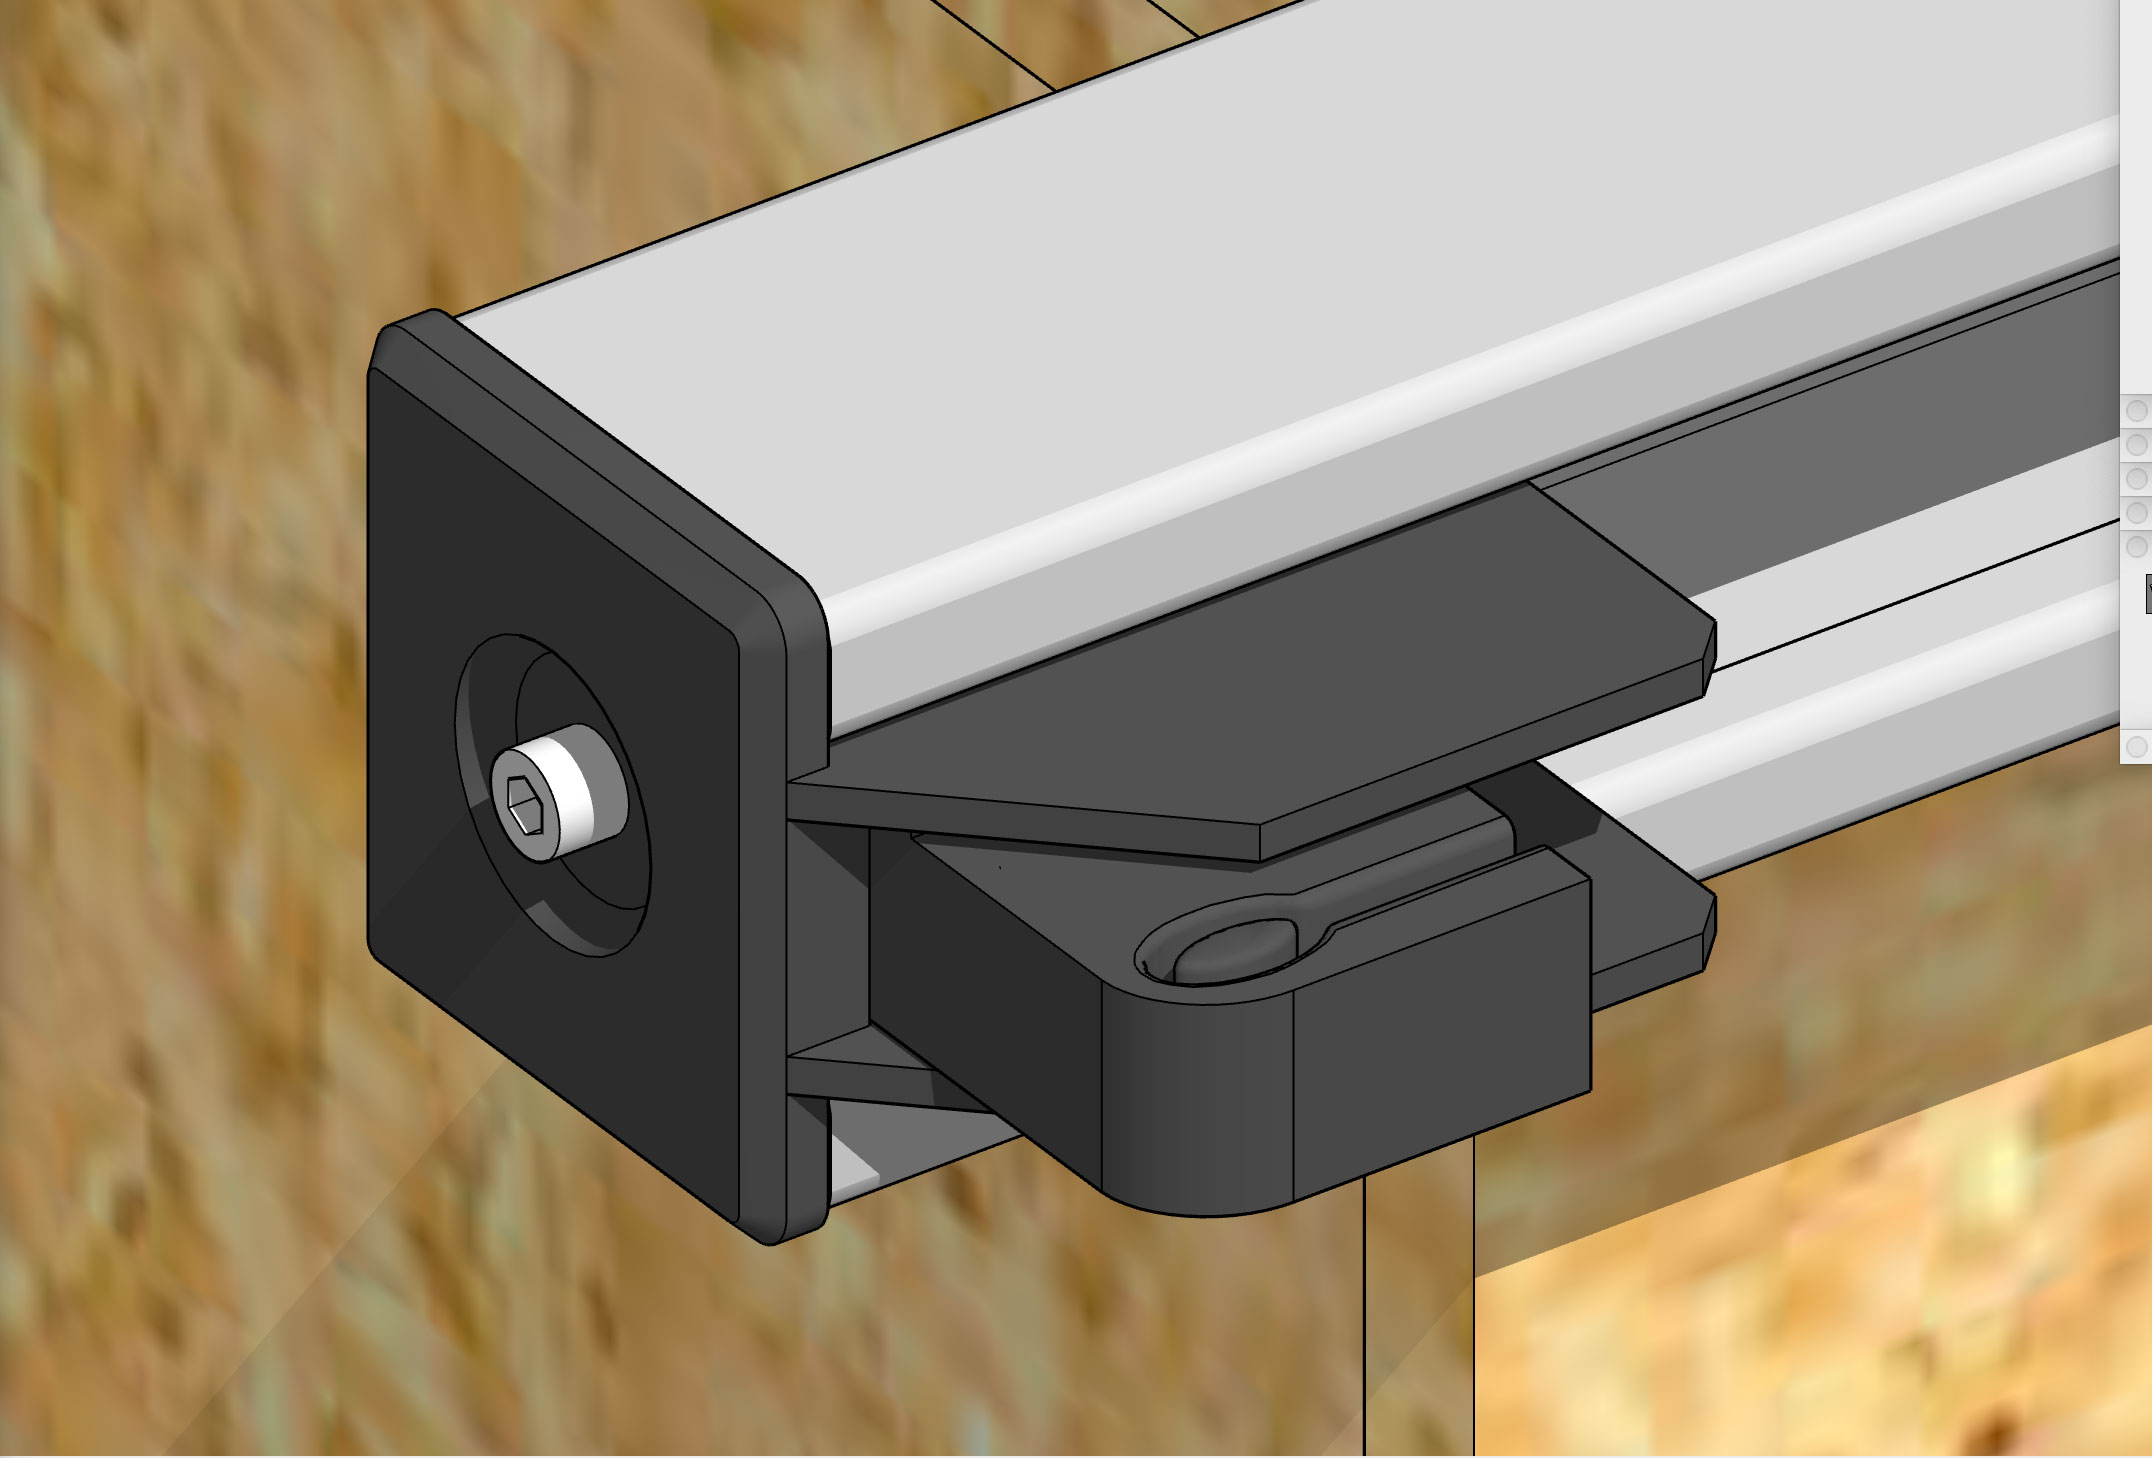
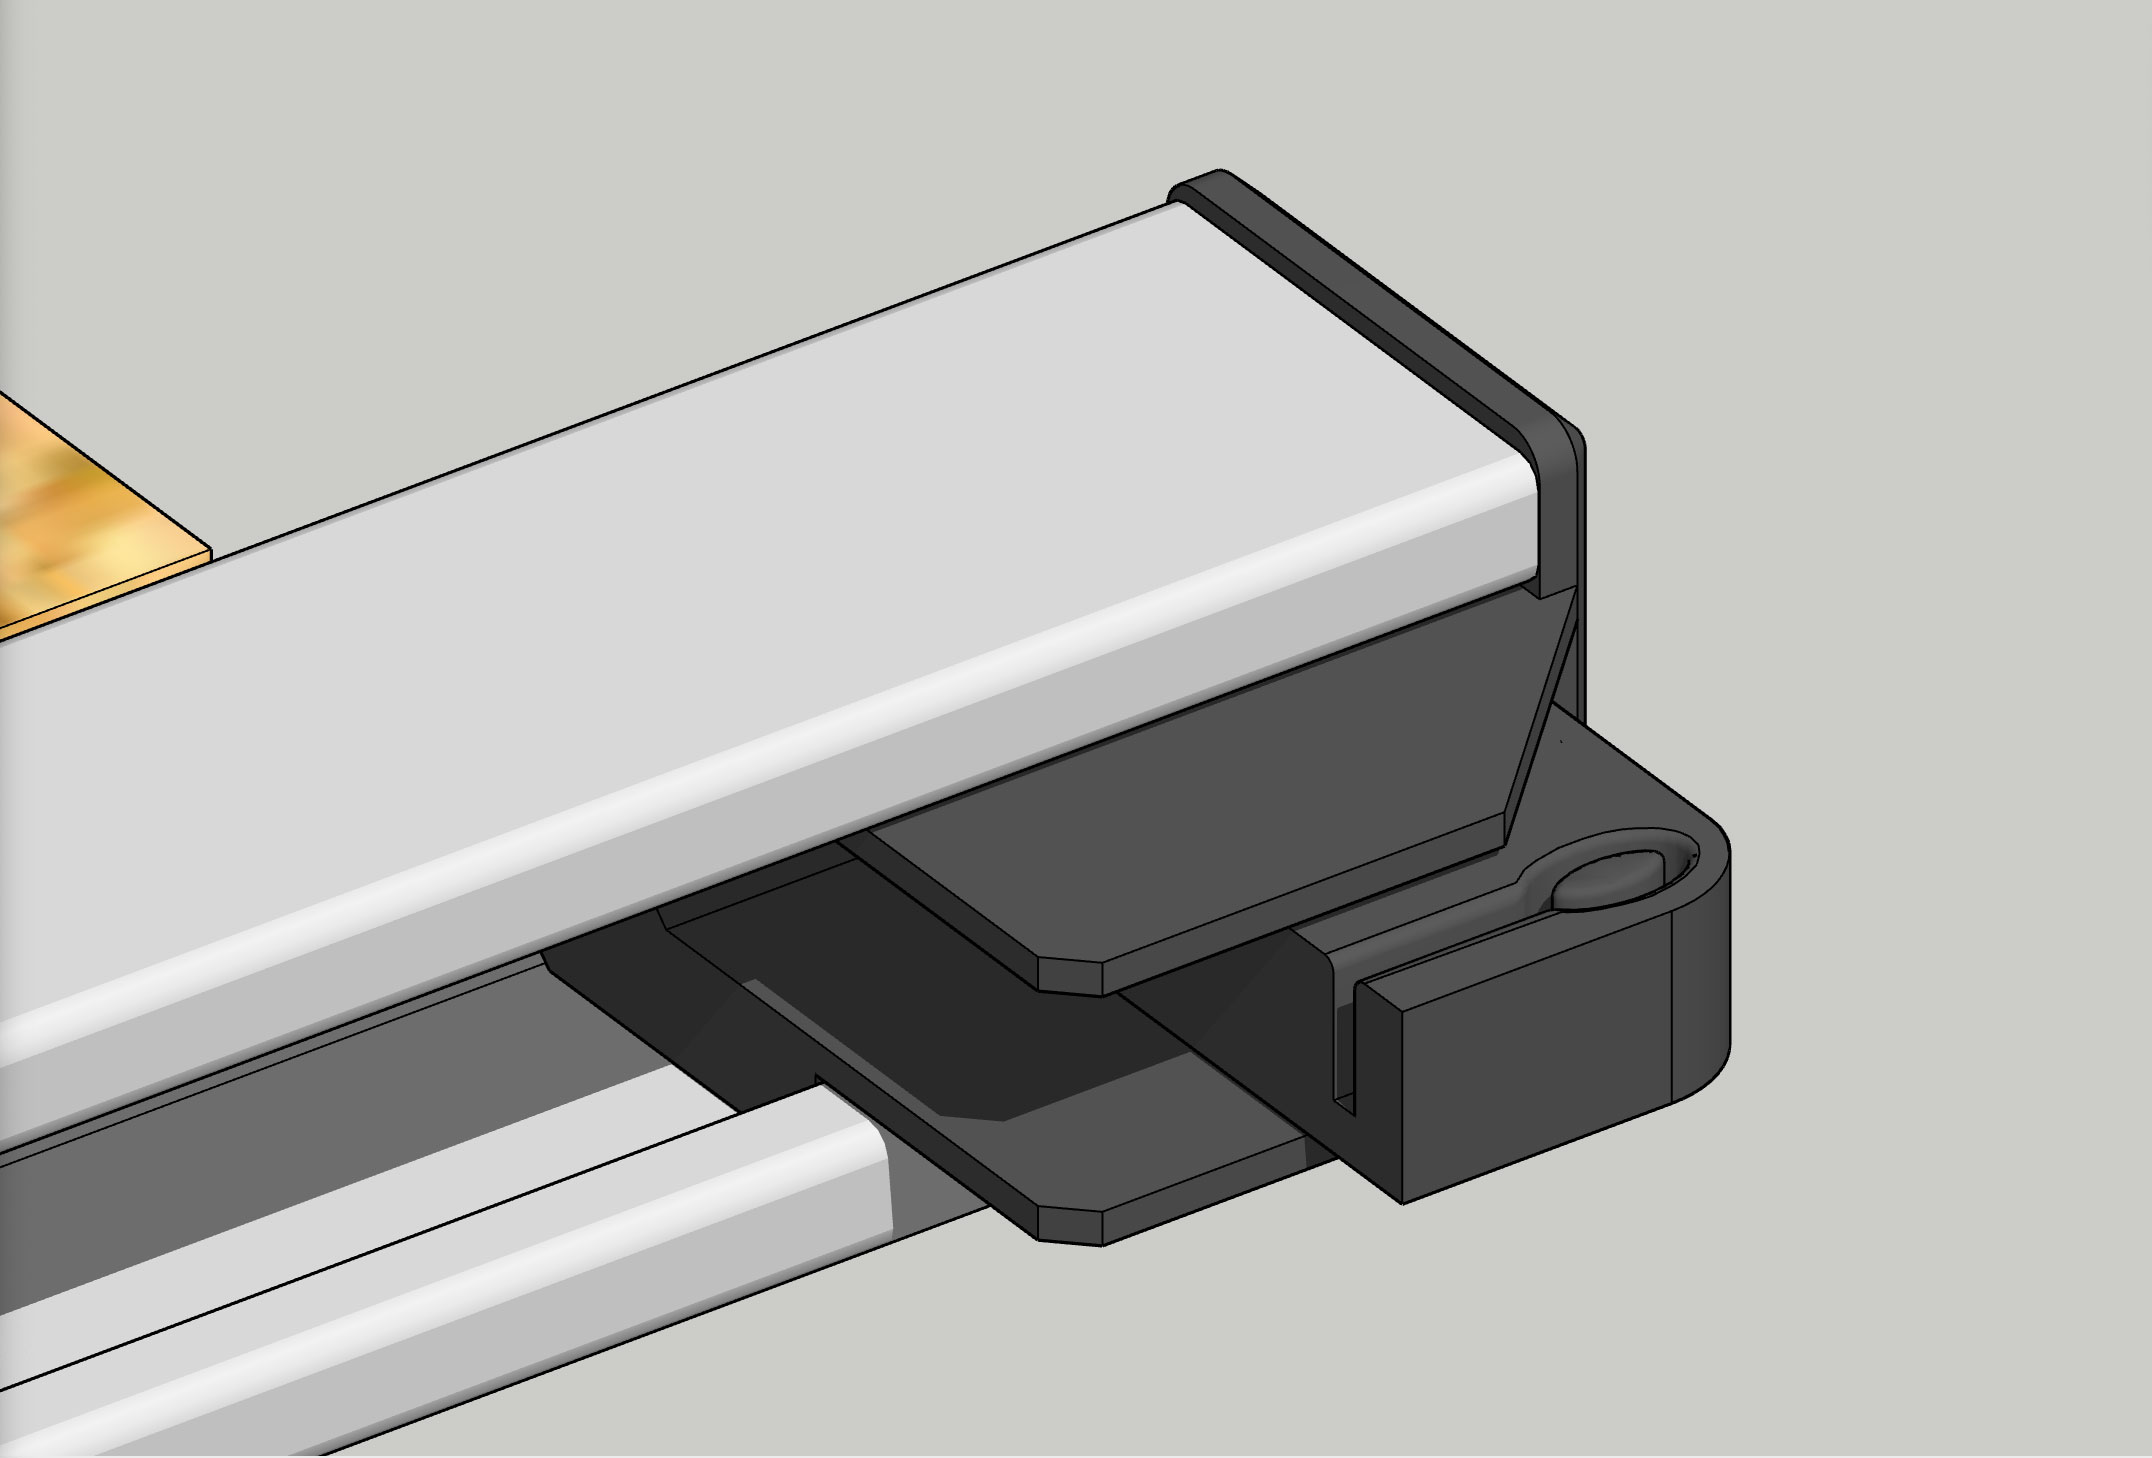
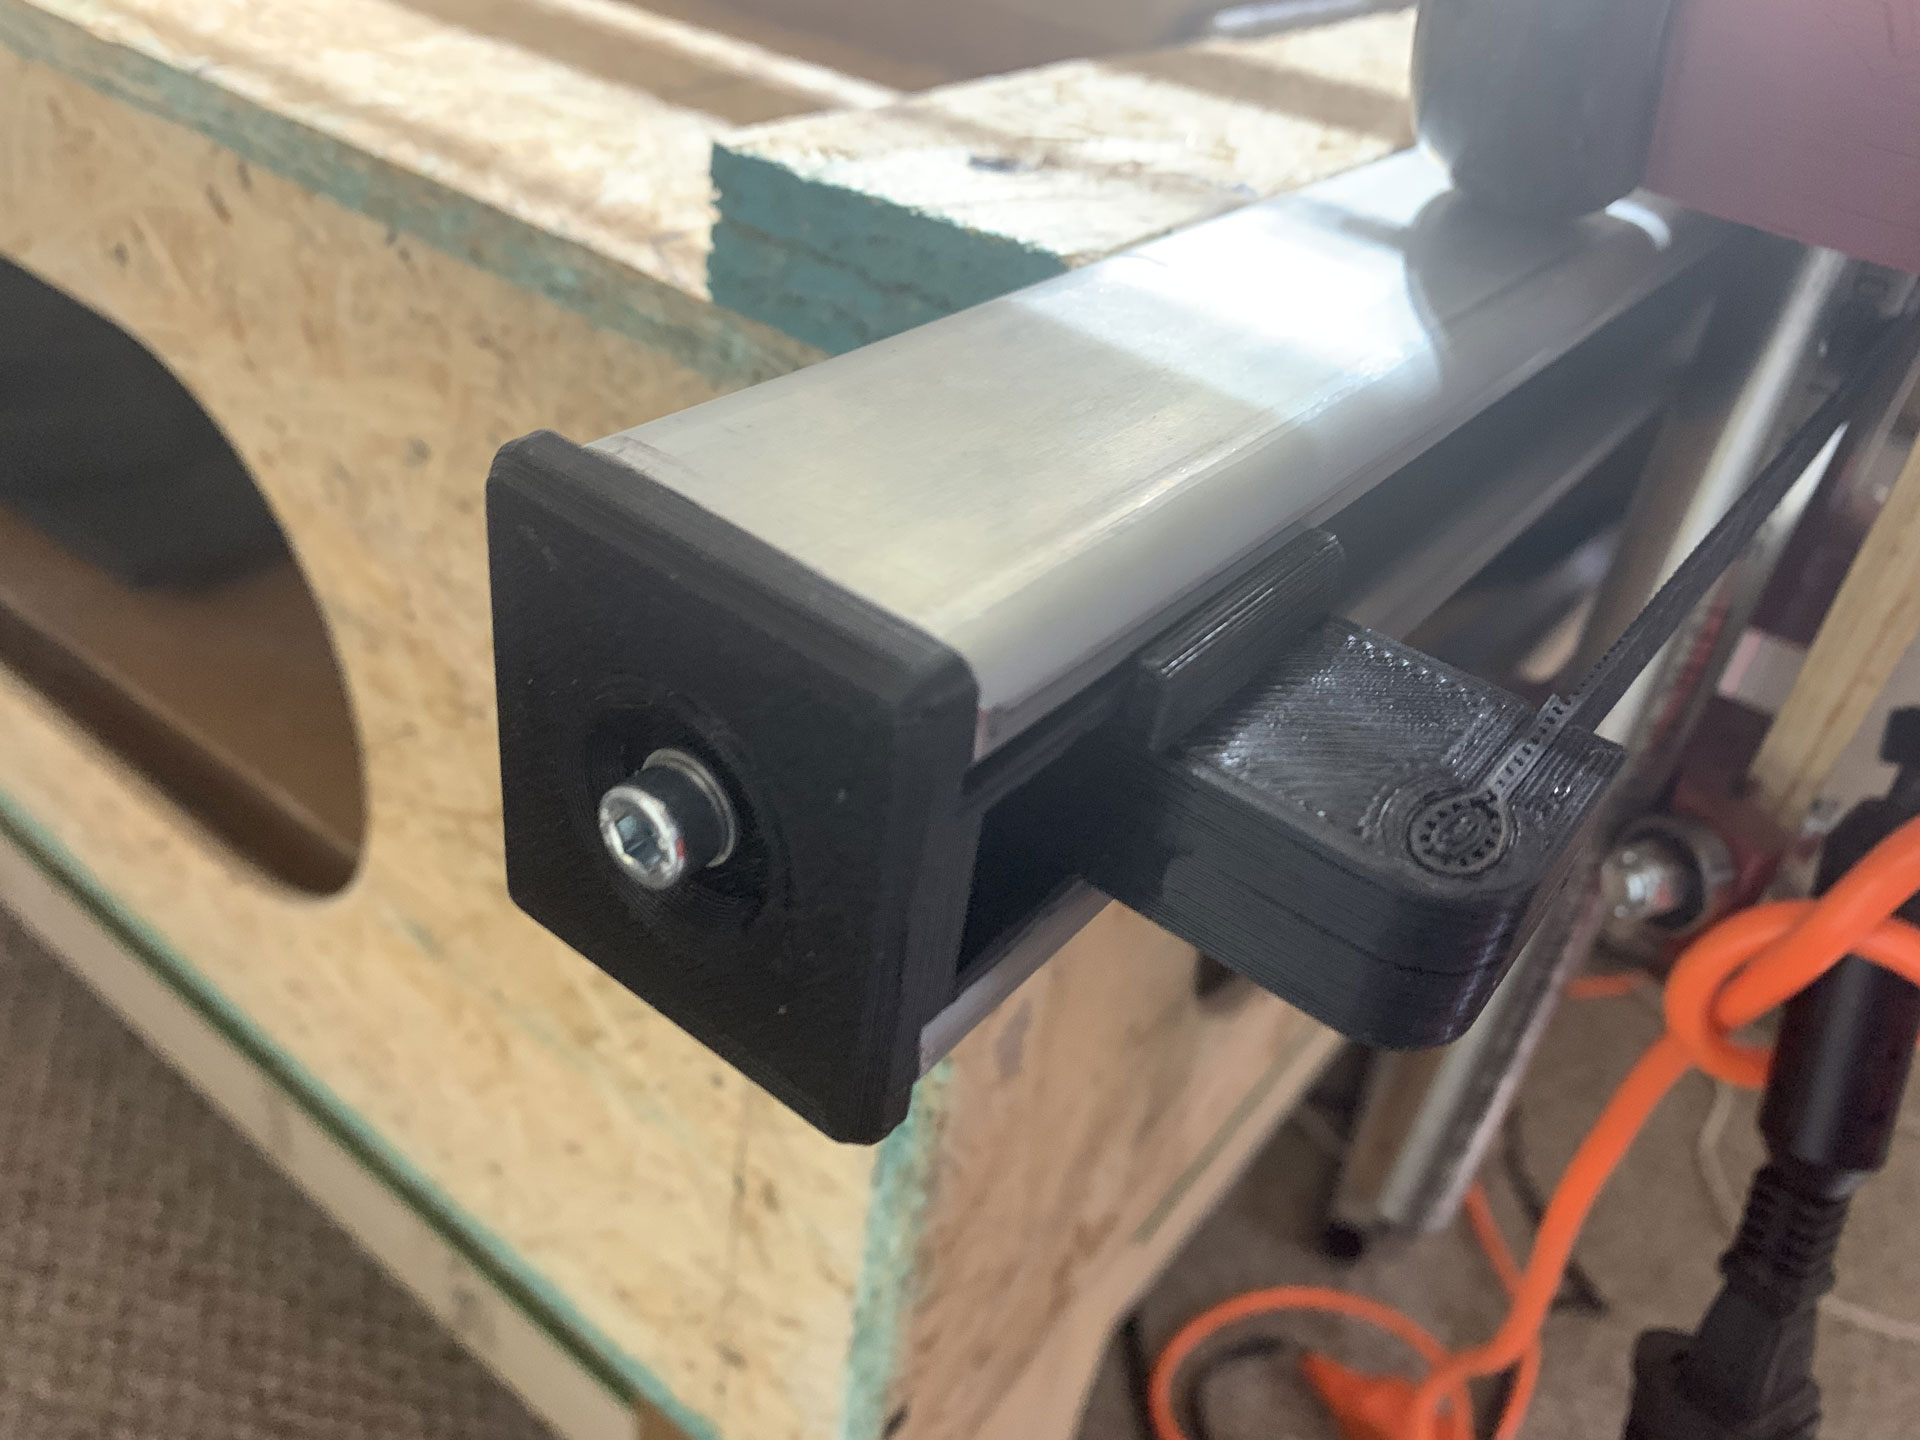
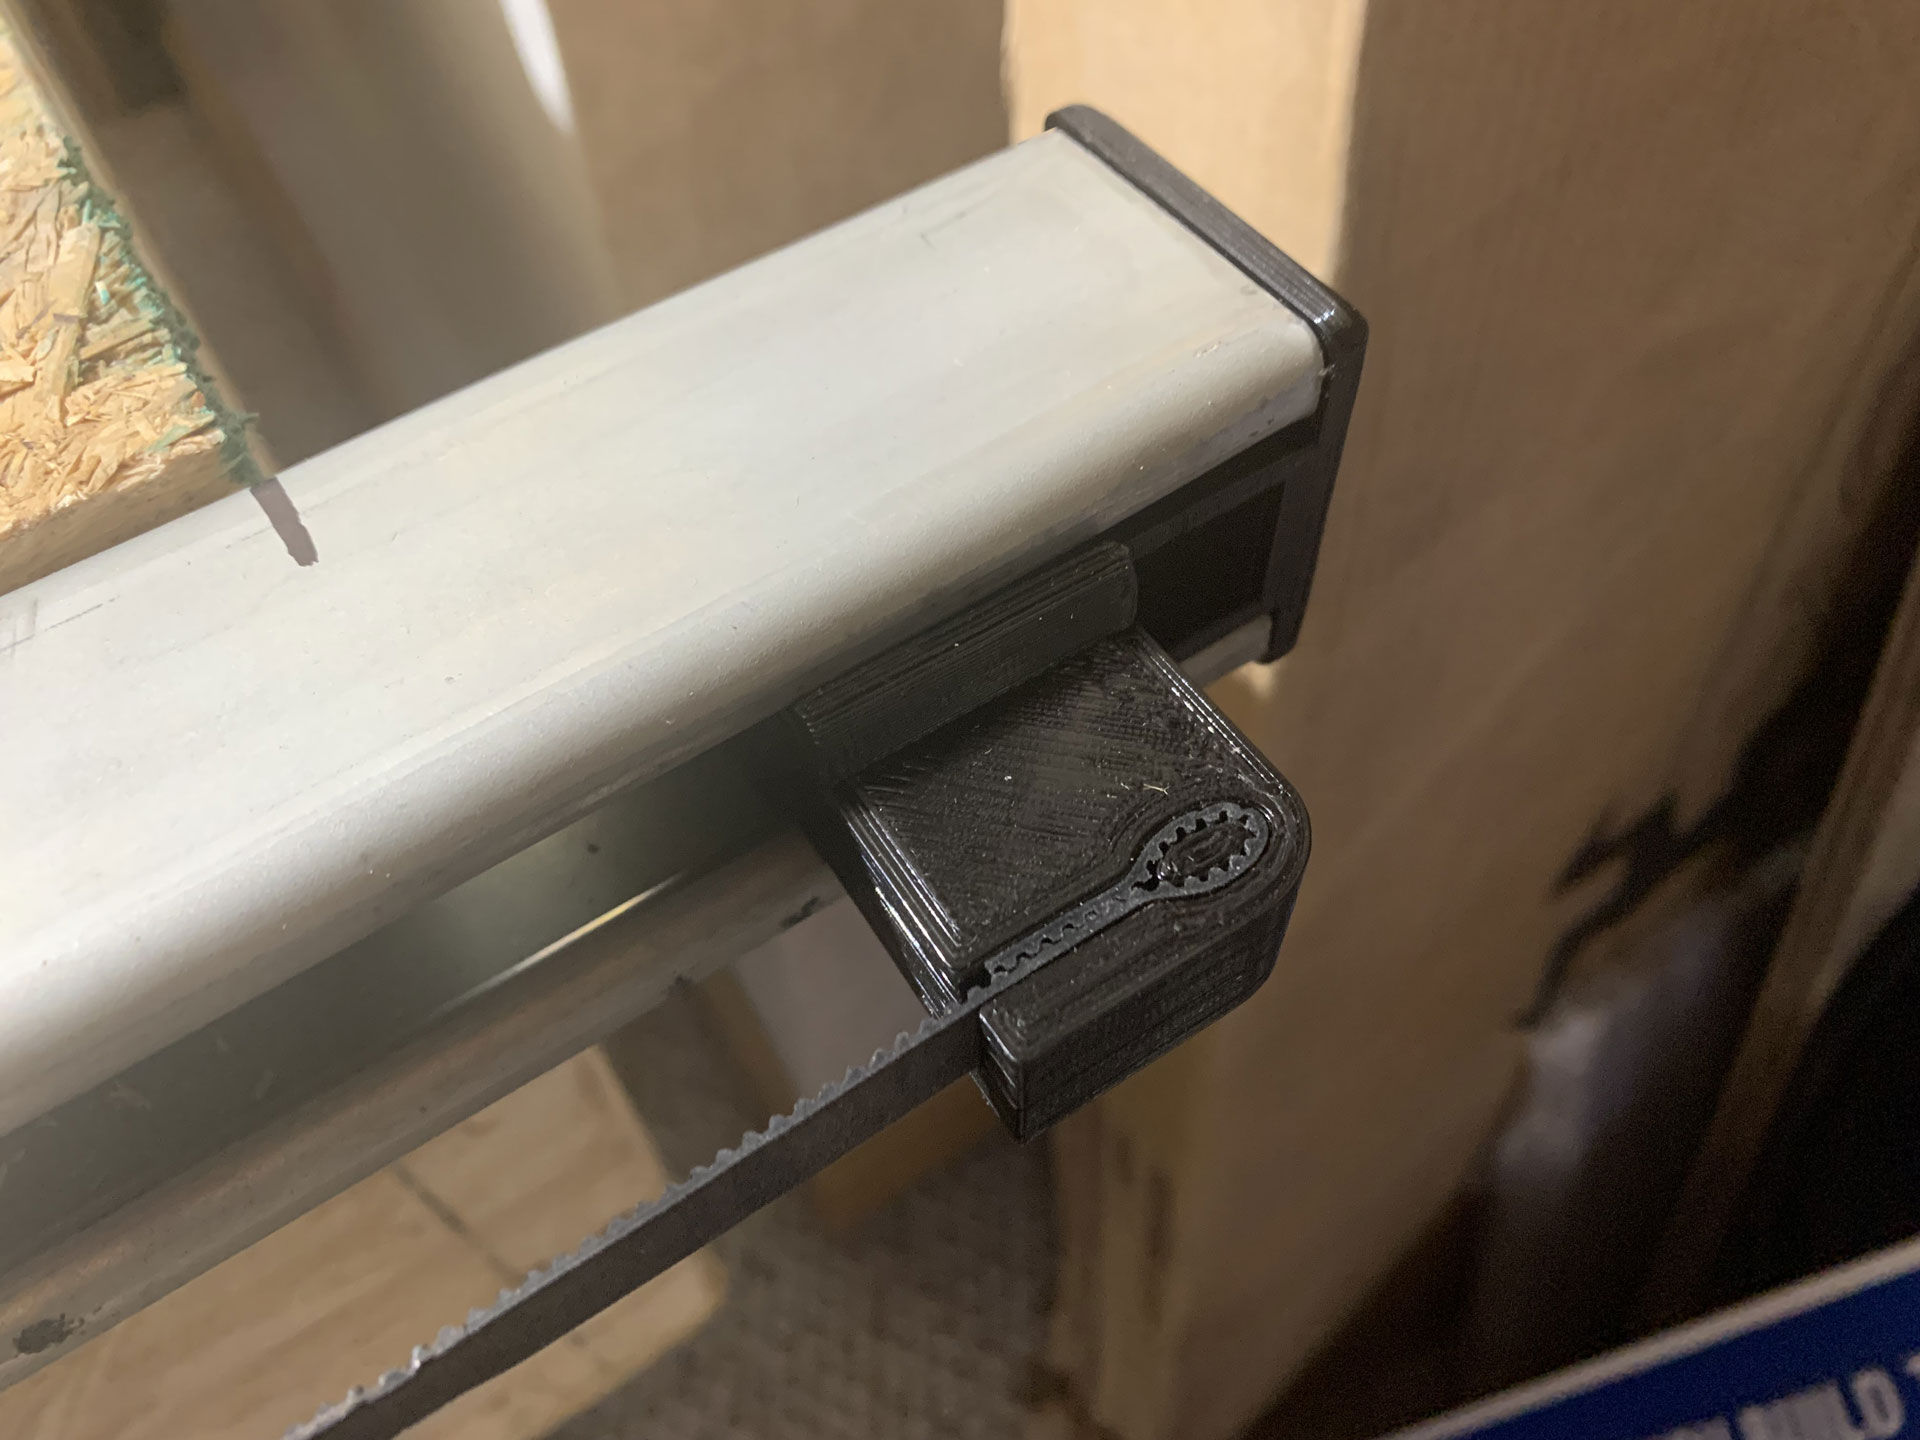
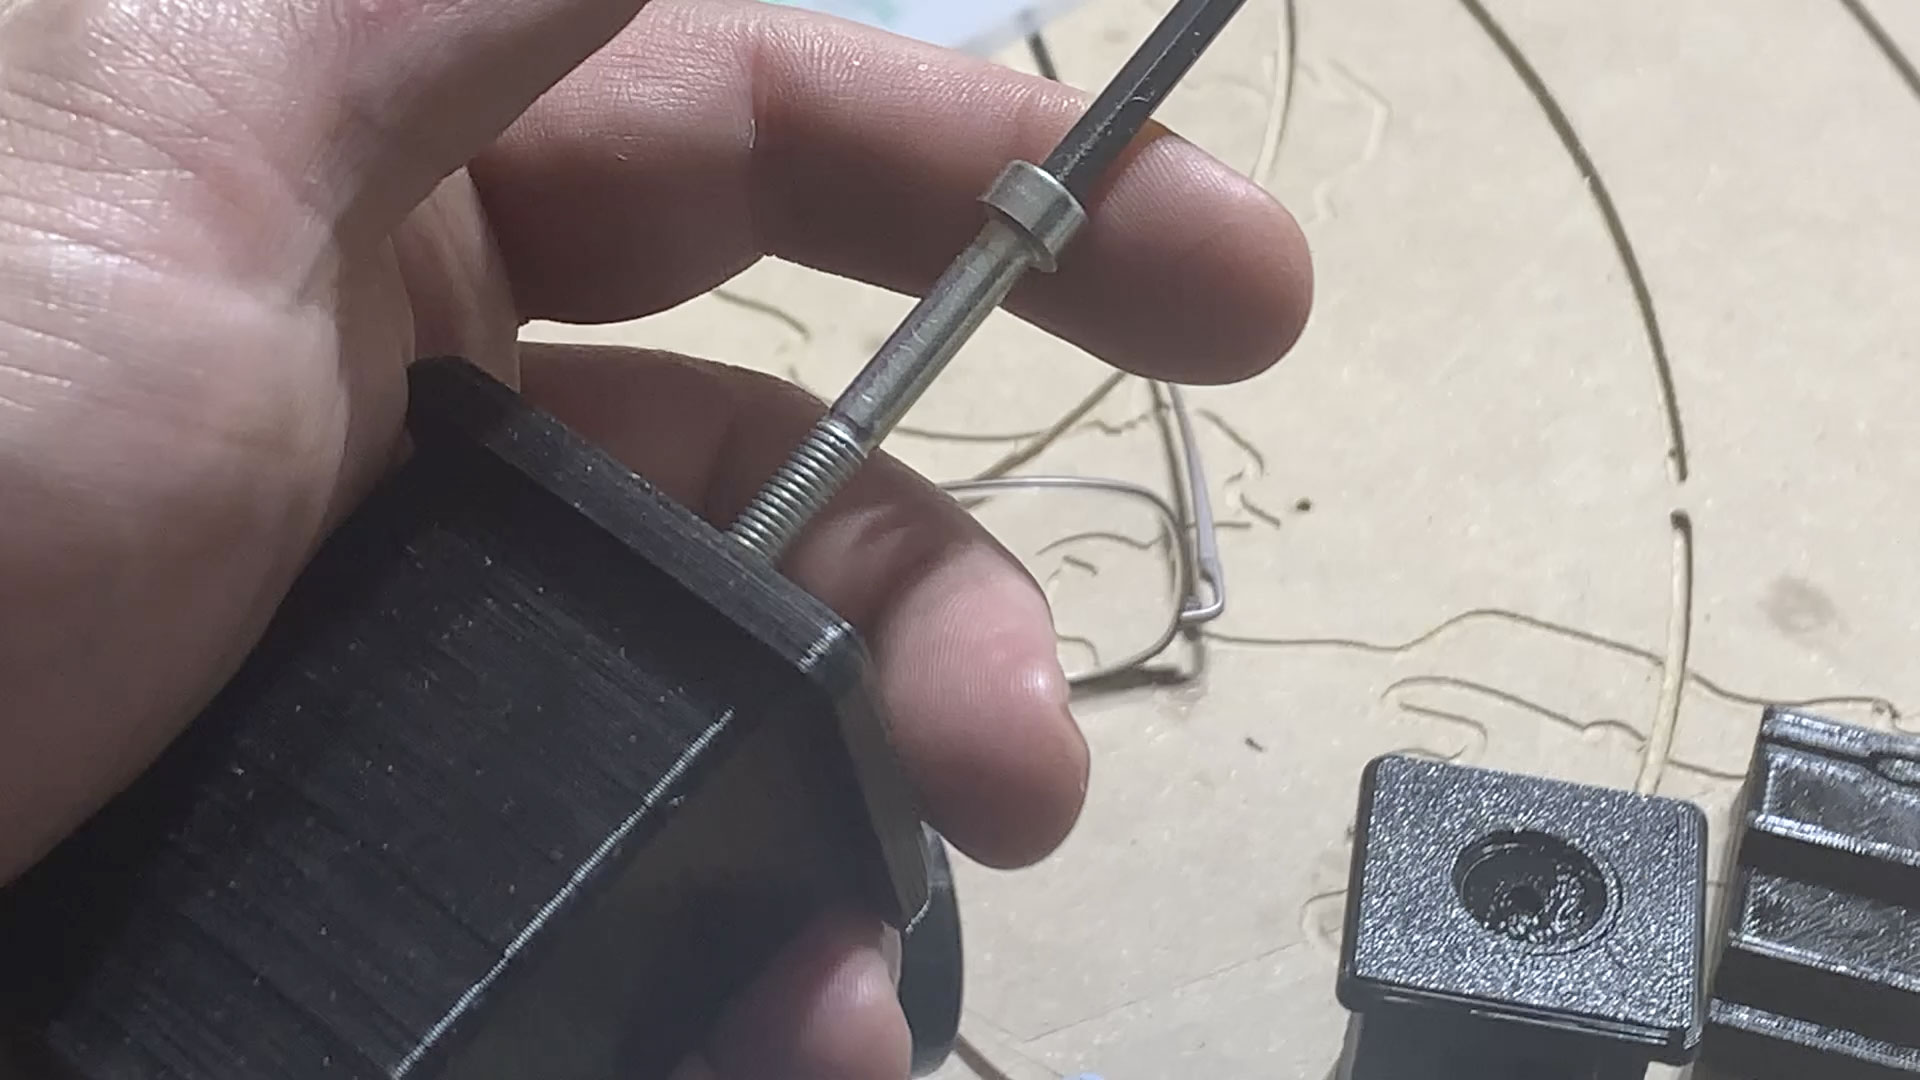
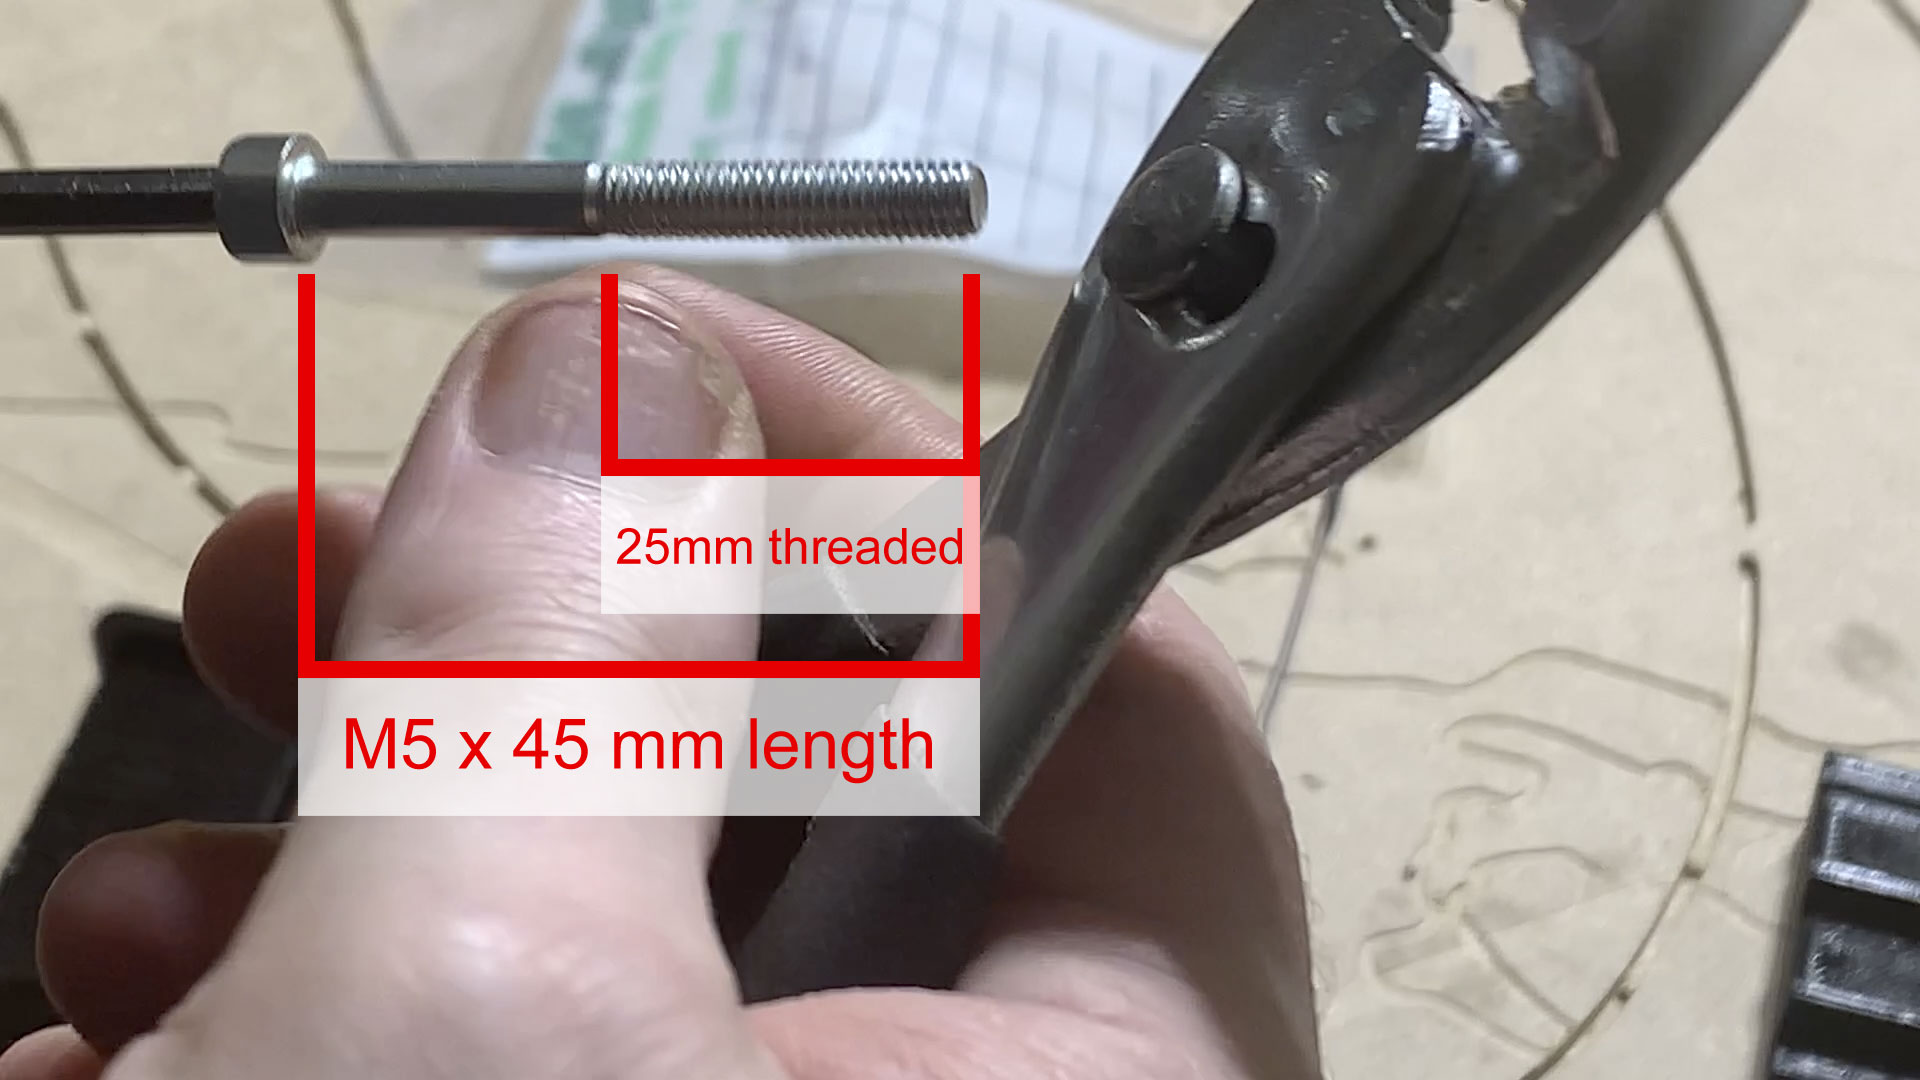
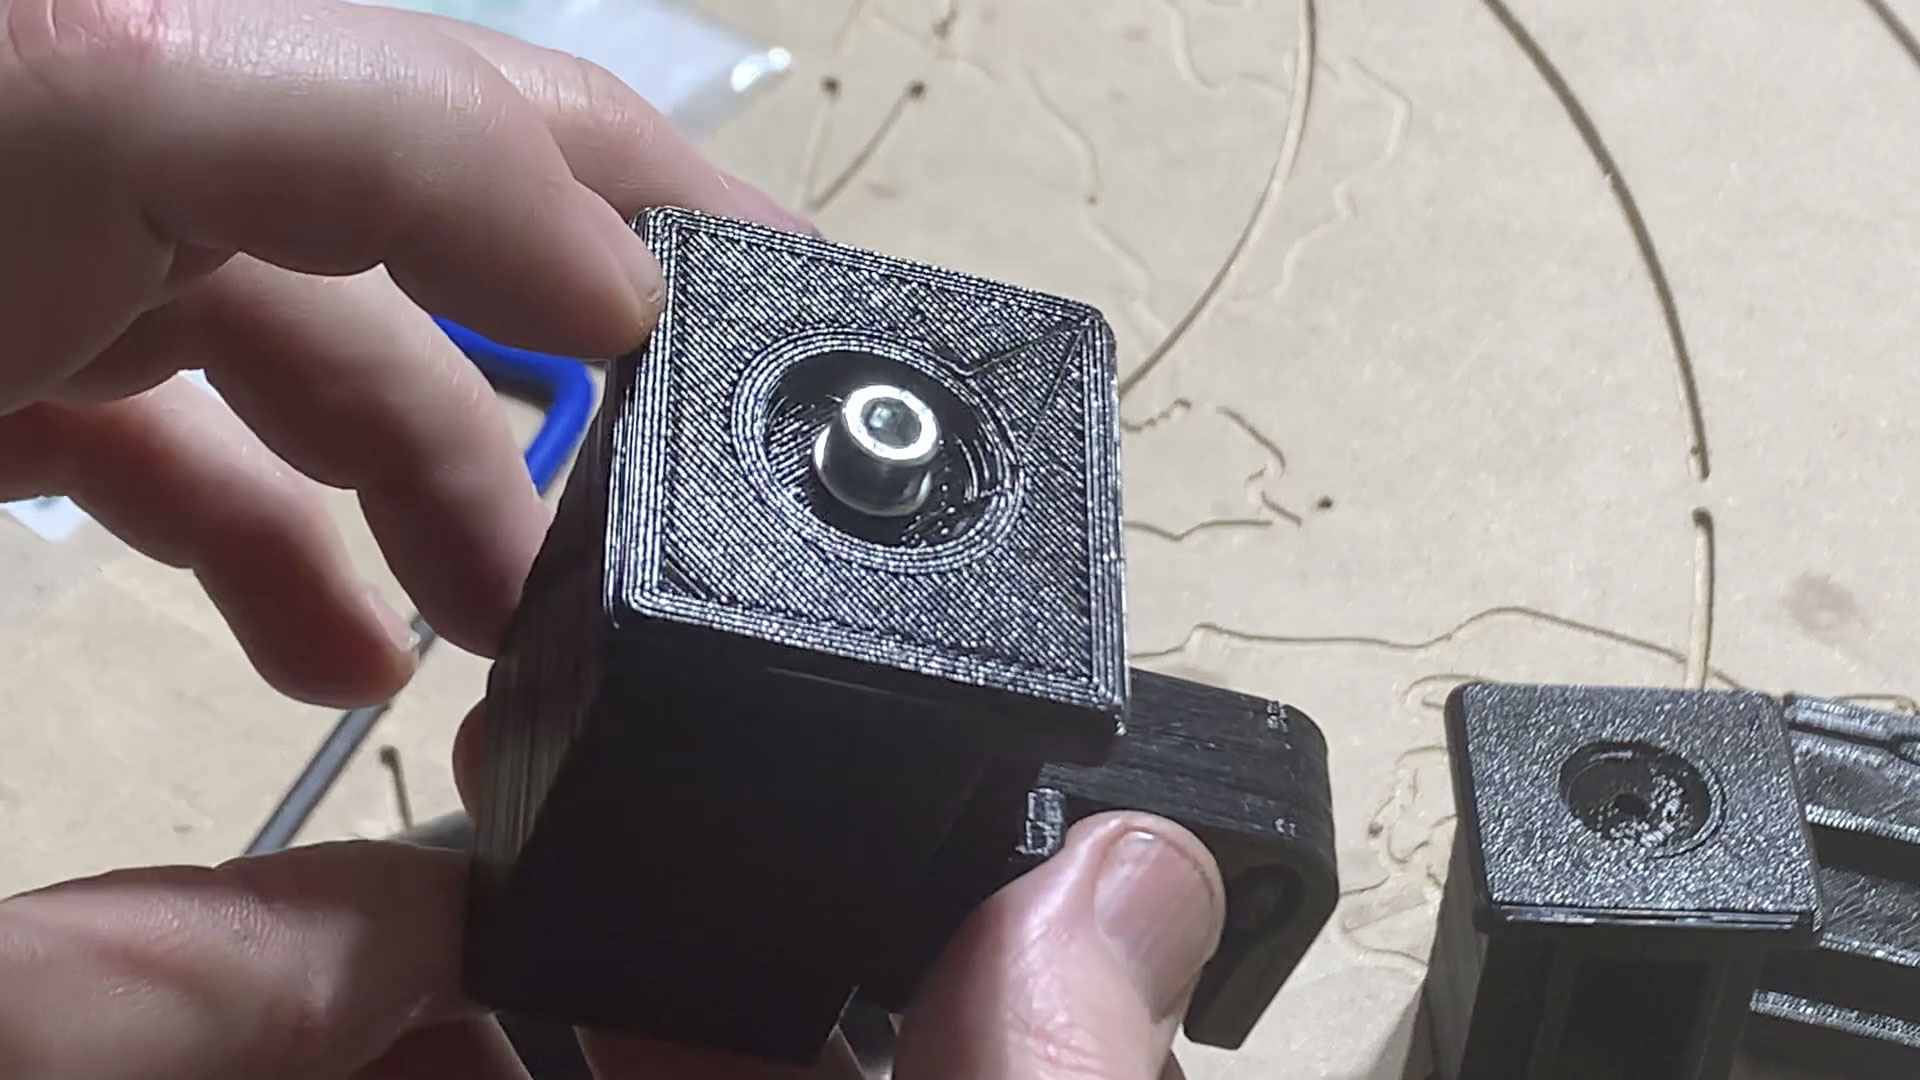
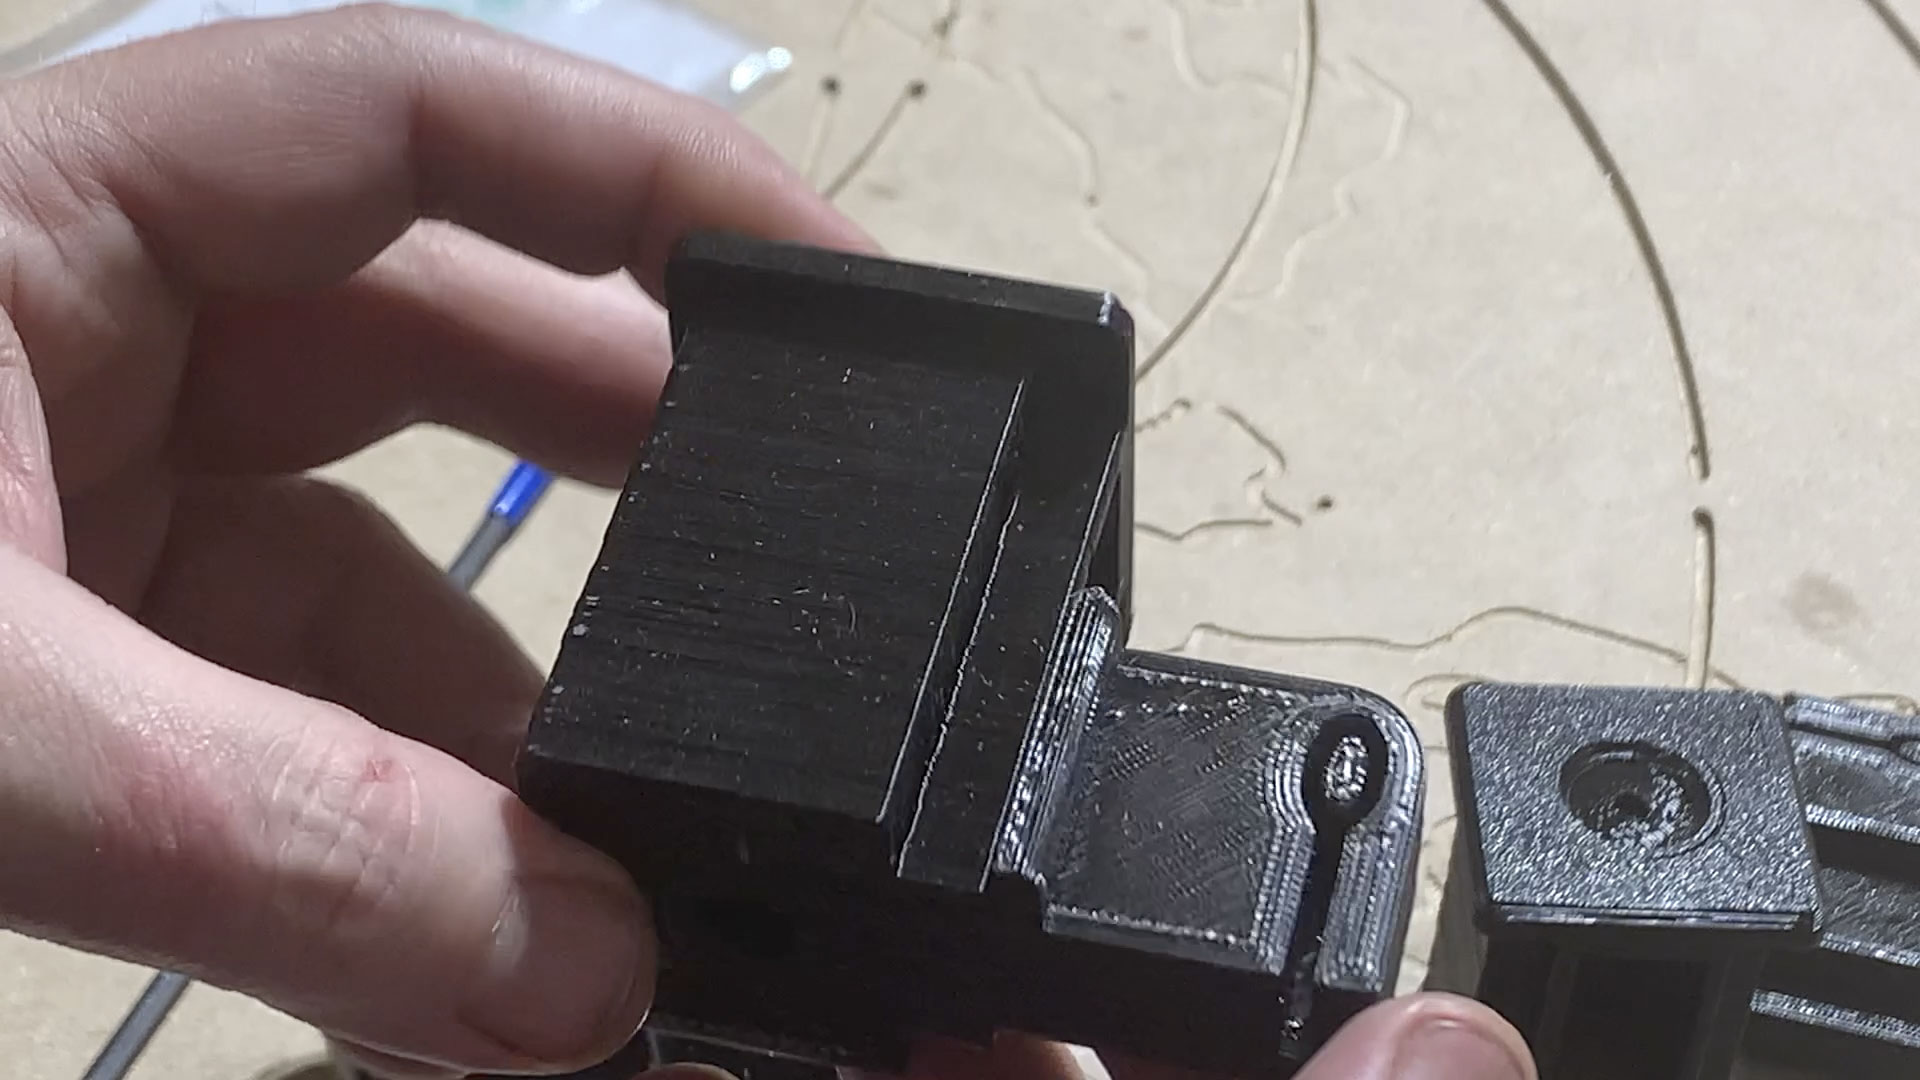
OK! I finally upgraded my LowRider 2 MPCNC from wooden side rails to the Superstrut metal rails I have had laying here for the longest time.
Through the V1 Engineering Forum I had found some awesome “endcap + belt tensioners” by pilotkip, however, I also wanted the “Primo” CNC style method of attaching the belts.
So I remixed “LowRider2 CNC ‘Primo’ Style Belt Stops” by cows2computers July 26, 2020 together with “LowRider2 Superstrut Belt Holders” by pilotkip October 30, 2021, along with some design innovation of my own.
These are made for M5 x 45mm screws and M5 locknuts. The screws should have at least 25 mm worth of threads. When they do, you gain the max of 2cm of adjustment range on either side, for a total of 4cm worth of tensioning available.
I have my printers setup so my 0.4 nozzles emulate 0.6 nozzles in output, so when I printed these with 3 (extra thick) walls (and at 30% infill) it was really like printing with 4.5 walls. These are good and solid.
These are designed to print without supports. Please note that the one screw hole on each “end cap” has a single-layer thick “sacrifice layer” across it to help the print go smoothly. You should be able to easily clear out that hole either with an Xacto knife, or by burning the hole open with a soldering iron, or even by using a drill & bit, though I recommend either of the first two methods over the latter.
STL files are published on Thingiverse:
Change log:
2022-03-14: tweaked an angle to make supportless printing work better. All four parts are affected (both parts and both mirrored versions).
2022-03-16 revised all four parts to allow the “end stop” feature to be fixed in place (not dependent on tensioner position). This is so that adjustments to amount of tension would not unintentionally change where the end stop happened.
Note: some of the installation pics were taken of a work-in-progress version that does match the latest improvements of the design. The 3D illustrations do match the latest improvements.
5 Likes
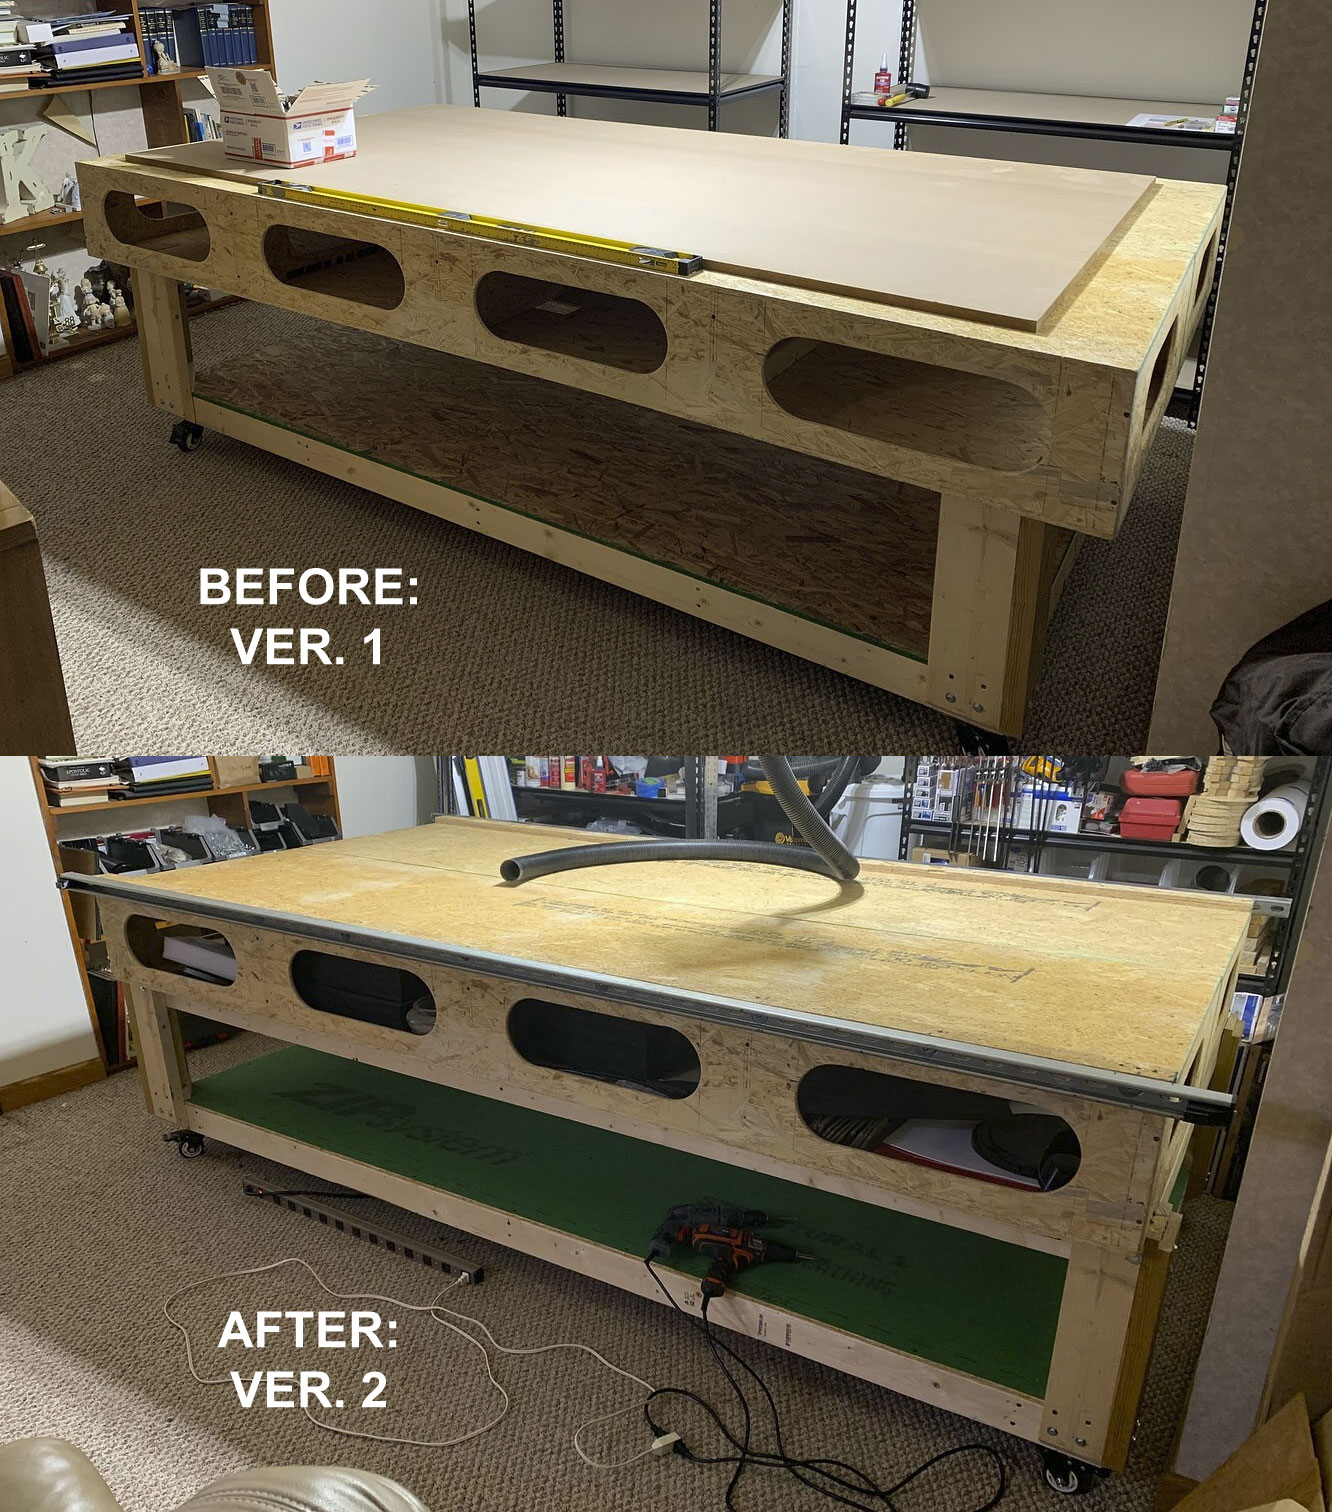
TABLE UPDATE
Above I mentioned both that my table had some issues of being “not flat” and that I also realized I should have made the bottom / leg / support area open enough to store some 4’x8’ sheet goods on it. Also I recently added metal Superstrut side rails with new tensioners/end stops.
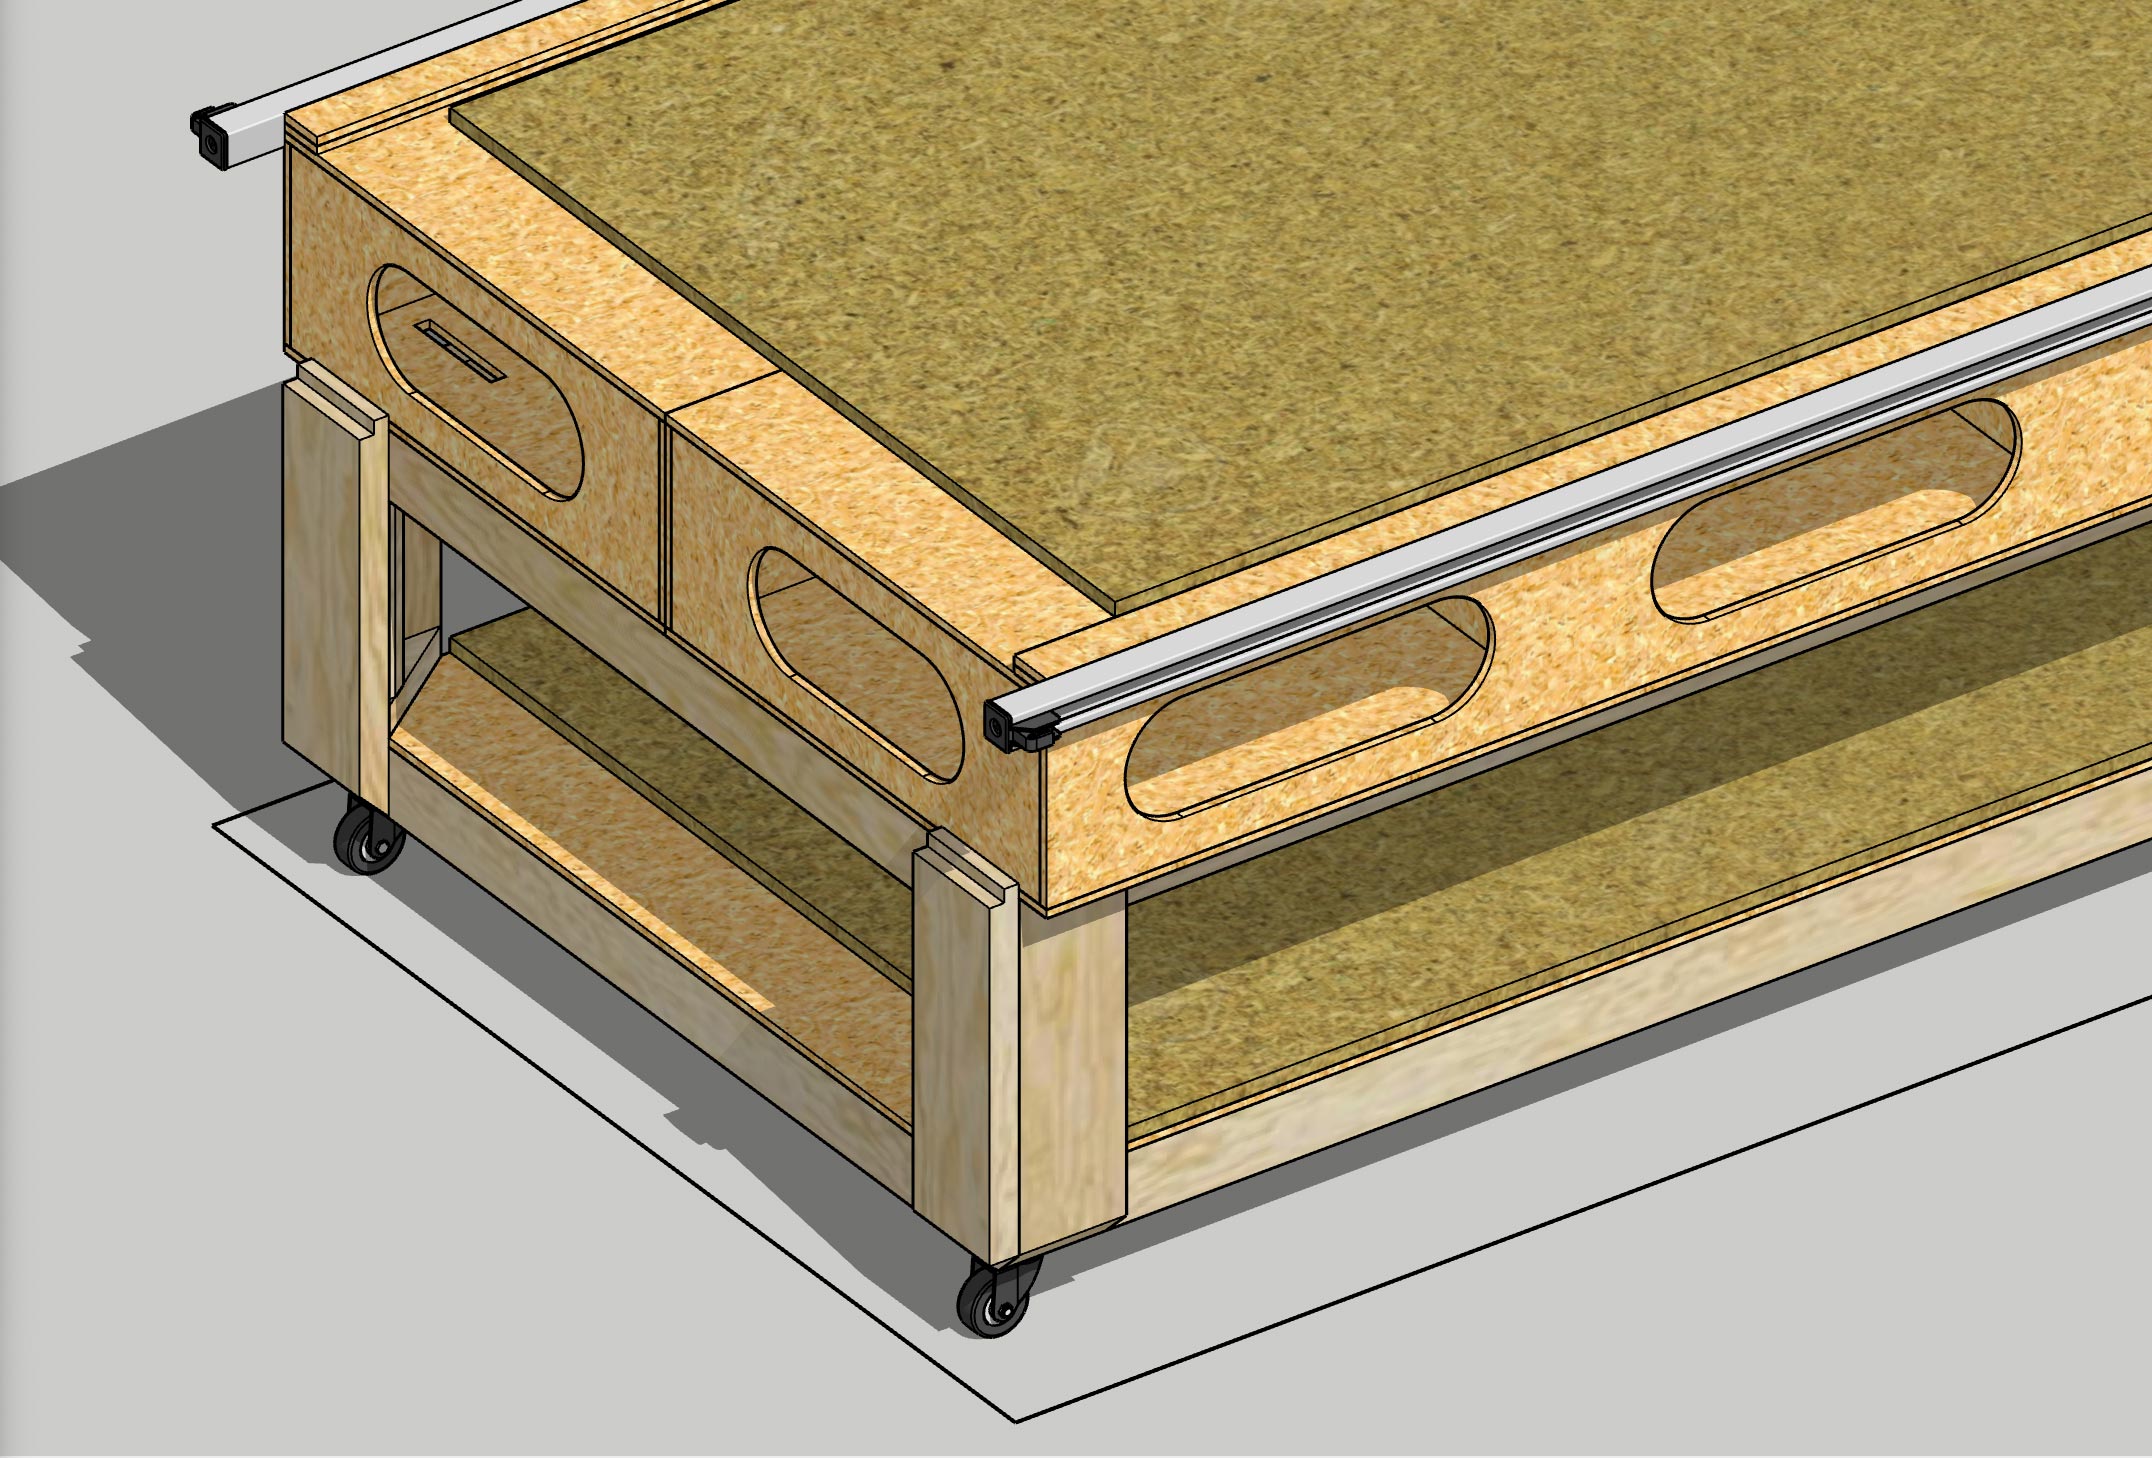
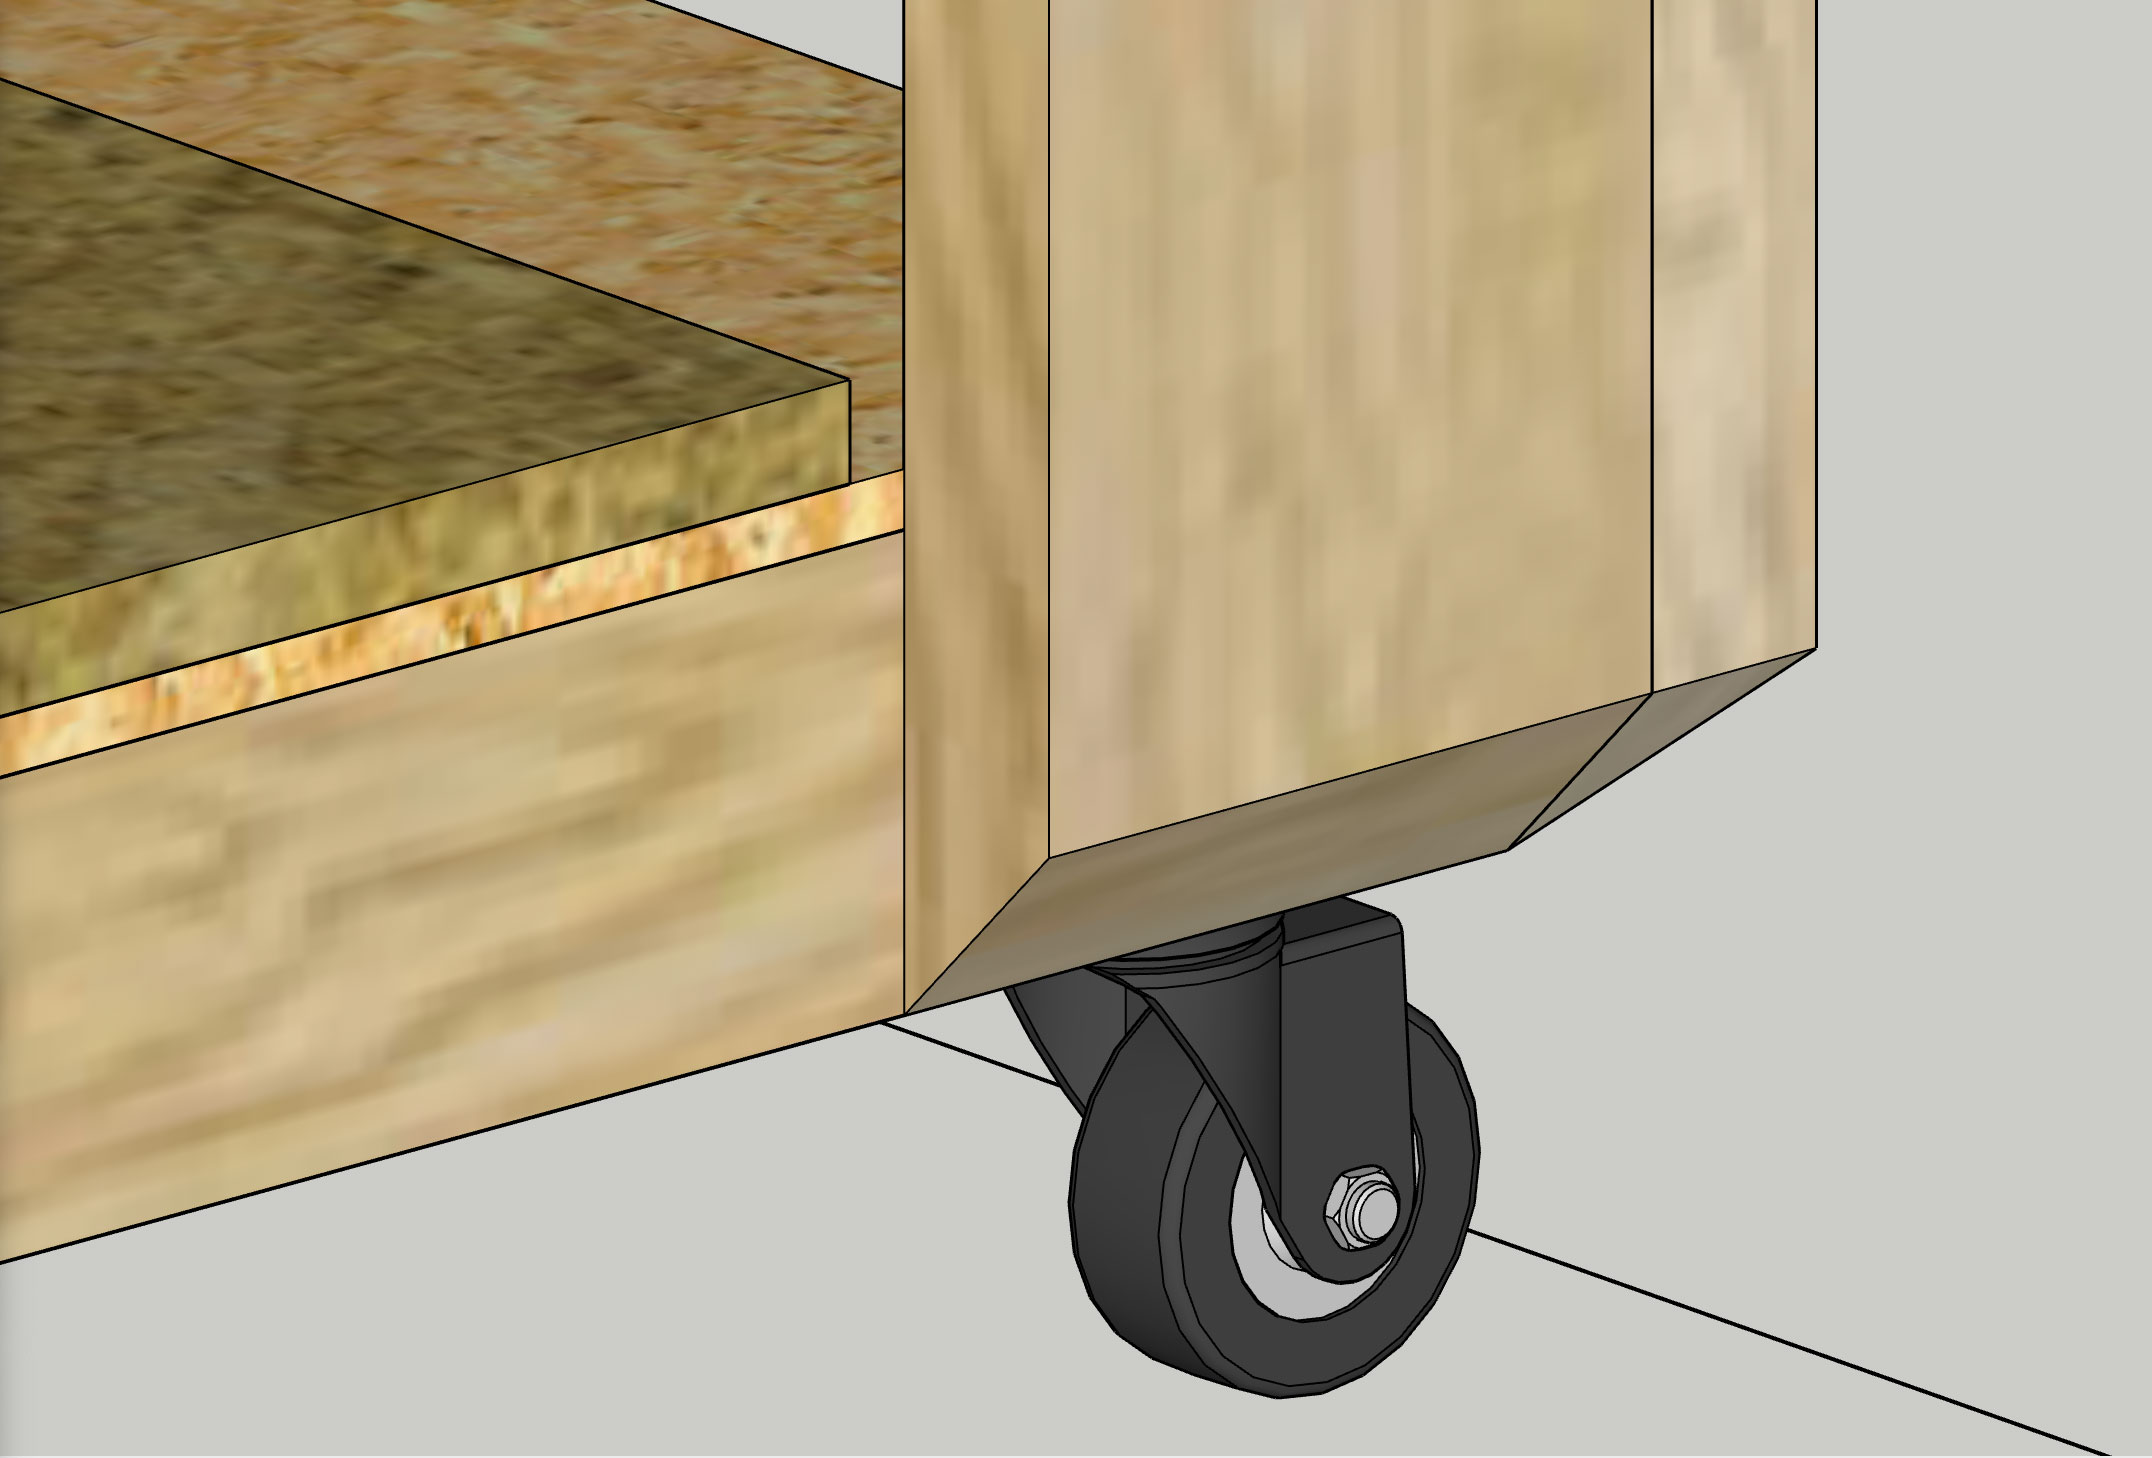
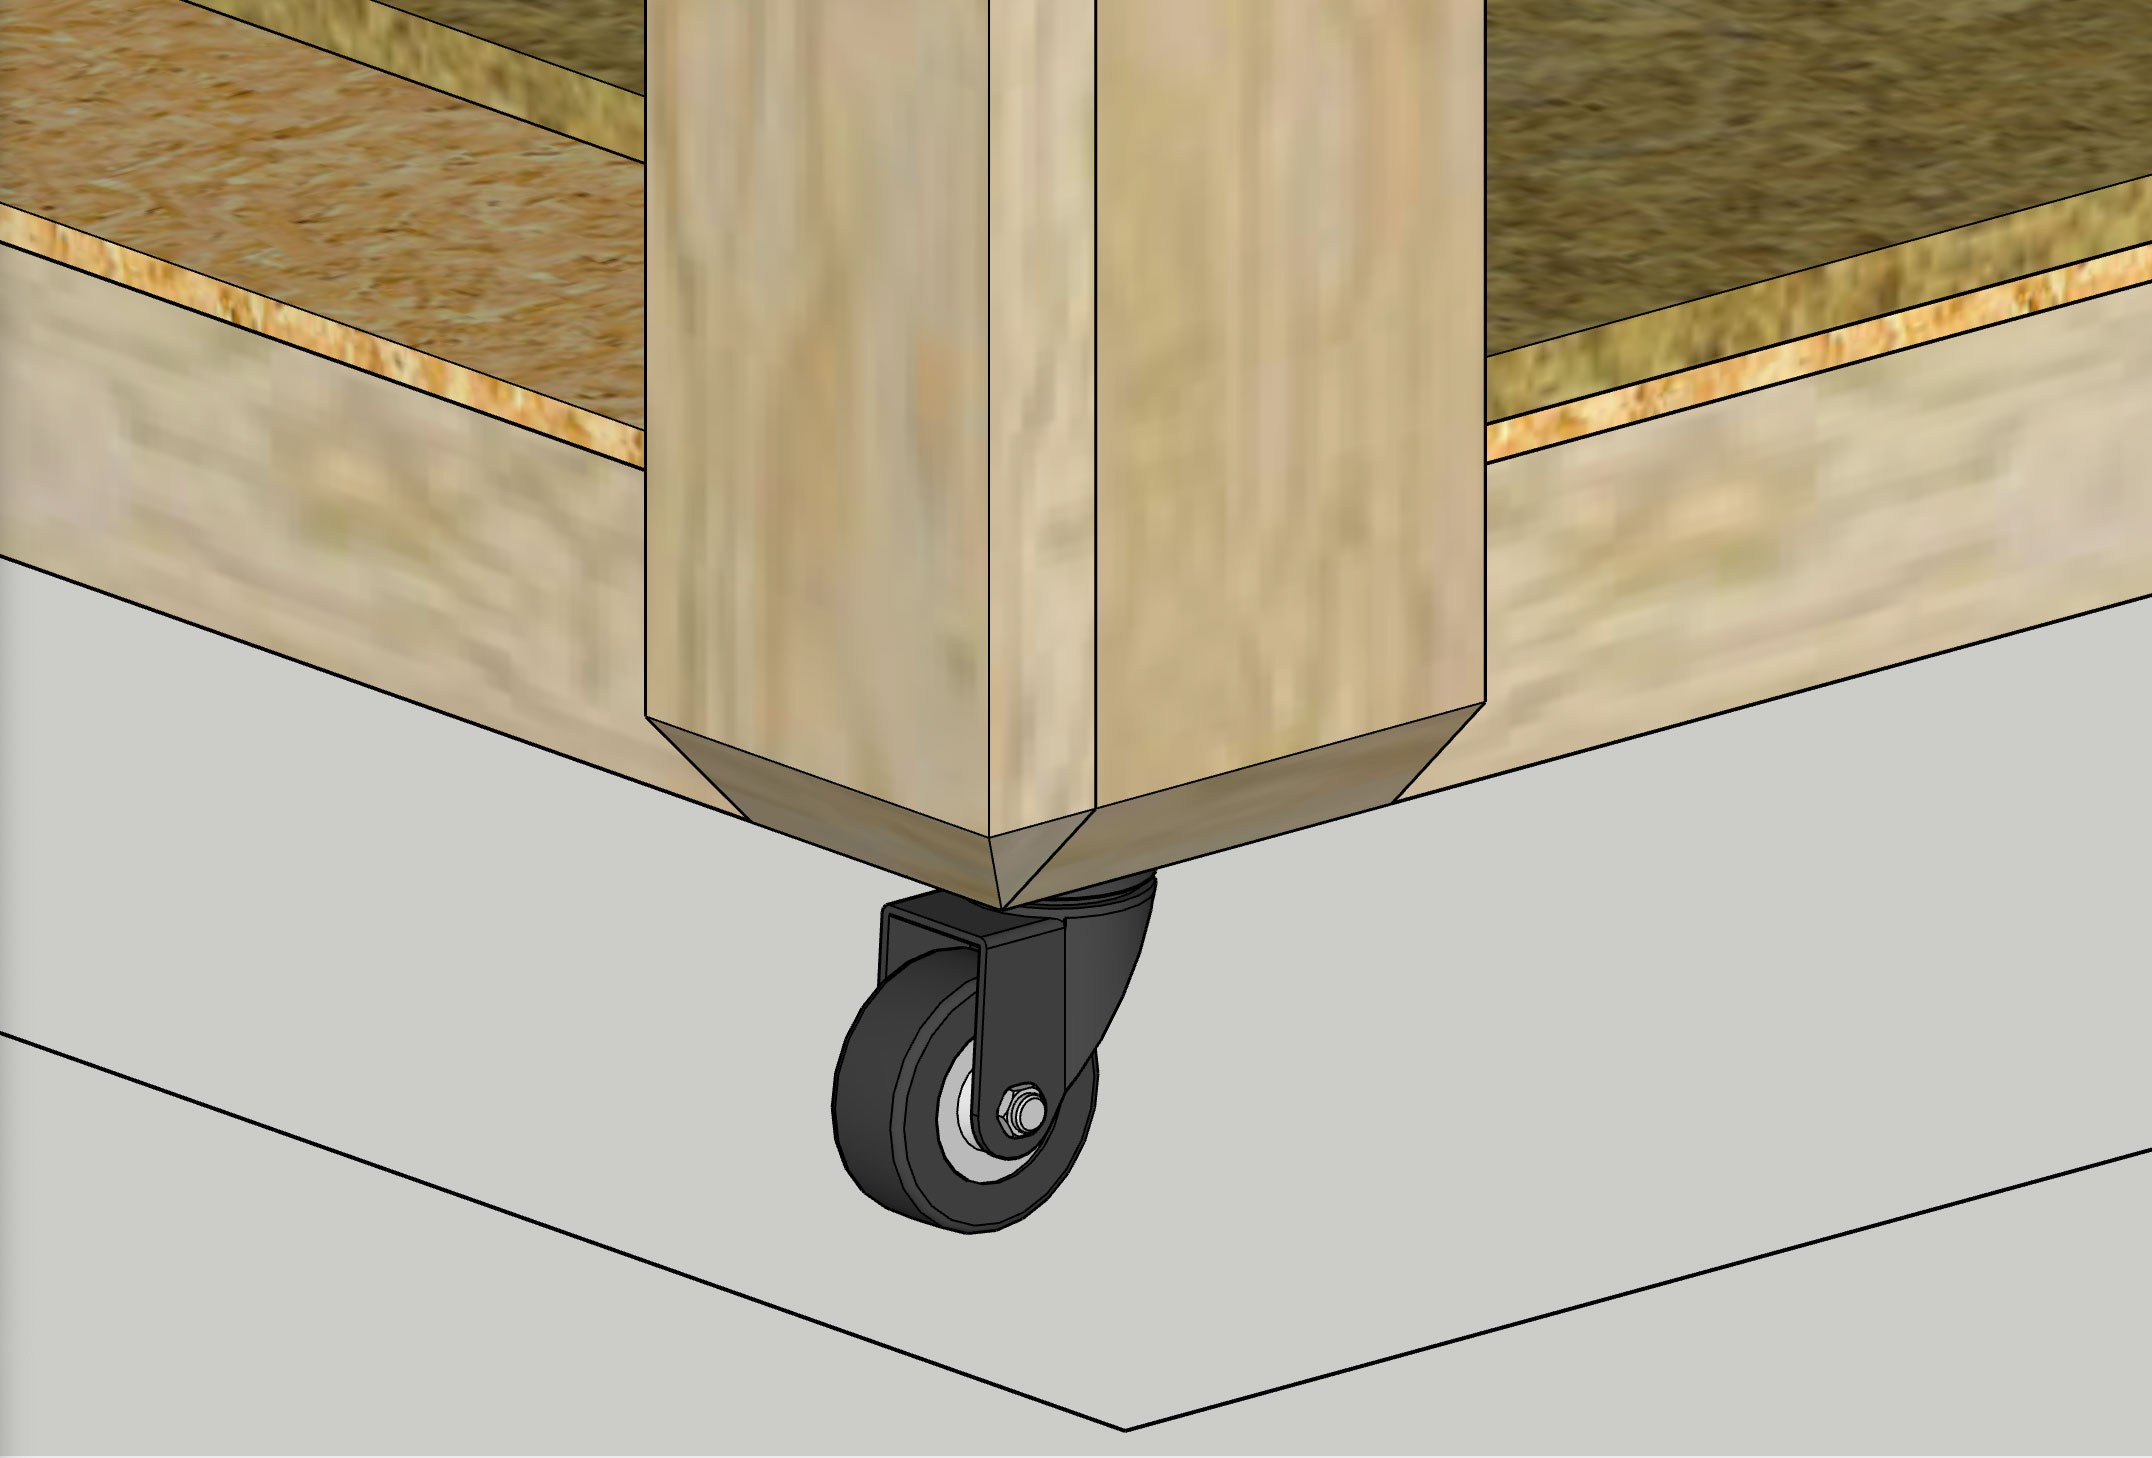
So, I decided take the table apart, replace the lower frame (mid section) that the legs attach to, in order lengthen it for 4x8 sheet storage access on the sides, as well as adding a more full upper frame to give better “center support” to the twin torsion boxes. Most of my “not flat” issues are because the bolts holding the torsion boxes together are not “enough” to keep the two torsion boxes from sagging a bit at the middle where they touch each other. That issue is compounded by a really sad oversight on my part, in which the upper cross bar supports (made of 2x4 lumber) were attached too low. By that I mean, the leg assemblies have tenons extending upward, that went into matching holes on the torsion box bottoms, and the “shoulder” on the tenons, was actually higher than the cross bar supports. Really frustrating oversight. It meant the outside edges of the torsion boxes were supported at a higher level than the inner edges of them (where they meet). I fully intend to fix that this time around. Actually, because (in the new design) the tenons are no longer going to fit under the torsion boxes and will now simply brace against the ends of the boxes, the new upper frame will be the only thing holding up the torsion boxes, so the low center issue really should disappear.
Below are some screen shots of my 3D planning, which was done in SketchUp Pro.
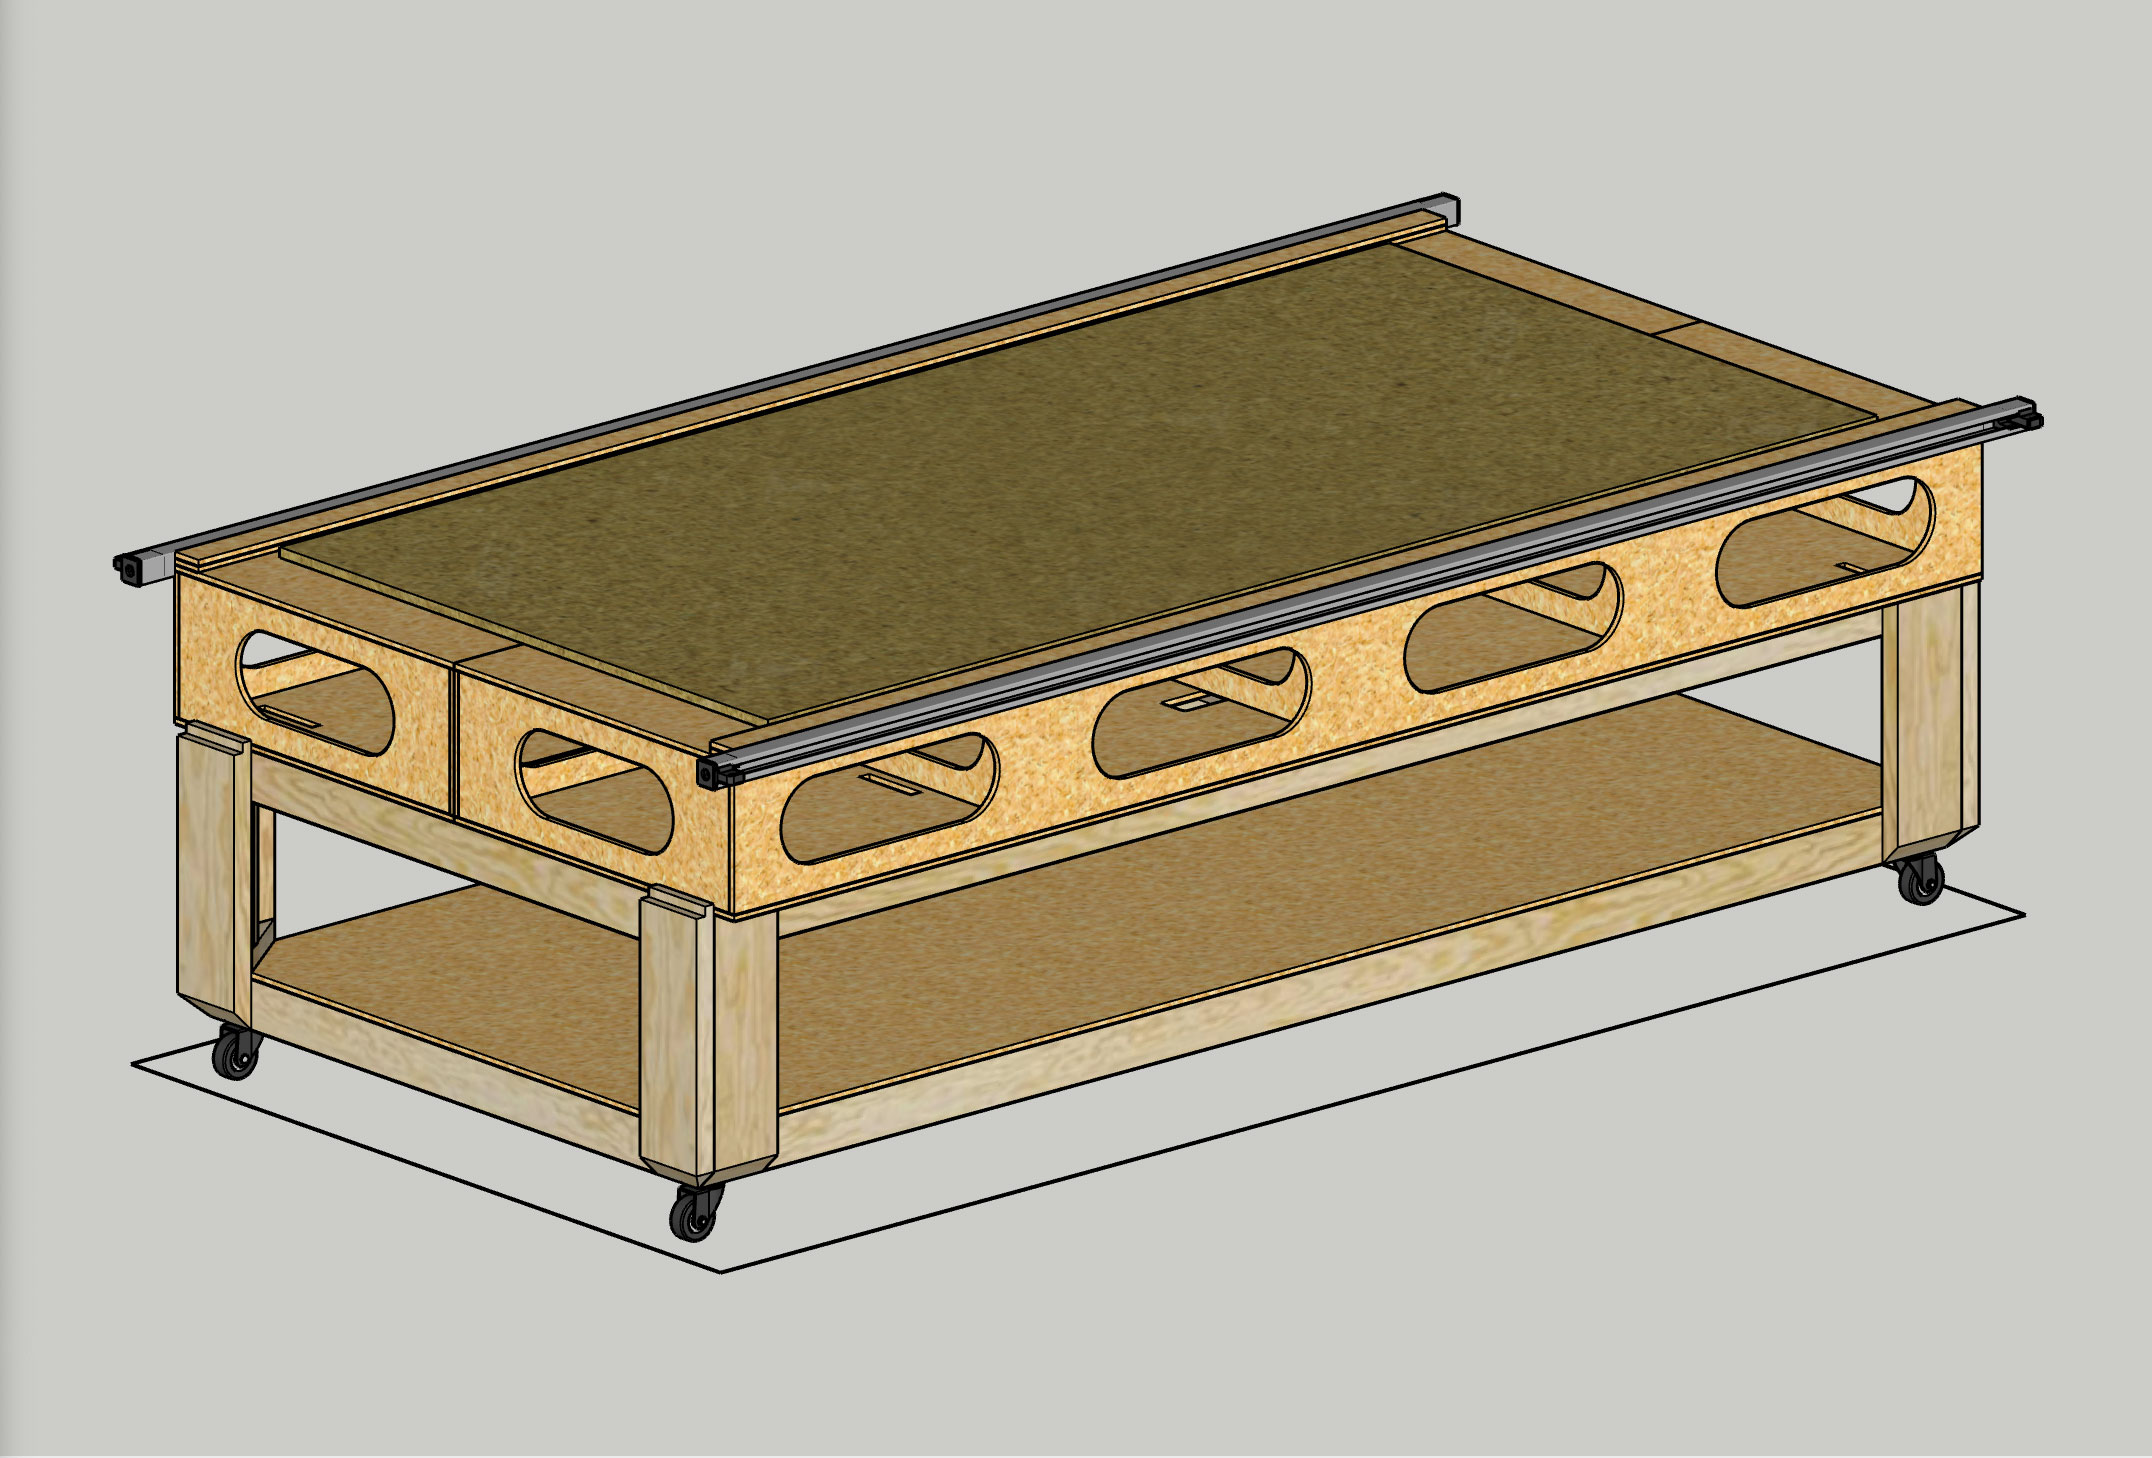
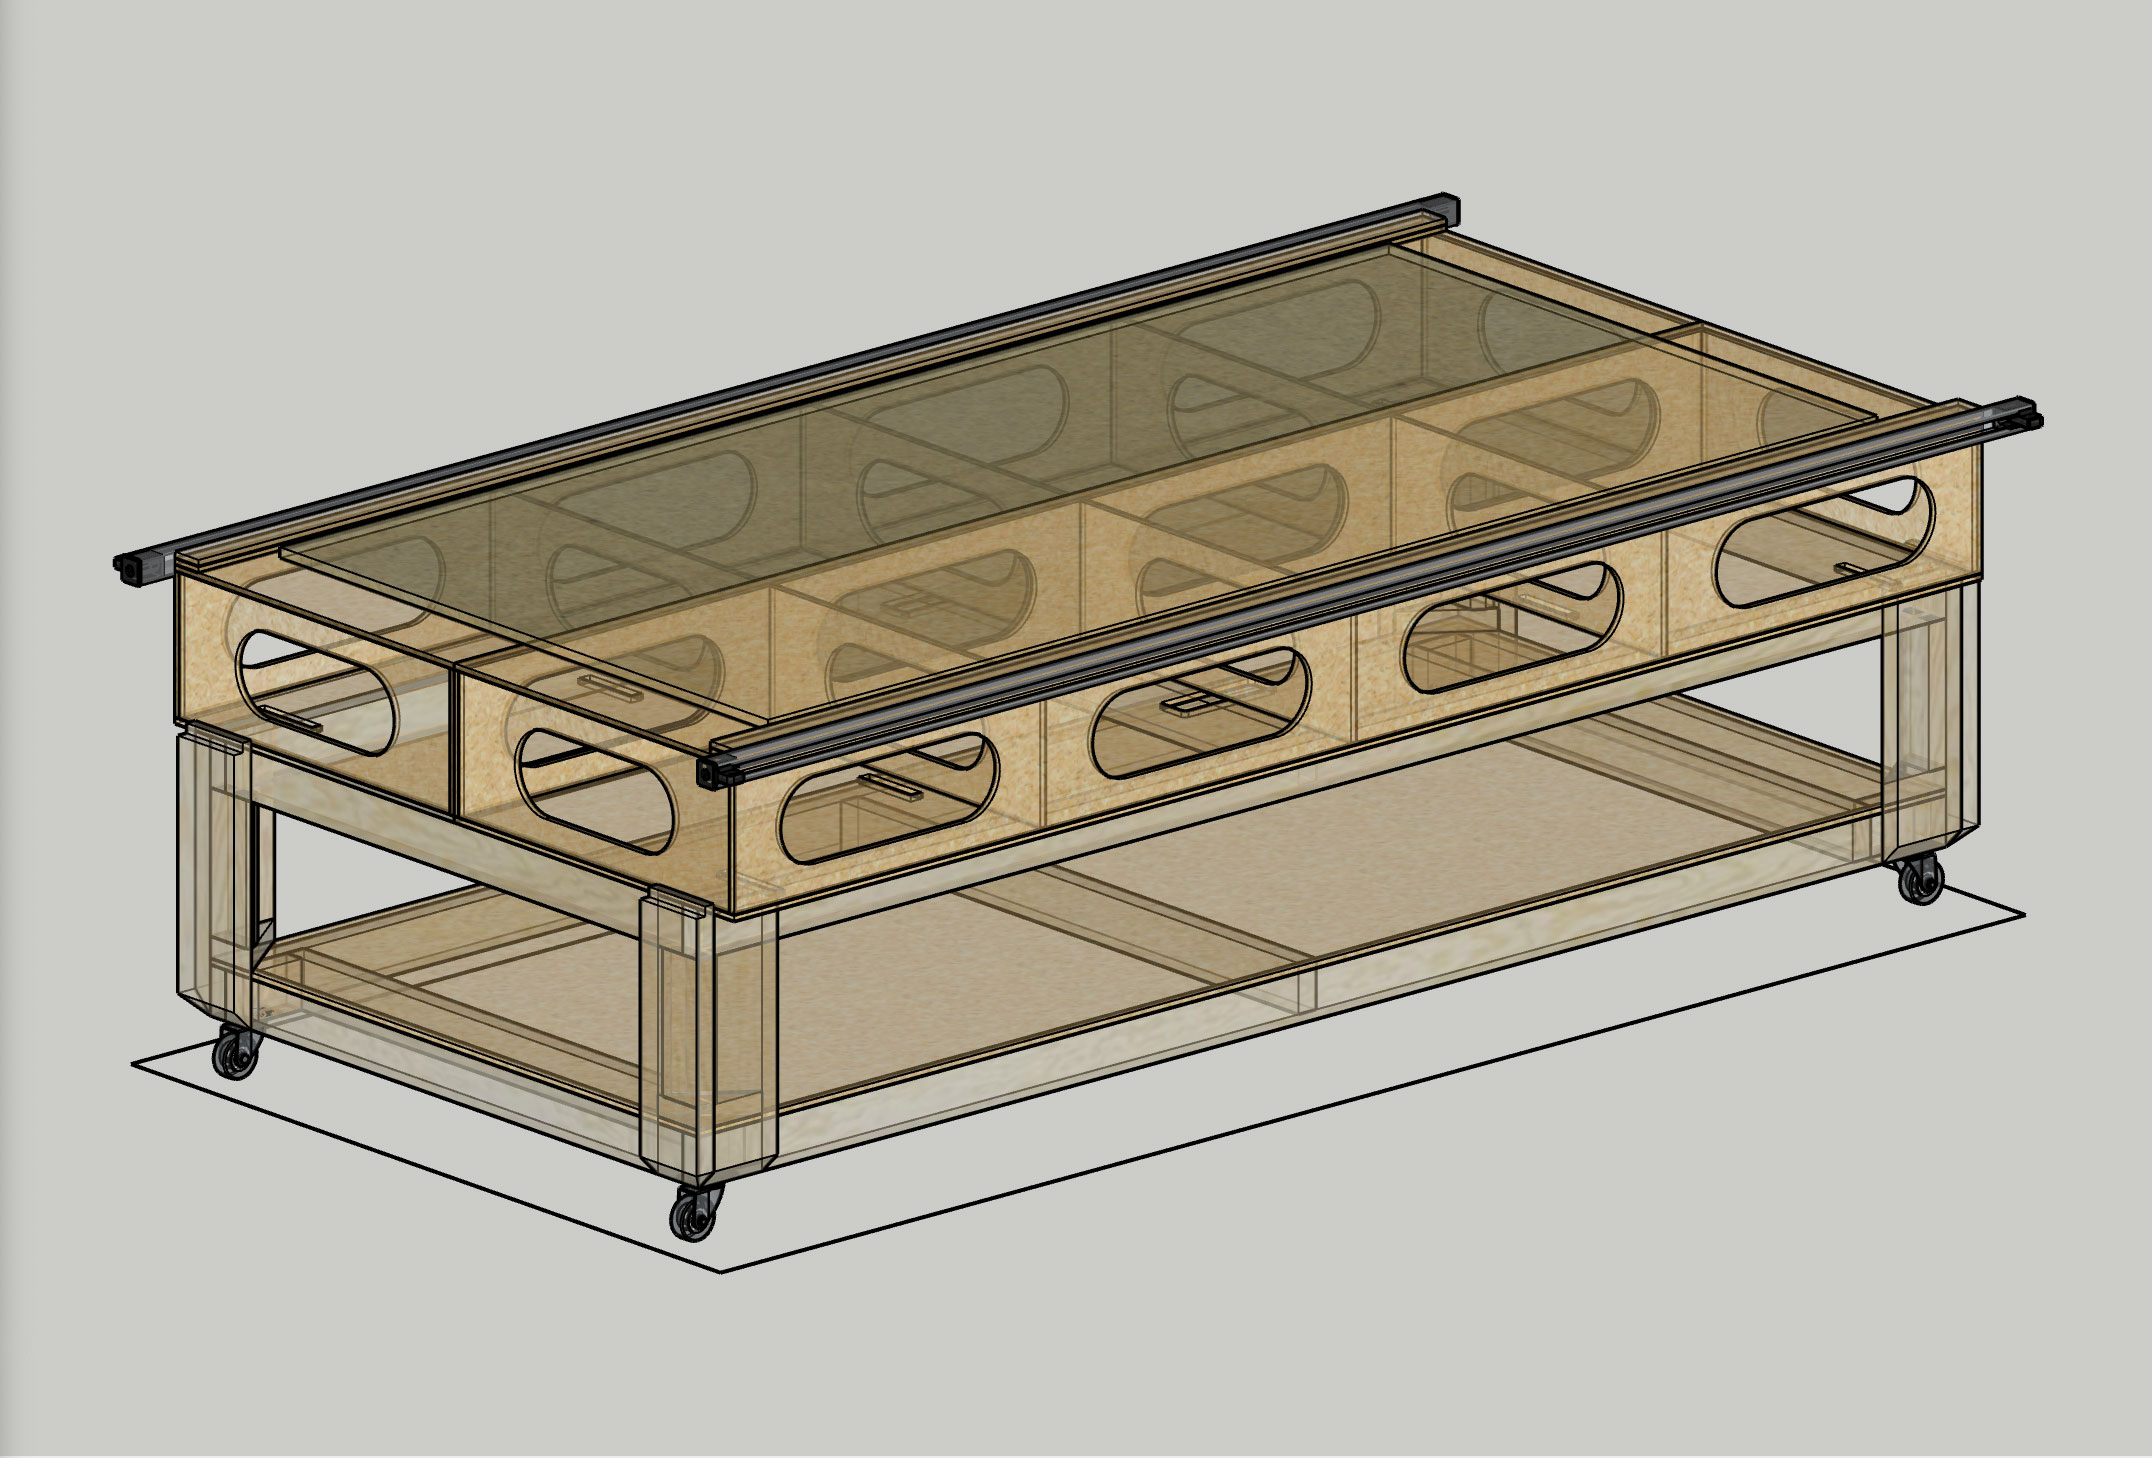
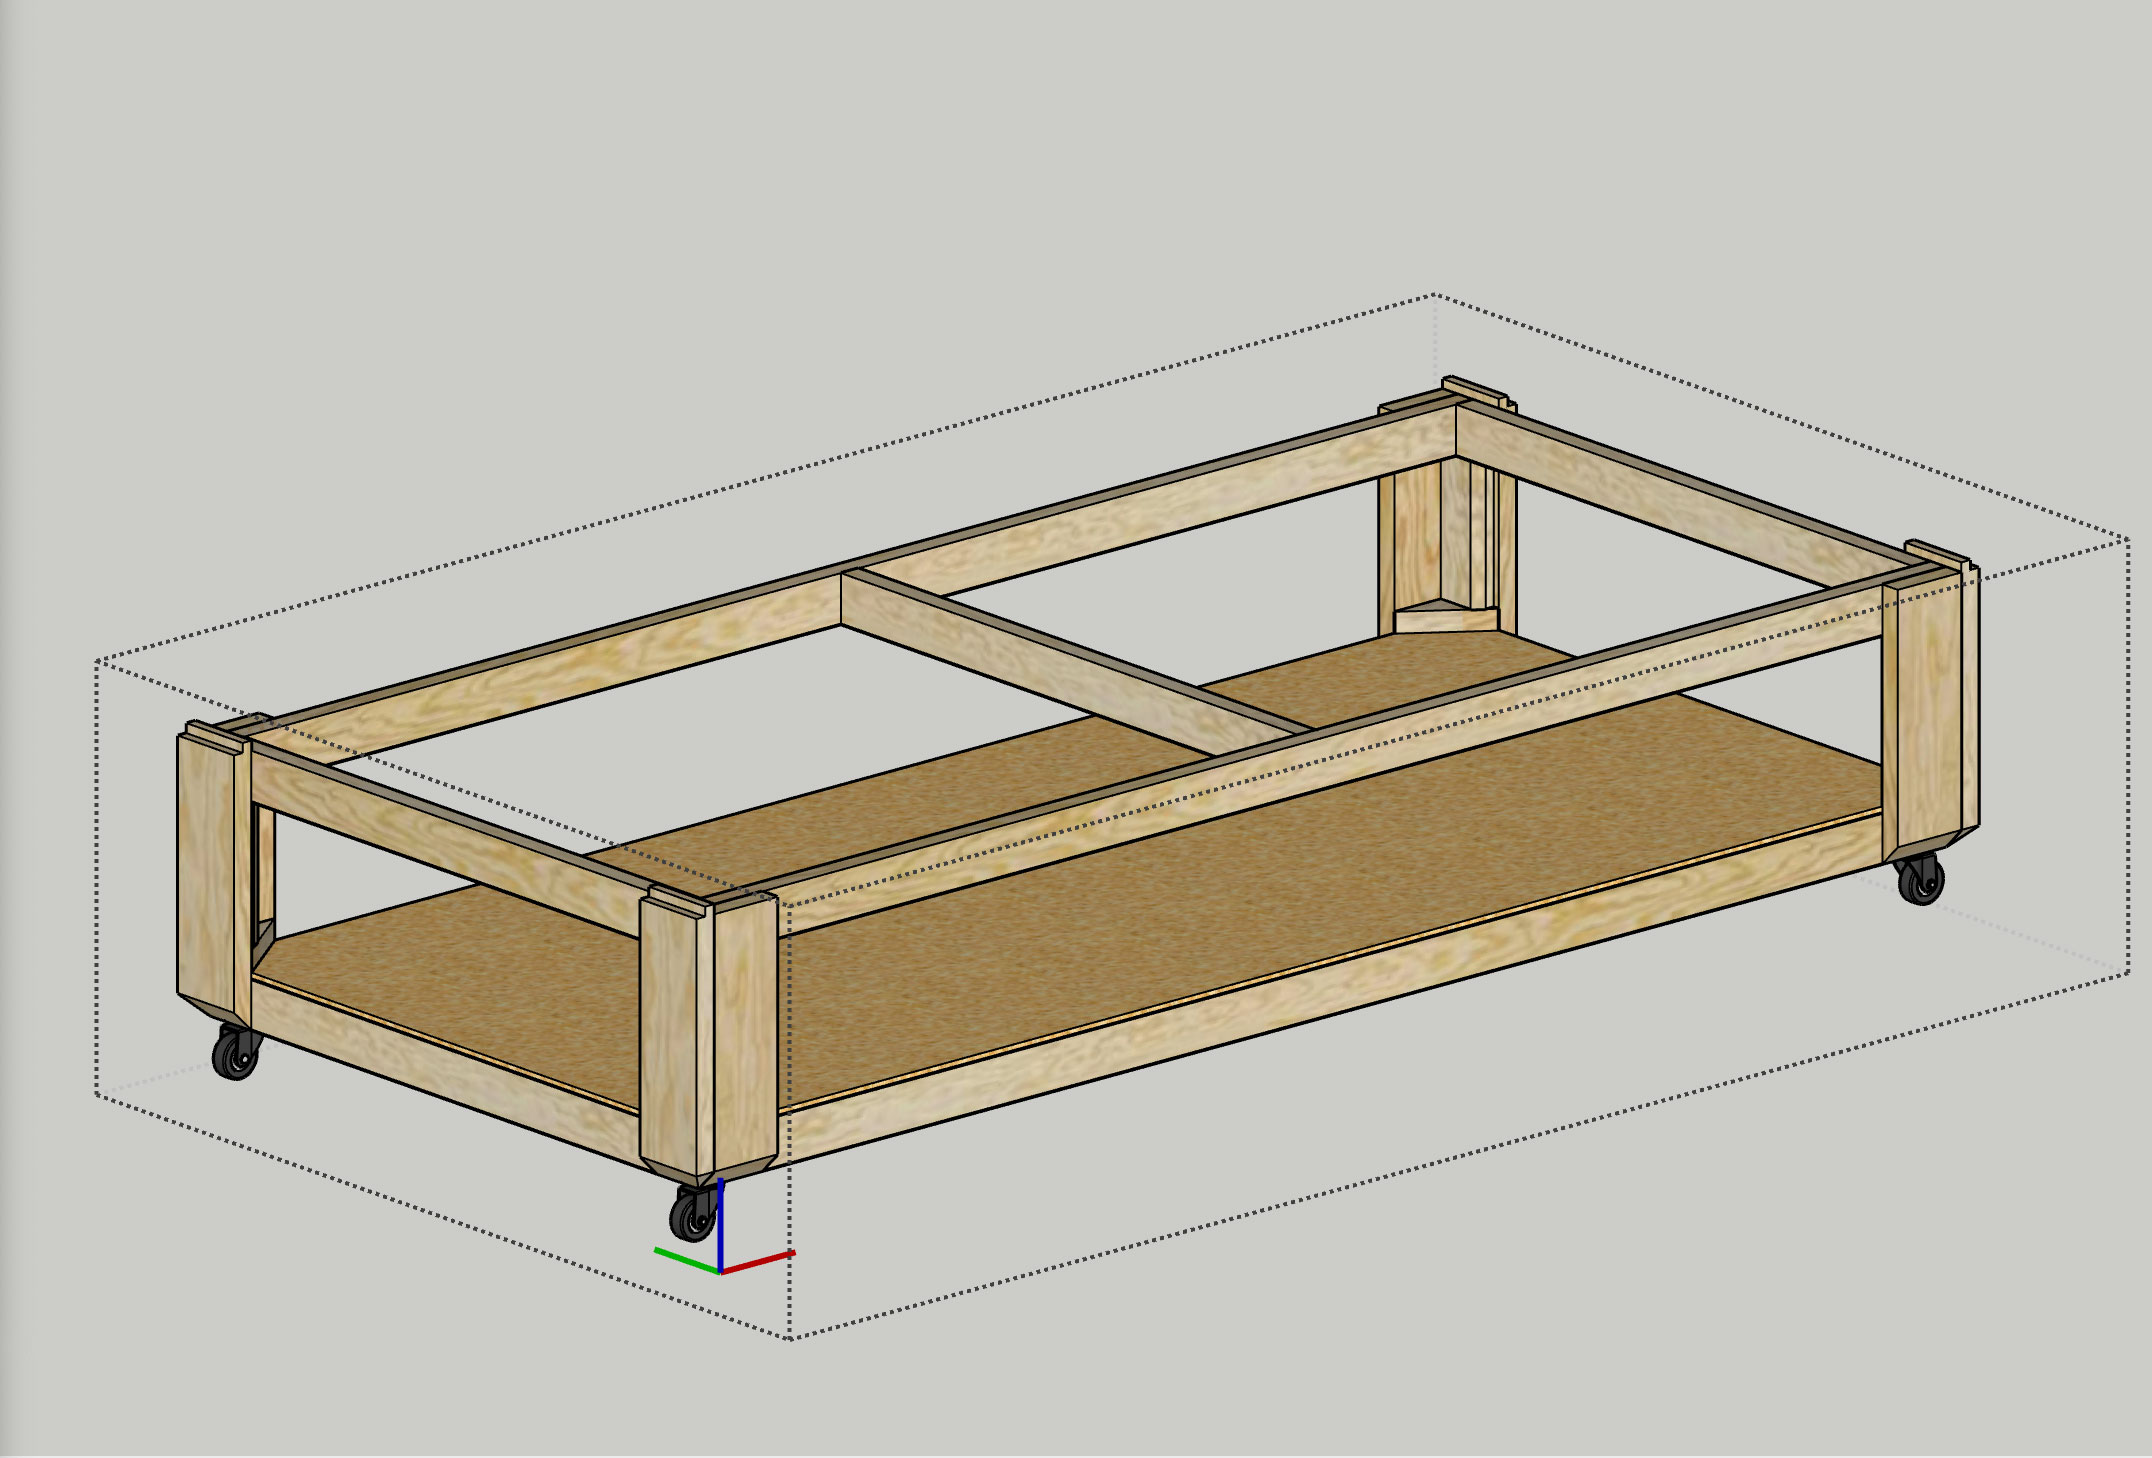
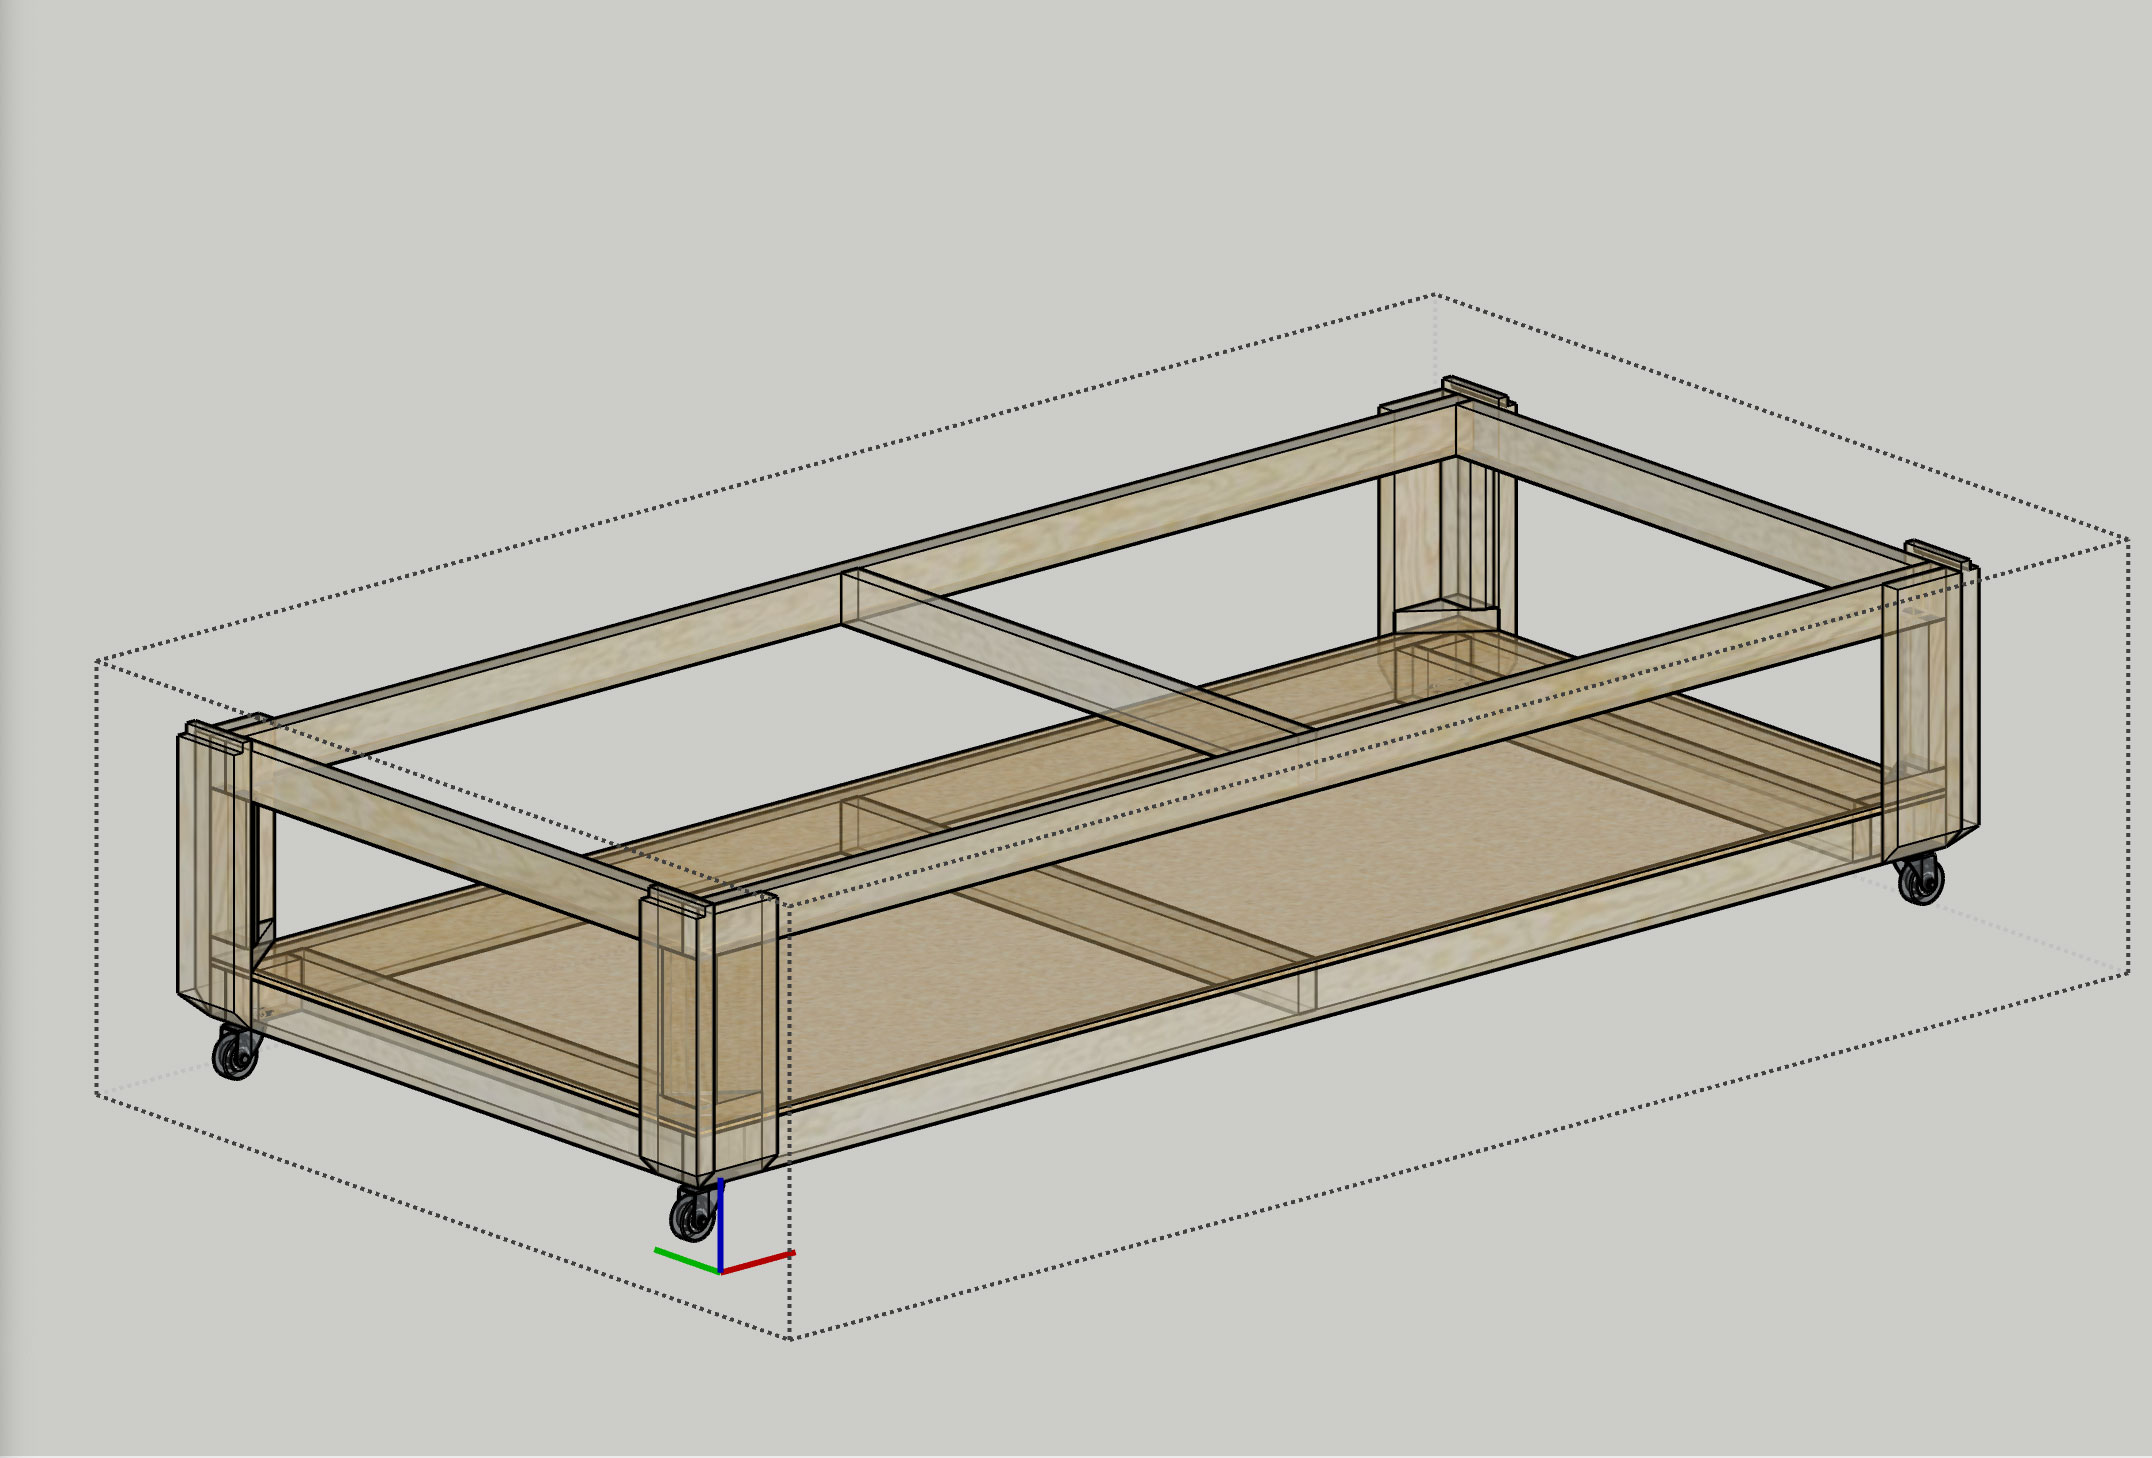

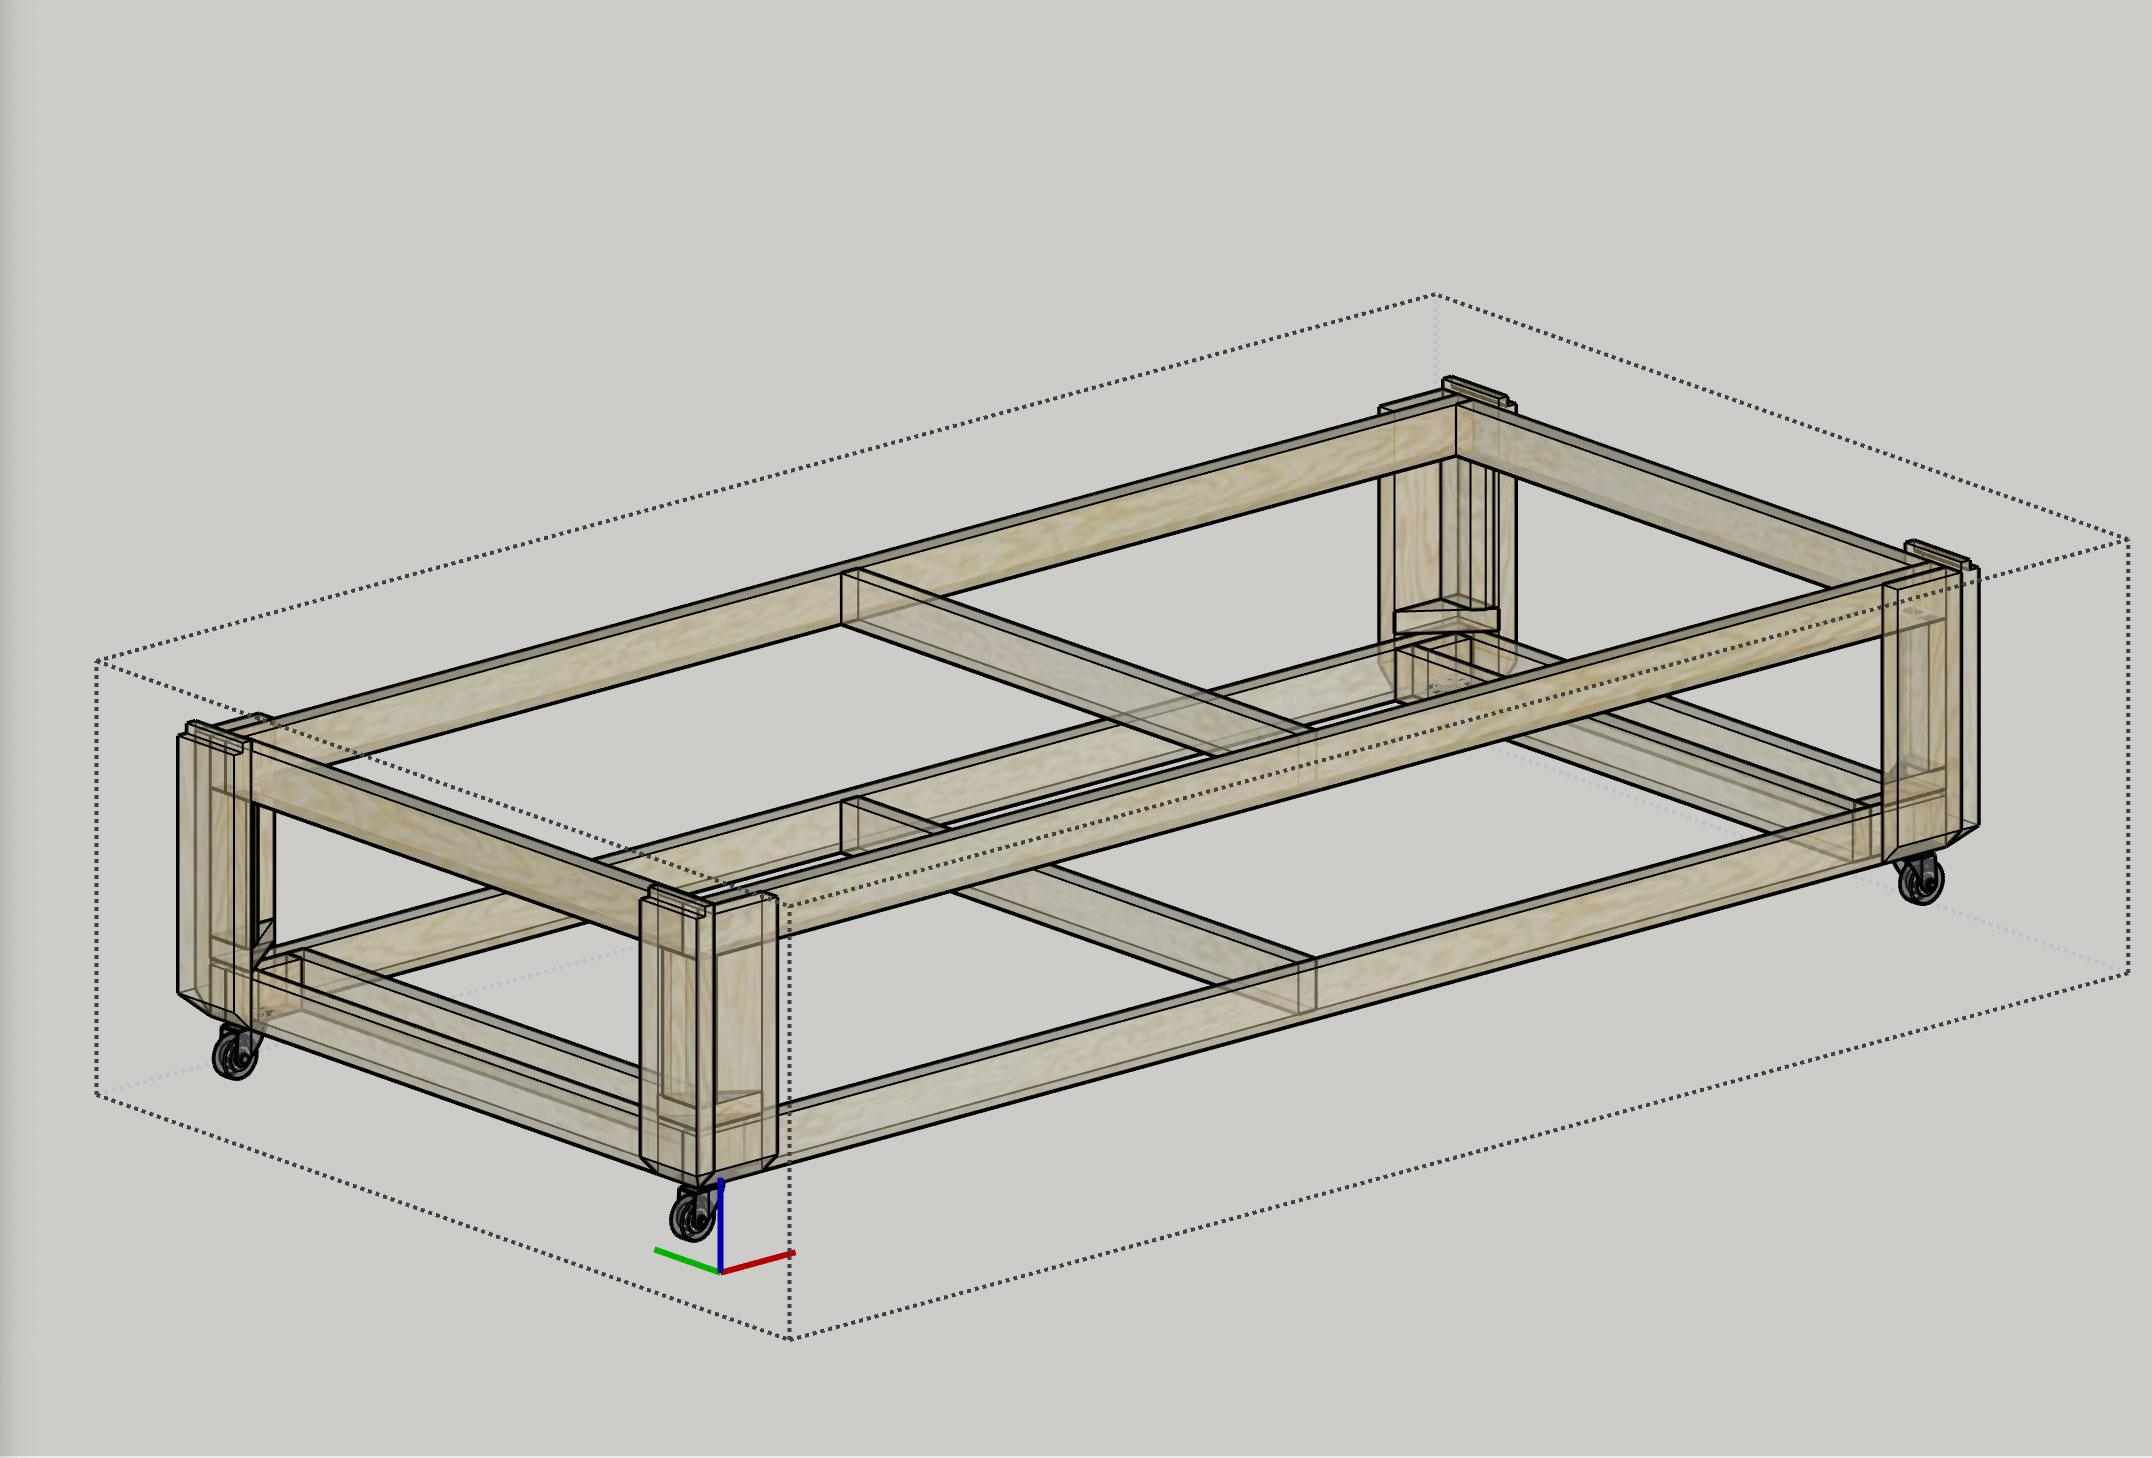
Caption/Note in image below:
Example 4’ x 8’ sheet storage on bottom shelf, accessible sliding in/out from the sides.
Side opening is 8’-1".
Note: Legs could be ‘notched’ to widen the opening even more, to allow for MDF 49" x 97" sheets to be stored.
PS: Before reassembling the new table, with my table saw I shaved 1" off the insides of each leg, widening the side opening by 2 more inches, so I can now easily store oversized MDF panels (49" x 97") as well.
2 Likes
UPDATE re. “LowRider2 CNC Belt Stops for Superstrut metal, and in Primo Style”
I realized the initial design did not properly handle the “end stop” feature. Namely, when the tension was adjusted, it also unintentionally adjusted where the end stop happened. That was not ideal, and it’s not how the Primo style handles it. (It has a firmly mounted stop that does not move when you tighten your belt). So, I revised the design, and uploaded new STL files in the Thingiverse listing (latest as of 2022-03-16, 5:00am Eastern Time).
1 Like
Digging your table bottom. Waaaaay better than the 2x6 thing I made.
1 Like
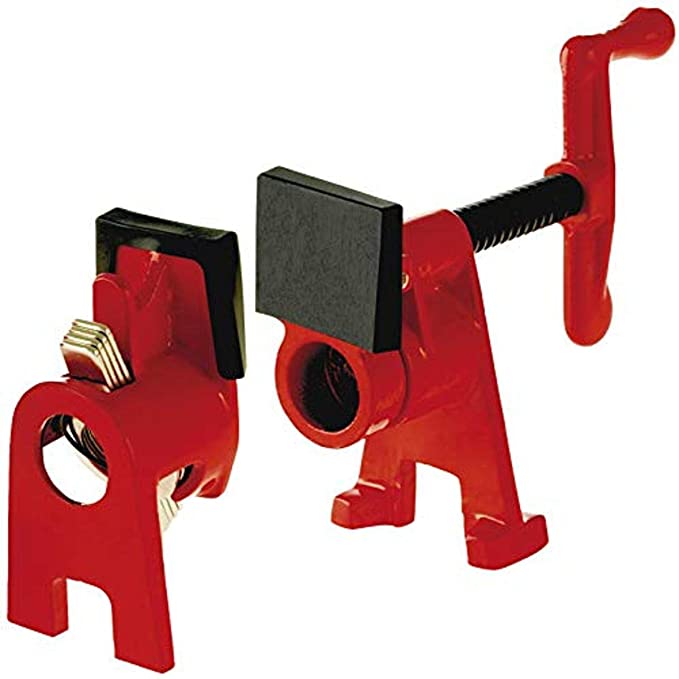
Thanks! Probably my best word to anyone tackling something like this is to have lots of clamps of every size and type, and you will use them all. I’m seriously going to make either a t-shirt or sign that says, “‘I have too many clamps’ -said no one, ever.” In particular, I was really thankful for having sets of pipe clamps, two 5’ long and two 10’ long. When one of those big torsion boxes needs persuaded a bit on where to sit while you’re tying it down, having lots of 2’, 3’, 4’, and the big pipe clamps, was really the ticket.
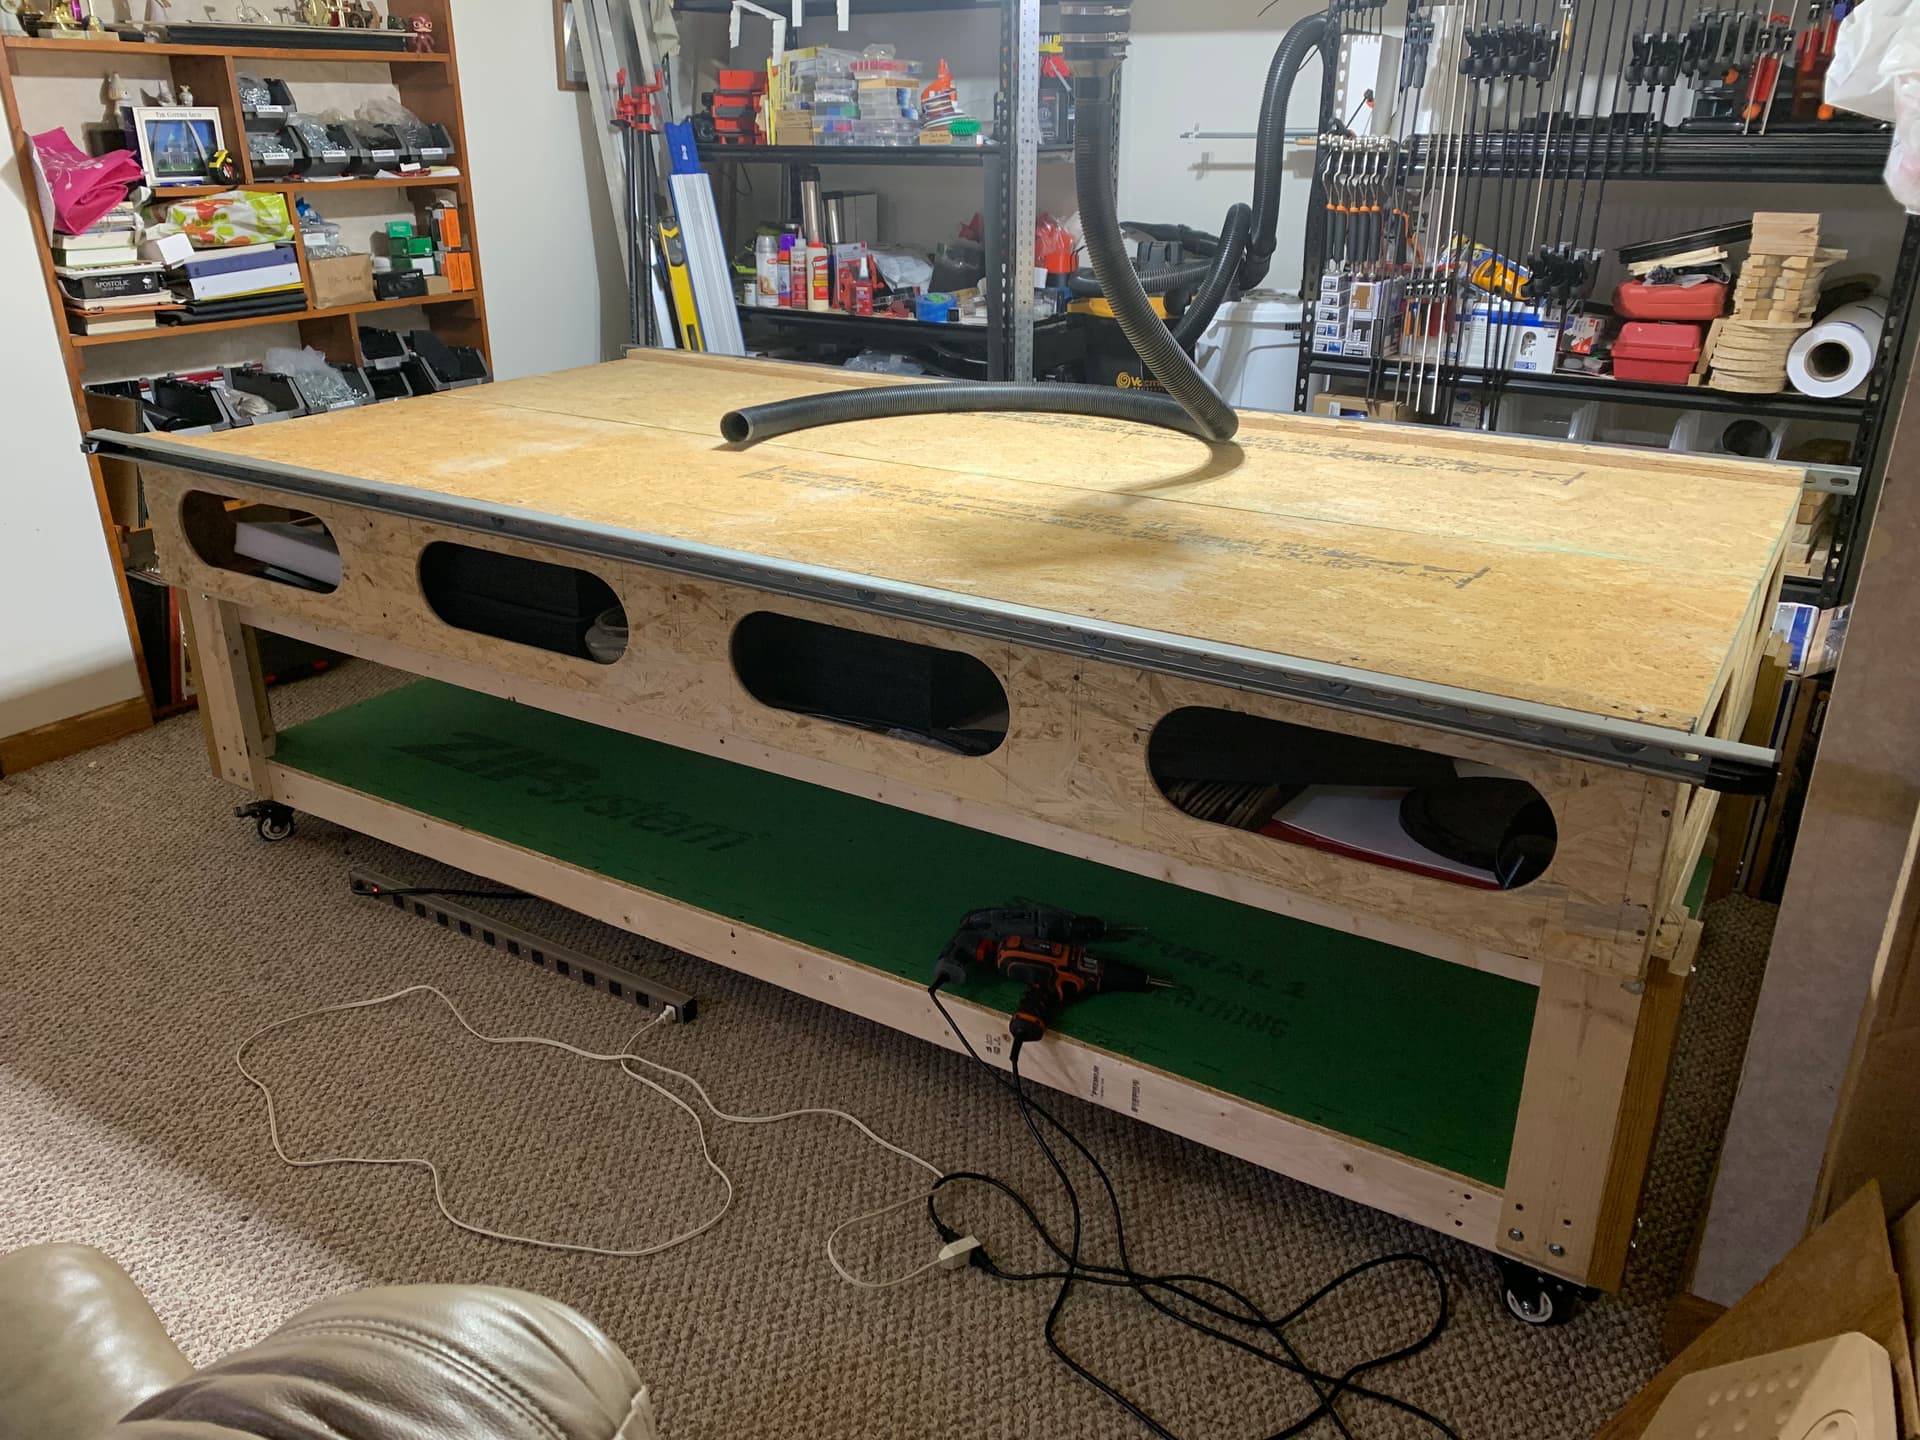
Here’s a pic of my newly remade table, with better support for the torsion boxes, superstrut rails, and storage underneath wide enough for 4’x8’ sheets and 49"x97" sheets. I’m just about ready to reattach my LowRider 2 and get back to cutting. The only 7/16" x 4’ x 9’ OSB I could find without driving an hour away, was the coated, exterior rated, “zip system” kind, which is why my under shelf is green!
2 Likes
Had. They’re both in a box at the moment. We moved.
I hear you. Hopefully you can get everything set up again some time.
1 Like
These pipe clamps I bought off of Amazon were a huge help on getting my table redone. The price was great and they are good quality.
https://amzn.to/3K2Uck7
Bessey BPC-H34 3/4-Inch H Style Pipe Clamp, red & Tools VAS-23 2K Variable Angle Strap Clamp with 4 Clips, Black with red handle
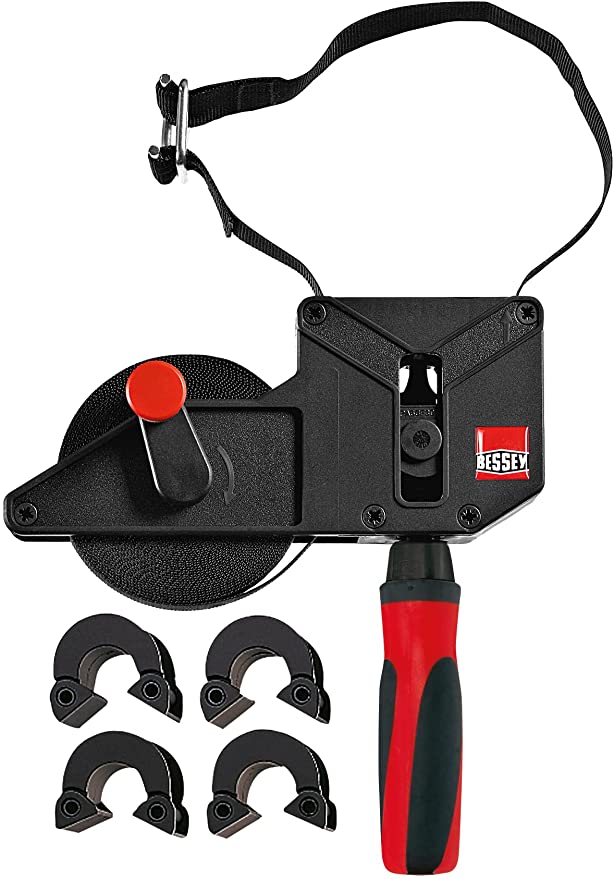
Also, I’m thinking about buying the Strap Clamp made by the same manufacturer. Anyone used these? I saw one used in a video and was impressed.
https://amzn.to/3Lz9AoW
Bessey Tools VAS-23 2K Variable Angle Strap Clamp with 4 Clips,Black with red handle
*affiliate links
1 Like