I ordered limit switches with my bundle and I would like to know how to wire/connect them properly to protect my CNC. Can anyone help me out??
It is a pretty straightforward connection.
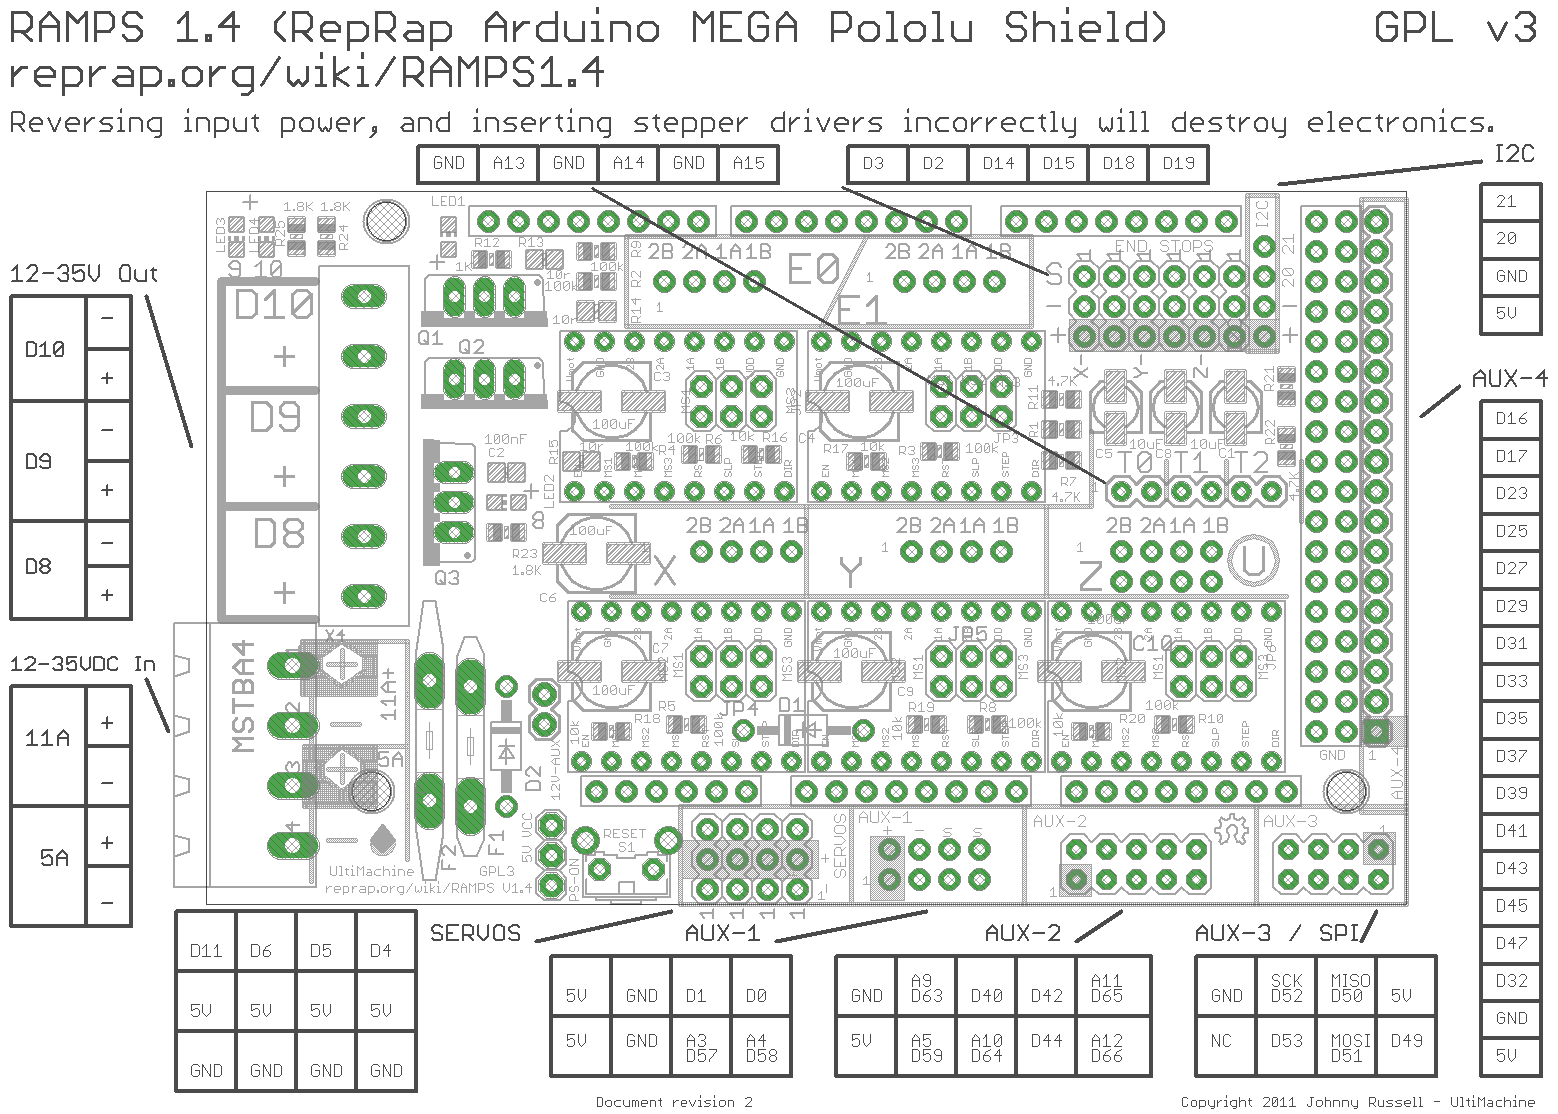
See the “Mechanical Endstops” section:
http://reprap.org/wiki/RAMPS_1.4
http://reprap.org/mediawiki/images/6/6d/Rampswire14.svg
See the endstops in the upper right corner of the board:

Thanks a bunch. This is exactly what I needed. I am looking forward to getting my printing done and to start actually building the CNC router.
Curt
If your looking for end stops for milling you should look into a Z touch plate. Lots of easy designs out there. Alligator clip thin sheet of metal and some wire.
I’m interested in using a touch plate for setting the z height. Is there a way to hook it into the ramps board to do some sort of auto setting, or is it basically used like a continuity light, to show when the very tip of the tool is touching?
Thanks!
Karl
Yup just like a continuity tester. You wire it into the z end stop port of the ramps board and just hit z home.
This is my first (of many I hope) posting in the forum. I’ve started my MPCNC and I’m about 90% complete. I’ll get some pictures of the work and post in the built on folder.
Right now, I’m working out the last of the details and was looking for data on limit switches. This post above answered my questions and I hope to have Limit switches finished today. Once that is worked out, I’ll look to download the CAM software and try my first run.
I do have a follow-on question to the posts above. Has anybody tried the “auto setting” setup of the touch plate? If yes, could they please share?
Thank you to Vicious and to all other members. I hope to become an active contributor!
Richard
Hi Richard,
I’ve used the Auto Home function on the LCD screen - is that what you’re talking about? If so, here’s how it works for me:
- I have the x and y endstops connected to the appropriate pins on the ramps board. The switches themselves are mounted on clamps that can be easily moved. If I need to move and then replace them, I mark their location in pencil on the conduit.
- I have two wires connected to the appropriate pins for the z endstop. One wire terminates in an alligator clip, the other wire is connected to a small spatula. I clip the alligator clip to the bit on the DW660, and hold the spatula flat against the work surface in the approximate location of the x,y zero point. There are pics of the spatula and alligator clip on my build thread.
- When I select Auto Home from the menu, the x and y axes go to their endstops, and then the z drops until the tip of the tool touches the spatula and stops.
- The spatula is .8 mm thick, so I manually move the tool down to -.8 (using the LCD) and then select Set Home Offsets from the menu. That resets the zero to the work surface height. I believe there is a way to set this in the firmware, but haven’t messed with it. I just do it manually.
I didn’t have to do any special setup for touch plate to work. As long as your axes are all going the right way, and your wires on the correct pins for the endstop (min or max), it should work, if you’re using the firmware Ryan provided.
Does that help?
Karl
Karl, thank you for the feedback. I’ll be giving that a try.
Maybe you can answer a question? I hooked up my limit switches for moth x-min and x-max as well as for the y and Z. The Min switches are recognized but not the Max? I’m using pronterface on a Mac to test this out so perhaps that’s my problem. If I switch to the Estlcam, will these max endstops be recognized? Is there a different setting in the Arduino configuration i should be turning on?
Thank you for any help. Happy Holidays
Richard
Hi Richard,
Hmm. I’m not an expert, but I don’t think pronterface or Mac is your problem. There are settings in Marlin to enable/disable endstops. It’s been a while since I messed with them, but look in configuration.h for the settings. Estlcam only generates toolpaths, so doesn’t affect the actual operation of the machine.
Let me know if you’d like more details. Merry Christmas!
Karl
What happens when you hit the max end stops?
They should stop the axis from moving further. They are enabled in the firmware, in the NO position. They should just act as a safety, they might only work when in a job. I would say run a test job and hit the max end stop when its moving that direction.
I Think people are catching on to why I do not include end stops. They are deceptively complex.
Thank you Vicious and Karl for the feedback. At this time, none of the endstop-MAX switches appear to be recognized. I"m by no means any expert, but I’ll dive into the configuration.h file and see if I can find the endosotp enable setting if they are not already set. I finished my build last night except for a motor speed control (fan switch). I’m still unsure about my drivers being set correctly, so I’ll run through those procedures another time or two. After that, I’ll need to dig up a PC and get a copy of ESTLcam. For the record, I’m a complete Apple fanatic, so getting a PC to work may be harder than building the CNC…
Thank you again. I’ll see if I can get a post up this evening in the build area with some progress photos and hopefully a shot of it making some sawdust.
Richard
If you are using my firmware the endstops are enabled, min and max. I think the max endstops only come into play during a cut though. I’ll try it out today. You should really use the machine without endstops for a while, they really are not optimal for this style machine.
Did you get the parts from me? My drivers come set.
I did not get the boards from you. I have build the entire system from scratch including ordering and using my own parts. I have verified my limit switches by switching them and moving in the opposite direction until they stop. I’m now confident in my motors and end stops. I’ve moved onto trying to get ESTLcam working with a PC and I have spent nearly four nights getting no where. I have been able to download the Pronterface for PC and been able to replicate the motor and end stop functions. I am thinking I have the wrong script because I can’t correctly connect with ESTLcam.
Question, in the ESTLcam download and instructions, it tries to download or install an INF file to the Arduino. This file is labels as UNO. I have a MEGA, should I be trying a different file or is this file board agnostic?
Is there anyplace I can get your script? Are there more detailed instructions for setting up the ESTLcam software and getting it to connect with the PC?
I appreciate any and all help. The past few days have been maddening; it’s like owning a Ferrari and not having the key…
You can’t connect with ESTLCAM. You generate the gcode, save it, then run it with repetier or pronterface.
walk-though - https://www.v1engineering.com/estlcam-basics/
Didn’t get that… Saw the CNC control in the ESTLcam and guess I got lost in the details. Can I ask if you can verify the Arduino programming? If you feel that your code is optimized, is it available?
Thanks for getting me back on the rails. New attitude for tonights efforts.
Richard
Code is at the end of the post, or there is a link to the new beta.