I’m Jerome, living in france and just build my 1st coffee table before I knew this forum exists.
I discovered the Sisyphus table from a video of a tech youtuber, and loved it !
We have an autistic boy who’s fascinated by that kind of thing, and help him to feel secure.
So I bought a second hand eleksmaker laser cnc, convert it from benbox to grbl and drive it with octopring on an rpi 1b (yes it runs with 256Mb of ram !!).
I own a 3d printer (ender 3), so it was an easy path for me to put together a whole table using the cnc.
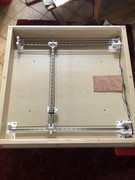
I build it based on module I can add and remove on the fly to allow fast and easy debug.
Why do I come here ?
I’m looking into building a much slimmer mechanism, more efficient, and allowing for homing the magnet (missing it cause lot’s of crash on the cnc).
I was doing lot’s of research and decided to go for a core XY belt system, and use a 3d printer control board with endstops this time. As I was stuck there I discovered the ZenXY project, and here I am looking for help to go forward.
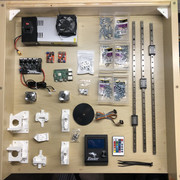
I own 2 controls boards, Creality v1.1.3 (ender 3 basic 8bits board) and Fysetc Cheetah v1.1b with tmc2209.
I would like to use one of them for my V2 prototype, and this requires heavy Marlin tweaks I believe.
Is there a list for needed modifications to allow Marlin to run without missing parts ?
Thank you
We configure the software using MarlinBuilder. It checks out a vanilla Marlin and applies specific changes to it.
If you know a bit about git and bash, you could try using the scripts. If you don’t, that’s ok. You can use them as a guide to see what we change and make the same changes yourself.
Let’s look at the V1ZXY SkrPro 2209 config:
That calls several other scripts, including zenxy_config:
You can see, that sets a lift of individual settings. Visit the link, the preview doesn’t show them all.
That would get you pretty close, especially if you took the time to understand them a little while making the changes. It looks like a lot, but most of them are small tweaks.
First I would like to thank you for your very detailed answer !
I’m not familiar with github yet, I only modified marlin using visual code studio to enable runout sensor on my ender.
I will take the time to dive into it, and if it work, give back the firmware info for the community to use.
Also, I want to thank you for your great tool sandify, this makes our life so much easier to create shapes
A very great use of the ZenXY! I coach soccer with a pair who have a son who has Pitt-Hopkins, he doesn’t do much, but I would think he would enjoy time watching this. He tends to like to put things in his mouth - so I’ll have to ensure the enclosure is secure. Thanks Jerome for the inspiration!
Hi, I’m very happy this can inspire you too !
Our son isn’t deeply autistic, but enough to get him in trouble too.
To be very safe instead of glass, I used 8mm acrylic glass, it’s almost unbreakable and easy to cut to
desire shape and size.
You can glue the top glass and make a strong top cover attachment.
You do need to get into the sand every once in a while though. Just to spread it out a bit more. Something like wood screws into wood would not last very long. It would be a pain if it was machine screws, unless you could use an electric drill.
So, got hit this week with a huge deal on refusbished Ender 5 (Comgrow), got it wednesday and now that it’s working perfectly, I dismantled my Ender 3 to upgrade my table to another level !
I didn’t used my silent Cheetah board (keeping it for the ender 5), instead went ahead with my old creality V1.1.4 (non silent).
Configure it with single X and dual Y to use my CNC frame, again this forum is a real great place to find answer’s for marlin setup, thank’s a lot for all your help !
I spent the whole day to configure Marlin to the best, reposition the CNC to maximize draw area and finally, got it to work perfectly !
One small issue, she was writing inverted, I had to change X axis direction in marlin, easy fix
So from eleksmaker arduino with Grbl 0.9 to 3D control board and Marlin-bugfix-2.0.x
I forgot to mention I upgraded my RPI 1 model b with the newer RPI 3 Model B, it’s a space rocket compared to the old one
I managed to had single axis endstops from my ender 3
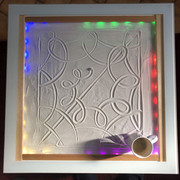
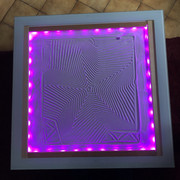
And the final test written in the right direction after correcting the X direction
(Jesus Save, in french Jesus Sauve)
Next move ? I guess trying Ryan new design when it’s available and use a silent board too.
Also try using sandypi instead of Octoprint, I like Octopring a lot, but would love a much simpler interface for my purpose.
I tried to use sandypi as a control software but after struggling to install it on latest pi version, an update killed it last night.
So back to Octopi, much less sexy, but get the job done.
(I’ll be back on sandypi as soon as possible for my family).
V3 is already ordered as my lovely wife want now a round table, and what wife wants…
So, soon a new scara design to build
That’s great. It looks like they don’t make them anymore. At least, they aren’t trying to sell them to me in the US. There are a few hits on used sites like ebay.
I would like to be able to find a common base table for an easy zxy. It would be great if we could build it from something found around the world. Ikea is quite a contender, but nothing they have is quite right.
There is a VITTSJO round glass top coffee table that I thought would make a nice polar sand table.
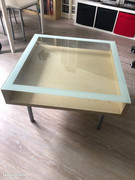
Of course I use a LACK coffee table with the UTRUSTA glass shelves, which make a pretty nice fit.
The LIATORP table looks like it could do a nice job. It would beed some modification from it’s normal configuratuon, but it’s about a 93cm (3 feet) square with a large glass area.
My concern with that is that there may not be room under the table edge to put the ZenXY mechanism. The drawer isn’t quite deep enough to house the whole mechanism (although it might hold an old version, actually) so it would need to be substituted for something else, and of course the compartment separators would be removed.
I wonder what Ikea would charge for a “replacement” top glass…
Yes and no, the magiker table only have one cavity, but with the 3d corexy system I use, I can directly put the sand bottom cover on the top of the motors and all this below the glass.
Depending of your hardware, you need not a so much deep table.