So i just had a nice long post drafted up and it got wiped (cuz i am an idiot).
Long story short now.
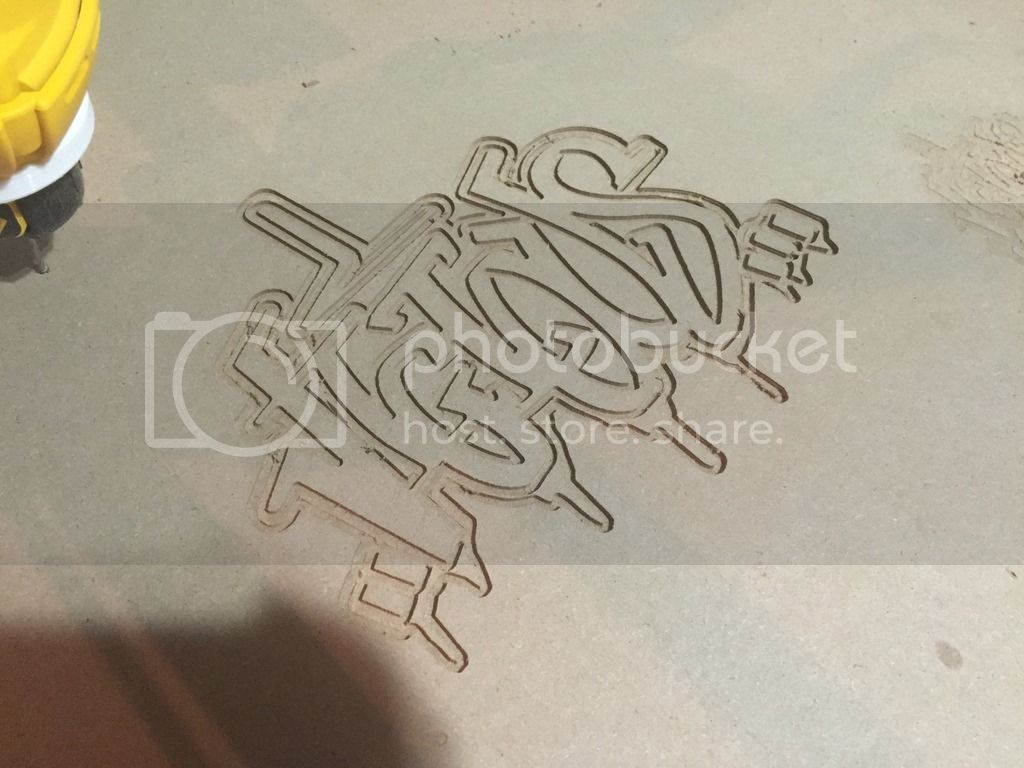
This thing is great. It was too small, so i made it bigger.
Love it.
Here is the youtube video, followed by a pic 
YOU TUBE VIDEO
So i just had a nice long post drafted up and it got wiped (cuz i am an idiot).
Long story short now.
This thing is great. It was too small, so i made it bigger.
Love it.
Here is the youtube video, followed by a pic
YOU TUBE VIDEO
Very nice, Ryan LB (I’ll call you that to distinguish you from Ryan, creator of the MPCNC, aka vicious)! Yours is the first white MPCNC I’ve seen - looks like the stormtrooper edition!
I suggest you remove the toolless chuck and mount a vacuum shoe. I got tired of chasing my router around with a vacuum. I have an adapter on thingiverse that will fit the DW660 mount you’re using and let you add PCFlyer’s vacuum shoe. Ever since I did that, there’s pretty much no dust whatsoever around my MPCNC.
If you just paste in the link to your video on youtube, it will embed the video in your post (I use the link that comes up when you click Share on youtube, but I think you can just use whatever is in the address bar, too). Like this:
thank you and i absolutely will do the vacuum shoe. Just when i get around to it but when doing wood, aluminum and acrylic its absolutely necessary.
thanks
karl… im printing the vacuum shoe pieces now…
How are you changing the bit without the keyless? just tightening that silver nut?
I think i need to switch to all 1/4" shanks because having to change out isnt that much fun.
And on the vacuum shoe where your adapter goes, there are 2 large bolts connecting in to the nut trapped knobs. what size and are they coming from undernearth?
Hi Ryan LB, the bolts are 1/4-20 x 1.5 inch. For the collet I use one of these two wrenches, based on another one I found on thingiverse. I do usually have to remove the dust shoe to change the bits, especially if I have the change the collet too. There are techniques that make that task - not simple, but simpler. Locking the steppers helps. A pause script can move everything into the best position for changing bits. You can use a regular wrench on the collet, but these are easy to handle, and one of them has a thing that holds the bit up - useful when you’re trying to change out a 15 degree v tip.
I actually found it really easy to just slow the print down to 5% (of 60mm/s) and slide the nut in while it was printing, for the knobs… great design there.
Although i dont have a large enough vacuum for that hole, so ill have to make an adapter
Thanks. The knobs were just created with the customizer. I can’t really take any credit for the design of the knobs or the shoe. I use a PVC pipe reducer as a vacuum adapter because I was lucky enough that there was one that fit. I think there is a customizer for vacuum adapters that will let you just put in the diameters you need.
BTW karl, that door sweet has been IMPOSSIBLE to find. HOme depot says (both stores around me) they have 23 each, but no one can find them. Finally had to order one online somewhere else. HD, LOWES, etc only have rubber bottoms, not brushed which of course we want.
Ive had to put this on the back burner because im waiting for that.
Hi Karl, What two wrenches were you referring to above?
Drew
Sorry you’re having trouble finding the door sweep, Ryan LB! I recently learned that the brush used on industrial machines is called a strip brush, and is available at McMaster-Carr, Grainger, and other places.
I found yesterday that my dust shoe and brush were pushing my router off of the toolpath. To avoid this, I recommend making sure that your bit extends below the bottom of the brush when milling the deepest cut for your project (I was cutting 15mm deep). This might reduce the effectiveness of the dust shoe somewhat, but it should still work.
The problem is caused by a combination of the stiffness of the bristles, and the size of shoe we’re using (it creates more torsion on the tool and mount). I am currently working on a new design with a smaller footprint, and am also looking to purchase some much softer strip brush (horsehair, probably). Switching to horsehair alone would probably solve the torsion issue, but I also want a smaller footprint so the shoe is not covering up the work as much.
Anyway, the original dust shoe works fine, just keep in mind the things above, and look for a softer sweep when you can.
Here’s what the new design looks like so far - I’m just now building it, so haven’t tested it yet:
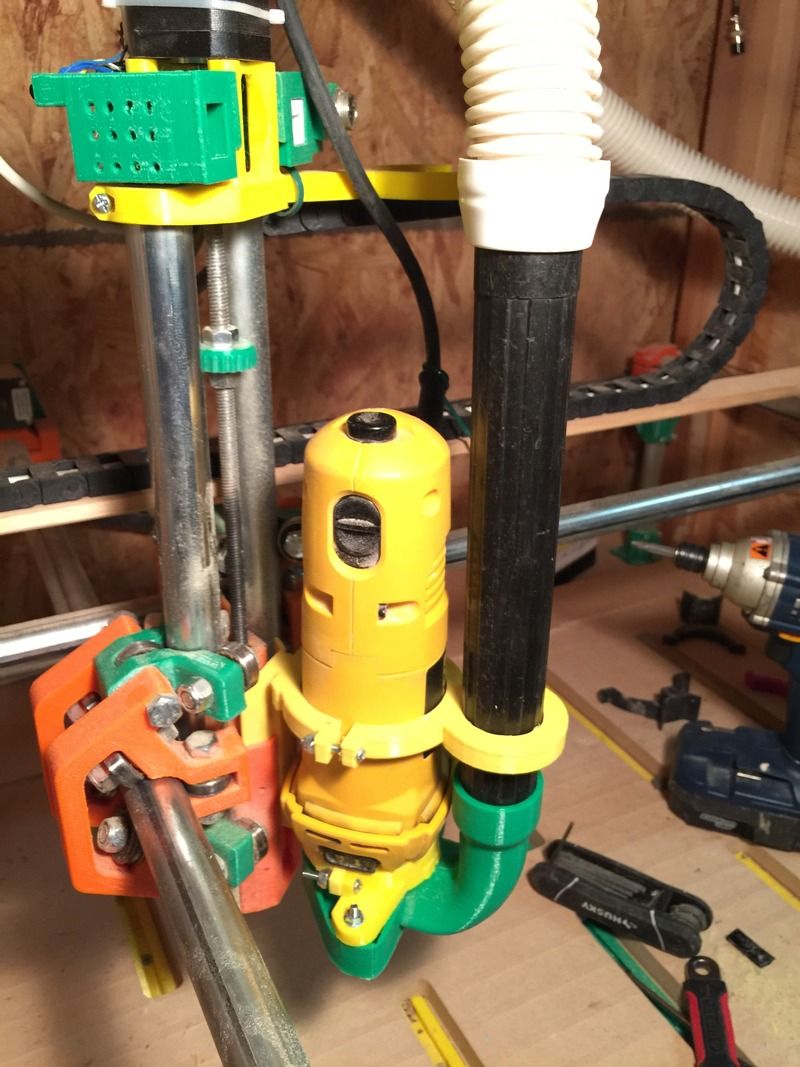
Take off or minimize that long rigid tube. It will easily torque your tool. Best case I would mount it to gantry as well and get the lightest weight flex hose you can. This is why I haven’t added a vacuum yet.
Good point, Ryan. I was looking at it last night after I got that all put together and thought if anything catches the hose, it will torque the tool.
I’ll look at shortening it and getting a very flexible hose.
Whats funny is I just finished this so yeah im going to be giving it a try. But since this is my first ever CNC and i really have no idea how much ill even use it yet, i could have waited haha.
I tend to build fun stuff, then not use it. However I think the possibilities for this area immense, so I intend to keep it
Good tips karl. So for my chess board, its just a 1mm-2mm engraving, so that should be fine, but then im cutting around the entire board, down 1+ inches, ill just take the shoe off for that.