Fun with Lightburn, lasers, and dithered images

Roger,

If you don’t mind… what feedrate, power (min/max?), and resolution (vert/horiz?) did you use on this engraving?

I’m trying to compare Grbl/LB results to my previous Marlin/ImageToGcode results using the same “shades_of_gray” image and settings I used in the “…not great results” thread…

E6CCD618-F417-4CC1-B3F8-BC915DA591C2

– David

Greetings, David,

This was my setup for the portrait:

By the way, I am delighted with the software that “LightBurn” recommended to me, I was very right, it is worth the $40.

I was able to laser cut 10mm thick plywood with 11 passes.

:smiley:

1 Like

What laser are you using? That cut in 10mm material is pretty impressive…

This one:

https://www.ebay.es/itm/450nm-5-5W-Blue-Laser-Module-12V-Adjustable-Focus-Laser-Engraver-Accessories/113562823381?hash=item1a70df2ad5:g:bakAAOSw5r1cPtUa

I set a distance of 65mm between the lens and the material, 65mm because I found it to be the optimum working point of the laser. I lowered the Z axis by 1mm on each pass. I liked that option in LightBurn.

1 Like

Thanks, Roger. You’ve got a bit more powerful laser than mine… and it’s really looking good. I’m using a 2.5 watt Eleksmaker laser currently. I have a couple of 3.5 watt Banggood lasers that I’ve played with in the past… but they really don’t seem any more powerful than the 2.5 watt lasers I have. I think it’s most probably due to a larger spot size…

1 Like

Alright!

For fun, and as best I could, I engraved the “shades of gray” image with Grbl 1.1h and Lightburn, using the same material (chipboard), feedrates, and resolution (0.2 mm and considered “best” at the time) used when testing/discussing issues with Marlin 2.0 (bugfix) back in the “…not getting great results” thread back in Feb/2019.

SIde by side, the results WRT “shading” are [to my eye] reasonably similar at feedrates of 20/25/50 mm/s (top to bottom) and resolution of 0.2 mm… Grbl/Lightburn (left), Marlin/ImageToGcode (right)

shades_of_gray-gs_feedrates_test-COLLAGE

Of note, the motion of the laser carriage is far smoother with Grbl’s laser mode ($32=1) than the Marlin 2.0 of Feb/2019… without the starts and stops (and overburn) at each power change across the shaded blocks of the image, especially at 50 mm/s.

With Grbl 1.1h and Lightburn…

and with Marlin 2.0 (Feb2019) and ImageToGcode…

I’m really not sure the current “state” of Marlin’s laser capabilities – judging by Roger’s results it seems way better – and for non-laser functionality and fancier features, Marlin may be the better, more versatile, choice… but, for laser engraving (which is mostly what I mess with these days) and basic CNC, Grbl seems to suit my need(s) nicely.

Just my $0.02… and – as always – YMMV! :smiley:

– David

1 Like

The tones in the marlin image look better to me - but that may have to do with the distance of the photograph. The grbl photo looks like the sample was slightly closer to the camera.

1 Like

David, thank you so much for sharing.

Of course, with Grbl the movements are perceived as much smoother and more continuous. Curiously, with Marlin, as the speed increases, there is a burnt edge effect, probably due to the sharp accelerations and decelerations, this doesn’t happen with Grbl.

With Grbl I notice white horizontal stripes where the laser has not caused any effect, on the other hand, with Marlin it has not happened, at least it is not so noticeable, I don’t know if this is due to the software or firmware. It could also be what Wade Ford says, camera effect.

I have to do the same test, see how it goes. :thinking:

Roger

TBH I’m shocked the comparison is as similar as it is… given that the only thing these two tests had in common was the test image, material, feedrates, and resolution.

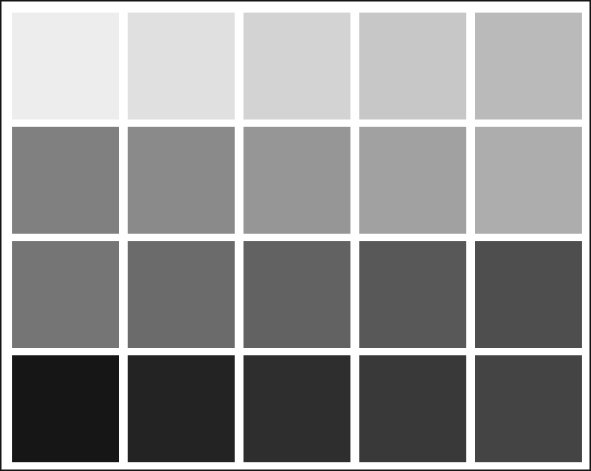
The Marlin tests were conducted over a year ago… in a different city, a different house, under different lighting conditions, with a different camera, different CNC machine, different controller, different firmware, and different gcode generator/post-processor. Using the “tones”/shaded blocks, I tried to make the side-by-side pictures similar enough to get a general idea of the overall “balance”/contrast of light and dark blocks for each run.

But what we were actually testing at the time was the “overburn”/acceleration effects on the shaded blocks as the laser power changed from block to block… especially apparent on the 50 mm/s (3000 mm/min) run. Marlin definitely showed the effects (darkened, overburnt edges) of starting/stopping at each block boundary and no laser power adjustment as the carriage accelerated and decelerated to speed. And we were having to use the M106/M107 fan control gcodes to control the laser… Marlin’s M3/M4/M5 gcode only seemed suited for spindle control IIRC.

Grbl, for the last year or more (since version1.1f), has used the same M3/M4/M5 gcodes to control both a spindle or a laser. With a spindle (“laser mode” disabled), each speed change is accompanied by a stop and pause, to allow the RPM to stabilize to a new value. With “laser mode” enabled, the stop and pause is eliminated and the motion is smooth and continuous. Also, the laser’s power/intensity is dynamically adjusted with the current feedrate… reducing to 0 when the motion stops and increasing/decreasing with the acceleration and deceleration of the carriage during a change in feedrate. In fact, I often pause a burn in progress – it stops instantaneously with the laser OFF – when I need to leave the room… and I simply resume it when I get back, with no visible effect.

So, to me, ignoring “tonal” differences, it is the clean edges (not overburnt) and uniform shading that stands out on the Grbl runs. And they really are both run at the same 0.2mm resolution… though it does appear that the Grbl photo (taken yesterday IIRC) is maybe closer and better focused, revealing a little more “daylight” between lines and giving it a bit “coarser” look.

I’m, of course, not trying to start a “holy war” here. I’m just trying to prove to myself (and anyone interested) that – for me and my need(s) – Grbl’s “laser mode” seems to be responsible for the better quality of my recent photo engravings and my laser “tool” of choice. I’ve still got a long way to go to achieve @Bulldog’s results (over on the Lightburn forum) but I seem to be getting better. I’m still an avid fan of MPCNC and am thrilled to see Marlin making progress because of the hard work of many of you here. Roger’s results… I find very encouraging. I say… keep up the good work. And let’s keep it going! IMHO this is FUN! :smiley:

– David

1 Like

I would agree that the grbl example looks much cleaner – especially at higher rates. I’m sure that also has something to do with the overall tonal quality. This is all very interesting to me as I would like to get a laser module at some point. So keep the experimentation going – it’s fascinating to watch.

David, what controller board are you using and what’s your gcode sender setup?

Heath,

I’ve used a lot of different controller boards but the one currently running my FoamRipper machine is an inexpensive Nano-based Eleksmaker 3-axis board. I’ve personally found virtually everything “Eleksmaker” to be decent quality hardware-wise [with pretty poor documentation] and generally don’t hesitate to buy something if I need it… and the fact that I use 2.5 watt Eleksmaker laser modules usually means straight-forward hook up with any Eleksmaker controller boards. Here’s the one currently installed on FoamRipper (the machine in the Grbl raster-engrave video a few posts back)…

One of the attractive features of Grbl is that it still runs on Uno/Nano Arduino modules… even the latest versions; i.e. I’m using Grbl 1.1h. There are tons of inexpensive Nano-based controller boards out there and they seem perfect for the basic CNC machines I build… nothing fancy; i.e. no end-stops or limit switches for me :wink:

I run most all my machines these days with a Pi-3B+, running Jeff’s V1Pi image and CNC.js. It connects to the Nano-based Grbl-controller with USB, of course… and I then control everything across wifi from a variety of Chromebook + Linux(beta)-enabled laptops. I’ve run MPCNC (both stock and R&P), FoamRipper, TimSav “minimalist” needle cutter, TimSavX2 hot-wire machine, and T8 CNC (HobbyKing) engraver machines with this combo. Interestingly, I don’t mess with my Prusa MK3S 3d-printer (bad karma?) and use the manual LCD/SD card interface provided with it.

And for software, Lightburn, Inkscape/Jtech laser, and F-engrave all work well with Linux and generate Grbl gcode. I really hate programs that are Windows-only… so generally shy away from them. I could use Wine with some of them (and have in the past) but, right now, I have satisfactory Linux alternatives and these cover most of what I do with my machines these days… with emphasis on being both light (weight) and quiet. I “tucker” easily these days… and need my naps :wink:

TBH I actually just play with my machines… and rarely actually USE THEM for anything productive.

:wink:
– David

2 Likes

If grbl would support an LCD screen and loading gcode from an SD card, it would be a much easier transition. I make a lot of sawdust in my shop and I’m hesitant to put a laptop or even a Pi out there. Plus, my WiFi does not extend to my shop and I’m just fine with that. The need for such additional external computing devices just to send commands to the control board is my biggest obstacle. The LCD/SDcard is much more tidy and convenient.

1 Like

I hear ya’… it’s not for everybody’s situation. I’m sure the lack of such features is why it still runs on Uno/Nano…

A pi is very dust resistant with a case on it no moving parts I never had trouble with mine till the room hit 80+ then a small oscillating fan work great acting cooling on the pi may to just don’t see the need. I added a windows 10 tablet to replace the pi and love it now I can do quick edits with out the run to

There is a version of v1pi with hotspot, but you’d still need something to connect to it.

I think there are some lcd like options for grbl. I have been wondering if one of those tft24 screens could work. Someone posted a little dongle for grbl the other day.

That is the buggest hurtle for grbl, IMO.

There is a Grbl “offline” LCD controller that I have no clue about… what controller boards and/or software it requires, etc. Maybe someone here has some information about it?

Yeah, that’s what I was thinking about. I wonder what the pinout is. I assume the arduino board powers it, and then it just talks uart instead of the computer using usb. But the port they show has more than 4 pins.

I’m still clueless about all this… but this appears promising and seems to describe a pretty complete system like you mention, Jeff. And this github page describes and provides links to all the bits and pieces – hardware and software – for a Grbl-based system using MKS DLC v2.0 controller board and TFTxx display.

Maybe you can make sense of it all and verify to this “stuck-in-the-mud” that this looks workable… :stuck_out_tongue_winking_eye:

Dang. It is such a good idea someone has already done it!

I want it to work with the standard grbl though. I am AFK, but I will have to dig a little deeper at the github details.