So I’m having some issues trying to get an engraving or a cut to happen properly. I designed a fairly simple V cut engraving and set my stock dimensions in fusion. I then zero my machine before starting the cut. But the cnc seems to go to some random location on the x,y and start making its cut. I’ve had it either cut totally above the board or cut straight through it. not to sure what I’m doing wrong. Hope someone can point me in a direction.
This sounds like a G92 thing. Without that in your gcode that runs your cut program the router will work from the power on location as its origin if that makes sense? You say you reset that though but may be worth double checking?
So you power on and the machine considers that as the origin. Then you jog the router over to your work piece, carefully align things and start the program. At this point without resetting the origin the machine will reference that initial origin for all the moves in the gcode.
This is covered in the milling basics I believe. I struggled through this initially and was pulling my hair out trying to understand what seemed to be completed random moves on program start.
G92 X0 Y0 Z0 ; Set Current position to 0, all axes
Otherwise could it be that your z axis direction is reversed somehow?
4 Likes
Brent’s suggestion is a great one that accounts for all of your problems at the same time. If you are new to Fusion 360 CAM, there are a variety of other “mistakes” that can individually add up to something like what you are experiencing. If Brent’s suggestion does not fix the problem, post back and I can give you a list of things to check.
3 Likes
Awesome! thanks guys. I will try tonight and get back to you!
ok so pretty sure my Z was flipped. now just need to set this to print at the right level
1 Like
Good stuff. Let’s see what you can do!
Woooo! Thanks guys! Z was inverted. And I needed to set the zero coordinated then reboot the cnc for it to work. Now what’s the correct way to get it to print without rebooting the machine each time?
2 Likes
Brent mentioned it above, but these things can get lost quickly. Jog to your 0,0,0 and use the G92 X0 Y0 Z0 from a console. If you are running with the screen, they’re will be a “reset coordinates” in the menu.
Sorry I haven’t had much time to test this further. But is this something that needs to be added after I post process every time? or is this something I can set once? and where does it go in the G code? sorry im a noob when it comes to Gocde
In estlcam you can add it as an item in the settings. I would imagine this is something you could also do in fusion360 cam as well.
Here’s what it looks like in estlcam for me: 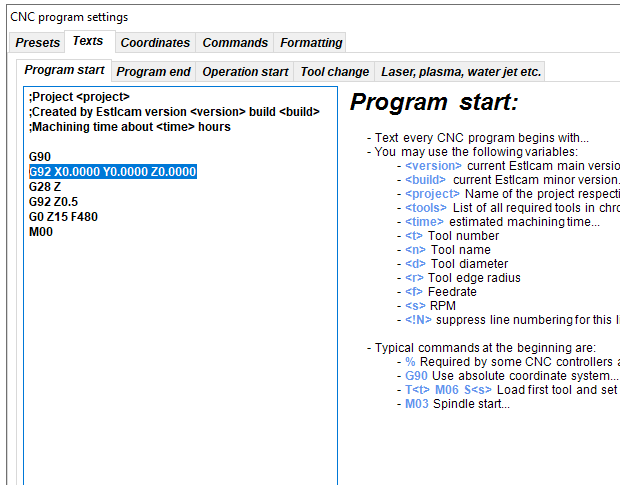
Whether you need to insert a G92 X0 Y0 Z0 will depend on your milling process. With my Burly build that did not have end stops nor a touch probe, this code was not needed. I would just drag the router into position and use a piece of paper and twist the lead screw by hand to set the Z height. As long as you don’t jog the router electronically (or home the router), the location of the printer when you start to cut will be considered the origin.
If you need to insert this g-code there are a couple of places that it can be inserted. If you use Repetier-Host, then you can go to Config/Printer Settings/Scripts and insert it in the Start Code script. If you are running headless, you can put this code (and any other start code) in a file in the same directory where you write out your g-code files. I run headless, so I put mine start code file on the SD card since I always write out my g-code directly to the SD card to keep things simple and less cluttered. Once the file is created, bring up the post processor in Fusion 360 and scroll down to the Extern: Start File parameter. You can enter the name of the file here. Once entered, it will remain. Just so I did not confuse this file with a cutting g-code file, I gave it a .txt extension.
And even if you use Repetier-Host, you can use the Fusion 360 post processor solution. I just think the Repetier-Host is a cleaner solution if that is how you are delivering the g-code to your CNC.
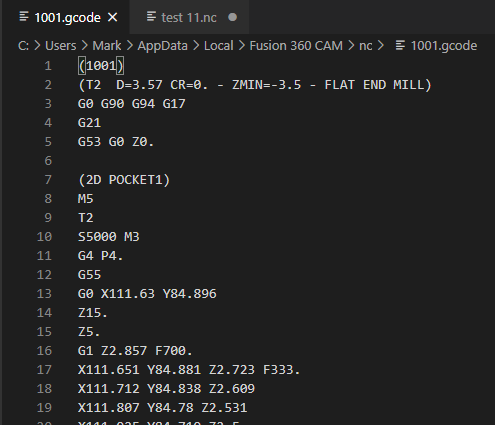
so this is what the start of my gcode looks like from fusion. I tried entering it as the first line of code and on line 6 both didn’t seem to start from the zero point.
What Fusion 360 post processor are you using? What license do you have with Fusion 360? This code is very different from the g-code I see from Fusion 360. And it is doing movements and using workspace coordinates that don’t make sense for the MPCNC. I use this post processor: https://github.com/guffy1234/mpcnc_posts_processor as do most of the Fusion 360 user I see on this forum. And I just noticed that my post processor already outputs the G92 X0 Y0 Z0.
Edit: Just got back from running errands and your question was still on the screen. As I take a closer look at your g-code, what is here is pretty messed up. I’m not sure if this is due to editor you are using to list the code or whether this is what is actually being output by your post processor.
Let me see if I can reload the GitHub post processor. maybe thats what the issue is.
GitHub is a repository that can contain any number of projects (usually software), including any number of post processors. You are looking for the specific post processor I point to in the link. After installing, you need to select that post processor. In your post processor page, you should see this:
![]()
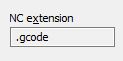
the nc extension is different and not Gcode. and after I post I get “failed to include DIYCNC_comon.js”

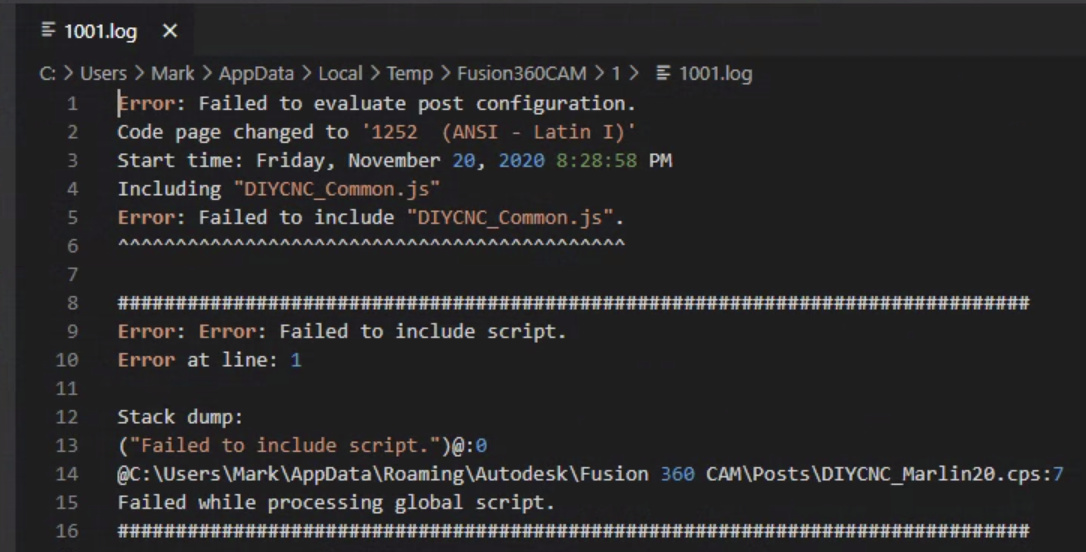
DIYCNC_comon.js should be in the same ZIP file you downloaded when you downloaded the post processor. It needs to be in the same directory as your other post processor files. To fix the .nc issue, change the value in the NC extension filed in the post processor from ‘.nc’ to ‘.gcode’.
2 Likes

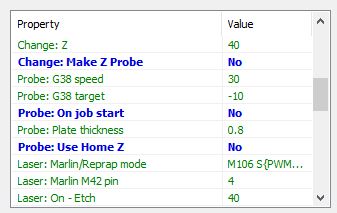
This is looking much better. Note that this g- code executes z probe before starting cutting. I recommend at least for now to run the z probe as a separate operation…or to start with just set the z height manually with a piece of paper. With that in mind, I recommend changing some post processor properties. The ones in blue I changed from the default to disable any form of z probing as part of the Fusion 360 output file:
Once you have disabled z probing, I recommend doing an “air cut.” Author a engraving or a trace and set the origin (tip of the router) above the material. You can watch the movements and make sure you have your authoring and coordinates worked out.
1 Like