Yes, that should be fine. Just trying to provide areas to look into.
1 Like
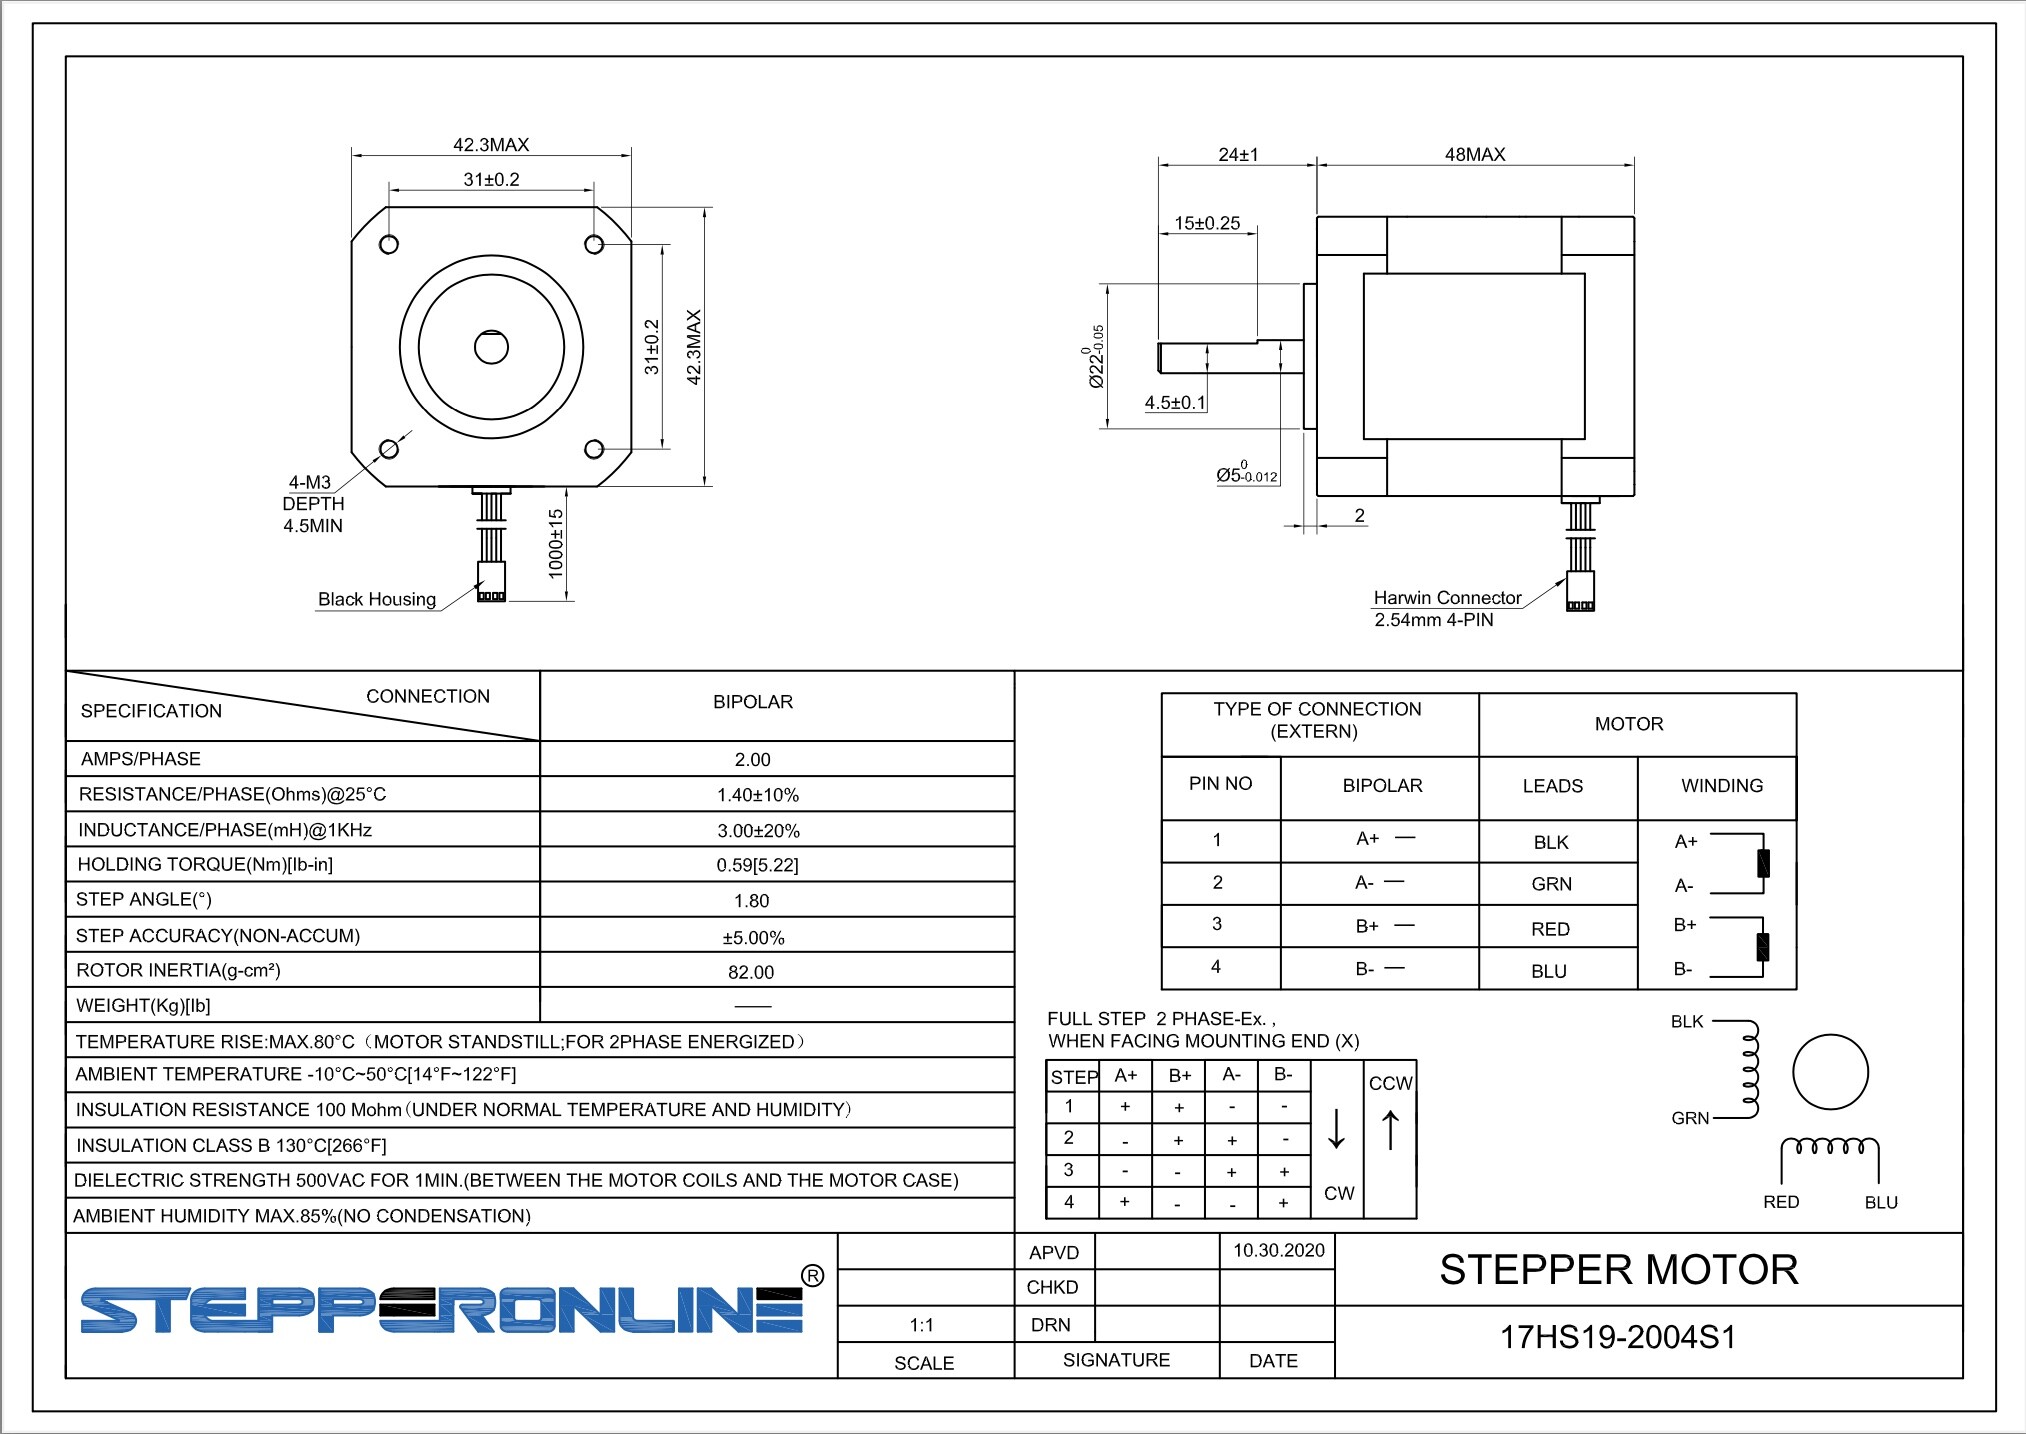
Do you know the exact specs for your nema17 motors… ie amps/resistance/torque/inductance?
Generally 12V and 8255 should be able to drive most if not all nema17 motors, but figured I’d ask since this seems like it’s going to be a hard one to fix where such smaller details could help.
It also could be a problem in the signal path (intermittent duponts etc). When you observed a slight difference from one set of drivers to the next, the duponts started looking suspicious to me. To be sure, driver dupont connectors are a perennial problem for everyone who’s been at it long enough… IMHO they should be banned lol.
It may just need higher voltage. Definitely higher voltage = higher max speed… or rather with higher volts you are less likely to skip steps at any given speed. As I said 12V should be enough, but if you happen to have like a 19V laptop brick sitting around or similar, it might be interesting to try it out and see if it helps.
Thank you!
This sheet came with the stepper!
EDIT: I bought it on Amazon, and just saw recommendation of vendor at customers questions answered, it’s better to drive it at 24V!
We found an 20 years old 19V laptop power adapter at my father’s basement archive, I will pick it up and give it a try.
2 Likes
YES! With 19V there are no interruptions any more!!!
THANK YOU ALL!!!
EDIT: I found the command $110=6000.000 $111=… and $120=100.000
Is there some recommend numbers to set?
If I understand correctly feed rate will need to be adjusted later at jog controller to material and tool I use, am I right?
The gcode can include feed rates, but the firmware won’t allow feedrates higher than these defined maximums.
$110, $111, $112 set the maximum velocity the controller will allow the machine to move the X, Y, and Z axis respectively.
$120, $121, $122 set the maximum acceleration for them.
Each machine is different, so you’ll want to tune your’s experimentally.
It is common for the Z axis to have much lower velocity and acceleration than X and Y.
1 Like
…finally time to move on…
Thank you all, it is doing the job so far now! It drawn a test crown very proper.
Next step is a touch probe.
I made one from a small aluminium block and a crocodile clamp. I used this instruction https://www.instructables.com/Setup-a-Touch-Probe-With-a-Arduino-Cbc-Shield-and-/
I think I did all correctly, but it does not work, I got an error:
[Error] An error was detected while sending ‘G38.2 Z-10 F100’: ALARM: Probe fail. Streaming has been paused.
[PRB:0.000,0.000,0.000:0]
ok
An unexpected error was detected: error: Alarm lock
Any suggest where to look?
I tried UGS Platform and CNCjs
Either limits are not set up properly, or you have noise on the probe and/or end stop lines that is causing false triggers.
You can use a single dollar sign command ($) from the console to get current status, and it should report end stop state on the resulting status line with the letter of the axis when the stop is active/triggered. I would see the X, Y, Z and touch probes triggering randomly when I repeated the command when I was certain the switches were not being touched.
I had to add little 4.7uf ceramic capacitors to my end stop and probe lines to reject noise. I just slipped them into the connectors on the CNC Shield between the signal and ground lines and it cleared up all my ghost triggers.
1 Like
Finding the problem will be a lot easier if you can provide a short description of exactly what happens between sending the probing command and the error. Like, “it starts moving toward the block but stops before touching”, or “it doesn’t move at all, errors out immediately after sending the probe command.”
As Tom suggested, it could be a false trigger from noise. It may also be a problem with soft limits, or positioning before the probe command. If soft limits are enabled and your WCS origin is set too high, grbl will halt any commanded movement that would put it below the z soft limit. For pre-probe positioning, with your command containing z-10, the controller will only move down 10mm in attempt to probe. If you start with z too high and there is no trigger before 10mm, it will error out.
1 Like
Sorry for double posting!
To check the wiring twice was a very good advice! I did a really stupid mistake with the bushing for the probe, I used the wrong connector! Now all is working fine!
Thank you for all the help, much appreciated!!!
Next step: learning to draw and convert to a usable file!
2 Likes