I’m sorry to have to ask something I know has been addressed but I’m not even sure of the proper terminology of what I’m trying to do so in many, many, searches I have not been able to find anything that addresses my issue.
I need to figure out how (IF) it is possible with Estlcam to rough with a larger bit (say half inch or 13mm) to clear away large open portions, then follow up with a fine bit for the detailed areas the large bit cannot reach.
When I’ve tried finishing passes it will get the fine details tight to the desired cut line but will not clear the material between where the half inch bit can reach and where the 1mm ball mill cuts. I’ll try to get pics to clarify but for now I’ll explain it like this:
Say I’m cutting the capital letter E at a size where the space between the horizontal lines is 10mm. I can clear around the entire E but not inside the horizontal lines, with a 1/2" bit no problem, but when the program shows the finishing tool paths for the 1mm ball mill it oulines the E but leaves the rest of the material in between the horizontal lines uncut. In other words it leaves unwanted material in between the horizontal lines. Which has left me clearing the entire perimeter with the small bit.
It makes for some very, VERY, long cut times.
I tried giving more clearance on sequential cuts but then it will cut into areas that shouldn’t be getting cut. So far the solutions I’ve come up with are #1 buy better software (which I cannot currently afford) #2 add lines to the design to use only as reference for cutting (which complicates the design and can also confuse Estlcam as to what lines are for what cut) and #3 swallow my pride and look like a lazy noob by asking what I know is a repetitive question.
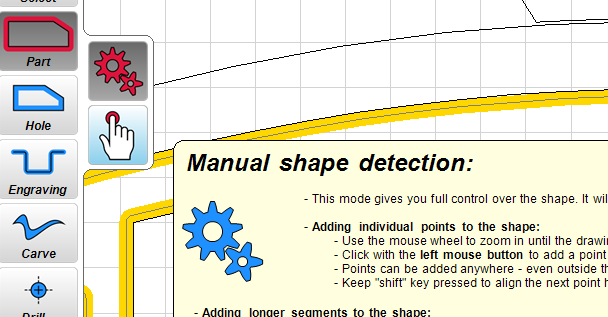
I think you have the right idea – use 2 cuts with diff tools. Rough out with the large tool and cut again with the small tool. However instead of adding additional lines so Estlcam can auto pick for the small tool you can pick your own area/path in Estlcam. When you pick the Hole/Part tool there is a option for manual shape detection that lets you pick the area to be cleared. That’s how I do it… But if there’s a better way then I up for learning.
I’ve done the manual shape detection too, gets very slow for more detailed cuts. As I was reading your comment it dawned on me that Estlcam has the “update drawing” feature which would allow me to just save the initial image (for me usually an inkscape vector) in different stages which I believe would make the automatic detection easier. I’ll have to give it a shot.
This is one place where Fusion 360’s CAM is easier to use than ESTLCam. In Fusion 360 there’s an option for ‘Rest Machining’ which will only remove material left behind from the previous tool.
Successive operations using FreeCAD’s 3D Surface for the finishing pass with different tools can achieve this. It’s not as efficient as 360’s Rest Machining, but could be pretty close.
I have yet to be able to figure out how to get fusion to work with my mpcnc. I’ve used it for 3d printing but have yet to figure out what I’m doing wrong for the milling. I’d love to figure it out because so far I’ve been stuck doing 2.5 D engravings and I’d really like to do so 3d parts and carvings. I can’t figure out how to add repetier host to fusion as the post processor.