I have finally returned to the CNC.... and there be issues

Hello people. I built my spanky CNC a LONG time back now with it’s posh wireless controller etc…

And it’s never got used once in about 12/18 months.

So, seeing as Covid has killed my career stone dead, I have been having a play. Hmm.

First of all. I just don’t know what the heck I am doing. I purchased a whole host of milling bits, but I am getting all kinds of mixed results. I just don’t know which bit to use for what with what settings.

I have 10, 30, 45 and 60 degree bits. Plus square and round tipped as well. All 1/8" shank and varying diameters. But if it’s under 1.5mm… I have probably broken it!

I’ll list my issues.

Any round or square tipped 2mm+ diameter bit shakes the entire rig almost to bits. Even at the smallest plunge depth. Seems to be spinning true and the Z axis seems rigid enough (to a point).
What could that be? Are round/flat tipped bits difficult to use?

Is there a resource on the net of what bit to use, what speeds to try etc?

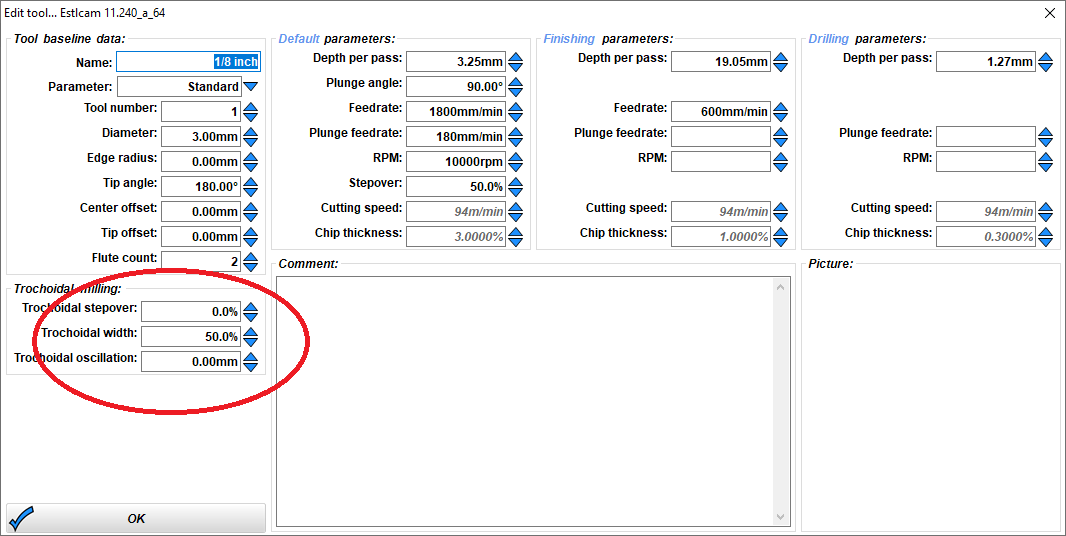
I am still stuck with Estlcam (which I think is why I gave up the first time)… UNDO FUNCTION!!!
Make a programming mistake and you literally have to bin it and start again.

My lack of knowledge regarding bits, their plunge depths, speeds etc then leads to ridiculous milling times. A small 6" sign, 12mm thick earlier had an estimated carving time of 65 hours. I could sand it by hand in that time!

Any advice gratefully received, as the CNC is in danger of being dismantled to gain the space back.

Thanks!

1 Like

With a Cnc that looks like that, I would leave it out just for decoration even if it was never used hehe.

Mastering feed rates, speeds, and cam software is no small undertaking. Sometimes approaching it with the idea of memorizing a ton of numbers can be a road prone to more failures than just nibbling away from the bottom with a certain project… taking notes as you go.

Materials cut differently, and cutting strategies can add to the variables with the same material and bit. Using the latter method, you learn some general ideas that can be applied to many different things Cnc. For example finding out certain contour cuts need to go slower than a pocket adaptive cut… or having to keep the feed rate high enough to avoid burning bits… both true regardless of material.

So next project you get going, bounce your setup, gcode, and ideas off the community as you go. While the advice you get may be specific to the project, you will also be able to pick up gold nuggets of generally applicable knowledge too… and have a project that progresses to success at the end.

1 Like

The sharper bits are good for beginnners when doing carvings for things like text. Any error in Z makes errors in. x and Y. That error is smaller with the sharper bits.

1/8" bits with 1/8" diameter is a good starting place. Flat bottom bits and the jobs you can do with those are good starting projects. The milling basics has some pretty conservative starting numbers. If your machine can’t handle those numbers then we should work together to troubleshoot the mechanics.

In my mind, progression of difficulty goes like this:

  • cut out shapes completely with a flat, 1/8"+ bit.
  • add pockets or rabbets, this is 2.5D. same bit
  • carve some detailed patterns with vbits. Smaller areas are mich easier. A 12"x1" is harder to get right than 4"x4".
  • add some tool changes. For example, a carve with a flat bit to pocket out most of the area
  • the round nose (bullnose) and some bit changes to make some 3D carves (this is still one sided). Imagine milling a landscape of a mountain 6"x6". That would still be a pretty complicated job, with plenty of hours from the cnc.

I’m not sure where you are on that list.

As long as you have a bit that is meant for cnc work, it should be the easiest. There are many 1/8" flat bottom bits that can’t cut well when pushing on the sides of the bits. Getting some sharp stuff from the v1 store is a good way to at least have a baseline for what to expect.

There are lots of ways to make things more optimized and get a job done faster. 65 hours is not doable :slight_smile:. I think the most important is to think that the machine moves at a linear speed. So the total time is close to the total length divided by the linear speed. A pocket, for example, adds a ton of linear distance. The settings on a pocket (stepover, total number of passes, size of bit) have a huge impact on the multiplier on the time. Those same settings on a cutout are nearly insignificant. You might choose to cut the sign from multiple thinner layers of stock. Or you might want to exchange some speed for depth to reduce the passes. Or you might want to swap a bigger bit and remove most of the material in a roughing pass, and then choose a finer bit for a finishing pass. I know you are creative, so just think about reducing the total distance of the cut to reduce the machine time.

I love your machine, and your quality output. So I really hope you can keep at it.

1 Like

Can anyone recommend some milling bits I can experiment with for use with Aluminium?
Preferably in the UK.

My Router is set up for 3/8" (3.175mm) bits, but I can increase that to 1/4" (6.35mm) if you think that would yield better results or less breakages.

I have some slabs of 20mm ally and fancied seeing if I could get anywhere with milling them.

Thanks

OK. Today I decided to try and cut out a simple ‘demo piece’ I designed.

I am not thick (well, I didn’t think I was), but this is how that went…

Designed it in EASEL. Spent 20 minutes trying to work out how to export it as a G-Code file, as I simply cannot get EASEL to talk to my Rambo controller.

Loaded the exported G-Code into ESTLCAM. Sat through the obnoxious 1 minute ‘buy my software’ pop up about 20 times (which overlays everything on the screen, not just ESTLCAM).
Totally failed to get ESTLCAM to talk to my CNC machine either.

I tried to get the file to load into ESTLCAM as an SVG file, as I know I can export that to Repetier and then send it to the machine.

Repetier refused to open the exported EASEL code.

Gave up after about 4 hours and cut it out in 15 minutes with a jigsaw instead :roll_eyes:

This CNC is just a very large table at the moment.

I can understand your frustration with trying to get things working, but Estlcam is really worth the low cost. Besides, the software is fully functional to try - not common these days.

That said, when you tried to load the SVG into Estlcam what happened? Can you upload the file here?

In the standard workflow, neither Easel nor Estlcam “talks” to the Rambo controller. They generate the gcode file on the computer where they’re running, and then that gcode file is sent to the CNC by either a gcode sender (Repetier Host, cncjs, UGS), or the gcode file is put on a memory card which is then inserted in a slot (generally somewhere on the display) and read by the Rambo firmware, then you use the menus on the display to start the job.

Sorry, just reviewed the thread, I suppose with wireless you should be able to “beam” the file to the CNC, but that’s beyond my personal experience.

I don’t know what other people’s workflow looks like.

I draw up my project in FreeCAD, or Fusion360, or Tinkercad, or inkscape, or whatever gets me a usable .svg or .dxf file.

I import that file into Estlcam, and export a “CNC program” .gcode file.

Then I transfer that file to my router. Currently my Primo is running RepRapFirmware on a Duet Wifi, so that means uploading it via the network, but I used to put it on an SD card plugged into the LCD, which is the intended workflow for my LowRider build.

This does mean that I use several pieces of software.

Fusion360 is supposed to be able to do the CAM work as well, but since I don’t really use Fusion360 anymore at all, I’ve never tried it.

I like the options that Estlcam gives me, and it generates code that works well for both Marlin and for the Duet’s firmware.

yeah, the nag screen was troublesome, but I do feel that the functionality was worth the purchase price. The screen starts off as only a few seconds but gets longer. I basically just never closed the program until I bought it, so that I didn’t have to see it as often.

For “one-of” projects, the CNC is basically a cool toy. Where the CNC really shines is if you find “I want another one just like that.” or even “That’s good, but it would be even better with this one more feature.”

The first one takes 15 minutes with a jigsaw, but then so does the second one.

Something that I could do in 15 minutes on the tablesaw, drill press and a bandsaw might take me an hour to draw in CAD, do the CAM in Estlcam, and then another 10 minutes to cut.

The second one might only save 5 minutes, but it will be exactly the same as the first one. No small errors from not setting the tablesaw fence in the same exact place, or dealing with a wandering drill bit, or small errors with the bandsaw (or jigsaw) No small errors with dado joints,

1 Like

Take a look at the software workflow and see if that helps. There are an awful lot of pieces and it can be confusing to connect them.

I have never used easel. I usually start a design in CAD (and I use onshape because it’s the devil I know). I would expect the gcode file to open in repetier host (it may not show up unless you have “show travel moves” enabled. I also would expect an svg or dxf from easel to open in estlcam (see estlcam basics) and then exporting that gcode would be something you could run in repetier host.

I’m sorry you’re having trouble. I love your machine.

1 Like

Yes. It’s immensely time consuming and slow. It’s just taking FAR too much time :roll_eyes:

I finally have kind of a system…

Tinkercad can produce SVG files, but I basically have to produce a CAD item with holes everywhere, whether I want a hole or simply an area milled out. Then I can use ESTLCAM to actually decide how much of that ‘hole’ I want to remove.
I can then load that into REPETIER to mill it out.

I just don’t find ESTLCAM user friendly enough to pay for it.

I also did get EASEL to output a file I could load into REPETIER. This I found much better.

But, the actual milling times are mad. We are talking either hours or days in some cases for small parts.

I worked out that my Z axis needed tightening up at first. That solved some issues.
My Katsu router seems to cut best at almost its slowest speed, which is 13,000 RPM.

But… I thought the router would be better (and so does Google) at its max 32,000 RPM.
However, the noise is then so offensive it’s unbearable.

My settings were 20mm/s feed, 0.2mm/s plunge, 2mm depth of cut.
But the milling time on a piece of ally 3.2mm thick was 5hrs+ Mad. And the noise!

I could build a sound-proof enclosure for it, but I think that may be dead money after dead money.
So, currently, I am looking at removing the wireless controller I fitted (I want to use that on something else), and selling it as a going rig. I am just not going to get the use out of it and it takes up a lot of space.

Hmm

1 Like

Just can’t walk away…

3 broken 1/8" bits so far today :roll_eyes:
Just cannot seem to get the flat ended mills to enter aluminium without instantly shattering.
I even tried manually lowering them in super slow… instant twang and it shoot across the room.

Got somewhere with round end mills (still madly long milling times), but the finish is pretty ropey.


Try using trochoidal milling. This will basically move the bit in little circles through the material. which will make it much easier on the bit.

The harder the material, the better the CAM processing must be in order to go through it. My Primo is too big, so I have only used the “drill” function in aluminum myself.

2 Likes

Not all endmills can cut downwards. Have you tried ramping into the cut, or coming in from the edge of the material?

1 Like

Well the part I was trying to mill was in the middle, so I cannot come in from the side.
I set the plunge speed to biblically slow (think it was something like 0.1mm a second) and the feedrate was set at 20mm/s. It still shattered on touching the metal.

Maybe the wrong type of bit :face_with_raised_eyebrow:

Similar to this bit but 1/8"

I don’t have any aluminum experience myself, just passing along what I’ve read/seen. My understanding is that unless the cutting edges cross the centerline on the bottom, then the bottom of the bit doesn’t cut, and the bit it can’t “plunge.”

Complete armchair engineering, but that looks like it should work. You should be cutting at a reasonably slow RPM, otherwise you risk not cutting enough and overheating your bit (or worse, welding your bit to the stock), especially with a two-flute bit. And if you can, change the plunge angle to something other than 90 degrees. Let the bit work down into the stock rather than jam straight down into it. Once the endmill is fully involved in the stock, having the full cutting length of the flutes engaged will help. Or at least, the full DOC… And the trochoidal milling really will help a lot. Assuming, of course, that the pocket/channel/hole you’re milling is larger than the diameter of the endmill.

Its just SO time consuming to try and dial this in! (And expensive #BrokenBits)

I think part of the issue is the wealth of conflicting information on the Web. Some people say mill aluminium at 32,000RPM, some say at 12,000RPM.

I have not particularly noticed any difference yet between any speed.

It does make sense to me that the bottom of the bit must have a cutting ‘blade’ across it’s entire width, otherwise it simply cannot plunge into the material full stop.

I do have bits that are angled at the ends. They say they are for aluminium, but I have yet to find any use for them. Because the point is off-centre, they instantly snap the second they touch the surface to be cut.
I tried them approaching from the side and they didn’t last long at all (snapped).

Going to try a 1/4" bit this afternoon. Straight cut with a cutting face across the bottom. Nothing to lose really

I would suspect it is either your feed settings or rigidity of your router. I had no issues cutting aluminum with my older 525 version MPCNC. I used these bits:

https://www.amazon.com/HQMaster-Carbide-Router-Acrylic-Hardwood/dp/B010NI39WO/ref=pd_d_sim_b2b_1/145-7799280-3545728?pd_rd_w=OixB6&pf_rd_p=c1143869-a7d7-4cfd-bf9c-0da7305c3e64&pf_rd_r=E4G45419X4HQ11ZV5XF3&pd_rd_r=aa855136-2ab0-4ae4-ba9b-a966740f6d36&pd_rd_wg=5GvKq&pd_rd_i=B010NI39WO&psc=1

I have tightened up the Z axis, and it seems pretty solid.
I have ordered more bits. See what happens.

What feedrate, plunge speed, DOC etc did you use for that aluminium milling in your pictures (3&4)?
Would also be interested to know how long that took to mill out.

Pretty sure slower is better when it comes to the bit speed. Soon find out!

Feed and plunge were 1 mm/s. DOC .1 mm/s
So yeah, it took like 16 or so hours to cut…

I could probably speed it up a little and shave some off the time, but it was my first cut in aluminum and it’s using an older model MPCNC (core isn’t at rigid as the Primo).

The part came out great and the piece of aluminum was like $10 shipped. A local water jetting place wanted like $100 for the same part, so I was happy to wait a long run time to cut it!