Image to Gcode Converter

@Ryan I have been testing this program the Viktor made and posted on Thingiverse. I have some test results.

@viktorglekler I really like the program. I love the clean interface, the idea of keeping it simple but functional. I also like the way you made it so it doesn’t have to do as many unnecessary moves. Creative solution that took time and effort to implement I am sure. As a former programmer I commend you for a job well done.

Now if I may say the bad news. It doesn’t work very well for an MPCNC. The MPCNC has a lot of weight to move around. So it needs to take extra time and distance to get up to speed. Smaller laser engraver machines can accelerate faster so I think this program can work very well for them.

In some of my testing I used this horse image as an example. In my first attempt to use this program I set the speed to 600mm/min (or 10mm/s). I have tested this speed with my laser previously and I know it is a good speed to use that will produce the most even results. That should make the darkest spots at full power burn a dark brown. In the file created by the app it started with the legs. I saw the laser move directly to the first hoof then go back and forth left to right for a few lines then jump far to the right to start on the next hoof. It went back and forth left to right for a few lines then returned to the first hoof for a few lines. The problem is the machine at full acceleration couldn’t get up to full speed of 600 mm/m. So it was burning much darker than it should have. I let the test run for a while and the larger partial horse was the result. Way too dark.

[attachment file=83954]

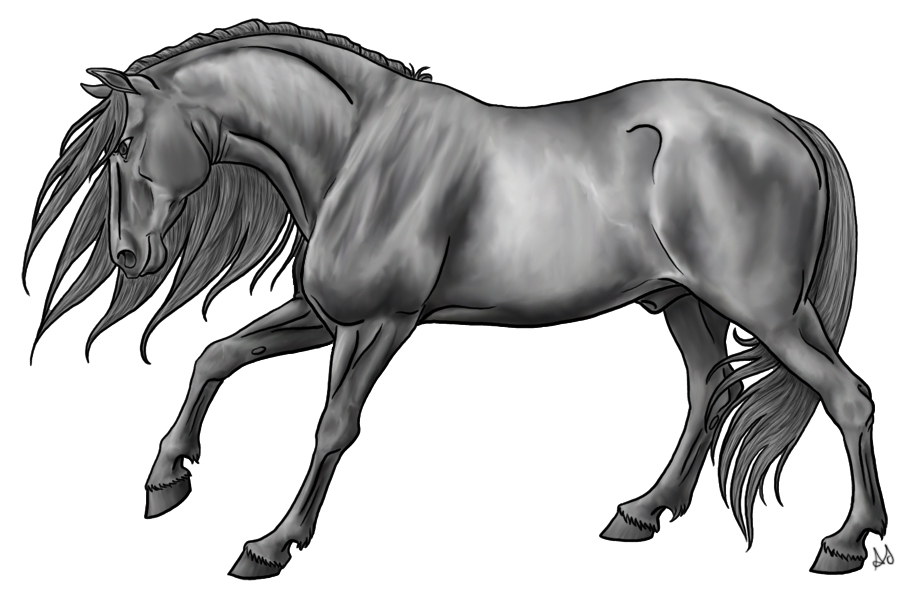
It should look closer to this. This was made using a different program on the same machine, same wood material with same power settings. The only difference is speed. My previous burn used a constant speed close to 10 mm/s that passed the entire length of X one layer at a time.

I decided to end that test early and test again increasing the speed in the app to see if it made any difference. I changed it from 600 mm/m to 1800 mm/m. The result is pictured in the first image. The partial legs. They are just as dark as the first test at 600 mm/m. So I know for sure the top speed doesn’t matter if the acceleration is so slow that we will never reach that top speed.

I thought about running a test using lower power settings on the laser but I realized that would be like trying to hit a moving target. Sure, I could try a few combinations to eventually get the horse legs light enough to be correct but then the body of the horse would be way to light colored. So I gave up on that idea before I even tried it.

I decided to test an image that doesn’t have any “Skipped” space. aka every pixel is grey to black. No white pixels to get skipped. I was hoping to discover that the outer edges would be darker but the center of the image would be the perfect grey. (Unfortunately I left the travel speeds set so high that my machine skipped some steps so the X axes shifted a little. So don’t judge that part.) But if you look closely at this next image you will see that it actually worked. The far left and far right sides of this 80 mm square burn are darker where the machine is speeding up and slowing down. It looks like it is about 5 mm on either side that is darker than it should be but the rest is pretty good.

[attachment file=83955]

In conclusion. I love this app and I am really sad that it won’t work for the MPCNC for most images and logos etc. I love the idea of eliminating wasted movement but it is that movement that keeps the constant speed necessary for a clean image burn.

@viktorglekler If you are willing to make a few changes for us MPCNC users could I please request the following:

  • Have an option for full rectangle movement to minimize the accelerations.
    • Or a more advanced option would be to have a setting for an acceleration buffer. A distance that the machine could use to travel beyond the burned image to speed up and slow down so the laser can be moving at the desired speed by the time it is supposed to turn on.
  • PLEASE add the laser off command to the end of the gcode file. If you look at my third picture you will see a large burn hole near the corner of the test image where it finished the file and then left the laser on. This happened on a few other test runs I made as well. very dangerous. I was near the machine and heard it stop but I took a minute before I approached it. That minute could have started a fire and would have if I didn't have an air assist fan blowing on it.
  • Please replace the feedrate and travel speed sliders with text boxes. It is very difficult to get close to the numbers I wanted with a mouse. It was even harder with a laptop touchpad. I gave up and just held the CTRL key and used the arrow keys to get to the numbers I wanted. Sorry to say but it was frustrating to make a small movement and be 1,000 over my target number.
  • Please add Gcode to the beginning of the file that will turn the laser on with a power level of 5 (of 255) so it is visible. Then draw a rectangle around the area that the machine will go when it is cutting/burning. This way the user can see if they have the right size and alignment before the burning begins.
  • Please add the ability to set the origin as the center of the image. This is a really cool feature that allows the user to be able to burn a logo or decal into the center of something.
  • Please add the ability to perform a test burn that will compare speed vs Power level. I build a gcode script that does this but it would be better if it could be made into a program with parameters and settings so the user could control the max and min speed & power. Something like this would be helpful for users to get to know how their machine works and what settings would be best for them to use in the app.
Once again. I want to say that I am really impressed with the app you have created. I was really excited to try it out. I was happy with the simple and easy to use nature of it. I was sad when I concluded that I can't rely on it for my MPCNC in current state.


1 Like

WOW, extremely insightful!

I think this is how my big laser used to do it. With a buffer we could also increase the speed greatly as the acceleration ringing would not exist.

It really sounds like this could be a very powerful program with a few changes. I really appreciate you trying this out and sharing your findings.

1 Like

Victor just need to implement tunable “pass extension” feature like fusion 360 does for 2d facing milling. of course it should extend line with zero laser power

[attachment file=83964]

1 Like

My laser is still sitting on my shelf, so take this with a grain of salt.

I thought when Marlin was set up for laser, or maybe this was in the grbl docs, that if the gcode was asking for 255 and full speed, but it was moving at half speed due to accelerations, it would reduce the laser intensity in the firmware to 128. I’m sure that’s not perfect, because I doubt it’s linear, but I remember reading about that in one of the laser feature descriptions.

Also, if you set your max speed lower, your accelerations higher, and your laser power lower, wouldn’t that make the feet and the body about the same? Drawing over the entire area, including the white spots seems like it could have trouble with extra burning, and certainly seems like a waste of time. Plus, the stuff at the edges will still be too burnt due to the slower speeds.

Aaron, this is great feedback and a very detailed report, but I was just thinking maybe there are other solutions when I was reading it. I definitely think that lead in would be a great feature. And again, I’ve never tried it, so this is me monday morning quarterbacking.

You might be correct. When I was trying to get my machine setup to control the laser I followed some of the documentation that Guffy linked me to and I saw that Marlin V1.9 and 2.0 have a bug in the laser control (M03) that causes a delayed reaction to power level changes. In other words the exact feature you are talking about isn’t working right. So I went the easy path and just implemented my setup to use the fan controls (M106). This fan control setup is pretty common but it doesn’t get the cool features you are referring to.

So you may be 100% correct. This might be easier to setup if we could rely on the marlin firmware. I just don’t know how long that will take or how well that will be implemented. I do know that the current idea of the “Pass Extension” should work on most systems with most firmware configurations.

I agree there is more than one way to accomplish this and I am open to all of them. With that in mind I may even try to get the M03 control working on my machine with an older version of the firmware to see if it works. maybe 1.6 or 1.7. Or if someone else is already running a laser setup on an older version of marlin maybe they could test this same app and see if there is a difference between the M03 and the M106 that I am using.

No, marlin just doesn’t care about any correlation between current movement speed and spindle/laser pwm value. Check m3-m5.cpp

I guess smoothieware does, but marlin doesn’t.

With marlin gcode generating applications must care.

Ah, I was thinking of the grbl mode:

cool features. unfortunately fusion 360 grbl pp doesn’t support it at all

FYI. I have found two other programs that I will be testing soon.


Too bad. The first one (LaserWeb) is an advanced (free) program with many features and options. They call the “Pass Extension” feature “Over Scan” in their app. The app has a steep learning curve but it has all the features we could ever want and more. The problem with it is the the flavor of Gcode it produces is not going to work very well with Marlin. They add the laser on command Then do a move command on the next line then do the power setting for the laser on a third line. Like this:

M106; Laser on full power

G0 X## Y##

M106 S### ; set power level.

Ummmmm. That’s not gonna work.

I will submit an issue on the github forum. The developers seem to be pretty active. But to be honest this program has so many features and buttons it might intimidate a lot of new users. There isn’t much documentation or tool tips to help out either. Too bad. It can do 3D reliefs, DXF files, raster to laser etc. Many many features.


The other one LaserGRBL Only supports M03 and M04 laser control commands. It also doesn’t have a “pass Extension” option. I am done testing that one since I am not setup for M03 and I don’t care to do a find and replace for ever test file I make right now.

My top preference would be the first program listed in this thread. Image to Gcode Converter. A few tweaks and it would be gold.

Loving this! Detailed reports of the plethora of laser programs.

I have added support GRBL to fusion 360 pp including GRBL’s laser mode $32 command and m3/m4/m5

1 Like

It’s my understanding that the user should be setting $32. That should be set on laser machines, similar to setting up steps/mm or something. Once it’s set, it’s sticky across startups.

i think it can be set any time and as many times as required.
so i set
$32=1 at begin of a section that user jet (laser tool)
and
$32=0 at and of the same section

1 Like

I think that will write to eeprom each time it is called. I could be wrong. I don’t think you want to call it that frequently.

I’m also not sure you can put any ‘$’ commands in a gcode file. They are usually setting parameters, although some are for communication between the controlling program and grbl. I tried to home in a gcode file ($h or something similar). It would not let me do that.

I could be wrong. We should probably try it with a grbl 1.1 board :). I’m basically guessing based on what I’ve seen.

Wait, I have one. My zxy.

test.nc:

$32=1

output when I run that file:
ERROR:1 IN SD FILE AT LINE 2
error:1 in SD file at line 2

1 Like

i have an uno flashed with grbl 1.1 at home.
it is connected to empty cnc shield that not connected to any hardware. but this enough to test gcodes.
will check this later

1 Like

There is a limit to how many writes but it is a lot :slight_smile:

it seems you are right. in contrast to marlin grbl immediately writes settings to eeprom. and because eeprom writing disables all interrupts (even serial port doesn’t work at this time) - it seems that it’s not possible to stream settings mixed with job gcode. but according documentation i expected error code 8, not 1

1 Like

Ok, that’s probably from the SD card logic in grbl for ESP32. I’m not sure if it’s unique to esp32 builds or not. I forgot that this grbl was running on an esp.

I assume you’re convinced not to put a $ command in the gcode though? I don’t want to beat a dead horse.