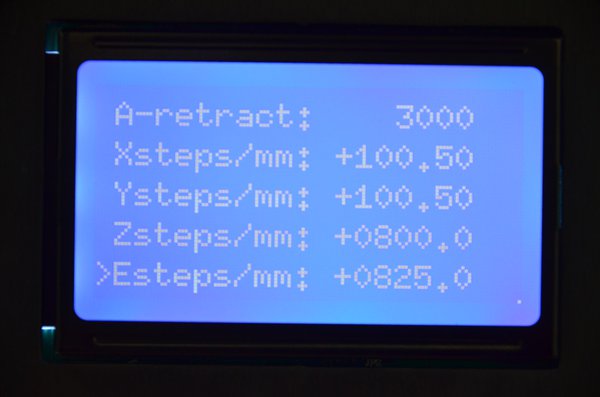
I have been wanting to try an inlay myself. I will have to give it a go. I honestly do not think you have anything wrong you just need to remove a bit more material with your pocket. I see you are concerned with your dimensions being slightly less than expected. I had a similar issue and resolved it by modifying the steps per mm on your x+y travel. You can do this through the LCD screen. Just press button on ‘configuration’ and then select ‘motion’ you will see a screen like this.
You would want to concern yourself with XSteps and YSteps. Based on the stepper angle and GT2 teeth and such you should be at 200. Things and tolerances are not dead on so you may need to swing this a bit. In your scenario if you are putting in 1.5 and getting 1.48 then you would want to start with your math like this.
(expected) / (actual) x (curent value default: 200)
so your math would be
1.5/1.48 = 1.013513513513514
then take
1.013513513513514 x 200 = 202.702702
So you could then input this number in both your x and y estep values (simply highlight each value click and spin).
Hopefully this makes sense. I think you are darn close. I have wanted to try an inlay for awhile now. If I get time this weekend I may give it a go and let you know my findings.
Do not adjust the steps unless you test an inside and outside cut. The steps should be very accurate. If you get a small inside cut and a big inside cut the tool diameter is wrong.
Here is exactly what I am doing… I am now using a 1/8" bit which I think the size is dimensionally correct where as the 1/16" bit was some cheap crap off Amazon.
Even with the 1/8" bit re-running I ended up with a 1.48" square pocket.
You are within .02" in wood, you realize that is pretty good right?
.5mm is pretty small the average layer I use on a 3D printed is half that thickness. In these sizes it could be anything, the wood could be compressing, or expanding from the heat. I have put some tolerance examples in the FAQ’s.
I guess I should not be complaining… I sort of look at things black and white… I’m a bit OCD too.
Though the pocket is too 1.48" the inlay will not fit inside without some sanding. Is this normal ?
Is there anything else I can do to the tool or software? Will adding the finishing path to both the pocket and inlay make a difference and if so what sort of settings should I use for this simple square test?
Have a look at the faq’s about tolerances, .02" in wood is is beyond excellent. That is less than 1/32", it can’t be measured with a measuring tape.
You cannot cut anything as an exact fit, ever, you always need extra room, even more if you are using glue or epoxy.
Look at my 2.5D tutorial if you don’t understand the finishing pass concept. Yes they will make a difference, it is a standard machining process if you are dimension critical.
To do a test, as I said befor do an inside and outside cut. Same square on cut inside the line, one cut outside the line.
But really, you are within.02" if you want to try and get accurate measurements you can not do that with wood to this degree.
So here is my next stupid question… “To do a test, as I said before do an inside and outside cut. Same square on cut inside the line, one cut outside the line.”
How do you cut inside and outside of a line? I thought I had to use part for the inlay and a hole for the pocket.
If the issue you have is that small, light sanding should take care of the fit. (or a small overcut on the corners if that’s where it’s snagging)
To cut the inside vs outside of the line, that has to be done on a cut (or engraving w/ engraving depth set to the material thickness) and not a pocket.
*The screen cap you took shows the corners not getting cut out, you may try overcuts on the corners, or you may need to go in and either sand those corners off your inlay piece, or chisel/sand out the corner of the pocket after cutting out.
FWIW - slight sanding and the parts fit… however, it’s not totally clean and there are gaps. When doing inlays… how do you solve for something like this?
to get rid of the gaps, I would make a matching wood filler.
Using the dust from the inlay piece, you can make a matching wood filler by mixing that fine dust with glue/adhesive. and it could be sanded down/flush after.
Test the filler color on scrap wood first to make sure it dries the right color/consistency.
Another remark: pine is not really good for milling. It is a bit too soft.
So it is also possible that your pockets come out a bit smaller, because the bit pushes away the pine, which comes back in place after because of its elasticity.
What I would do if I were you: just cut the pocket one or two percent bigger than the original (it is very easy to do it in Estlcam). It should solve your problems
About the gaps, as suggested before, just use wood filler
Also, don’t expect necessarly a smooth fit, you can fit the inlay by pressing it in a vice or by hammering it in place (of course, don’t smash the inlay piece directly, put some plank on top of it before)
Hey Kris this video is in german (so I have no idea what he is saying) but if you watch it I think you may get some pointers.
notice how he is not cutting straight || he is cutting with / then laying it in. I hope that makes sense. This may be a better route then trying to fit an exact piece into a hole.