Jeffeb3 Low Rider Table v2

I’ve had my LR v1 on a torsion box table (details here) for a long time. And it has always bothered me to have the gantry going the long way. I also still want to have a go at milling the ends of boards, or maybe the sides of already built projects by clamping them to a vertical surface.

This is me dropping my thoughts in front of all of you. I hope I can find any glaring mistakes, and share some of what I’ve been obsessing over for the last few weeks.

I started with the build from the youtube channel “shop nation”. I just like the bulk and strength of that table build, and I think it will be relatively easy to come up with something in between quick and dirty, and indoor furniture this way. I want to enjoy working here, and I have enough space (volume) to put in some goodies.

I am shooting for about a 36" deep work area, and a 48" wide work area. This would fit the projects I am thinking of doing, and I don’t have room for a full sheeter. That puts the overall table top size at about 48"x60".

I have a pretty large dust collector/shop vac that I want to tuck in there. That will give me more room to fit the table without dominating the garage.

That brings me to my first compromise/design decision, which is that the height is going to be much taller than a typical work bench. The highest I have designed this so far is 40". I am OK with that. The benefits are more storage underneath. The cons are I have to lift boards higher and I will have a little more trouble working on the table. Kiddos who are interested will need a stool either way. The robot is doing most of the work, so I think this is going to be ok.

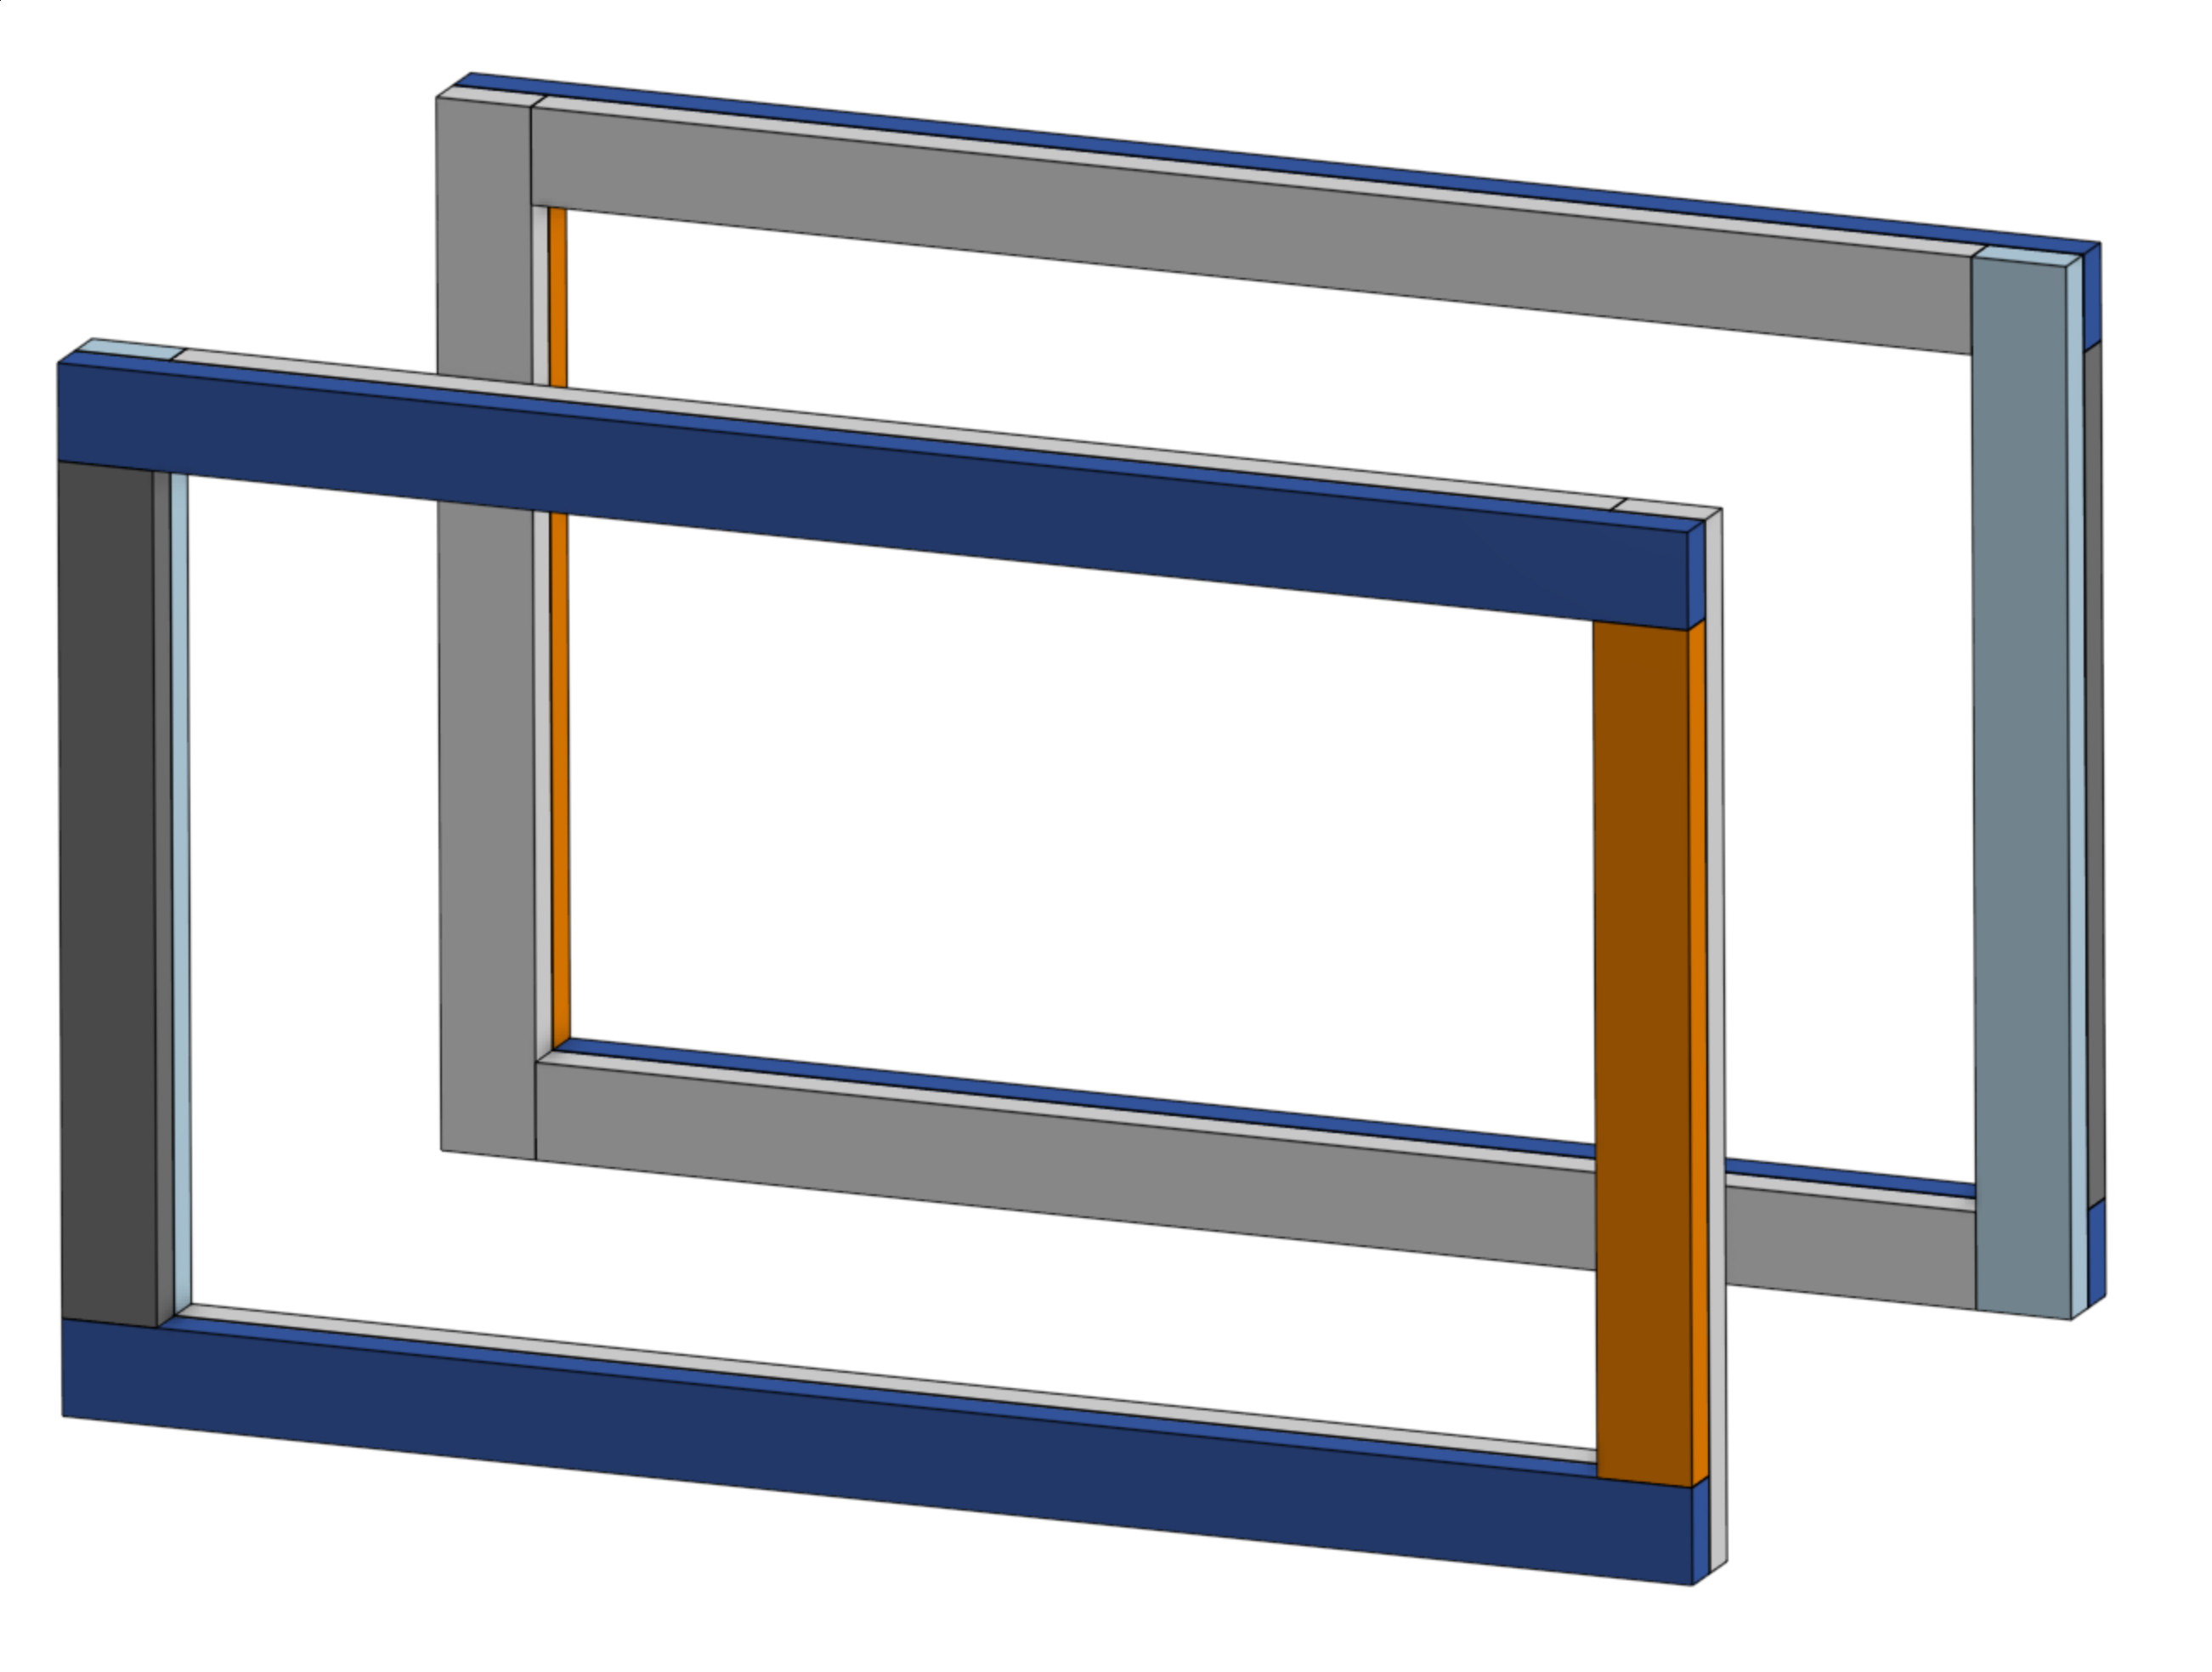
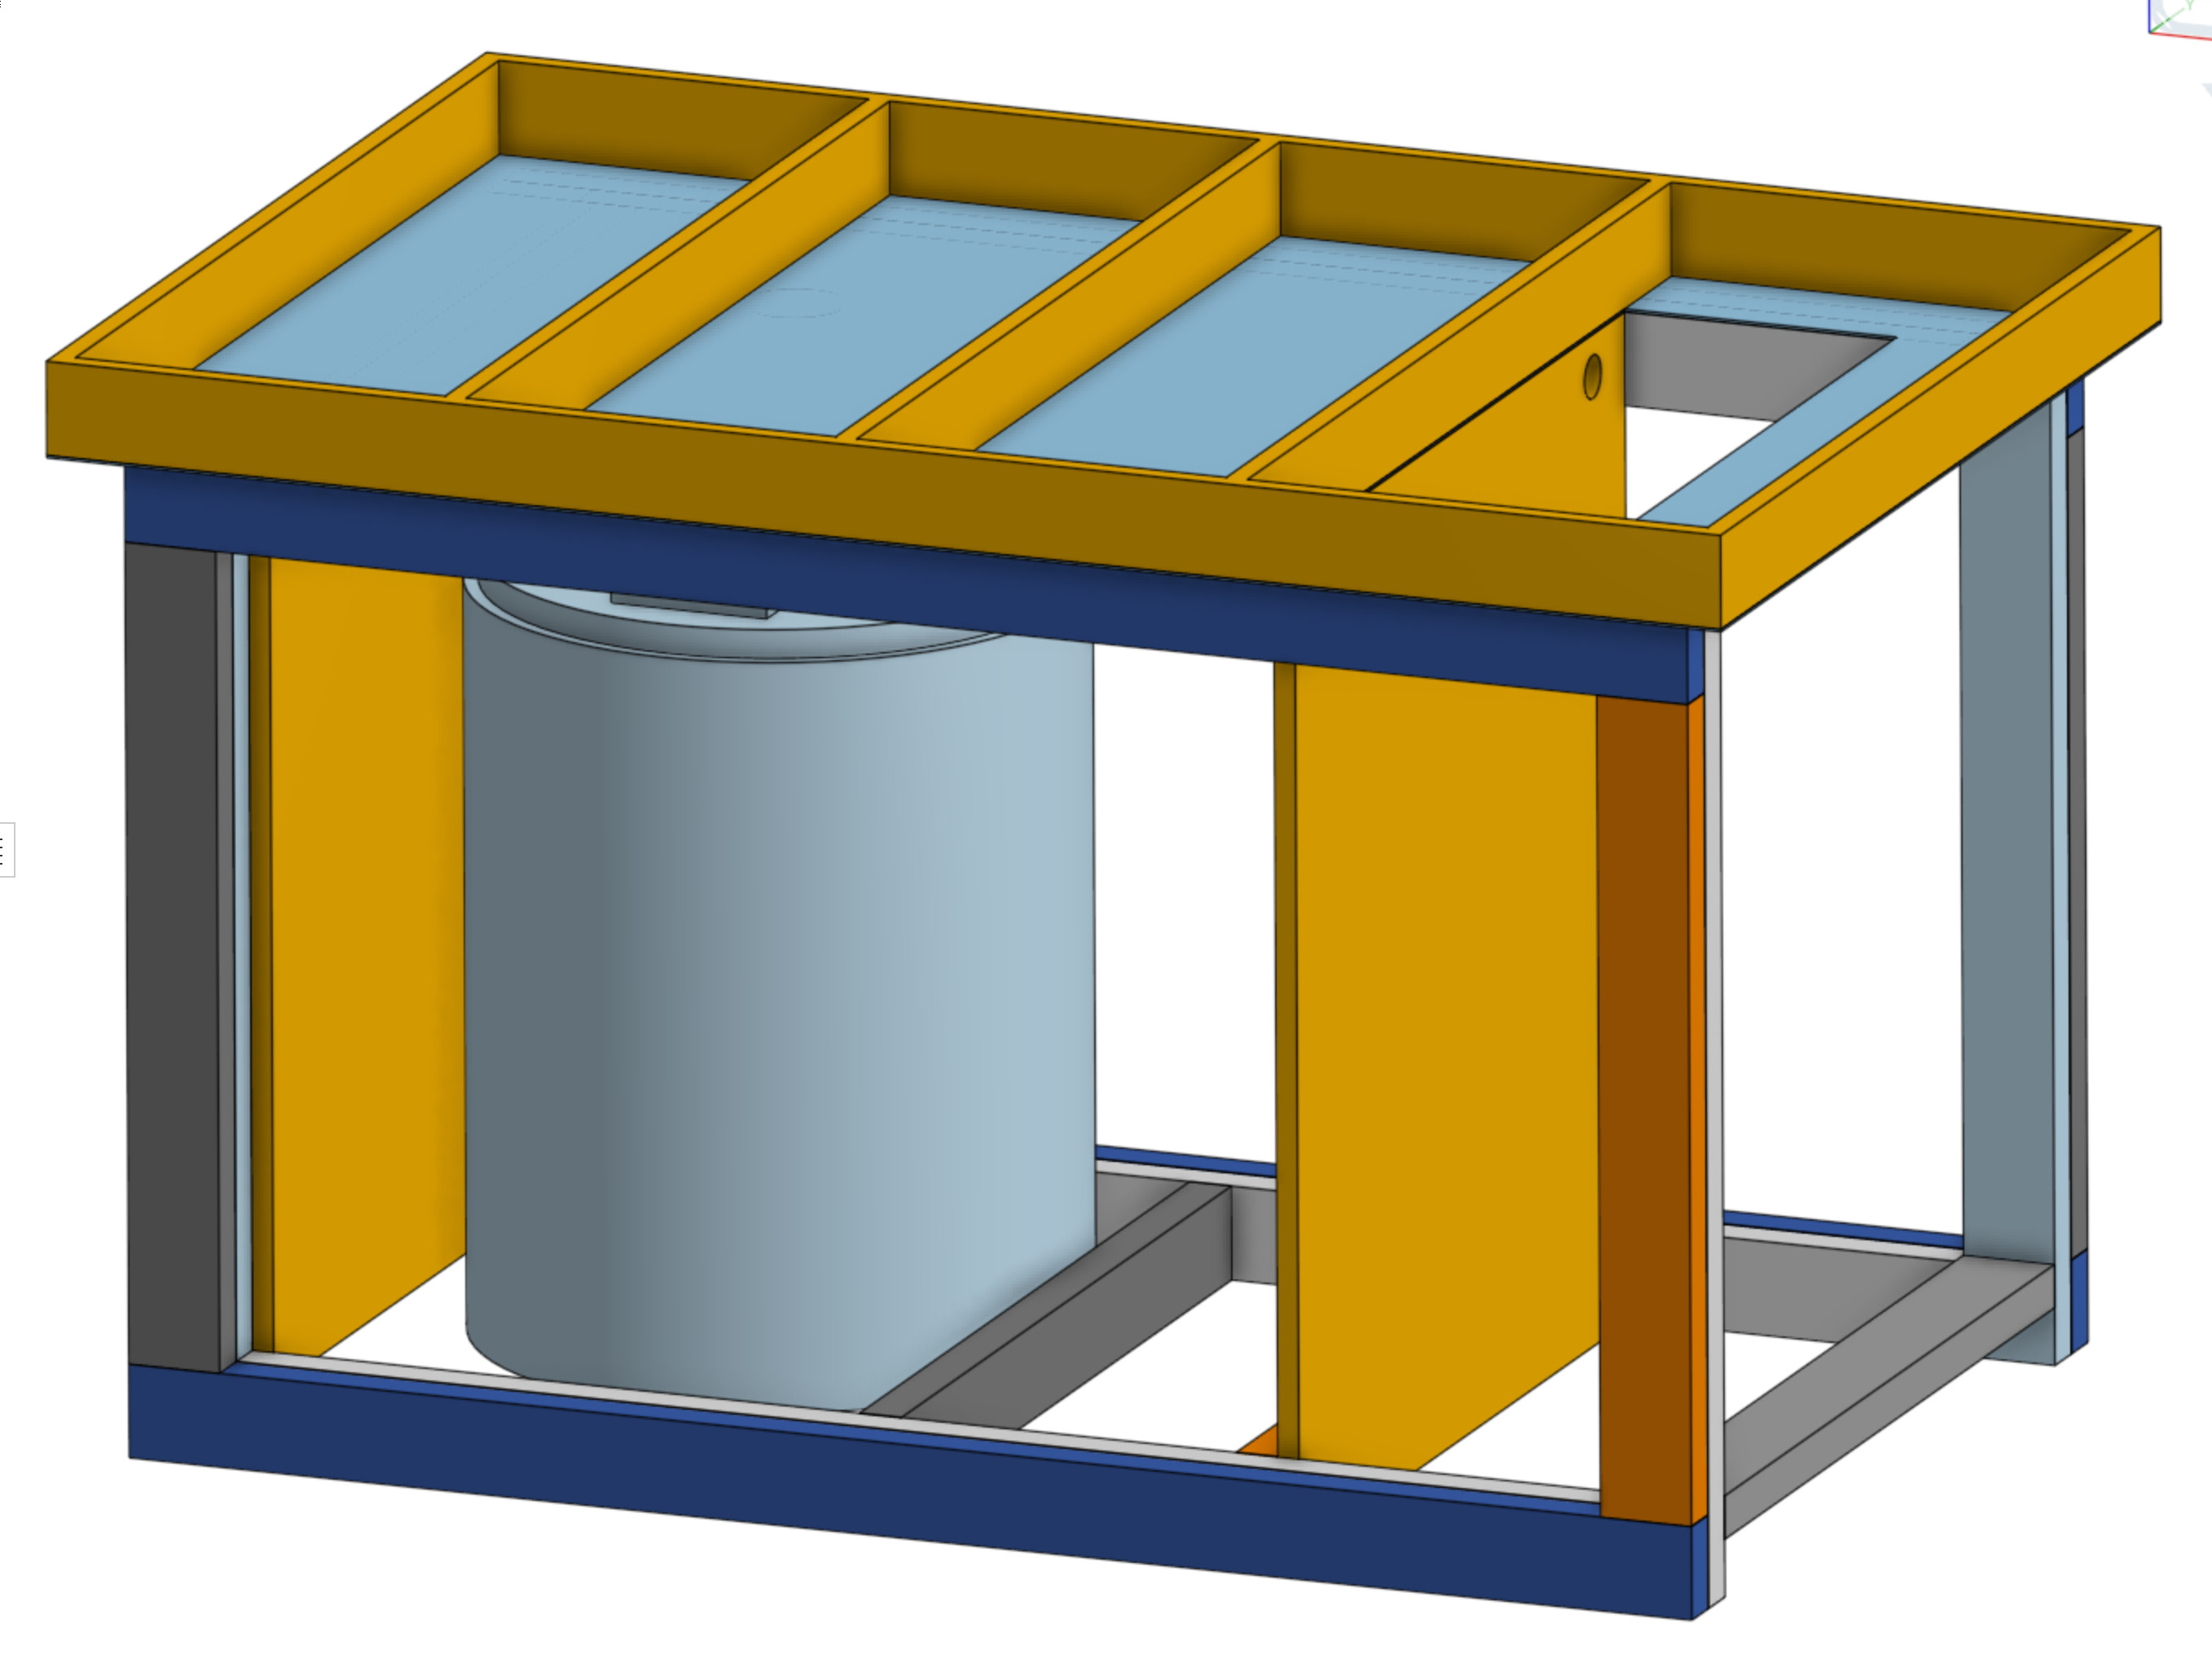
Let me show you what I have so far. These are the big structural pieces in the front and back that give me a strong start:

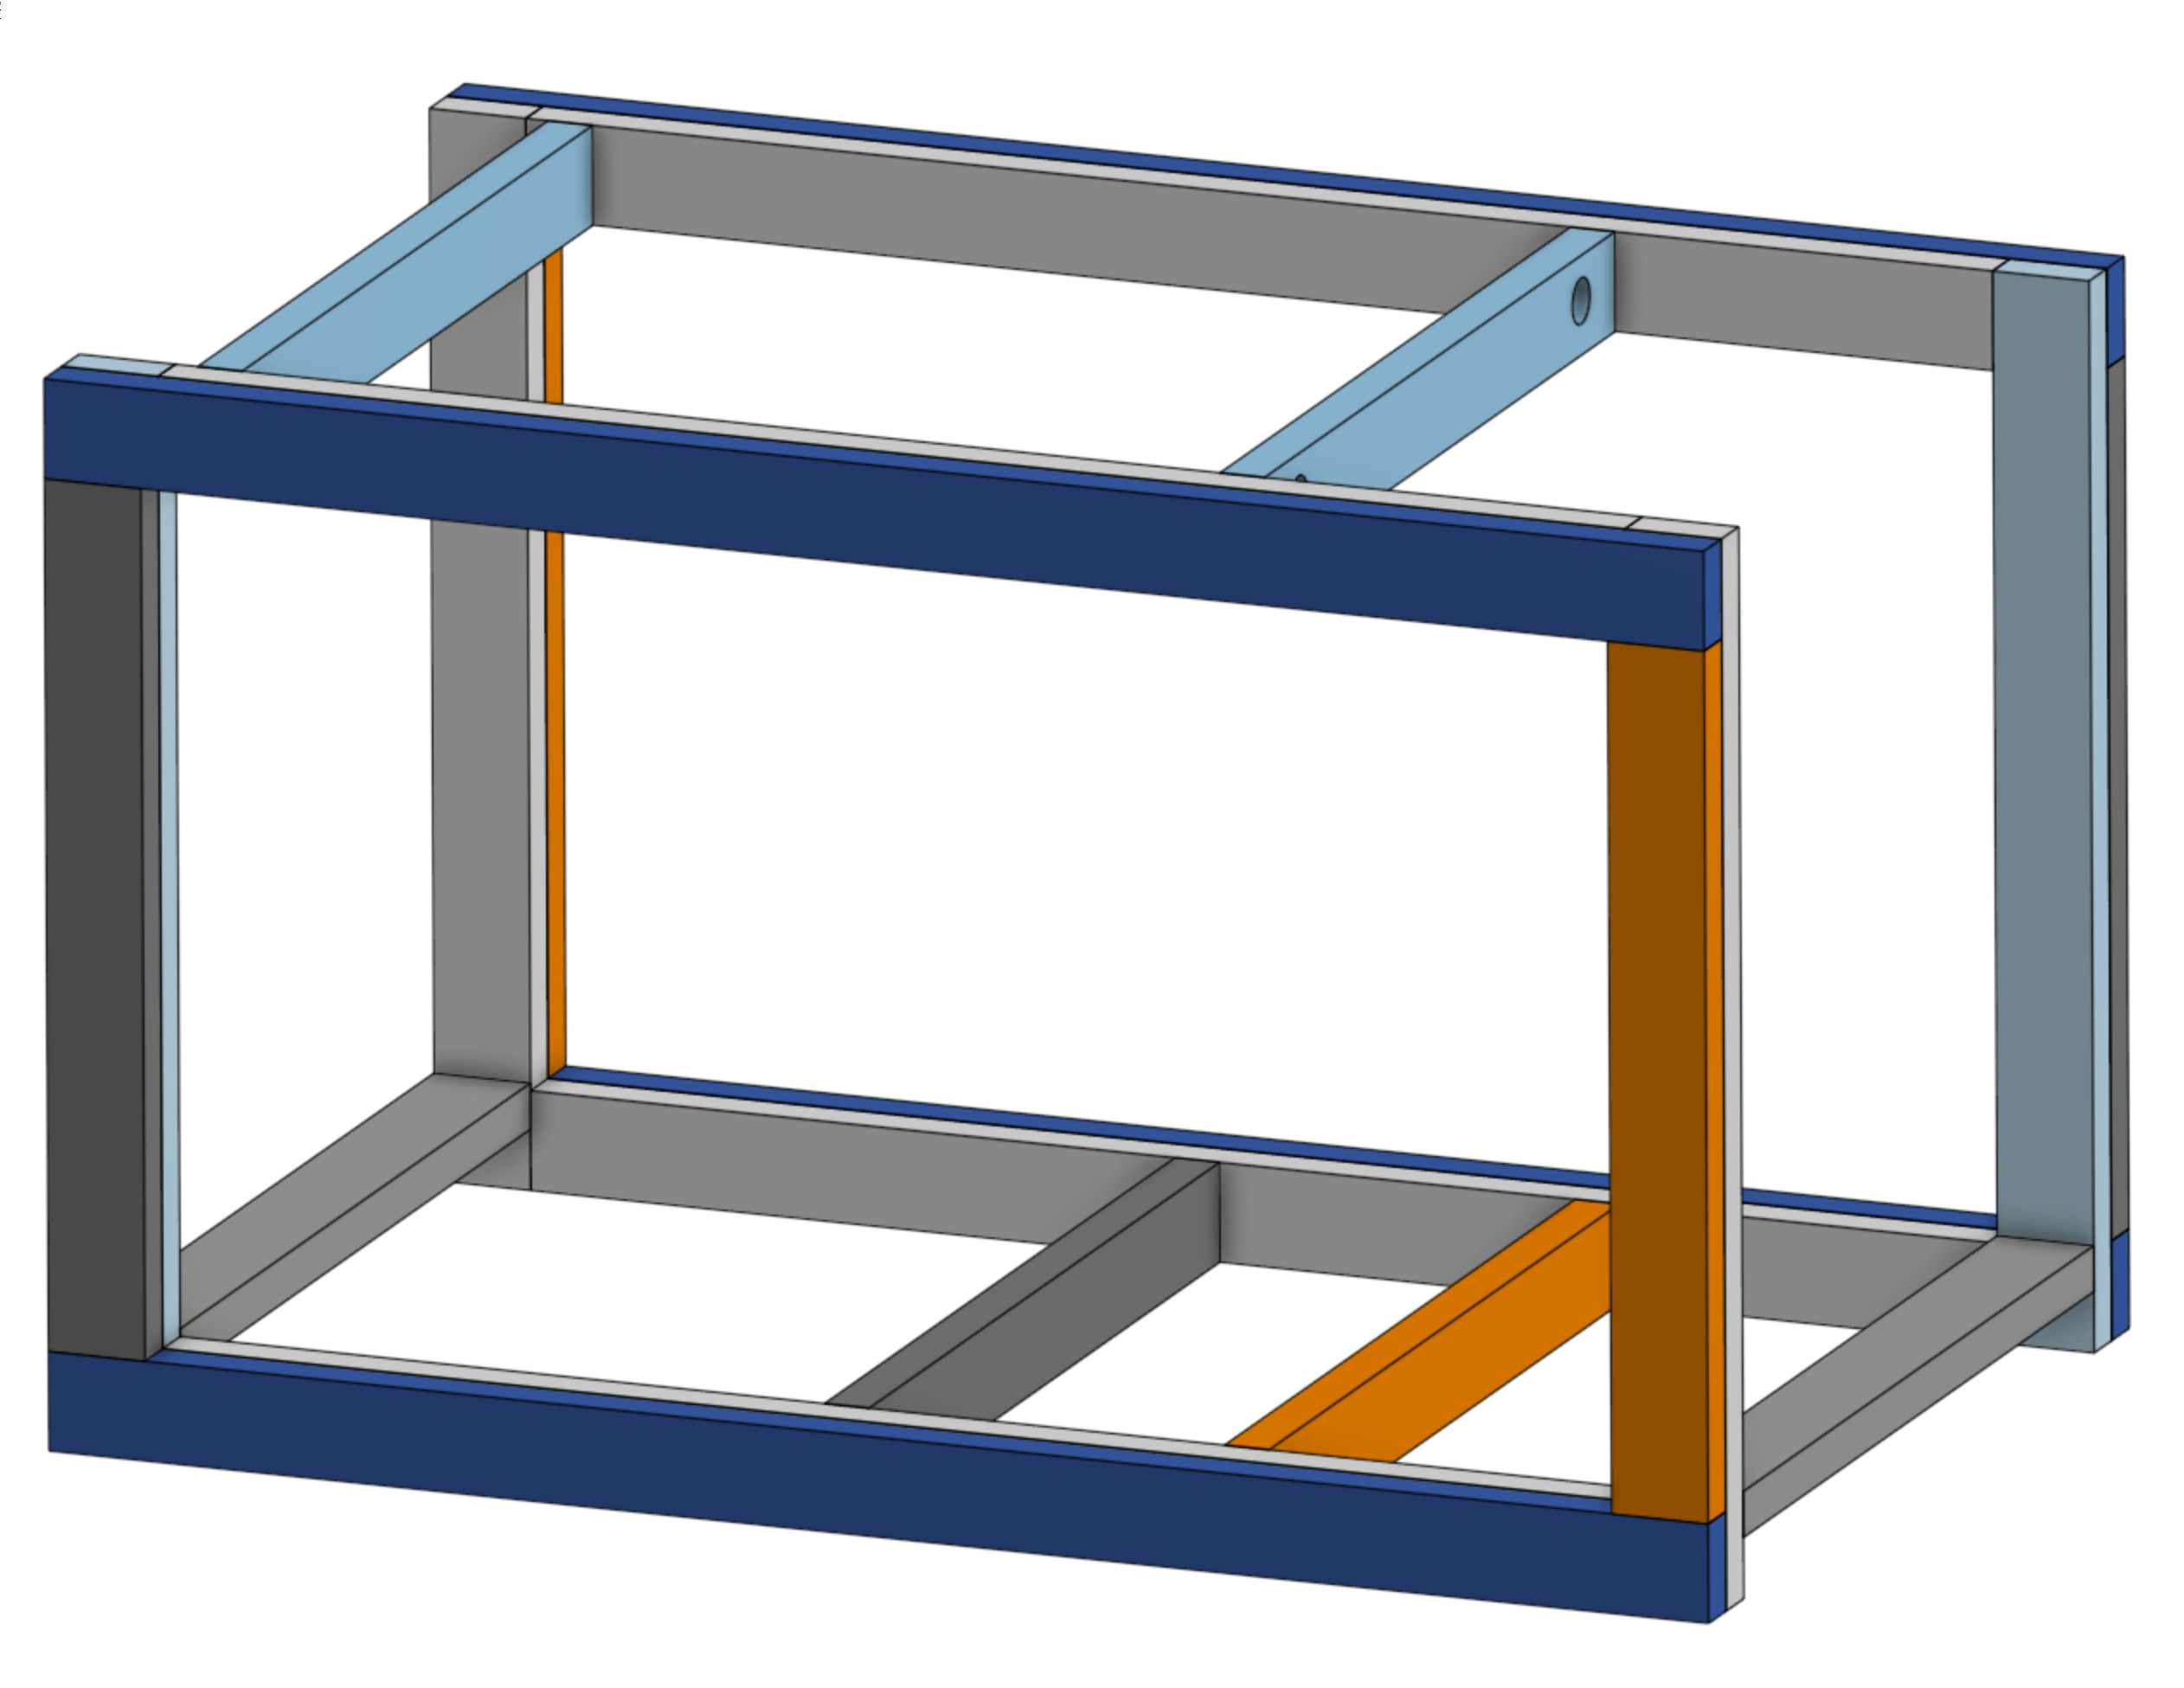
I add in some braces front to back and I have a skeleton bench (The placement will make more sense once you see the rest):

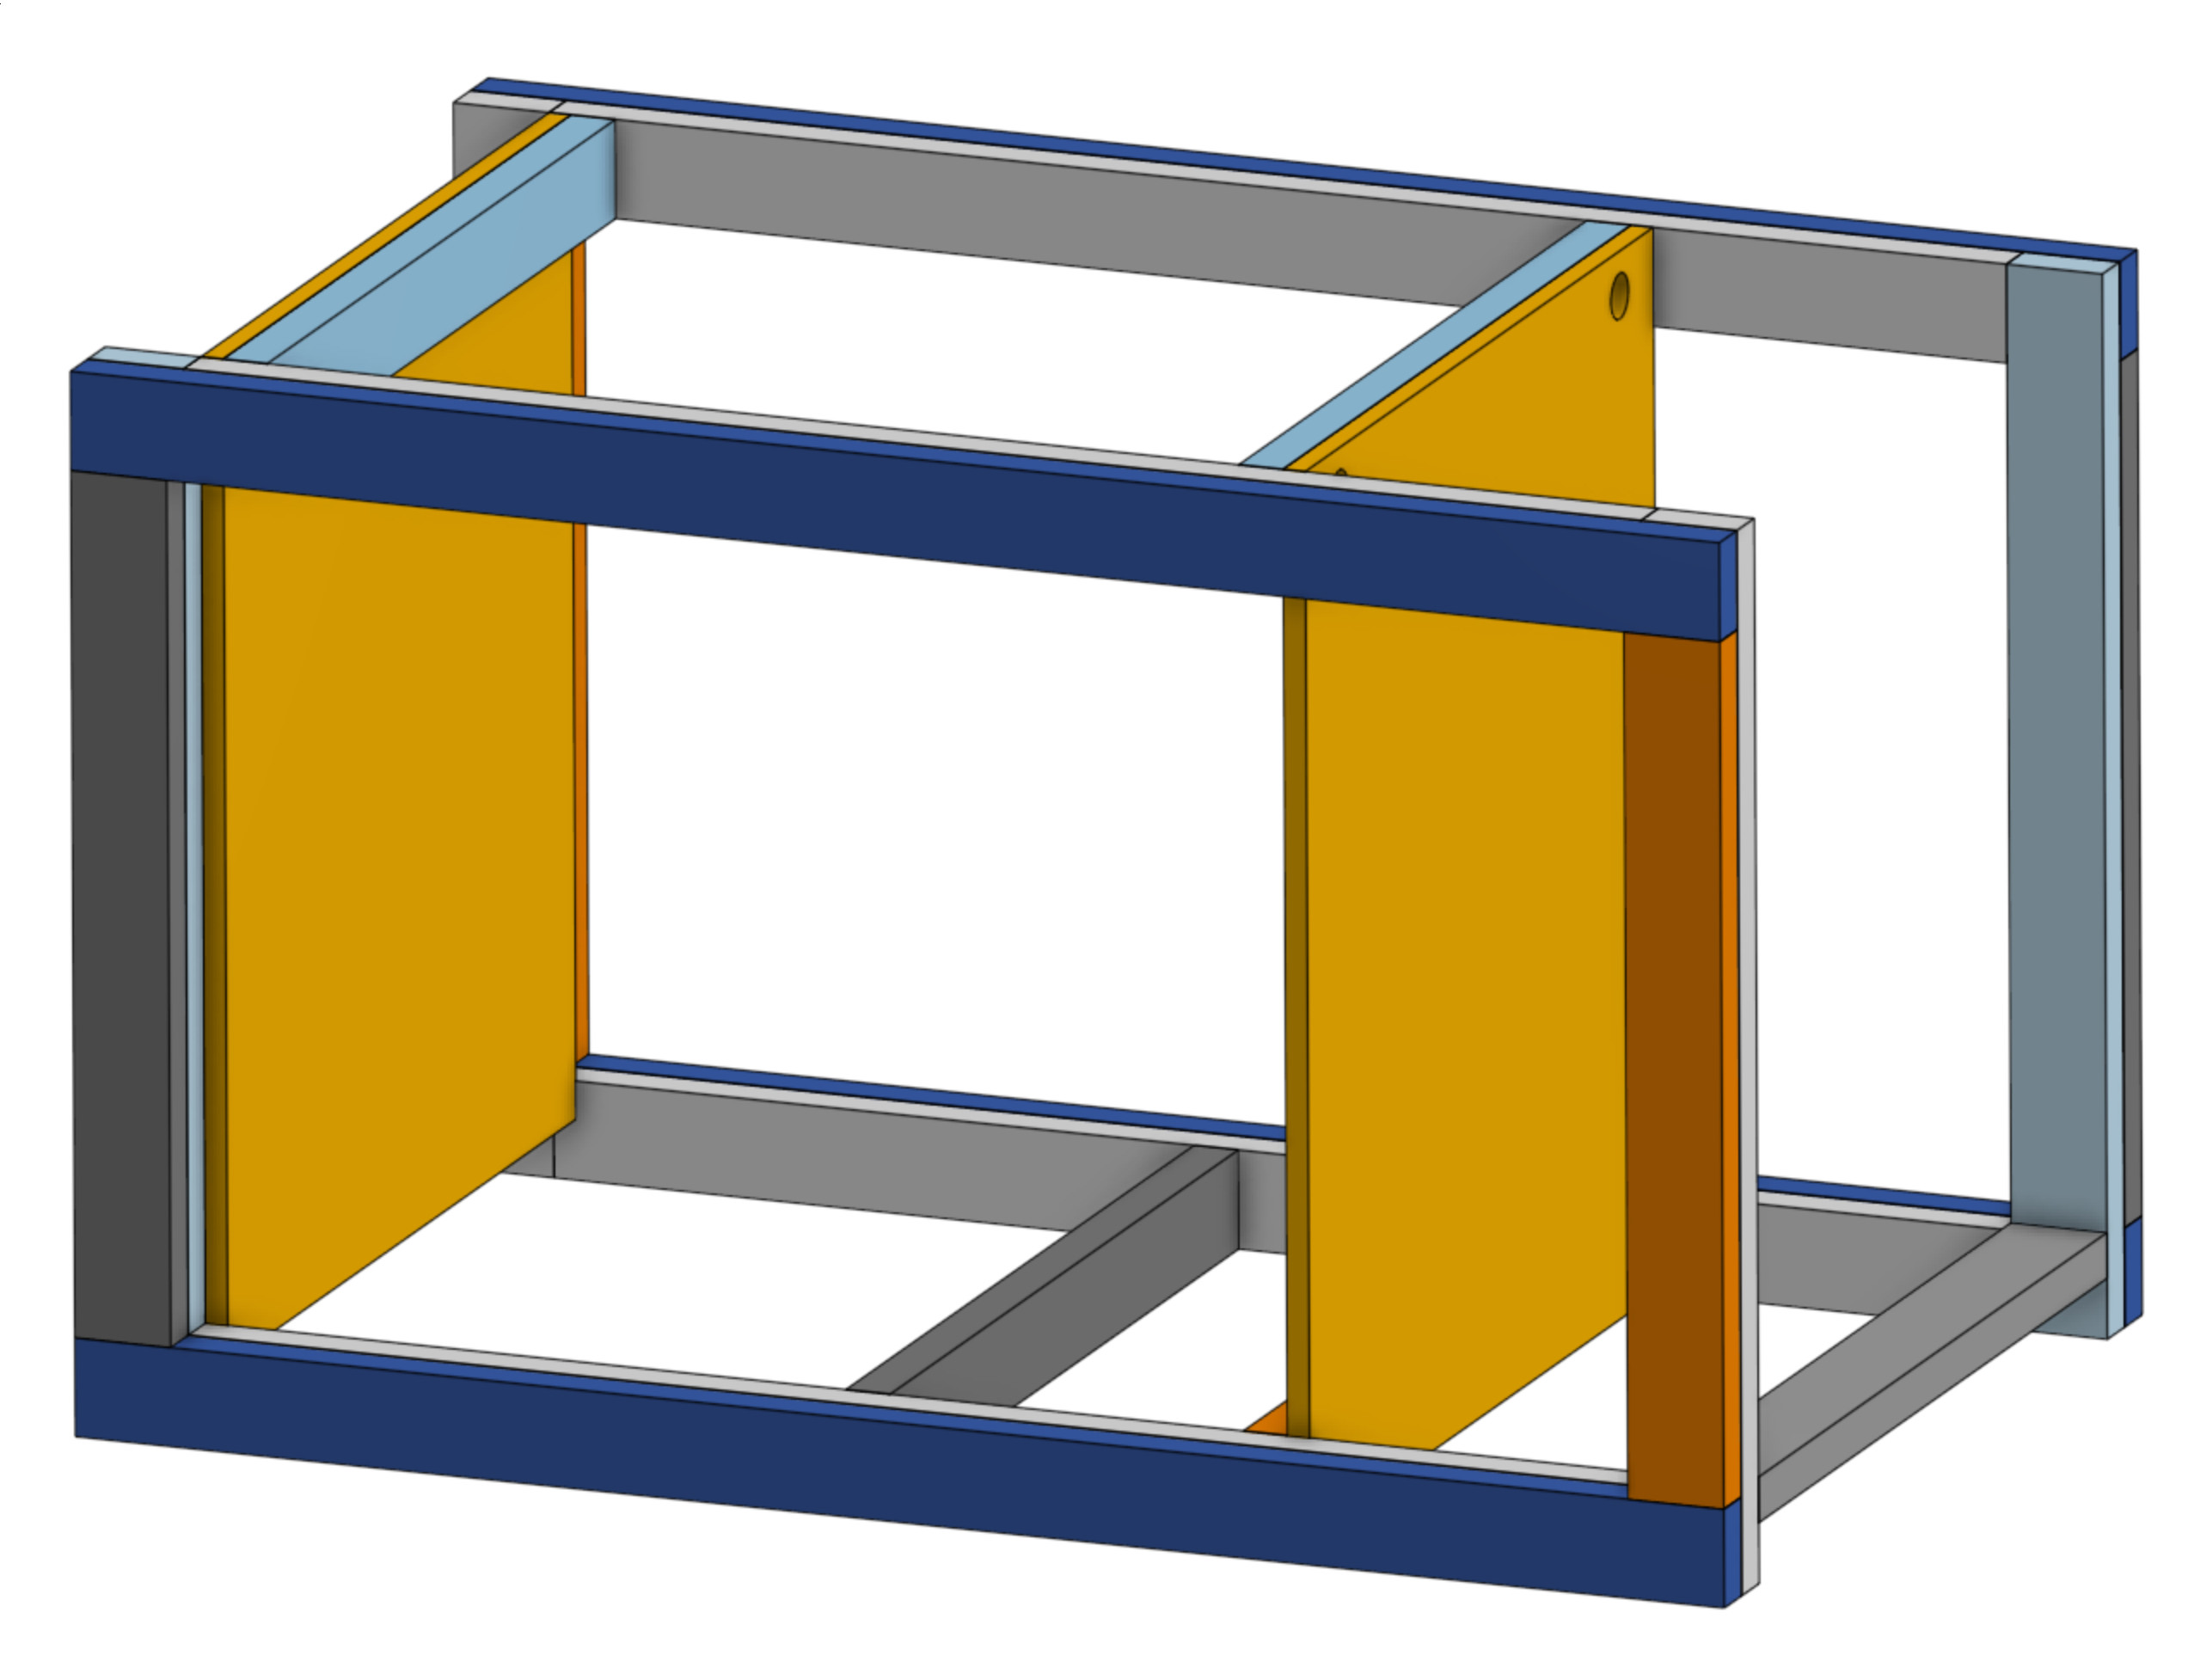
A few side pieces of ply (3/4") that will make it very rigid:

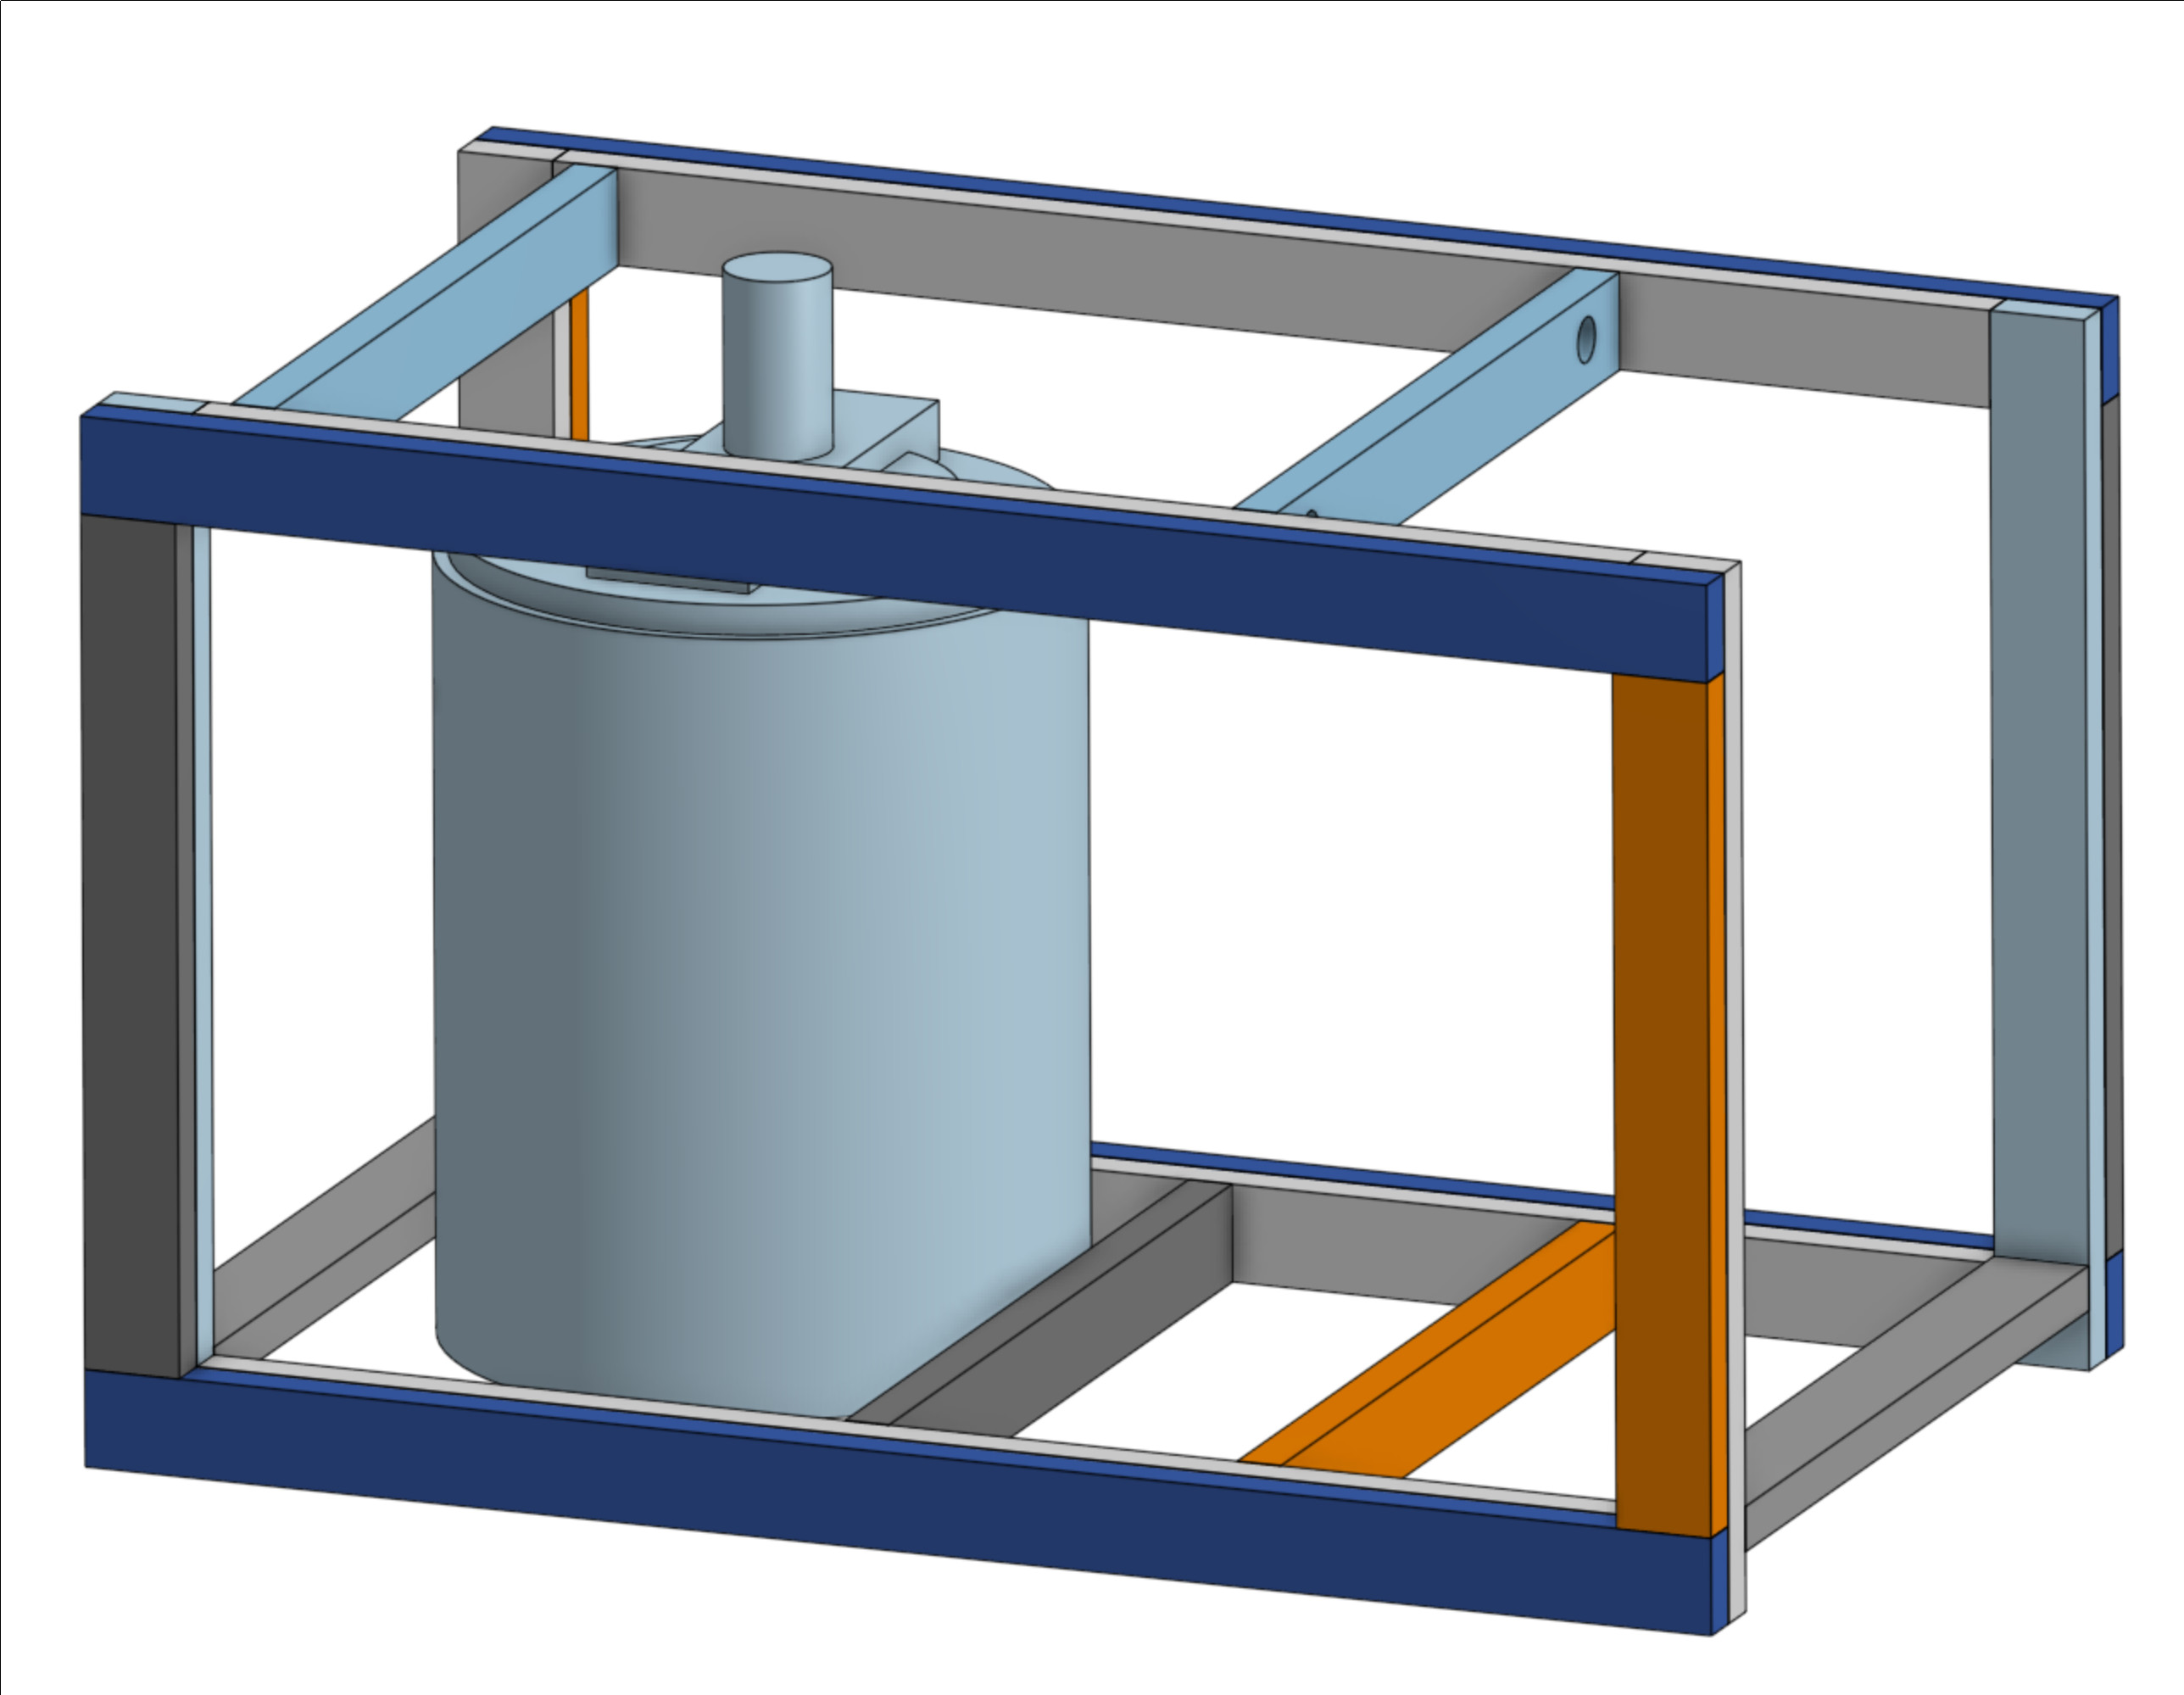
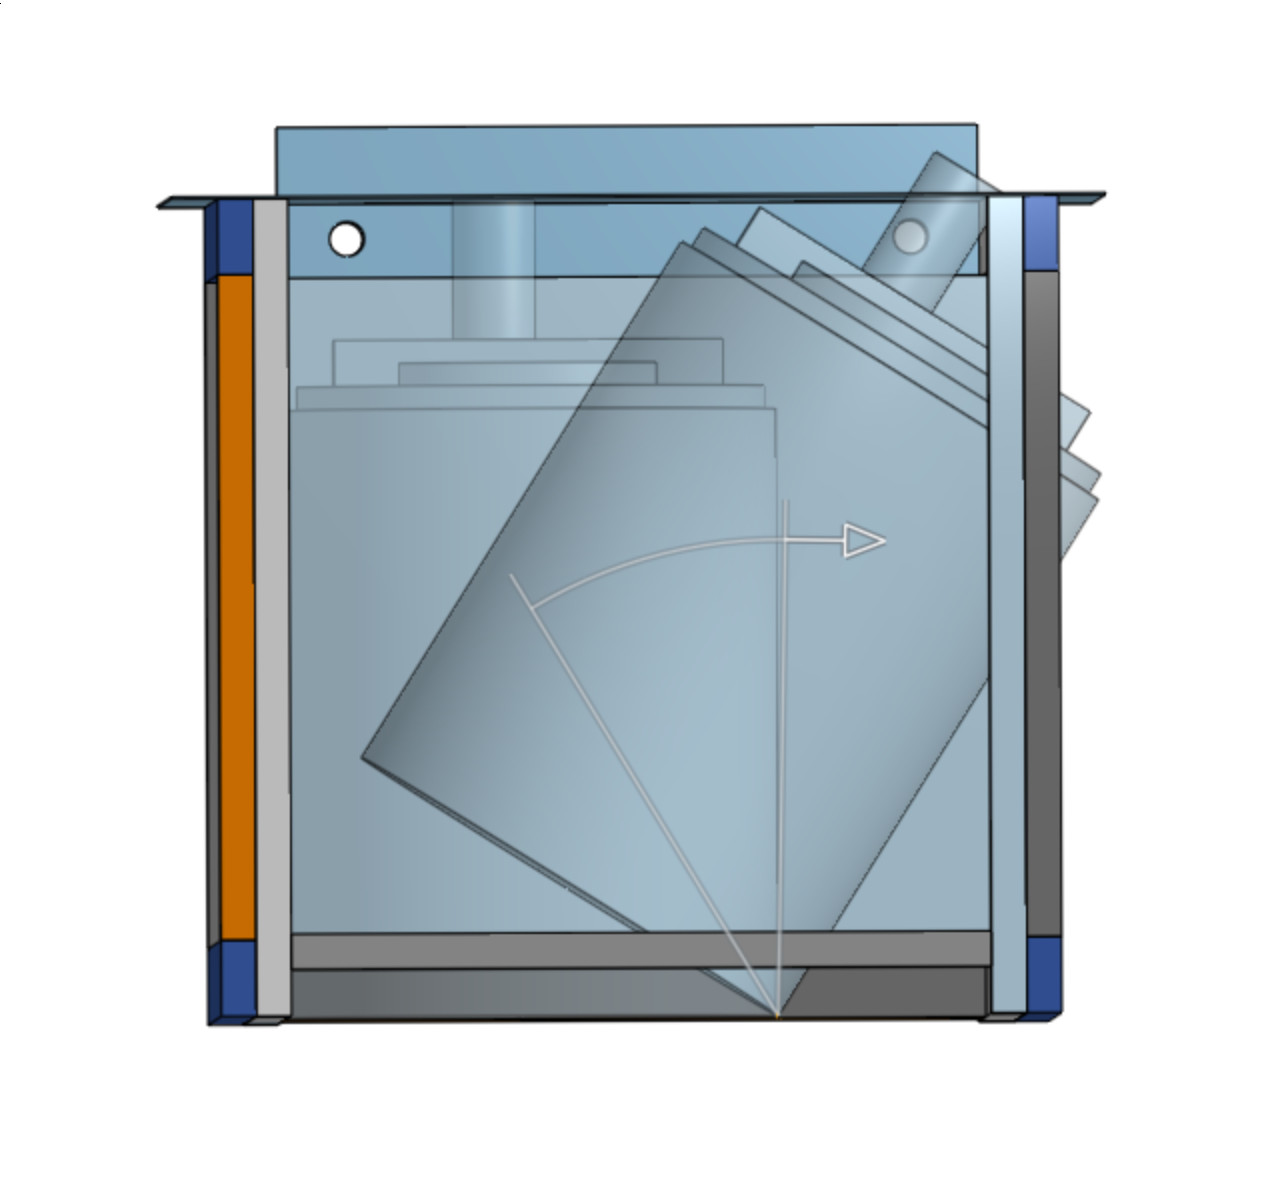
My Dust collector/shop vac will fit in that big pocket. I have tested rotating it in the CAD and it should rotate ok. I will be removing the stock casters. My hope is that this will stay in the corner and basically never move. So if I put anything in front of that can, I will need to be able to remove it easily to get the DC emptied. It is a huge can though, so I don’t have to empty it often. The cylinder sticking out the top is the vent, and it probably won’t stick up that high, and I can play some games to make it easier to fit if I really want to optimize the height:

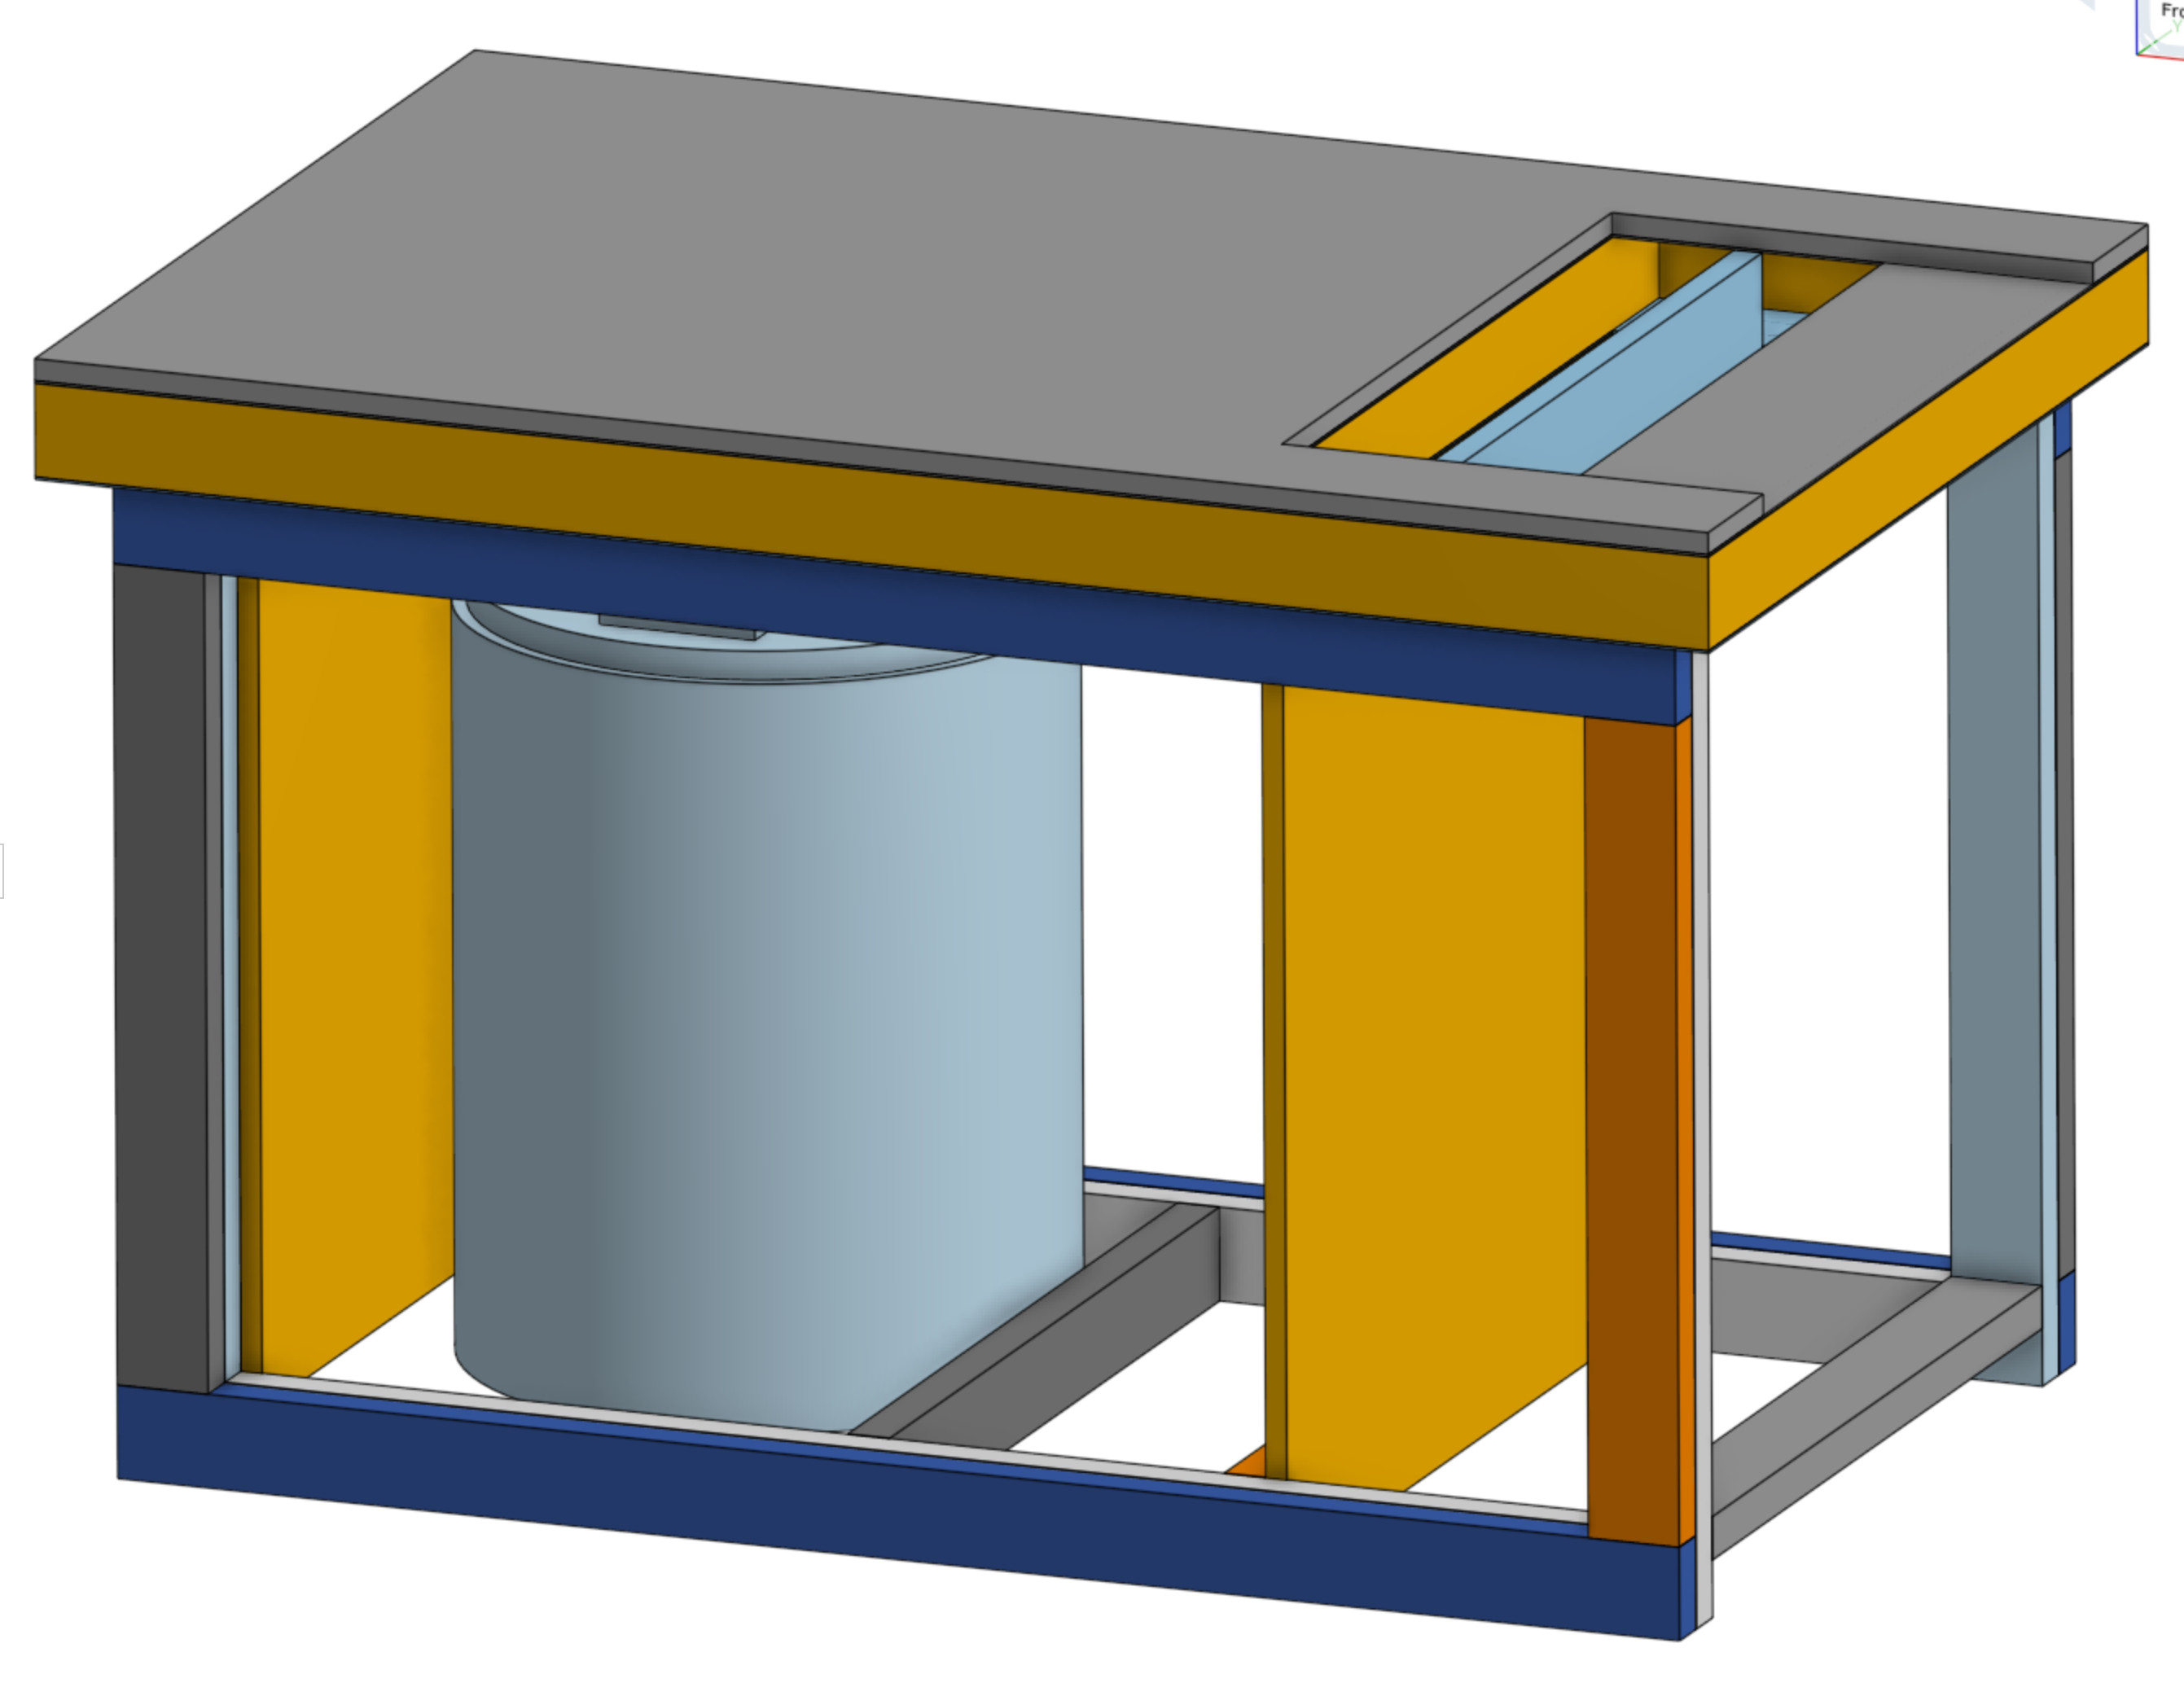
I can just put one or two sheets of plywood on the top. And I may still do that. But I actually cut the pieces for a 60"x48" torsion box when I made my first table. So I can build that for nearly free. It would look like this:

With top. You can see the alignment between that inner spar and the side panel are pretty critical. I might actually avoid installing the side panel until this top is all the way installed, and use the spar as the “ground truth” for that location. I would need a pretty rigid alignment of the top to the base though:

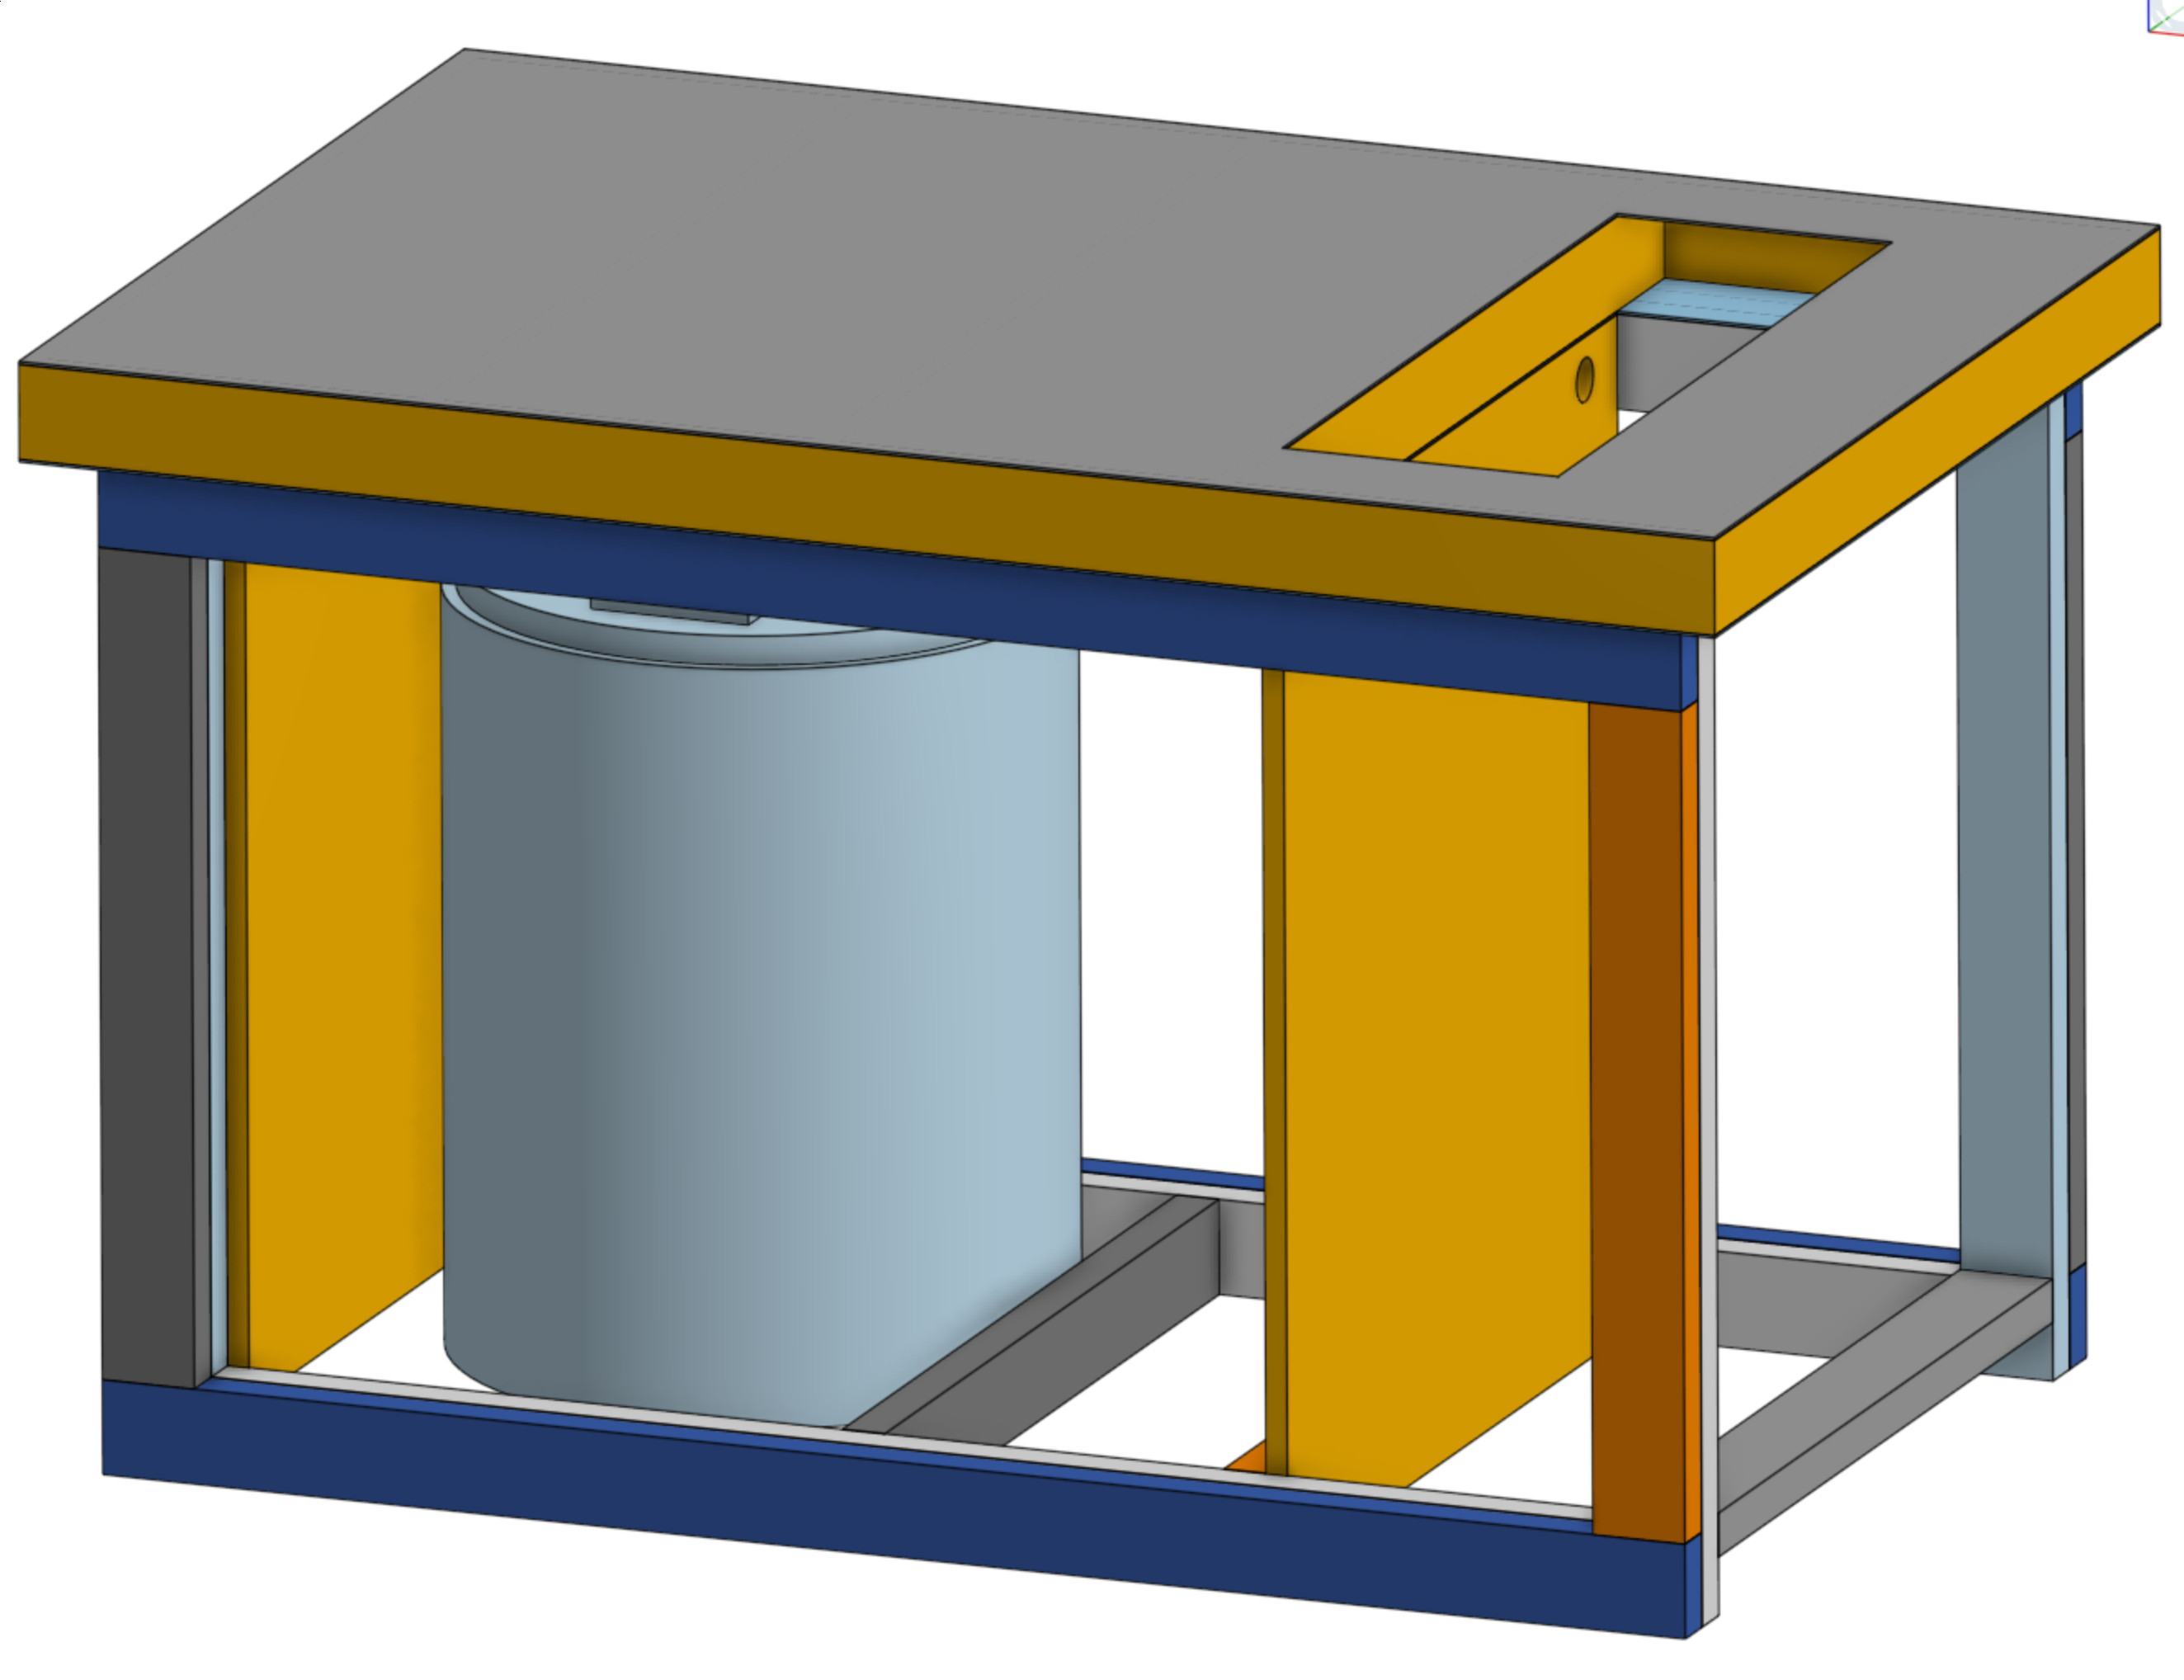
The hole in the top is for a vertical clamping surface. I am planning on using two pipe clamps to tighten a clamp face board that would be loose in that hole. I can use it to cut the ends of boards for some joinery experiments. Or I can clamp something like a drawer with it’s face and carve or etch right on the front of the drawer. I would add another sheet for a spoil board, and that clamp face:

I have two large areas of unused storage. Under the vertical clamping hole, and to the right of the dust collector. These are both very deep (48") and 16" wide. I can build drawers (although full depth slides would be expensive) or shelves, or just stack stuff in there. I can also fit some things in front of the dust collector, but that also needs to be removable when I empty the DC (and ideally, I could check the bin without rearranging my garage). I can work on these issues later, but my current thought is to put a shelf under the clamp area and then 2-3 shelves to the right of the DC. Then I could store my small joiner, my lunchbox planer, and my small air compressor in those spots. A single drawer at the top for bits, specific wrenches, and a box of screws (the kind I use for hold downs) would be useful. Another very useful thing would be storage for medium sized panel scraps for the LR to eat. I think I could fit 10-20 48"x30" boards in either area.

What do you think? Should I do it? Is the top way too big? Should I just buy a smaller shop vac?

4 Likes

I also have to decide if I want to build the v2 version of the LR, or just move this one, and then upgrade when v3 comes out (maybe next year?). I’m not interested in all the double decker/nema23 type stuff. But pen plotting and laser engraving are in my future.

2 Likes

I like the table design. I also like the idea of a taller work surface, particularly if you want to be able to work on edges like that.

Pen plotting and laser engraving don’t need a lot of torque, so it makes sense to leave the Nema 23s out.

I can see why you’d be interested in the laminated veneer lumber. That would be a very good fit for this design.

As far as the shop vac though, the way I see it, when I do something like this where something has a dedicated purpose, I always end up still needing a general purpose tool too. Even taking my shop vac from the garage to the basement for my MPCNC, I found that I probably need a new one for the garage, so I’m considering options.

A large cannister is nice, in that you don’t have to empty it often, but it’s a problem when you do need to empty it if it’s too heavy. Even the one that I have now, if I empty it from full into my trash can, the city won’t pick up the trash can to dump it in the garbage truck, so I have to do it earlier anyway.

I’m also generally a fan of not re-doing work already done. If the LR2 doesn’t give you something that you need over what you have, then keep what you have. Unless there is a performance or space requirement advantage, why go and print all new parts, buy new hardware for no functionality improvement? I don’t know, maybe the new one is able to cut faster, or more accurately, but how much?

That said, if there are broken pieces, or stuff that needs to be re-printed because of wear, I might upgrade then.

1 Like

I have a few shop vacs. I definitely don’t need to move this one from inside there. It hasn’t moved from its corner in more than a year. I would like to do something like the shop nation DC splitting and have a port on the side of the bench for general shop cleanup. It has nice 2.5" ports in and out and is quieter than the shop vac.

I do plan on milling. But I still think nema23s are overkill.

It is appealing. And I may do it even if it costs $200. Just to learn and see how well it works. I am sure I would also be happy using 2x4s. I can never find good ones locally though. Maybe it is just because I live in Colorado.

The LR2 uses 10mm belts vs. 6mm. The DC is a little better integrated, but mine isn’t half bad. IDK what Ryan will do for some future v3. But I also like to build these machines and building fresh appeals to me too (for no logical reason).

My first thought is why not do the vertical mounting off the end of the table? I’m guessing you don’t want to have to extend and cantilever the rails for riding the gantry over the edge? I wonder if you’ll have trouble keeping the cover piece there flush and in plane with the rest of the table. Is it getting a cover plate?

1 Like

I went through a few designs like that. If I need to cut something longer than 36", then it will have to extend over the hole. In that case, I can put a cover in, or try to support it some other way. Chances are, I will do that approx. 1-5 times and I will not be doing v carving or anything that requires accurate Z.

I also have thought of some other inserts for that area. A small clean table for pen plotting. A small router table for things like chamfering edges. A little protected spot for a laptop. Something like that.

I would probably keep the pieces I cut out for that area and just use them to keep long pieces stable in case I ever need to do that.

It seems a lot stronger to close it in than leave it open. And it seems better to support it down the whole length.

2 Likes

Ah okay I can see it in my mind’s eye now… That IS at the end of the table!

1 Like

I think you have a pretty solid design going here. Love the shopnation design even if I’ll likely not do it because it doesn’t quite fit my average workflow stuff but nice adaptation here.

I wouldn’t really consider the high table a disadvantage, just imo. I have most of my surfaces at around 36" in my shop. I find any detail/smaller work I do I end up scrunching my back a lot to do it. Even long sanding sessions on small parts sometimes does this to me. Probably just a function of being a desk jockey for a lot of my job but oh well. Anyway, long story short from me I think if you have a work surface/bench that is a little lower than what you’re about to build then you will end up finding uses for a higher surface, and the size of pieces you’re trying to get up there shouldn’t be a huge issue at the size table/work area you’re building.

2 Likes

I know you don’t intend to move the dust collector, but I would still caution against shoe-horning it into a spot like that.

You could do something as simple as removing the cross board that’s going just in front of the dust collector. Replace it with a board that overlaps the rest of the front pieces that you can screw on with lag bolts. You would still have the structural stiffness of having the board there with the added benefit of being able to remove the one board if you need to pull the entire cansitor out for some reason.

I think the rest of the design looks well thought out.

Just for clarification, you’re saying the gantry would run front to back in your picture here? so short gantry and longer rolling surface?

1 Like

Yep. I have it the other way now, which has some advantages, but I want to swap it.

According to the CAD, I can still remove it without removing any wood. I can remove the top vent hose and then tip the whole thing forward and pull it out. It is the reason this has to be so tall. I will have to remove it to empty it.

My hemming and hawing was about whether to build a shelf in front that I would have to empty every time I wanted to remove the DC.

Update on the LVLs. I contacted a couple lumber yards. Two got back to me and they don’t have studs (but they can order them for $23/8ft). They do have 1.75"x7.25" at around $33 ea. So I could rip those down and get what I want. I need 10x and some change. So that’s $170 for just that part of the build. Some of you might think that is crazy. I am on the fence.

1 Like

Jeff, with or without a shelf, I am seeing kind of a need of more sheer strength parallel to the front. If you are putting it against a wall, just nailing on some 1/4 Luan to the back of it will make it hella stronger/stiffer.

In lieu of that, you could add knee bracing to the front or back legs for the same effect. Lastly, bolting it to the wall studs like a base cabinet will also make it strong.

1 Like

That’s a good point. :star:

I can’t bolt it to the wall, because the gantry has to ride along back there. I was thinking of putting some sneaky boards on the bottom just to keep the bench away from the wall so the gantry can’t possibly bump the wall, even if I accidentally push it toward the wall.

Maybe part of the back can be covered with something to make it more rigid. Or at least a section of it. The part that is restricting that in the design now is just the half lap joints on the 2x4s in the corners. I plan to glue them, but I know from experience that can be limited in strength.

Sorry. As usual, I missed the important parts of the thread :confused:

With that being said, depending on what all you’re wanting to put in front of it, it shouldn’t be too big of a deal. I have a few rarely used pieces of equipment that stuff ends up stacked on or in front of. Even if it’s once a month or so, it wouldn’t be too big a deal.

Here’s a picture of that for reference. The tube thing is the vent hose, and I would have to remove that first, before tipping it, and then when I get about here (or just whenver that happens), I would need to scoot it back towards the back to tip it more. I don’t think it’s a huge deal.

I happened to have the perfect chunk of scrap to test out the height. I can shave 1.5" or so off the first height choice.

This is the DC. It is big for a shop vac, but small for a dust collector. That height is 33.5" and the diameter is about 19".

Worst case, if I can’t get the tube out easily, I will print some kind of 90’ connector.

My LR is 40" high, my MPCNC is 41.5", both honestly seem a bit low.

You can also add a router table insert. I had a hole drilled in my LR for that. Comes in handy and you lose nothing doing that.

I use a diagonal brace, 1"x3" , on all my tables. Front the highest corner to the lowest corner, screwed in anywhere it crosses.

1 Like

I am rearranging to try and fit in a larger compressor. While I am at it I think I am going to add some cheap drawer slides to my tiny vac.

This thread is at a perfect time. I am out of room and keep rearranging for what I am working on. The LR table takes up the most room and is probably going to get rebuilt soon.

This little 1x3 table is insanely strong. I just dragged it across this textured floor fully loaded yesterday. So your’s is looking plenty burly.

1 Like

It sounds like you think it may be overbuilt. It’s ok. Criticism is welcome. I have the same thought. I don’t want a lot of bulk that doesn’t end up helping me, and I don’t plan on using a hand plane on the top of it.

Why do you have so much of that insulation though? :slight_smile: 
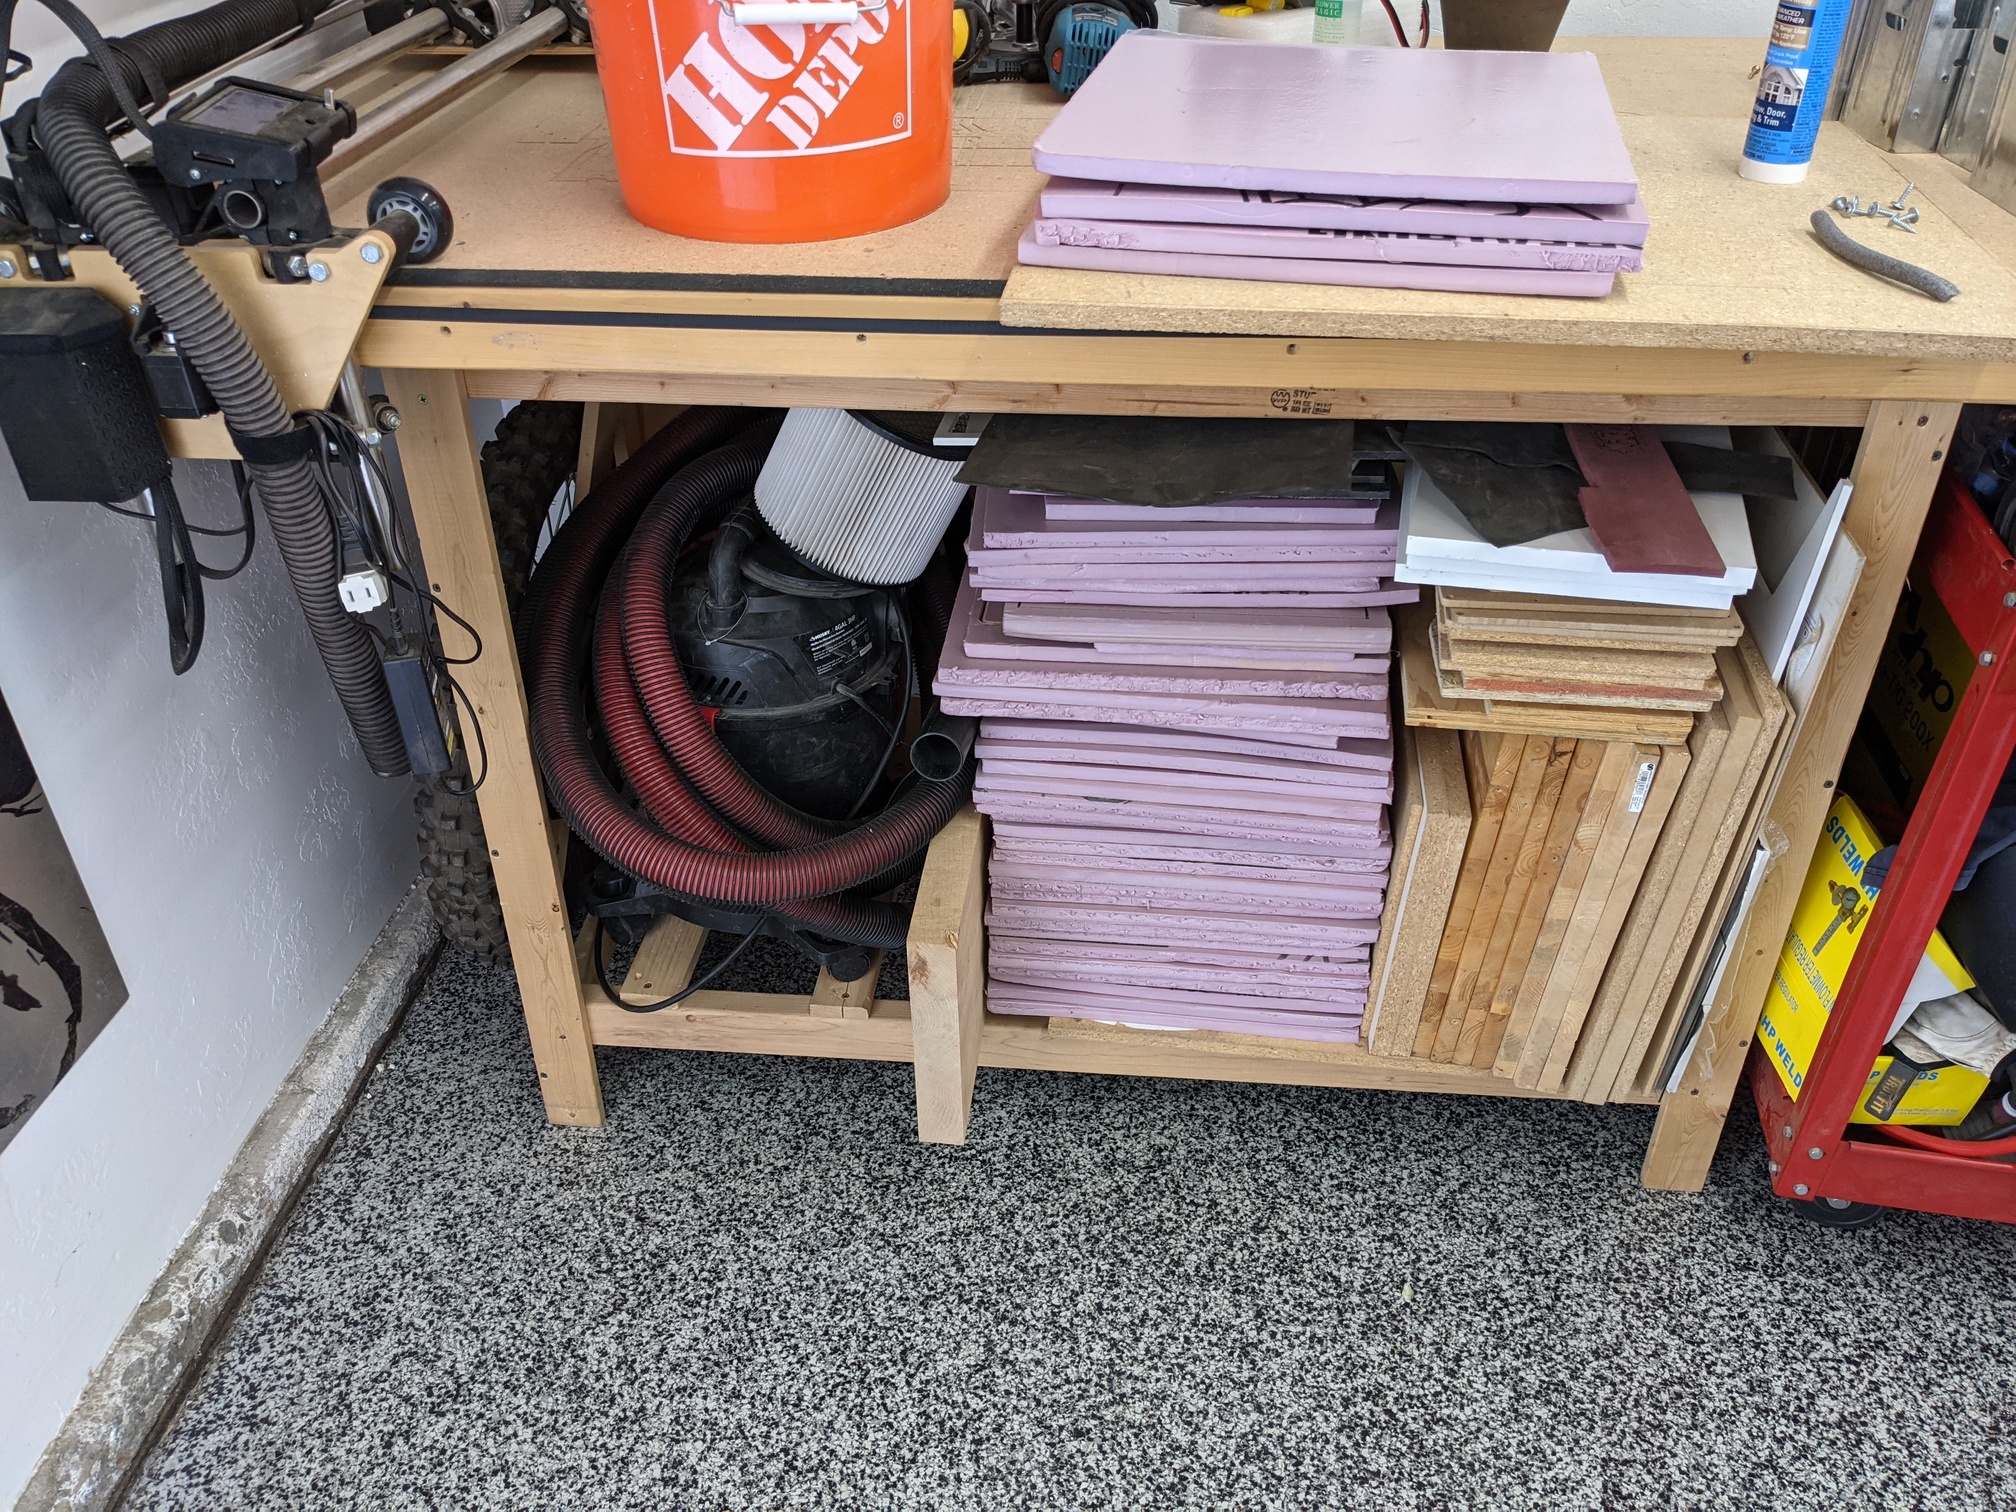
Very organized though. And nice bright lighting.

Sorry I guess I didn’t really put the two thoughts together. (I got side tracked staring at the “dirty” side of the shop dreaming about a new table for myself).

Not really overbuilt but if you turn that lower front board over (flat) and add some draw slides that vac could be a lot easier to empty. I think your table will be plenty strong to do that with a thin back cross brace.

2 Likes