Laser Cut Steel LR3 Build

I’m looking to minimise the 3d printed parts and MDF in my build, my garage is a nightmare and our seasons go from being quite damp to very dry, so I would like to avoid the use of too much MDF in the build.

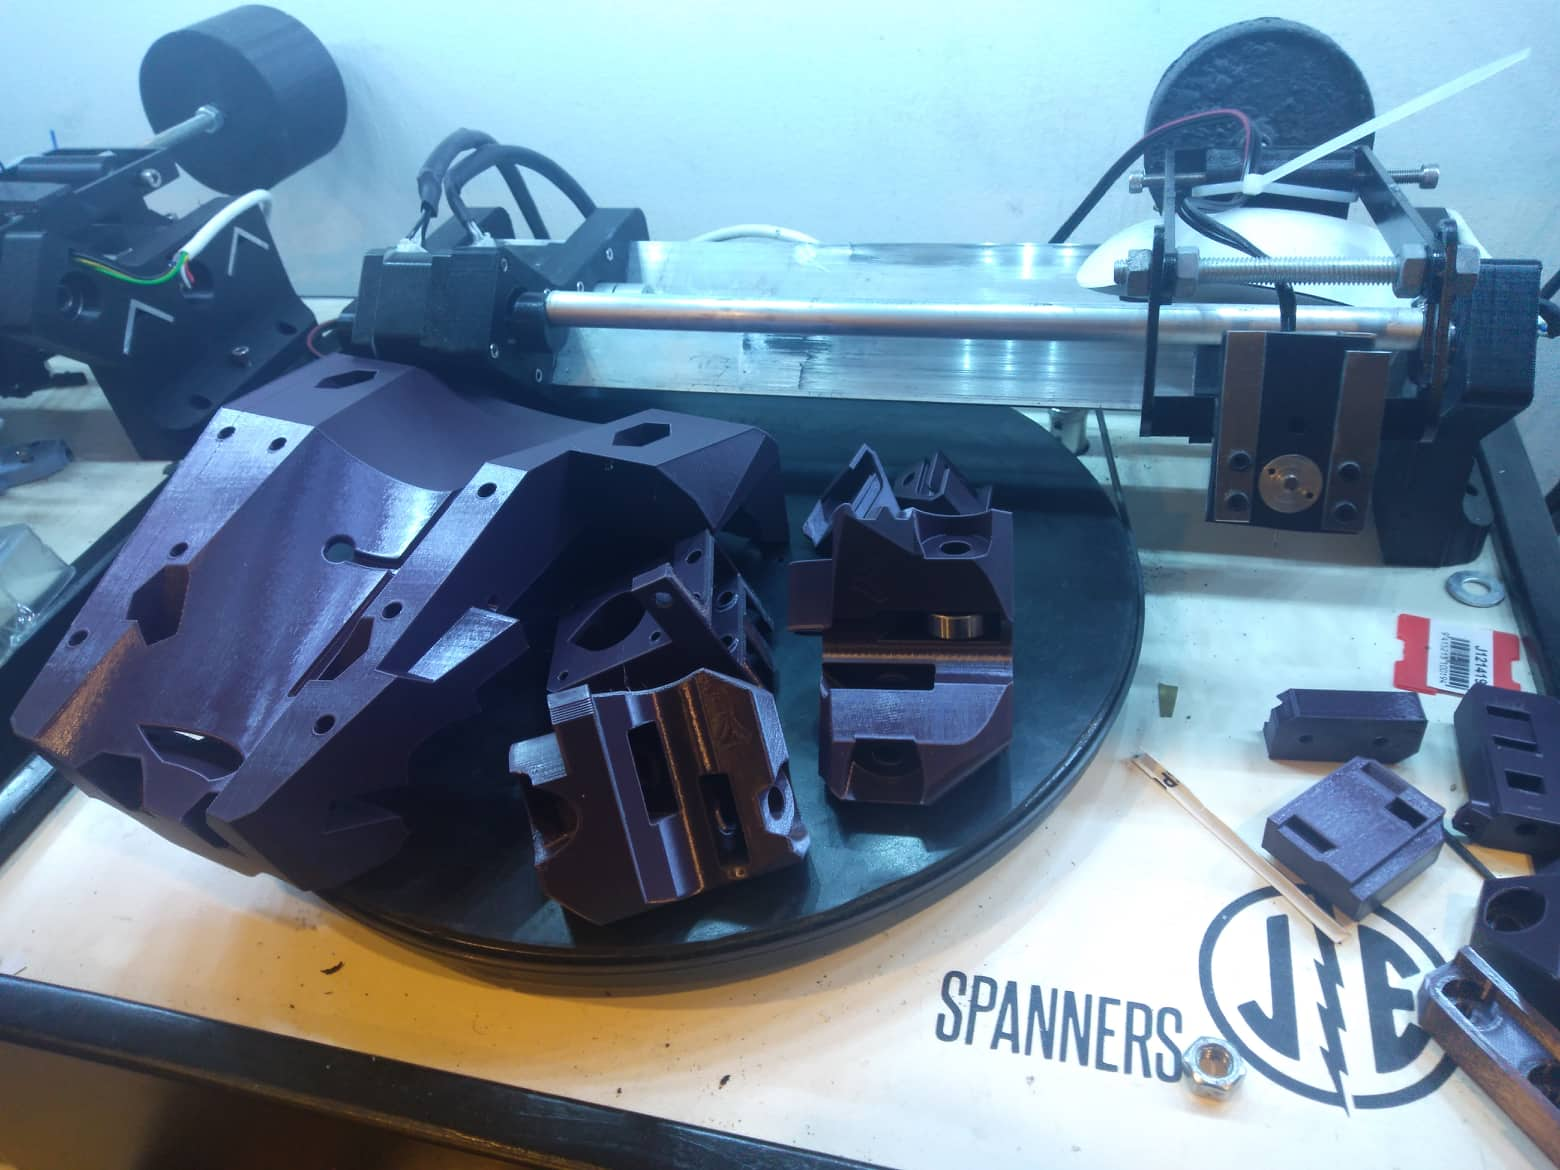
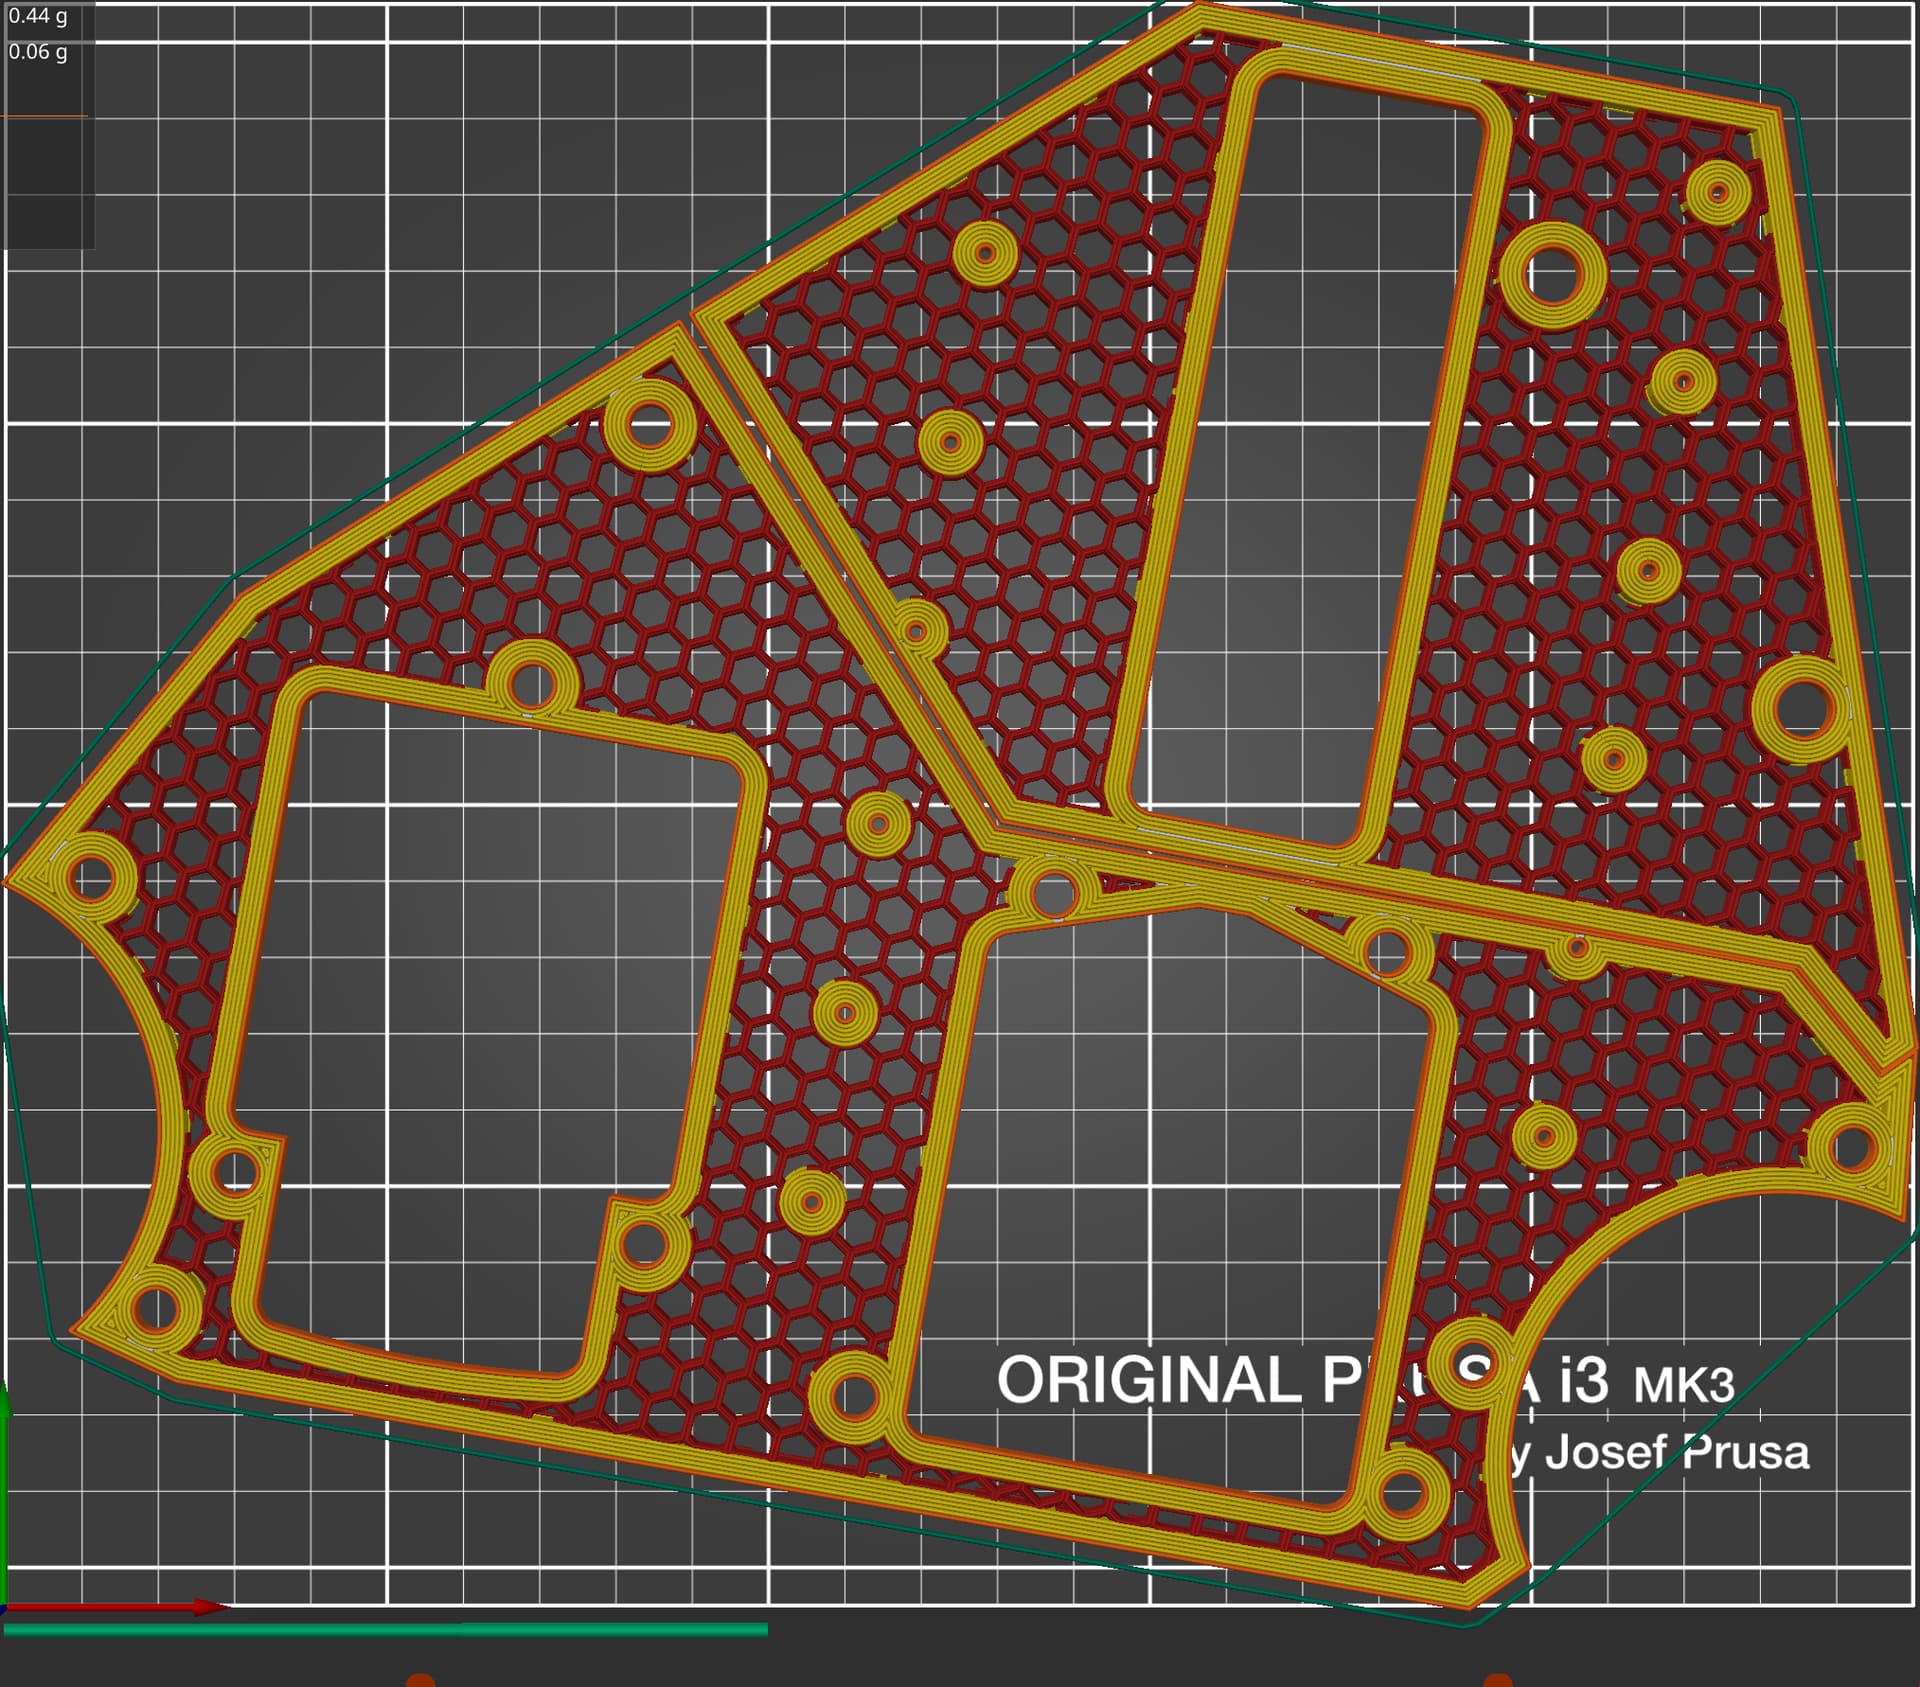
The core, belt holders and endstops will remain 3d printed in PLA (1.2mm walls/tops/bottoms, 30-50% infill)

My intention is that the internal struts and bracing plate will be 2mm laser cut steel welded into place.

For the MDF pieces, XZ/XY plates I am considering making them in two 2mm sheets with spacers in between to provide the rigidity.

This is a quick mockup of what I’m intending…

It seems to be that the part in a sheet of 1/2" MDF would weight ~480g whereas 2x 2mm steel plates would be ~900g, if it goes up to 3mm (as I originally envisaged) that weight climbs to ~1.35kg

Doing some more estimates of weight, it could be that 1/2" acrylic or polycarbonate could be the better option… the weight would be ~450g and then perhaps I would move all the motor holders back to printed PLA.

I’m curious as to what people on here would suggest, my brother welds, so I feel like it definitely could be advantageous to use steel bracing on the gantry itself, but if I try an redesign the parts in steel are the nema17 motors going to be the bottleneck for this CNC opposed to rigidity/strength?

I apologise as this post is ending up to be me thinking out loud.

I’ve printed a few parts and they’re all beautiful, I’m printing much slower and finer than I have before, but I think the extra filament and time are worth it.

Thank you Ryan for your design - and I feel a little guilty that I’m trying to mess with it!

4 Likes

And I bought (to be fair the cheapest I could find) charcoal filament - but it seems to be closer to EVA-01 purple…Maybe I need some green too…

1 Like

Interesting idea. I’m only popping in to say don’t feel guilty. I’d bet a dollar when Ryan sees this, whether he thinks it’s a good idea or bad, he’ll still think it’s a COOL idea. I sure do.

3 Likes

YES!

As long as you can screw on the rails. Welding might not be a good idea because it can twist and warp.

What, don’t be, I love it!

8 Likes

I’ll finish designing and costing this and see what’s the best option for me.

Speed is somewhat of a consideration - I’ll be primarily using the machine for cutting 175mm circles from 1-1.5mm polycarbonate (about 90+ per sheet?)

And it seems that speed is a balance between rigidity and weight?

I’ve been designing and building record lathes and cutting heads for the past 4-5 years - so I’m aware that all design decisions have a reason and effect (in the case of the cutting heads even the addition of 0.1g of weight to the moving part will alter the frequency response)

But my knowledge in mechanical and CNC design is limited, so I do worry that by doubling the weight of a part, or changing parts may lead to an issue you’ve spent a long time thinking about and trying to avoid!

1 Like

The second set I made is clear 12mm acrylic, I didn’t weight it though.
https://forum.v1e.com/t/gp-lr3-beta-build/31835/40?u=gpagnozzi

1 Like

Well in this class of machine it is far far more about rigidity.

2 Likes

Wow! I like!

Pair that with the steel XZ plates, and it’ll be a real beast!

I agree with the idea that screws for the linear rails is better, and allows just a little more freedom in assembly. I’d probably thread tap the steel for myself.

From the printed parts I see, it looks like you’re sticking with printed plastic for the rail bearings. Makes sense, those would be really hard to adapt. I take it that means that the other side will have the cutout shape like the original YZ plates, so you have 2 different designs for it.

I like the idea of the steel/welded braces. I suppose that if you welded steel strut pieces as well, you wouldn’t need the perpendicular holes for the 5mm screws. Those could be relatively thin metal. I might want to leave one brace bolted on though, just in case you want access to the inside of the brace. (I put my power supply in there, for example.) An all-metal beam would be super cool. (And an awesome project for a CNC plasma cutter! hint hint)

3 Likes

Okay, now you got me interested: Why would you do that? What are you working on that needs so many circles? I am curious. :slight_smile:

3 Likes

They’re for record blanks! I’ve got a reasonably large shipment of clear and coloured PC coming from China

I cut short run records onto polycarbonate for a living. I was using a lowrider to do it at one point, but ran into problems with concentricity and switched to buying the plastic locally, precut into squares.

I’ve been manually trimming them in stacks on a router then cleaning them up with a modified wood lathe with a compound table attachment to it to trim the edges so they are nice and smooth.

The CNC means I should be able to squeeze out an extra 25% worth of blanks…it also opens the door to lino cut stamps for the covers, custom shaped records and custom etched record dividers…

Heres a video of my the record lathe cutting a record;

If you go deeper on that YT account, you will find the first working version (and an old MP3DP + LR2 + a bad attempt at a V1-inspired 3d printed lathe to trim the edges!)

I try and keep a bit of an archive of the audio response I was getting on the records on this soundcloud too;

11 Likes

This is sooo cool. Really. :slight_smile:

/edit: Didn’t even have to go too deep, there are only two more videos. :smiley:

2 Likes

Thanks! It turns into a bit of an obsession!

I’m running 3 machines at the moment (there is a 4th but it is dormant with a stereo cutting head attached…It needs diamond stylus tooling, which I’ve got to figure out how to cut + polish) but I’m hoping to step it up to 6 machines in the next few months…

They’re all USB controlled so sync up to cut records at the same time, all the audio processing goes through a DSP so there can be a separate EQ for each cutting head + stylus’ unique dynamics.

Future plans include a way to ‘press(but isn’t really pressing)’ music onto recycled plastic blanks, but that may be a little way off. I’ve tried the basic concept, and 10% of the test record was audible, so with a little more time and care I should get there.

I’ve also finalised the design for the mono cutting head you can see in that video above, so I should have a few to release to market in the coming months too.

2 Likes

Are you intending to lino cut the stamps on the LR3 as well? I have been discussing doing exactly that with a print-maker friend and have been mucking around with scans of our sketches - we are having a few philosophical discussions about that but neither of us are as steady of hand as we were a few years ago when it comes to wielding very sharp knives!

1 Like

Yup, that’s the plan! Not so much as an artistic outlet, but more to keep production costs down.

I’ve got a friend who makes all the covers for the records by hand at the moment - digital print on 280gsm paper, then either machine cut, hand folded and taped. Unfortunately because this is quite labour intensive, the covers end up costing half the price of the records.

My solution to a low-cost option is to order in bulk pre-made record sleeves so the bands and artists have the option of either printing and sticking their own stickers for the covers, spray-painting stencils or drawing on them themselves.

The third option I’m thinking of would be to supply their digital cover art as a CNC lino cut, then the customer can ink and print their own sleeves - with the right ink they could even print the back of the clear records themselves to create a picture disk

These are the current record dividers I have - just sticker on polycarbonate, but I quite like them and do like the idea of engraving them with the lowrider…

5 Likes

I hope I’m not too far out of line here - rather than steel, I WAS intending to rebuild the plates for the LR2 using some 3mm carbonfibre sheets that I had access to, so I’ve been giving some thought to doing the same when the time comes for the LR3 or perhaps using an aluminium composite.

I had a little (not enough as it turns out) nomex honeycomb that I was going to use as a core so I’m wondering about printing the core with all the spacers properly located and tidy up the perimeter as well.

Here are my first doodles (sliced in two to fit my machine) but it looks as though I might squeak it in one piece if I try hard enough). This is 25% infill - 6 perimeters at 0.6mm, no top or bottom layers.

I can’t actually find any advantage in this, but I have time before I need to come to my senses.

2 Likes

That is a 200x200 bed? Whoa!

My suggestion is make sure the reference surface is up, so you will need to print one , flip the model and print the other. Mesh bed leveling can make the bed facing surface wonky and you do not want a wonky leadscrew mount. I do think adding a top and bottom skin adds to the rigidity a lot (torsion box). I could be wrong.

1 Like

The prusa is 210x250mm or so.

2 Likes

200X250 - now I have hijacked this thread well and truly - sorry!
I will quietly withdraw and come back much later when I am ready to go - but I will do a series of tests at that time and we can discuss them then!

3 Likes

Have you considered proper marine plywood with some fibreglass cloth epoxied to the outside?

I had the same problem with MDF on my LR2 so went down that road and it has been perfect.

My workflow would be…
Epoxy both sides of marine plywood
Epoxy glass cloth on one side. Let it dry, (couple of coats on wet on wet to build up epoxy on glass cloth)
Cut out plates on CNC.
Coat the end grains with thinned epoxy to penetrate
Sand and fit once cured.

Mine is bullet proof.

4 Likes

It’s tempting, but I’m not sure if it would be any cheaper than the laser cut steel - I think last time I checked treated plywood is about $160-180NZD a sheet as NZ is in the depths of a material shortage. From memory about 2-3 years ago a sheet of marine ply was about $180 too…

I’m expecting to pay maybe $20-30 per plate to be cut…

This just arrived today, it does seem to maintain a constant speed which is exciting (and a massive upgrade from the $50 routers I’m used to…)

8 Likes