Low & Slow. This is gonna be a while

Yeah, I split the finishing passes using those in the Primo for more than 1/2" DOC. It does work well for up to 3/4" cuts though. :stuck_out_tongue: just a little bit of sandpaper required for edge work.
I used a 1/4" bit for the gift box project, where I needed a whole lot of hogging out at depth. I should make more of thoseā€¦

I think I will re-make the router plate, and countersink all of the screws in the base. The router screws were countersunk in this one, Iā€™d have to add the countersinks to the #6-32 screws that hold the other stuff in is all. I might also sink the Makita base in about 2mm. Hmmm. Well, the countersunk screws would give me my necessary DOC for 1/2" right there. I could probably just do it to this one quick enough. Iā€™ should fix that ding where the pulled out bit nicked the shoe too.

1 Like

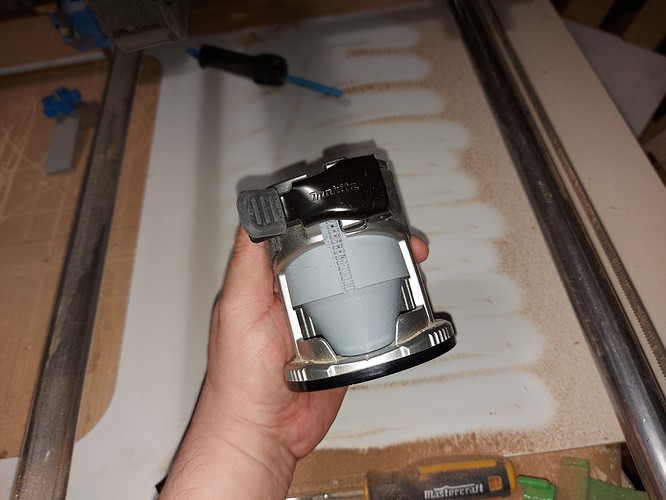
Ah, thatā€™s more clear. Yeah, but v1 doesnā€™t have that piece of white plastic. I guess thatā€™s what you were calling the shoe?

I know the Mak has a lovely metal base and everything, but Iā€™m wondering if thereā€™s a bit of an elephant in the room here?

The base was designed for a purpose that isnā€™t this. Is it worth building a custom base with a different air deflector? Iā€™ve been pondering with pen and paper, mostly because Iā€™m thinking about turning my existing trimmer into a spindle - but I think there are a few mm to be gained if thatā€™s important, which it seems it might be.

I am continually asking myself the same question though in an effort to stop myself racing off in some strange direction: with hundreds of builds already operating, how did others solve the problem?

I really like the 1/4 bits with my makita clone. The extra shank length means I donā€™t accidentally bottom out anymore. And my deflection issues magically went away when I stopped using the collars.

It is a lot messier though as the vac is farther out from the surface and Iā€™m making 4x the sawdust but Iā€™m not looking back.

I thought about this too, but first I need a better 3D printer, which is what Iā€™m using the LR to buildā€¦

I think the answer is probably going to be the 1/4" shank bits. Iā€™m going to miss having the resolution, but Iā€™ve already gone to 1/4" for many of the Primo projects that Iā€™ve done. Well, Iā€™ll still try to get this working with the 1/8".

I was playing with some other cuts, and managed to catch a screw head on the bottom of the plate. It got by, but thatā€™s definitely an avoidable problem. Tomorrow, Iā€™ll get some countersink head #6-32 screws to replace those with, and Iā€™ll take the countersink drill bit to the bottom of the plate.

Thatā€™s the Makita equivalent of whatā€™s called the VacDuct.stl in the LR2 files. I just happened to have white in the printer when I printed it. Actually it looks like it doesnā€™t allow the router to go much lower with it out, because there are stops in the side of the shoe (Clamp, whatever) to prevent the collet nut from coming out the bottom, and thereā€™s not a lot of clearance there.

Yep. I do have a tendency to want to re-invent the wheel, but Iā€™m always happy to take a hint from those who have gone before me. Even if nothing else, I can get an idea of what pitfalls I want to avoid by looking at other solutions to a problem. My CoreXY laser had all kinds of things inspire it, not the least of which is the ZenXY. (Actually, Iā€™ve found quite a few V1 inspired changes in my designs, like the way Ryan does the bottom of screw holes to layer the slicerā€™s bridging. Something that obvious once youā€™ve seen it is hard to ignore, but Iā€™d have never seen it if I hadnā€™t paid attention to these designs.)

I think that the DeWalt router might be a little different from the Makita, but there canā€™t be THAT big a difference. It does seem to me that the screw heads are really in the way when I look at it now though. I am fairly convinced that going with the countersunk screws might be all the difference that I need in order to do most of what I want to do with the LowRider. For more than 1/2", I think that Iā€™m willing to go with 1/4" bits.

Actually itā€™s only double. A 1/4" mill does have 4x the total area (A circle 2x the diameter has 4x the area) but except for drilling operations, itā€™s the width of path that matters, which is double. It might seem like more though. XD

The vac being further from the surface is another issue. Lots less suction there every mm you raise the plate. I donā€™t think that I want to put bristles around mine either. Itā€™s hard enough to see under there for zeroing on the tool to the work.

3 Likes

Okay, so the LR has been operating pretty well.

Some of the solutions:

  1. A 1/4" shank bit which is a 1/8" 2 flute upcut bit has been the main bit in the router, because itā€™s got more than an inch of cutting depth, so now I donā€™t have the plate riding on the work for most of my cuts. The overall length of the bit is 3" which might be a little longer than ideal for up to an inch of cutting depth, but itā€™s working for me.

  2. The ESP01 wifi is actually pretty handy. It might actuall be better placed on the board rather than on the LCD, but I like it on the LCD, because otherwise it can only access the board SD card. This can get both SD cards, and the USB port. Still, the firmware has some quirks.

Iā€™ve been trying to get a better drag knife solution. I did make one that is mostly good:


It holds the drag knife spring loaded so that it has a little bit of give, but it still allows a little more wobble in the knife than I like, and can be more than 0.5mm out of place at times. Iā€™d like a little better precision. This is likely to end up hanging off of the vacuum shoe, which I regard as less than ideal, but hopefully it isnā€™t something that Iā€™ll need to do often.

Iā€™m also probably going to give up on the coreXY laser, and put a laser on the LR2. Not because the CoreXY laser isnā€™t good, because itā€™s awesome, but just because Iā€™m not likely to need both at the same time, and itā€™ll be one fewer piece of equipment to maintain, heaven knows Iā€™ve got enough of that!

Probably for much the same reason, when the next LR comes out, Iā€™ll be rebuilding and retiring this one.

But firstā€¦

As I mentioned in my ā€œRepeatā€ build thread, Iā€™ve got another use for this SKR Pro, so Iā€™ll be pulling it off of the LR. In its place, Iā€™m going to set up my other Duet Wifi. Since Iā€™m already running a Duet on my Primo, the firmware isnā€™t going to be a big challenge (Though I havenā€™t really looked at laser control with the Duet specifically, Iā€™m pretty sure thatā€™s not going to be a large barrier.)

The wiring change will be the first thing. I have to change out the endstop connectors, but thatā€™s not too big a deal. I probably donā€™t have to change the motor connectors, but I will. Itā€™ll give me a chance to make the wiring harnesses much neater than they are currently.

Iā€™m a little concerned about replacing the board adapter that I have installed for the SKR Pro, but only a little. One of the big reasons for it was so that I didnā€™t have to drill into the Y plates, after all.

6 Likes

My printers have been getting all of the attention lately, so I figured while it was working on marble run parts, Iā€™d get some work done on moving the LR2 to the Duet.

I got the duet (sort of) mounted. I need to make a new mount piece for it, fortunately, I made that part of it modular to start off.

I finished re-terminating the motor connections for the Duet Y1 and Z1 are still just the DuPont connectors for the motors, because theyā€™re right there, but I had the JST terminals on the other ones, so they have the duet locking connectors now. Build quality on the Duet clone is crappy, BTW. I might not have otherwise complained, but having gone through 3 original boards, the difference in build quality is distinct and noticeable.

ā€¦ Aaaaaaand of course, I connected all of the motors backwards. Well, easy enough to change, but kind of annoying.

I tool the opportunity to run some braided sleeve over the wiring coming from the far side, and even out the wire lengths.

I also want to change up the Y endstops. Just a little. RRF doesnā€™t support M666 in cartesian mode at all, so I canā€™t use that for an offset. I suppose that I can program one into the homing sequence, and itā€™s easy enough to change on the flyā€¦ Well, weā€™ll see how it goes. Iā€™m going to have to square the whole thing up again regardless.

1 Like

I so HATE crimping wiresā€¦

But now the LowRider is running the Duet electronics.

I decided to see how the machine power lifts, and stacked weight on the Z axis until it skipped steps lifting it. Started with a couple of boxes of books, which were no problem at all at 600mm/min, and added some weight until one motor started skipping steps. (Then, just because, I replaced the 12V PSU with a 24V PSU and tried again. No difference.) Basically, I donā€™t think that the Z axis is going to give me problems lifting. In fact a bit more mass to keep the wheels on the table might not be a bad idea. I think it was lifting when I was experimenting with a downcut mill, I had some odd surfacing in places.

I need to wait for the printer to finish, so that I can print out the adapter plate for the Duet to mount to the side of the LR2. Eventually, Iā€™ll cut a new piece, bit in the meantime, I have a plate that the Duet will mount to that mounts up the same as the SKR Pro.

Gotta say that the Duet Web control interface is slick. Tap a couple of macros, and your workspace is all set up. Gotta clear off all of the wiring stuff on top of the table though.

Managed to get the wiring cleaned up a bit. The Y1 and Z1 motor, and X endstop wiring is still hanging in the breeze, but Iā€™m done with crimping connectors for today.

2 Likes

oooooooooo, since you are doing it already wanna try to see at what speed both PS fail at. If there is a significant difference under reasonable load, I will try the same, if we find the same thing, it might be worth changing. I planned on messing with this as soon as I test the new build but since you are already kinda playing with it.

Just think I hand made a few hundred MPCNCā€™s worth of wiring harnesses, while I looked for suppliers to make them custom.

I have a bunch of the wago style connectors coming in. If they work out nice it might be a cool way to manage wires. My plasma build left me with a rats nest all soldered upā€¦so now I want to clean it up but I am not resoldering those aviation connectors, and I have no interest in molex crimping either.

3 Likes

I actually like crimping (vs the alternatives). The molex ones I have (probably not authentic) are way easier than the Dupont.

I have spent too many hours debugging trouble that ended up being a poor solder joint under heat shrink to do that anymore. I spent a lot of time making car stereo harnesses that way, in a previous life.

I usually prefer a single crimp to crimp wire. If I have to do any forks or bridging multiple wires together, I would prefer they go into a pcb (or a perf board, more likely) to do all that and still have wires going 1:1. I also like the automotive style spade crimp connectors for some stuff.

In my house wiring, I use the other wagu connectors (without the tabs). I would consider the ones you linked for 12V power or something like that.

2 Likes

I was looking for skipping steps, and there are 2 ways to go about it. Speed and load. I was trying load only at a low speed. Load does not seem to make a difference (To a resolution of about 500g, or the weight of one university textbook.) Both were able to lift the load at 600mm/minute without the extra book, both skipped steps with it. (Duet wifi, TMC2209 drivers, same firmware, so same current. 1200mA if memory serves. Accel set to 250mm/s^2.)

I use that style for the last few house wiring projects that Iā€™ve done. A new junction box and switch for the storage room light (No more overhead pull-cord) and in the garage where I added in an outlet for the air compressor and another for the tablesaw.

I never did it professionally, but I did get an MECP designation so that I could install my own car starter/alarm system and have the factory warranty.

2 Likes

I have seen most of these! Love everyone of them!

You might try this method.

Cheers

Andrew

Well, now Iā€™ve gone and done itā€¦ I just ordered a NEJE A40640 laser module.

I guess itā€™s been coming for a while. I have the Makita adapter for it to use with the LR2. I also have @dkj4linux manual Z axis part, though looks like Iā€™m not going to end up using thatā€¦ Unless itā€™s for my CoreXY laser machine, which remains a possibility. I have a friend who seemed very interested in having a laser, so itā€™s entirely possible that this will simply end up going to him as-is though.

The LR framework will make this thing capable of some truly large scale cutting/engraving, and with actual endstops Iā€™ll have some repeatability for setting up things. The downside is that the Duet 2 doesnā€™t have the same provisions for laser. The Duet 3 would manage it without issue, but looks like I need to do some hacking for the 2. Looks like Iā€™ll need to make up a little daughter board to invert a heater output. At least I wonā€™t have to worry (much) about the physical mounting, just need to run the wires.

So looks like the LR2 is going to do double duty as a router and laser. Now to get some air assist goingā€¦

4 Likes

So the NEJE shopā€™s customer service is disappointingā€¦

So I pulled the trigger, and ordered the NEJE A40640 laser. All good. They shipped it, and it was ultimately deliveredā€¦ To the wrong address. No, itā€™s not their fault, it was the logistics company that delivered it to the wrong address, and now, Iā€™m apparently screwed.

I went back and forth with the delivery company, and theyā€™ re admitting that they delivered to the wrong address. It took them a couple days to tell me which address. (Turns out it was a vacant house down the street.) and of course it wasnā€™t there by the time they sent me the picture with the address.

The NEJE shop was a bit worrying when I asked about it. They said it was delivered, and if the address was wrong, it was my fault for not filling it in correctly. I agreed that they shipped it tot he correct address, but that the delivery company that they chose delivered it to an address that was not where it was supposed to go. In todayā€™s email:

Dear friend
If the logistics staff sent the wrong address, we cannot give you a refund, because the address we sent is correct, and the goods are shipped according to the address you filled in, so it is recommended that you wait for the results of the investigation.

Best regards,

the ā€œinvestigationā€ that they speak of is asking the shipping company ā€œwhat happened?ā€ From them, I have:

Driver couldnā€™t get in touch with the person how received your parcel and she has provided a refund to your shipper yesterday. We have reported this as a lost parcel to your shipper, they will be providing you a refund/replacement.

Again, we apologize for the inconvenience

I donā€™t know what refund they gave the NEJE shop, probably just the shipping fee. I get the feeling that Iā€™m out the $254 USD, and ā€œtoo bad so sad.ā€ If Iā€™m lucky, someone will refund me the $15 shipping. Oh goodie.

Looks like Iā€™ll just keep on using the 5W laser that I have. Feels like a rather expensive lessonā€¦

1 Like

Ouch!! Many people pointing fingers, but no one own up to it. Sorry to hear!

Brutal.

If it wasnā€™t insured, then the shipping company wonā€™t cover it (I have learned that before). The seller usually takes the hit there. But I am not sure if they legally have to or not (especially across borders).

But you didnā€™t get what you asked for. So you can also get your credit card company involved. It hurts them a lot to get a charge back (something like full refund, and a percentage and a flat big fee).

Maybe try one more time with Neje and then talk to the CC. Visa wonā€™t mess around. They will drop the hammer.

2 Likes

Well, I paid with PayPal. I did not want to go through their dispute and resolution centerā€¦ But I started the process. Even when itā€™s to my benefit, I am not personally a fan of PayPalā€™s strong-arm tactics. I believe that in this case their buyer and seller protection might end up being the best overall resolution though. It wasnā€™t the NEJE shopā€™s fault that the logistics company employee canā€™t tell a 0 from a 6, but itā€™s not my fault either. I doubt that they shipped with any kind of insurance on the package, so the best that I think they can expect from the courier is a refund of the shipping charges.

Well, if itā€™s PayPalā€™s protection program that ends up paying for it, Iā€™ll call that a win. Not sure that the Neje shop is going to want to deal with me again though. :frowning:

5 Likes

At work we sometimes ship things that we make. It has less than a few hundred dollars in parts, but so many hours of work that replacing it could cost tens of thousands. But we canā€™t insure it for $20k. It just doesnā€™t make sense. We take that risk when we ship something. There isnā€™t much else you can do. The shipping company canā€™t charge us $50 and then pay us $20k if they put it on the wrong doorstep. Weā€™re better off just sometimes doing the work again. Or mitigating the risk some other way. We usually insure it for the price of the parts (because weird accounting rules make that make sense).

IMO, Neje is the one that is benefiting from the good luck (they arenā€™t insuring the package of requiring a signature, so they save money) so they also should pay for the bad luck. They should do enough volume to justify that cost.

For all the shipping company knows, they delivered a box of pencils. They canā€™t be responsible for a fancy piece of electronics inside

2 Likes