Dang, Mike! I hadn’t seen laser modules for $40 before and shipped from the US to boot… so I ordered the 3.5W unit you linked.
And then, of course, interesting stuff showed up in the side bar. There was a pretty interesting laser engraver machine offered with several different laser modules – 3.5W up to 20W – and since I live well within my means, and already had the 3.5W module in my cart, I opted for the 20W unit!
I’m quite aware of the kinds of “games/tricks” they play to spec these so-called “higher powered” diode lasers so if it turns out to be worthless… I know I can always use the parts and/or modify the machine however I want, so I haven’t lost much. But I haven’t personally played with a diode laser of more than 3.5W before and it’ll be interesting to see what it really brings to the party, if anything.
And, hey! It’s like I NEED another laser machine to play with. This is the kind of stuff that keeps me off the streets and/or out of an institution anyway.
Hey, Dave! You’re not going too far afield at all. The JTech folks are a good source for information and from what I’ve heard their products are first-rate, though not cheap. That Sphinx CNC controller board you mention looks as though it should be easy to add a laser… since it’s Grbl (my preference for laser use) and brings all the appropriate signals out to the board edge terminals. I’m assuming that controller will stay on the Sphinx CNC machine, however.
So, what controller board are you using on Rolling Plotter now? And are you using Marlin? Grbl? You might already be set… just need to know what controller you already have.
The xPRO board will stay on the Sphinx. On the rolling plotter, I am using a MKS Gen V1.4 board with 12v PS running Klipper firmware. I would have used Marlin on it, but could not get the servo Z axis to work the way I wanted it to. For Servo M280 gcode commands in Marlin it sends them immediately instead of waiting for G1 or G0 x/y movements to finish. Klipper lets me define a macro to redefine a gcode command in my case I changed G11/G10 which is normally Filament Recover/Retract to Pen Up/Pen Down movement which makes the machine use it in correct sequence. I got the G11/G10 idea from some source on the internet that I don’t recall at the moment. If I decide to use a normal Z-axis motor for this instead of a servo motor that problem can go away. I have a spare arduino uno with CNC hat and also the keystudio board. I was going to use one of those boards on the Eggbot, but put that project aside when I started the Rolling Plotter idea. Actually I started the Rolling Plotter idea while waiting on parts for the Eggbot. If I use the laser, sounds like grbl is the better way to go. I doubt I will get a laser anytime soon unless I really get bitten by the laser bug. I would like to gather as much info now to help make an informed purchase later.
I might get the glasses sooner in case my neighbor needs some help with his laser engraver. He has zero experience with these, but is doing well with it so far. His engraver came with benbox. I told him about lightburn you mentioned and some other free sources. He seems mostly interested in using it to burn an image of his signature logo in wood products he makes. I mentioned to him that a vector image would be a lot quicker to burn.
I also bought a wood burning tool last year from Sam’s Club & a router speed control from Harborfreight. I really should test that since I have it on hand, before getting a laser. No glasses needed either.
I would recommend getting away from the servo-Z and using a stepper motor. IIRC you said you had one of those little hobby 28BYJ-48 geared-steppers (they’re only a couple of bucks each) that I’m using or a small NEMA11/NEMA17 bipolar (4-wire) stepper of some sort. Is the Keyestudio board you have a 3-axis board? If so, it’s pretty much the same setup as I have. Regardless, the Uno/CNCshield combo is a good choice as well. And both will run Grbl 1.1f or later… so “laser mode” would be available to you. This alone makes Grbl preferable to Marlin for laser use IMO.
I ordered the 3.5W laser Mike linked this morning… at about half the price I paid for the Banggood/Eleksmaker units I’ve bought on sale in the past. Since it ships from the US they’re saying I should have it within a couple of weeks. It also appears to be just the bare module, without cables/wiring, but the required signals are all there in the connector and look proper. I use these Elegoo jumper wires to gender-adapt, daisy-chain, and connect to bare pins on the board when I have to… they’re inexpensive and really handy.
About the glasses… TBH I’m far more careless about it than I should be. I don’t recommend you be as lax… and if you value your eye-sight, JTech’s proper glasses I’m sure will fill the bill. I do have some cheapie glasses that came with a past order and they seem to work when I need to stare directly at the spot… but I can’'t swear how well they are really protecting me.
I am pretty sure the keystudio board is 3-axis, but can’t find it at the moment. I have some jumper wires similar to those, so I could probably piece a cable together. That is a pretty good price for that laser engraver you just mentioned buying. I will save that link & ponder it. Looks like a good footprint & portable. Making a nice little cover using one of https://jtechphotonics.com/?product=445nm-laser-shielding in the front would make it a lot safer to use. Let me know how that new engraver works for you. Have you ever cut leather with your engraver?
When I bought my laser modules they came with a 4 wire pigtail that fits into the connector on the top of the laser module. The requirements to drive it are +12v, GND, PWM (@3v3 according to the specs and I build a 5 to 3v3 level changer into my boards but you would probably be ok with the 5v PWM the Nano puts out) and there is also an output from the internal thermocouple so you can keep an eye on the laser diode temperature with a simple circuit, I never bothered with it so cannot say how it performs. That is it…no external regulator with two or more confusing connectors, no problems driving the PWM.
dkj4linux - the 20Watt module is actually supposed to be a 7Watt output laser diode…although I am not sure there even is a 7watt laser diode made, I thought the highest power laser diode in the 445 wavelength was 6.5 watts… the 20 watts refers to input power…It will be interesting to see what results you get!
My advise to you geodave would be don’t fit a laser to your existing machine…build a dedicated laser machine. The minimum you need for a laser machine is this… . A Nano, two stepper drivers, a logic level shifter, two big caps and a couple of resistors. This gives two axis control and a 3v3 PWM output. Running GRBL with laser mode enabled. It really doesn’t get much simpler than that…even the eleksmaker is more complicated as it has a 3 axis capability!
I documented a build for a simple laser engraver here if you are interested in building one. It was for that build I had the PCB made…
This is the 20W laser engraver machine I ordered… and it’s less $$$ for the whole machine than I’ve seen just the laser modules, especially the “high-powered” ones. The 3.5W version is about $60 less thatn the 20W version… but I wouldn’t recommend the 20W version if it’s your only laser. I hear of many unhappy users over on the LB forum who purchase these cheap machines and can’t get them to run with LB because of the “hokey” software they come with and the disappointing [lack of] performance of the “high power” laser module. I’m not averse to changing out controller boards, laser modules, and/or flashing firmware when/if necessary so I’m always positive I can get something going… but many of those folks lack confidence and don’t have the experience with this stuff that I have.
I personally like a 3-axis capability… even with laser. A real Z-axis allows you to easily adjust the Z-axis for ABSOLUTE BEST FOCUS – I use Ryan’s focus script all the time! – which is necessary for the smallest spot and finest line. It is also a requirement for the absolute nicest photo-quality engravings… like these done by @Bulldog, over on the LB forum, on ceramic tile with just a 2.5W Eleksmaker laser!
I don’t see the point of a third axis myself. The focus doesn’t change when engraving, it is no harder to set the focus by turning the focus ring than driving the whole laser up and down providing you have a decent collor on the focus ring. If you are cutting 6mm thick wood that is a different matter, some focus adjustment may be required for best cutting results but that can be achieved by pausing the program and manually refocusing using low power. I think having any Z commands in your gcode can cause problems with burning as the laser stays on while the Z command is processed so I think better off without. Horses for courses!
I have probably a month or so to think about this. My wife said I can order one as a reward when I replace the decking boards on our two decks. Guess this will get me motivated to finish them sooner.
I think it must be the same basic machine Edward Chew ripped off with his TimSav machine as well… though he enlarged it to cover the extents of A4-size(?) foamboard and adapted it for the needle-cutter. He put a servo-driven Z-lift on it for the needle-cutter and added a little outrigger “landing gear” to prop up the far end of the skinny axis, for consistent depth of cut control.
Thanks for the pointers to these 2 designs. I might have to look at one of these designs & just buy the laser components since I have some 1 meter 2040 & maybe a 1 meter 2020. I like the wheels on those versus the cheaper Chinese ones. This way I could use the components I want.
After looking on thingiverse for some CNC engraver ideas, this design https://www.thingiverse.com/thing:4332724 looks similar to these designs & fairly simple parts. I have enough V-Slot for it. The parts he made on his CNC look like they could also be 3D Printed. He is using a 400mm length of 2020 for the arm. If I cut that main part out of Aluminum on my CNC, do you think I could go to 500mm length arm? 400 is probably adequate though. I could always go to 1000mm on the 2040 axis.
That looks good. I built my second one to cut balsa from 4"x 36" sheets, my x axis was 1.20M long and the Y was only 25cms. The 2040 X axis can be as long as you like! The longer you make the unsupported cantilever the worse the sag will get as the mass of the laser moves outboard…keep it as short as you can. The wheels on the carriage will deform adding to the sag over time so an adjustment mechanism should be utilised to get the perfect position between play and rolling resistance.
I have uploaded my version stl’s if anyone is interested. cantilever laser machine stl.zip (1.1 MB)
Thanks for the STL files. I had already taken a look at your .123dx files yesterday. They will import ok into fusion 360. I will probably use the ideas from the 3 different machines that I like best to piece together my machine mostly so I can use any of the spare parts I have. I do like using the short 2040’s for the ends, although 2060’s might be a better height. I will use wheels for the x/y axis instead of the linear rail in that one design since I have some spares. The design I referenced has a main plate that is 105mm wide whereas yours is only 54-56mm wide. His seems pretty wide, but maybe that helped with him cantilevering further since it spreads the load wider? He does loose some cutting width with the wider plate. I probably won’t make the cantilever anymore that 400mm, but might use 300mm to start with as 400mm seems like a lot. I did see in the TimSav design that dkj4linux mentioned had a wheel at the end of his V-slot to handle the support of that long beam. How much cutting width do you have with the 250mm length? Seems like you will loose 60-100mm.
Here is another interesting design that looks like the Corexy belts are helping support the cantilever.
Actually lost about 140mm in all…100 at the root and 40 at the tip…but it was designed for a specific sized workpiece…balsa wood comes 100mm wide.
Any loss of cutting length from having a wider frame is easily made up by having a longer 2040 (or 2060) beam and I would think a wider frame has to reduce the chance of side to side play.
When I looked at the links from my build log the other day the second link wouldn’t work for me…if you need access to any missing files let me know.
I like the coreXY, that is a nice idea…although it does loose the beneficial counter weight of the two stepper motors hanging off the back of the ‘boom’. Linear rails are of course going to be better than delrin wheels but at a significant cost hit. Will GRBL handle coreXY? I don’t think so, so I guess it is running Marlin - you can just make out the extra burnt edges to the logo he was engraving…nice logo too!
I am sure you will end up with a better design by taking the best bits from many designs…and it is fun at the same time.
Maybe I should start a new build thread for my mish mash design so we don’t stray too far off tangent of dkj4linux thread? I am initially assembling all your parts in fusion 360 so I can understand it a little better. The other design does have 2 motors counter balancing that beam, but connected differently than yours. Not being an engineer, I am not sure which design will support longest reach best? I would not use linear rail, so my reach would be less on his design than what he is getting. His design has the part main_carriage.stl file connected to the 2020 cantilever beam around 66mm out on the bottom and the other connection about center of the 2040. I don’t have anything specific in mind for engraving with a laser, but would like to have it the best compromise of size to function. 2040x500mm for main beam & 2020x400mm for cantilever beam is probably good enough for me to start with. I might go 600mm for main beam. I will probably use eccentric spacers for all the wheels instead of the way you have it if it fits into design easily.
I did find all your parts in that thread as well as the assembly file.
Go for it! I’m not a mech engineer either so I am not claiming my design is mechanically ‘best practices’ so please feel free to take what you want and modify it… I bet you end up building more than one
If you use eccentric spacers on all the wheels might you end up with a cantilever arm out of square with the main beam?..might be best to just have eccentrics on one side only.
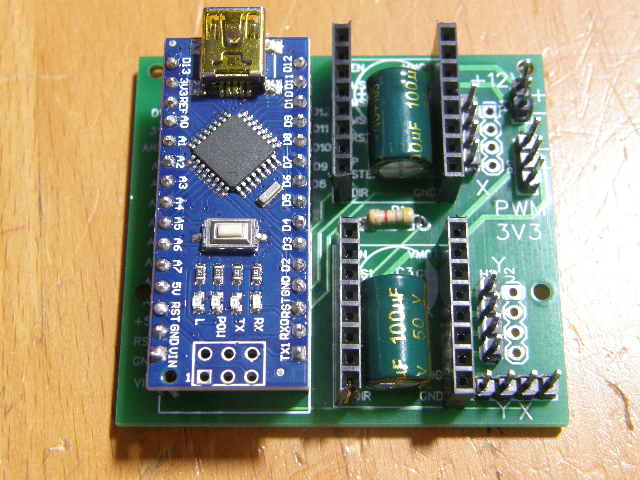 . A Nano, two stepper drivers, a logic level shifter, two big caps and a couple of resistors. This gives two axis control and a 3v3 PWM output. Running GRBL with laser mode enabled. It really doesn’t get much simpler than that…even the eleksmaker is more complicated as it has a 3 axis capability!
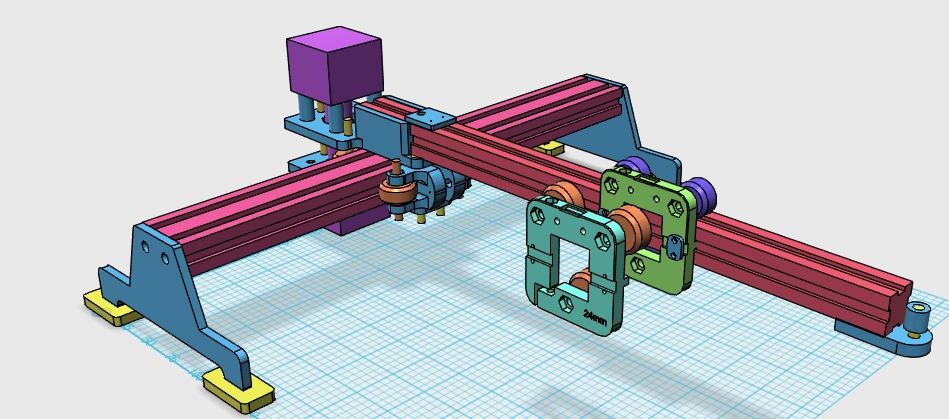
")

