LowRider v3 build for school/foldable/moveable/4x8' capability

Hello,

I am a computer science/programming/robotics teacher at a STEM Magnet school in Pennsylvania. We are working with a donor to purchase and build a Lowrider CNC v3.

  • We decided to go with a build as opposed to just purchasing a kit because it will keep costs down AND also should be a great learning experience for my robotics students to go through the build process
  • Among other things, we would like to use this to cut 4x8 sheets of coro board to make holiday props which will then be used in a holiday light show that we create for the donor and also th school.
  • We would like to build a folding design that is also on casters so we can move it around our shop at the school and also to the engineering room down the hallway. Similar to designs one would encounter upon searching "Lowrider 2 CNC 4ā€™x8ā€™ Tilting Table on Wheels
    " on YouTube.

Our donor is ready to make necessary purchases and order the parts for us, and they are flexible (within reason) with priceā€¦I just need to know what to tell them to order. I have been in contact with Ryan from V1Engineering and he suggested i make a post here. He basically told us what parts/kits to order from the site, but Iā€™m specifically looking for help with plans for the setup I described above.

We will be going the Makita route. Would a Makita RT0701C meet our needs or should we be looking at something different?
1 Like

What a cool project! I bet your students will have a blast building it.

In my mind, the tilting and rolling table is the biggest unknown. To do full sheets, the table has to be bigā€¦roughly 5ā€™ by 9.25ā€™, and making a reliable and sturdy/stiff rotation mechanism will take some engineering. Given your student environment (many hands), there is a middle ground that would be much simpler. Design a leg system that can be easily removed from the table, and mount casters or wheels on the side of the table. You would want four students to take down and put up the table, but, with the right design, setup could be done in minutes, and you would likely be able to store the table in less space.

The Makita RT0701C is a great router and a fine balance of weight and power for the machine. Personally (for my Primo) I went with this router. It is a Makita clone with respect to size and shape, is cheaper, and comes with the 1/8" precision collet (which you have to buy extra for the Makita). Carbide also has this router, which is the same shape, but takes ER-11 collets rather than Makita collets.

Iā€™ve wanted to try this carbon fiber PLA. According to the datasheets, it is substantially stiffer than ā€œnormalā€ PLA, and is roughly the same cost as Iā€™m paying for PLA now. It would require a steel or similar nozzle.

As for what to order, beyond the table, the list is pretty simple:

  • A Lowrider kit
  • Either a Rambo 1.4 or an SKR Pro 1.2 control board
  • Endstop switches and endstop wires if you ordered the SKR Pro
  • Display if you ordered the Rambo 1.4
  • Rails/conduit
  • Filament (builds takes a bit more than two rolls of filament if there are no print failures)
  • Router
  • 1/8" collet if you go with the Makita
  • Emergency stop solution (may just be a power strip with the power button appropriately placed)

There are some choices for plates (steel/aluminum) in the V1 shop. For coro board, you donā€™t really need anything stiffer than MDF or plywood, but if you are targeting other kinds of materials, you might consider these plates.

To get up and running, you will need to think about a few other things.

  • Endmills
  • Some sort of hold-down solution. Iā€™m thinking double-sided tape for coro board

Note a display allows you to run your jobs off SD cards, and therefore avoid the need to be tethered to a computer.

FYI: Not sure of the environment, but the router and the shop vac (optional) will be noisy. I wear hearing protection around my machine. Also, unlike a 3D printer, you donā€™t want to leave these machines unattended. Iā€™ve made lots of CAM and setup mistakes where I was very glad of my emergency stop switch. And, though it is rare, mistakes can kindle a fire.

1 Like

As one of the resident safety ogres :japanese_ogre: , and fathers :man_beard:, I have to highlight this, especially when being used in an educational environment. What you chuckleheads :clown_face: do in/to your garages is one thing, but when dealing with the spawn of others, you must ensure, to the best of your ability (and theirs), their safety. That involves indoctrination into the world of safety and risk management/mitigation. This means you really should have at least one Big Red Buttonā„¢ as an emergency stop, and beat into the kiddos that they cannot leave the machine unattended. Ever. Again, risk management can be a personal decision in the confines of your own personal property, but youā€™re talking about OPK (other peopleā€™s kids), and OPP (other peopleā€™s property) in a school environment. (Unless youā€™re the patron of a private school, in which case, itā€™s just OPK. Or homeschooling, in which case, your circus, your monkeys.)

4 Likes

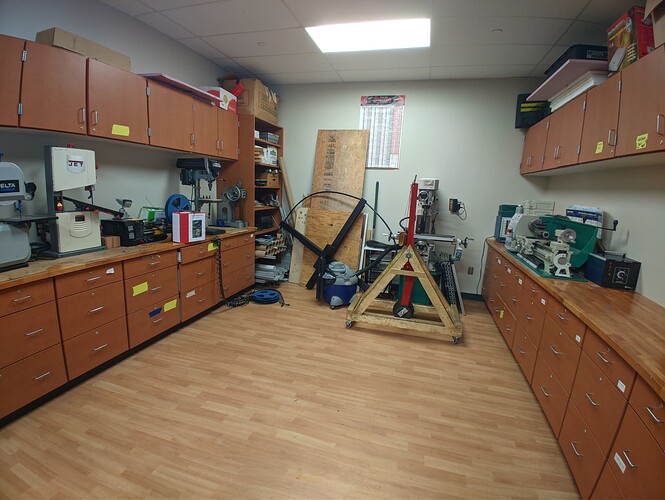
Thank you for the replies so far. Safety is always a concernā€¦ This is the corner of my shop/classroom where the cnc will be going. I have stuff against the wall now because of summer, but there is a dedicated outlet behind the mill in the photo and the room is fully safety-compliant with an emergency kill switch the instantly shuts off power to EVERYTHING in the event of an issue. Furthermore, students arenā€™t allowed to use power tools at all unless a certified instructor (me) is in the room.

I just wanted to be very clear that this isnā€™t a case of a guy wanting to be a ā€˜coolā€™ teacher and sending kids down the hallway with blades.

6 Likes

Didnā€™t really think that, just doing the whole ā€œdue diligenceā€ thingā€¦ :wink:

3 Likes

So I knew I had seen some folding tables for the lr2. Here is a link to the one site that has 2 nice tables.

The problem is they are still large when they are collapsed. In that room it will still feel very large.

Wish I was close so I could help :slight_smile:

3 Likes

The table is, unfortunately, not a complete project. So you will have to bring your own creativity to it. I have seen some ping pong tables used as LR tables before. They are 9ā€™x5", IIRC. Some of those fold up. It wonā€™t be a finished solution (you need to join the two surfaces together, figure out the spoil board and the rail, and if it can handle that much weight).

A full sheet job is also a long job, usually. They arenā€™t always the easiest jobs. Is there a way to somewhat limit your capacity, and greatly increase your convenience (and lower the barrier of entry)? Maybe by making a 1/4 sheet machine, you can have something on wheels that is 3ā€™x5.25ā€™, and you can cut 24" wide strips, and maybe cut 8ā€™ tall objects in multiple cuts? Corogated plastic sheets are not hard to mill, and accuracy for props is not aircraft grade. So those larger jobs should be easy enough.

Keep the questions coming and pay us in pictures of your school and projects. What a great idea.

2 Likes

While it isnā€™t a folding table, I think that this is an ideal table that takes up very little space when not being used.

Of course some modifications need to be done for a full sheet LR3 because of size differences, but the cradle builds alone could be part of your classroom ā€œworkā€.

2 Likes