Makita / Katsu speed settings

Hello

as a beginner in CNC I have no idea on how fast the router should spin, in different types of material. In this topic Rob mentions the no load speeds.

Could one of you senior CNC operators give a list with recommended speeds like for acrylic, soft wood, hard wood, plywood, …?

I know I can always do some try and error, but hope to avoid as much error as possible :smiley:

Unfortunately it isn’t as simple as RPM. The real measure you need to tune for is “chip load” which has to take into account the number of flutes on the cutter, the radius of the tool (impacts how big a “bite” to be taken) and the speed through the material.

1 Like

I will bow to other peoples experience here. Also my CNC machine is at the back of the garage as I am having plumbing and renovation work on my house, so no abaility to check anything.

rob

1 Like

I like to let the sound guide me! If I can lower the RPM, without things starting to jump or skip or make bad noises, it’s for the better. The bigger the chips, the better - as long as the cut goes smoothly. If the mill spins too fast, things tends to char or even ignite. Personally I keep it on the faster side, if I’m afraid of things starting to jump.

2 Likes

I figured RPM wouldn’t be the only factor in the play. I am also aware that the knob might have different speeds for the same tool depending on the production batch. But hoped one would have a cheat sheet for specific materials, speed and bit:)

At the moment I tuned back the speed and tried to have a look what happened, but that doesn’t feel like a good plan. It’s like Turbinbjorn mentions, it could skip ruining the workpiece…

1 Like

I always remind myself to do test-cuts, so that I can measure the actual tool width and to figure out speeds, DOC and such. BUUUT - usually I skip this phase, because I’m too eager to start cutting the actual things :smiley:

1 Like

The problem is that even manufactured woods vary from batch to batch and hardwood has knots that can be twice as hard as the rest of the piece.

For birch ply I run my clone at 3.5/6. If it’s vibrating I kick it up .5. At first sniff of smoke I turn it down .5.

I also keep a notebook with feeds and speeds for each material.

2 Likes

I have exactly the same questions so am following @Olivier 's progress with great interest.

Recently someone published a link to a “chip calculator” or some similar name, which was an online calculator that input travel speed, cut depth and so forth, but it seems that proper spindles are much slower beasts and as far as I could tell it didn’t allow for anywhere near the sorts of speeds our routers run at.

I get that there are lots of variables, and I get that some of you can hear when it’s right, but I haven’t (and I presume Oliver is in the same boat) got a base line to work from here.

I’ve had a lot of router experience, and can’t say I’ve bothered too much with the niceties of fine adjustment - I just run 'em flat out and slow down if it’s bogging and speed up if it’s burning - I guess it’s the same thing, but…

1 Like

I wish there was a cheat sheet too. As a beginner I am always wondering if I really have dialled it in.

Here is a photo of me trying to cut 2mm aluminium in a single pass. Both the foreground and background are full depth passes with the Makita router speed set to 3 (I assume that 16,000 rpm) and a single flute 1/4" end mill. The only difference is the Trichoidal step over, foreground is 4% the background is 3.5%. Difference is plain to see.

2 Likes

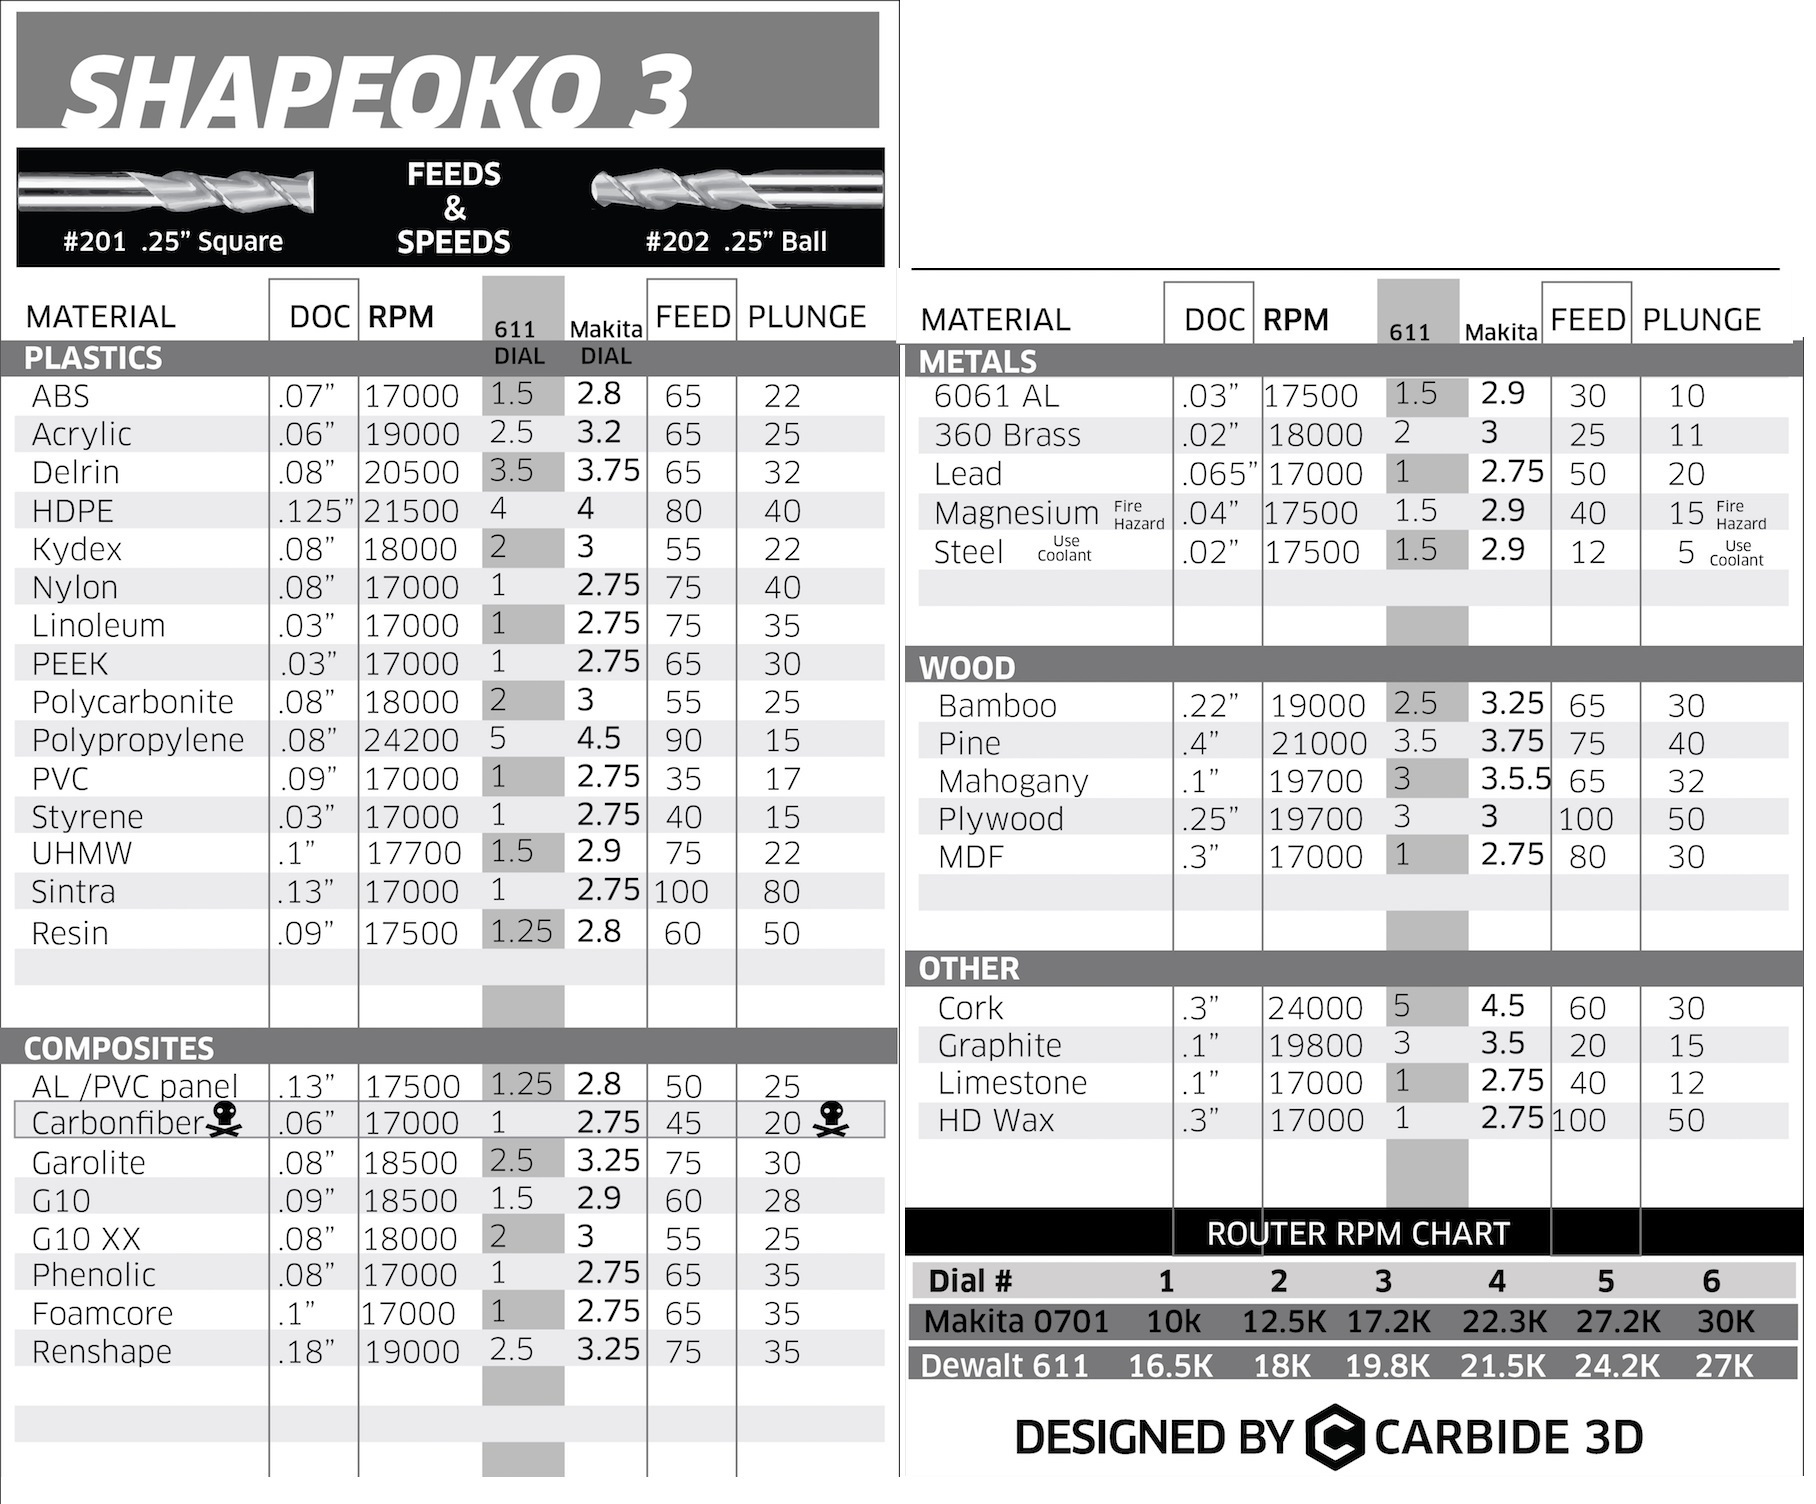
The biggest problem with rpm is the bit size. Bigger bits will cover more distance at the cutting edge (rotationally) than small bits for a given rpm because the circumference is larger. CircumferencexRPM is what we call surface speed (its the “speed” in “feeds and speeds”).

The problem with caring about THAT is that it changes with material (aluminum vs wood), tool composition(carbide vs HSS), and even coatings(AlTiN, titanium, etc, or none at all) and cooling(none, air, mist, and I’ve seen one flood cooled mpcnc).

It gets even MORE nebulous when you look at some of the HSM literature that shows even though you can machine aluminum at 500 sf/m (as an example) it might cut cooler at 1200+.

Basically, it gets really complicated if you need to care about it, and i suspect it’s just one of the many reasons professional machinists are valuable.

For most of us, woods are the main course, and they tolerate a wide range of surface speeds so it really ends up not mattering too much and we don’t need to care about it-hence the advice to calculate the chip load. I like to start with the chipload and multiply by the flute count and rpm to get a total distance to travel in a minute. Divide by 60 if you like distance/sec.

0.001in/tooth seems to work well on a variety of machines as a baseline to prevent tool rubbing (where you don’t actually cut material and generate a bunch of heat instead) on 1/8 in and 1/4 in tools, but smaller tools might need even less than that.

So for woods, pick a speed based on how comfortable you feel running your router (maybe you just don’t want to run full out, or you’re worried about overheating of you run it too slow), calculate the feed rate, and let it rip. If it goes well try deeper. If you’re already deep enough or it starts making noise, try faster feed instead. When you get a good combo WRITE IT DOWN. It won’t be useful anymore if you change your machine size or spindle, but it will be a great data point to have when you sit down to program jobs in the future.

3 Likes

Not for the mpcnc specifically but there is translations for the Makita :slight_smile:

Edit:

Here is one with mm Doc’s

Probably need to bring the values down but it could probably help you find a decent starting point when trying new materials :slight_smile:

5 Likes

Those are probably good lowrider S&F. MPCNC might need slowed down a touch.

Yeah for sure it needs to be slowed down a bit for the mpcnc but still gives a hint of how to make think when trying a new material :slight_smile:

wow, happy to see that I am not the only one looking for some directions :smiley:

That´s only human :smiley: I often make checklists, but I rarely complete them :smiley:

What do you mean with “vibrating”? And isn´t there a risk that you push the axis while turning it down? My clone´s button is a bit hard to turn, so not sure if doing this during the job would be a good idea?

And speaking of this, is there a way to pause the job and send the router to a place to modify this for example, and let it then return to it´s work?

Indeed! My router experiences up until now was pretty basic, I just milled what needed to be done without having an idea what to do with speeds settings :slight_smile: I often got away with it.

Wow, that´s a huge difference for just one small change of 0.5% !
I can clearly understand why one would keep a notebook with experiences, just like Michael and Tony do!

Great find Philip!
I am going to take my time to analyse this :slight_smile: and try to combine those two to get a file in mm.

I only wonder, on my clone I have only whole numbers, not 2.8 or 3.75, how would one do this on Katsu? Is it more an “estimation” ?
And based on Tony´s feedback, these settings would work for a .25 inch bit only?

1 Like

I suppose that there is, but that risk exists even if you lift the router and pause the job. The stepper motors are still responsible for holding the tool in place unless you put it against a hard stop.

My Primo is running RepRap Firmware, which does have a pause feature, where it lifts the tool and “parks” it, but I never use it for this, I do just adjust the Makita on the fly while it’s cutting.

It’s around on the forums. I know that Ryan is a big advocate of test cuts. Test in various materials, and you’ll be able to see what those cuts look like. Take note of the sound when you test cut. Look at the chips that the tool makes. (MDF just makes dust, even if you’re doing things perfectly.) Good chips in wood should have a look to them that is recognizable. Use a slowish feed rate with a variable speed router and slower and slower spindle speeds until the cut starts to look a bit rough. Listen to the tool at that speed, and that’s where you want to speed it back up.

This takes a good number of passes and some trial and error. The error is actually important, because you want to be close to that point, and you don’t really know where it is until you hit it. Just try not to let it get to the point where your router bit goes ping.

4 Likes

you´re probably right!

You´re right once again, will start doing test cuts, but at this time I have no idea what´s even close to being “ok”.

I am going suck up all the knowledge from above, and use this as a baseline:)

2 Likes

And I am going to wait until you report back! :rofl: :rofl:

(Not really through choice, but I’ve never been so happy to have a few other things to do while sitting on the sidelines!)

1 Like

I believe the 2.8 is a estimation indeed. Atleast my Makita also only have whole numbers :slight_smile:

:smiley: it could take some time to report back, too many projects and pressure for the paid jobs, but will do for sure.

Yes I figured!
I can see pictures of original Makita´s having some notches, so I think they are referring to that. My Katsu clone doesn´t have this. It makes a clicking sound and only seem to accept whole numbers.
I also read many forums now where they are pointing out that each router, from the same batch can have different RPM. So it will not be exact science :slight_smile:
d287f600963843ccf5ede50bc0c6c125bb655575_2_509x500