Somehow I missed that this category existed or perhaps I would have been keeping better track of my projects with photos. But here are a few to share from when I actually had my phone out.
One of the first functional things I made was a Thien Baffle for a two-stage dust collector. I don’t actually have any photos of the finished product as it’s currently wedged in a trash can, but here are some pics of the original cuts. I’m sure you can use your imagination and the link to picture it put together.
I actually posted a picture of this carving I made for my niece in my build log, so some of you may have already seen it. The original SVG came from Vecteezy and I added the name in Illustrator. I primed it before giving it to her so she could paint it however she liked.
Later on, I decided to make some new baffles for my living room speakers. This was probably one of the more nerve-racking cuts I’ve made, simply due to the time and money that went into the Mappa Burl Veneer and finishing of the faces, all prior to cutting.
And recently, I made several chaotic, end-grain cutting boards as gifts for family, plus one for myself. The woods used were maple, walnut, purple heart, and cherry — plus smaller amounts of poplar and padauk. I used the CNC with a spoilboard surfacing bit to plane everything flat between stages, as well as after the final glue-up. The double inlaid “G” was made with walnut and maple, in two steps, using a 60° v-bit from tiny end-grain boards that also had to be produced. I used a deeper inlay than what many guides preach as I wanted it to sit as close to flush with the bottom as possible, with just enough room for glue, to maintain maximum strength.
Also, I used the CNC to mill plate slots under both ends of the larger boards to make food transfer easy. And I’ve been playing around with my new laser and “branded” the bottom of the boards. I don’t actually make a business of this, but it’s fun to play around with making a logo and who knows…
The double inlay is really epic. It is quite the humble flex.
The Speakers are also beautiful. Nice work. And thank you for sharing.
BTW, if you ever want to sell cutting boards, I have heard that the best customers are real estate agents. They are more than happy to spend a few hundred dollars on a custom cutting board when they make a sale.
Thank you all for your kind words! I have to split the mentions into two posts as it wouldn’t let me do so for more than three people.
As for the cutting boards, I think I’ve been watching too much MTMWood on YouTube! That’s where I gained all of my knowledge for how to construct the boards and also the idea for the double inlay.
Regarding the home theater, it has been a labor of love (and money) that has developed and grown over the course of the last six years. When I was younger, I used to be heavily into car audio. I’ve grown out of that mostly these days, but have transferred the same love into my home system.
I run an 11.2 channel Denon AVR-X6400H for a 7.4.2 Dolby Atmos setup, plus two Peavy IPR 3000 DSP amps to power the homemade subs (4 x JL Audio 12W6v3 drivers), and a 3rd Peavy IPR 3000 for whole-house audio. The speakers, other than the center channel, are a variety of Klipsh in-wall/ceiling speakers, surrounds, and upfiring Atmos drivers. The center channel is a custom speaker made from individually purchased ScanSpeak Revelator drivers (see Madisound) and homemade crossovers from high-end, audio grade components.
Again, thank you for the kind words! This has been an adventure as I have found myself spending a lot more time in the shop these days trying new things and working on upgrades in that area. It’s a new-found love, I guess you could say. I’ve always had the passion to create physical things, I just never had all of the necessary tools until recently.
More stuff! I made these for fun as I was trying out a 60° v-bit carve, plus laser engraving on the same piece. Yes, I could probably get similar results with black paint, but I found this to have a very organic look and I like the texture added by the laser. I may give one to my nephew since I got him hooked on the Zelda series recently.
The Legend of Zelda: Skyward Sword — Door of Time (on poplar)
Engrave then etch…Nice, rarely used, but dang it looks good. That fist one has enough room in it to have etched some sort of pattern or something. That could be a really solid project (and money maker). Now I want to try it with my logo, I gotta see if I have any working lasers left!
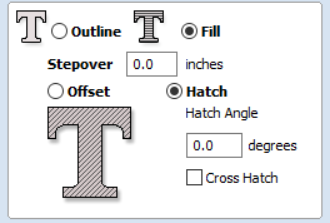
The pattern effect came from using the hatch fill method in VCarve. Despite what the image below shows, at 0°, it fills using horizontal lines. From the way VCarve creates the toolpath, it will sometimes fill only a portion of the area, then return to fill the rest later. I suspect, upon returning to an area, it makes a slight overlap resulting in a more pronounced line, giving some unique characteristics to the fill. The laser’s tool settings are set to a 100% stepover, so I’m not sure if you will see the same results in other software as it appears to be something added by VCarve itself.
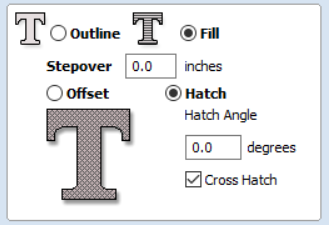
VCarve also has the ability to do a cross hatch which will return and do an additional pass at 90° from the original. I haven’t played with this, but suspect it will create an even more pronounced pattern effect, provided you don’t burn off the entire first pass with the second (and provided you have the patience to wait for another pass).


 OMG that is stunning! Bravo!