MPCNC-based foam cutter system

All,

I’m posting this to the several relevant RC forums where I’ve started foam cutter threads, to acknowledge and express my appreciation for all the nice folks who’ve commented, encouraged, shared their ideas, and contributed in any way to the development of the MPCNC-based foam cutter… and to let you see an example of just how far we’ve come over the past year.

First, I want to apologize for being so inactive lately and basically taking the summer “off”. I’ve actively kept up with all the great posts but contributed very little. Basically a lazy slob and living alone in my grandparents’ old farm house with no a/c in the Texas summer heat (hey! my grandparents did it…), I’ve been pretty un-energetic and hunkered down most of the time under a fan. But, now, the heat is starting to subside, fall is in the air (sort of…), and I’m starting to feel a bit more energetic again. So I’m now trying to un-clutter my path back to my machines and hoping to start being more active and useful again with all this foam cutter stuff.

Of note, I promised one of my two 3d-printers to my son-in-law when he got settled in a bit more, so I have recently looked into getting another one. I’ve been rather spoiled having TWO printers to work with during all my MPCNC and foam cutter builds, so I really feel I NEED two printers going forward. I’ve been entirely pleased with the $300 FolgerTech 2020 All-aluminum Prusa I3 kit I ordered and built last year, so I looked there first… it’s very well supported, there is a lengthy thread dealing with it on the FliteTest forum, and IIRC Jason (jhitesma) also has one and seems quite pleased with it. Anyway, it is indeed still available (google it… it’s the ebay listing) so I ordered another one and now have it to build. It is another of my motivations for getting my workspace cleaned up and de-cluttered so I’ll have the room to actively get back to building stuff.

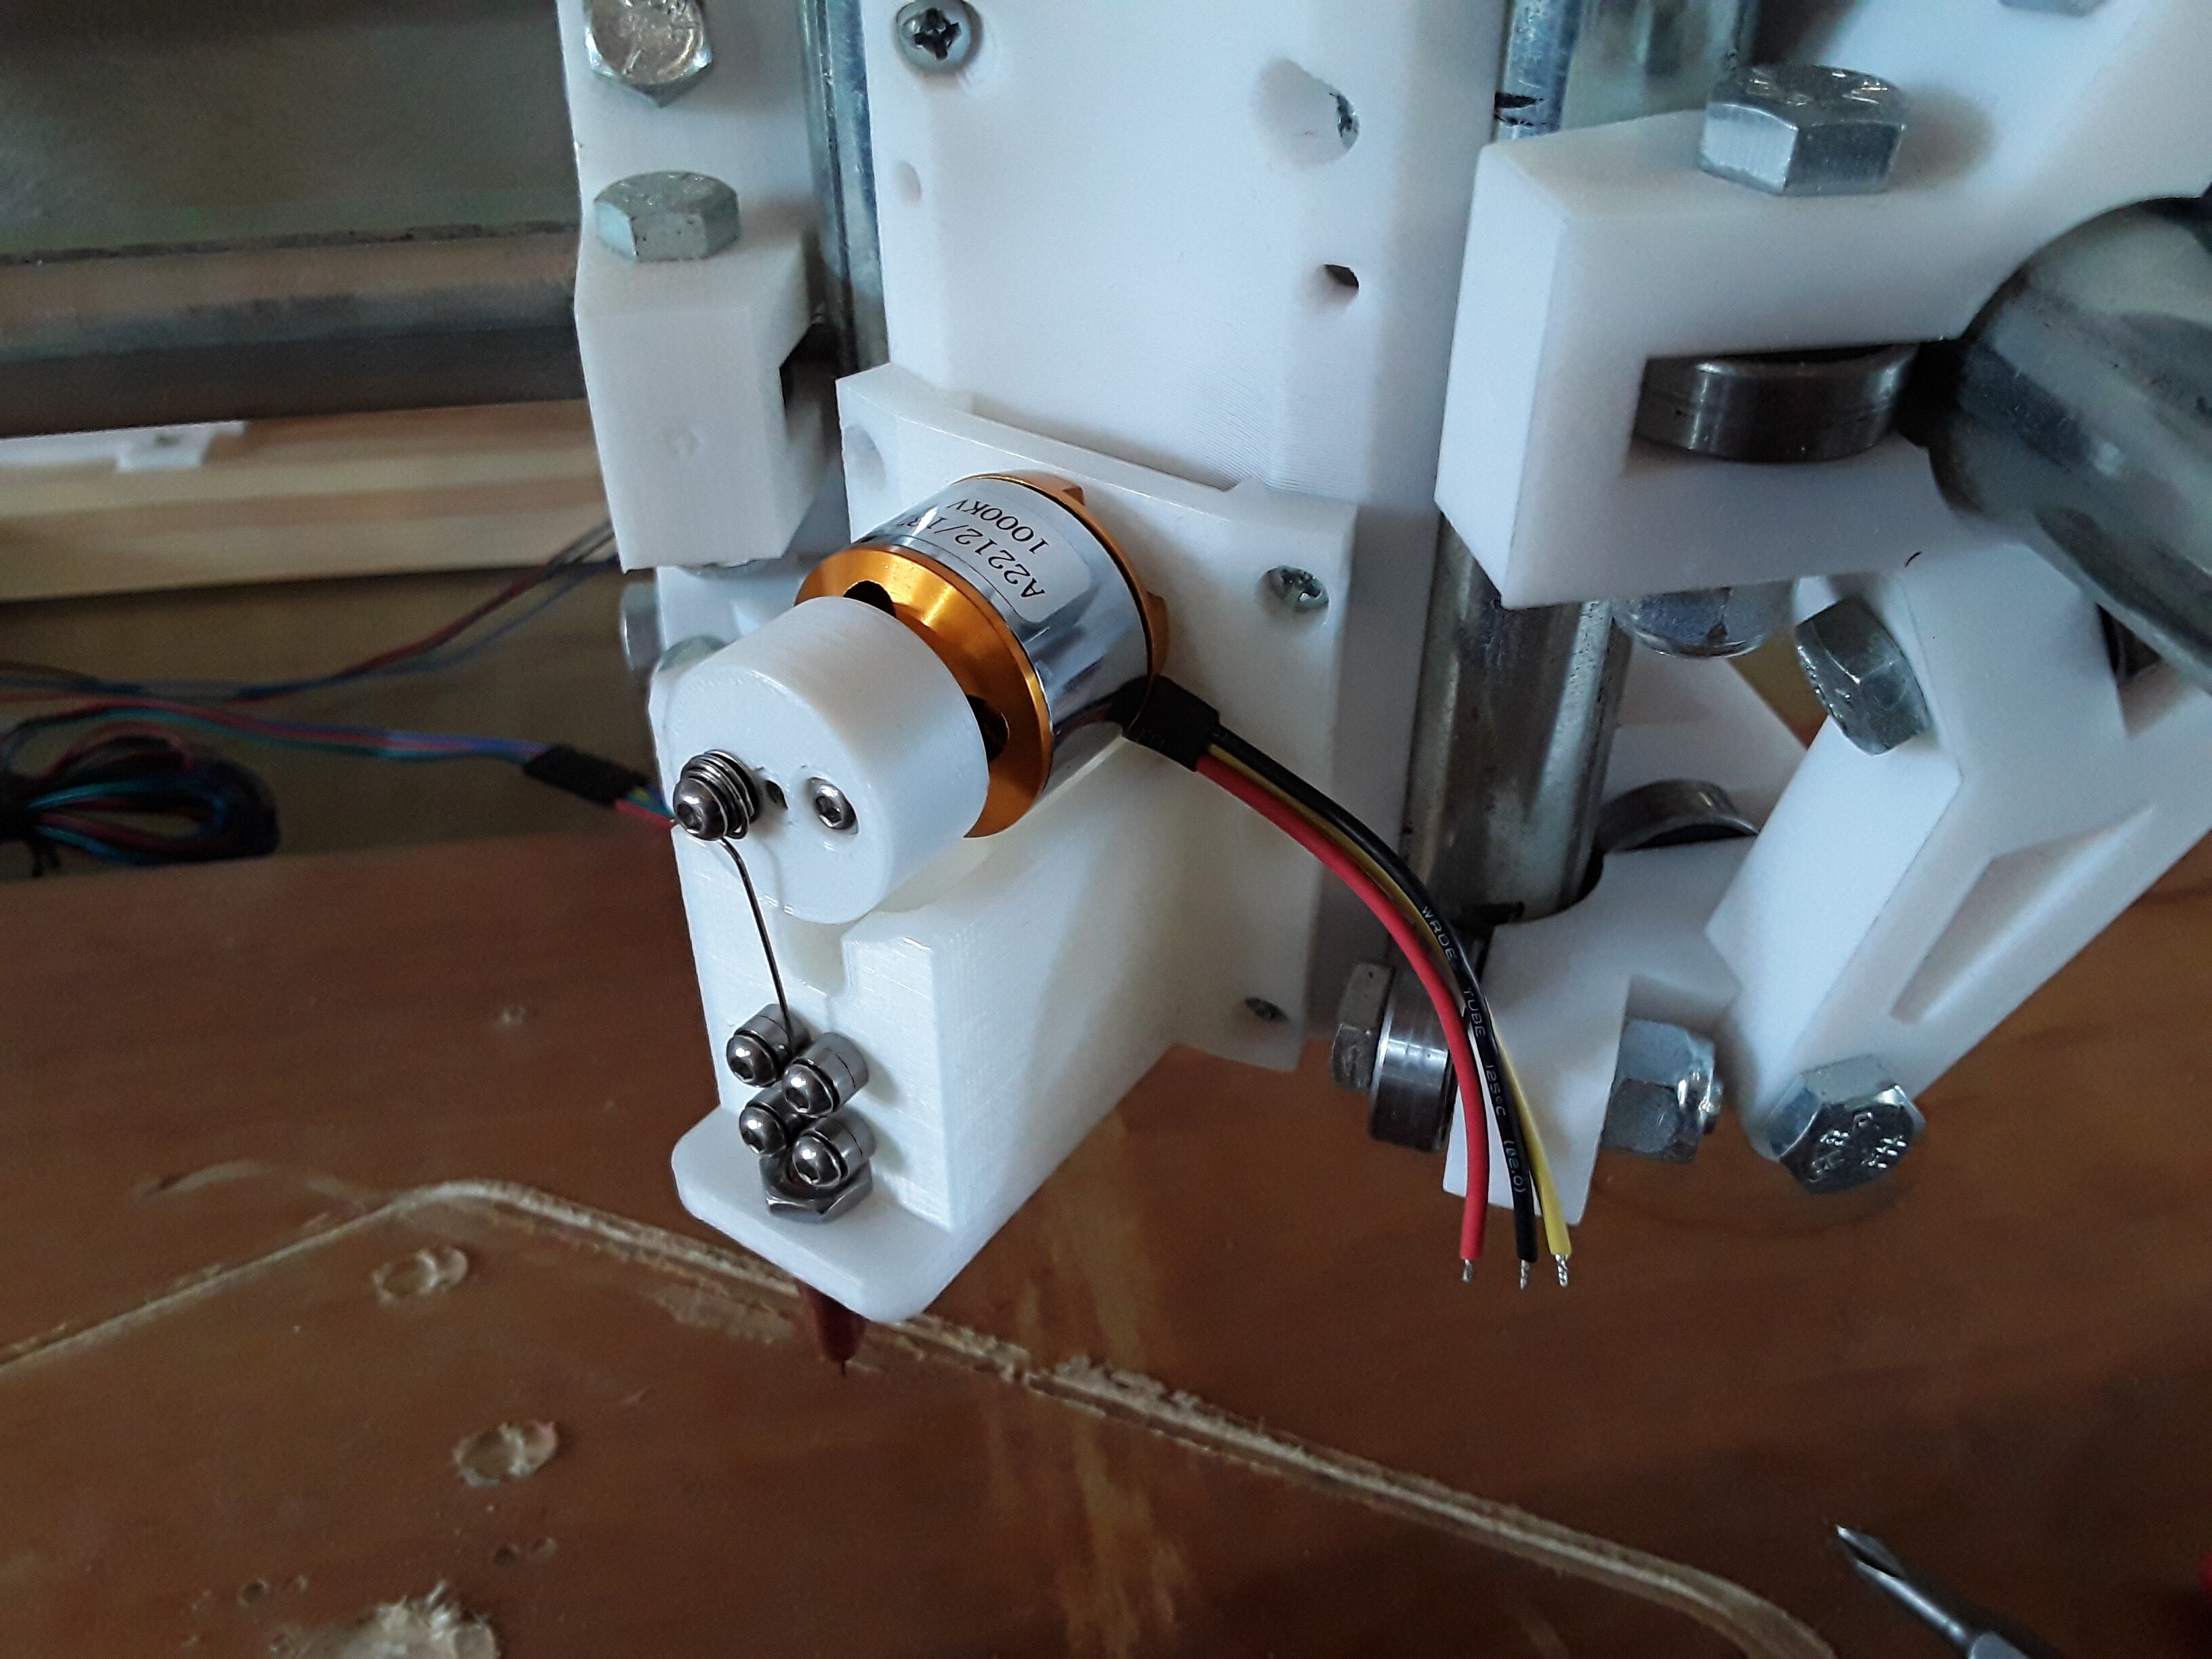
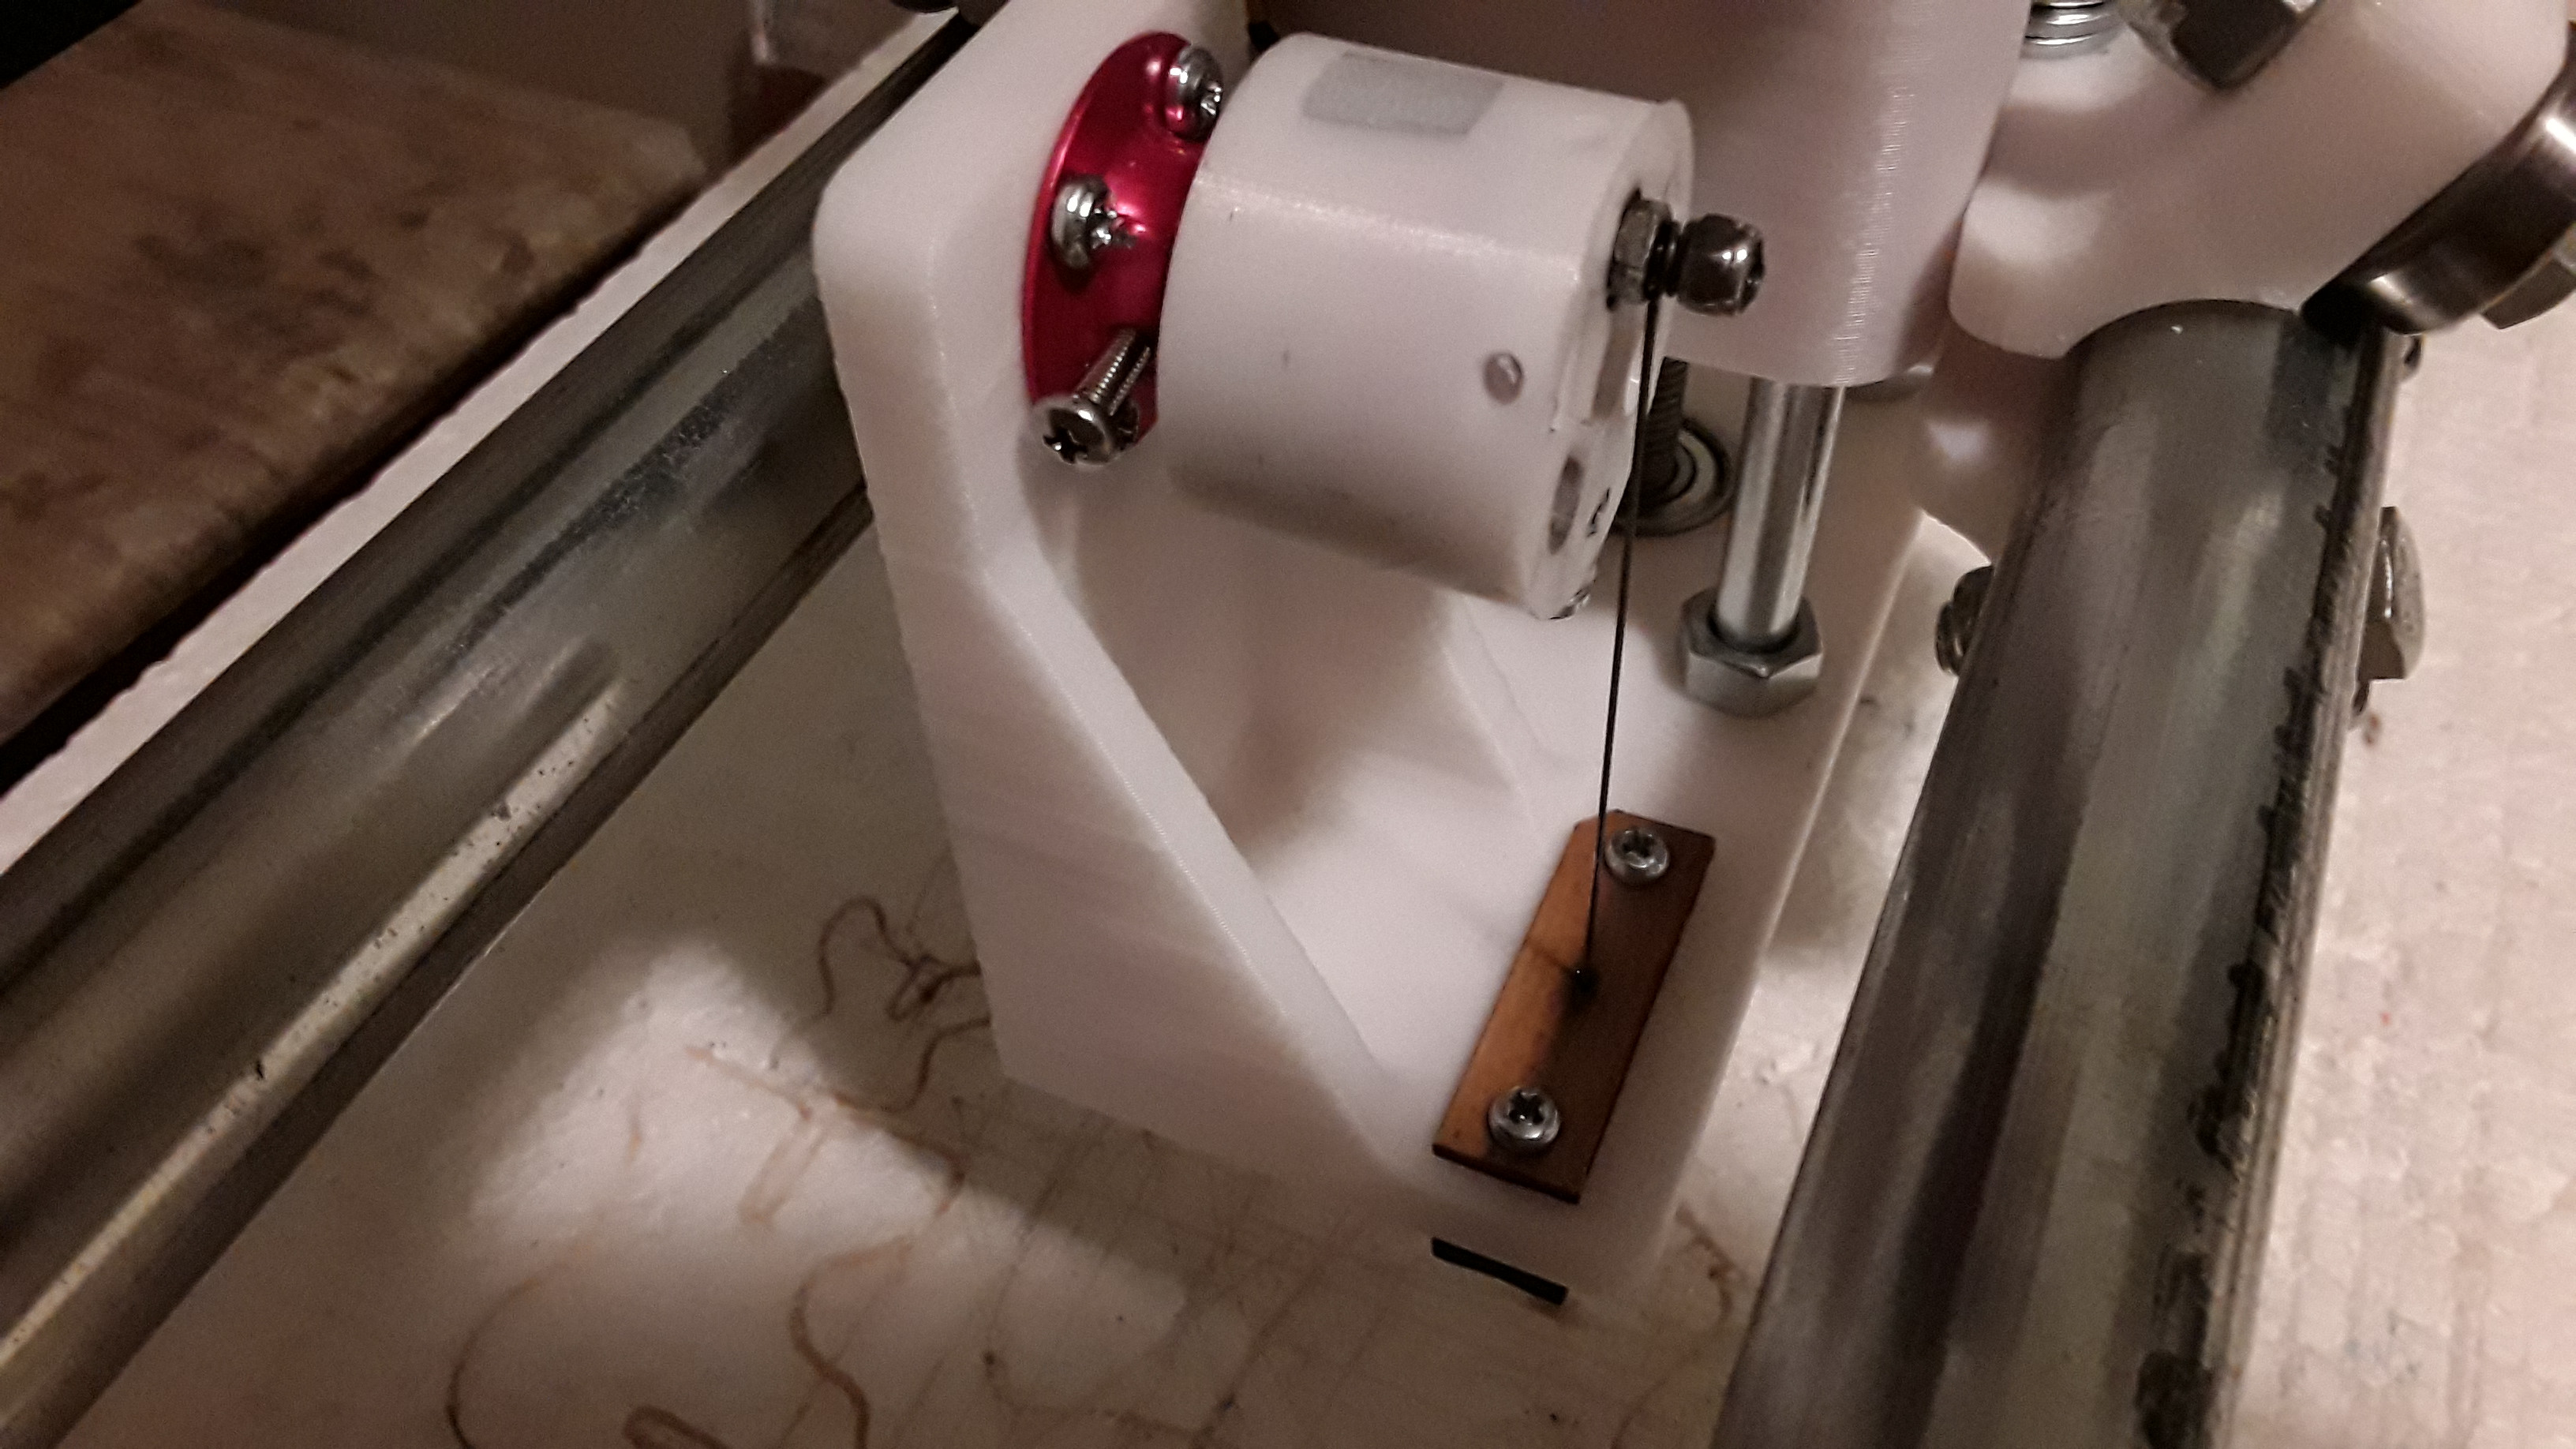
Lastly, I can’t begin to tell you how excited I am about all the MPCNC and foam cutter developments of the past year… and now – cheap! – VACUUM hold-down to boot! I think the magnitude of it all really hit me when Curtis (CartCurt), over on the FT forum, posted this picture of his very impressive, relatively inexpensive, and complete foam cutter setup… that wouldn’t exist today were it not for the collective contributions of all the nice folks in the several RC forums where all this development has taken place. What hobbyist RC’er in his right mind wouldn’t love to have a setup like that? Thank you all! – David

1 Like

David, just want to say thank you again for your needle cutter design and promotion of the MPCNC! I saw the MPCNC on Thingiverse a few weeks before you posted on the FT forums about your needle cutter but dismissed it. I figured it was too much printing for something that didn’t look like it would actually be reliable and usable. Then I saw your post…and honestly kind of dismissed it as well because of your love of the MPCNC :smiley:

But I kept reading because the needle intrigued me. And as I saw more of your success and others I became more interested in the MPCNC. And eventually decided I had to try and build one for myself since I’ve wanted a CNC machine even longer than I wanted a 3D printer. So after less than two months of owning my 3D printer I dug in on printing my MPCNC.

My build (https://www.v1engineering.com/forum/topic/my-build-5/) has not gone quickly. And I don’t have your excuses for my slothfulness :wink: I do also live in the desert (even hotter than TX. This summer at least one source declared the hottest city in the US to be right here in Yuma AZ) but I do have A/C. And I’ve even been running A/C in my shop all summer since my MPCNC is out there. (which is why I printed mine in PETG, though some test parts I did in PLA and set out in the sun for the summer held up FAR better than I anticiapted - only the original motor mount plates failed without serious effort to deform them.) On the other hand I do have a young daughter who takes a lot of my time and only and hour or two a night that I can get out to my shop…and the computer out there is barely capable of running estlcam causing a lot of my lack of progress.

Still progress has happened and I’ve had an absolute blast along the way. I started the project with the goal of cutting foam on 3’x4’ machine…but assembled it as a 2’x2’ first to keep things simple. Then had so much fun with it even at that size that I put off dealing with the needle cutter and expanding it :smiley: Finally got the needle going and got it expanded and now I’ve got the wonderful problem of having more things I want to cut than I have time for :smiley: Though I am still working on finalizing my own budget vac table before I really dig in.

I will take a moment to plug a few things that MPCNC and David’s needle cutter inspired me to create/modify:

My parametric version of David’s needle cutter design:

It’s still a bit of a work in progress as I’ve only got “no mount” and hicwic’s mount on it so far…but I do plan on adding the new default MPCNC mount once I get the new Z parts printed for my machine. This update to David’s design was based on feedback from several other users who confirmed David’s theory that raising the motor higher would improve the wear aspects of the needle. But I went a bit further and made almost everything about the design parameterized so people can experiment and customize for their own needs.

My square check tool:

This came from a discussion on the MPCNC FB page where someone posted a link to a similar commercial tool and I thought “Hey, that looks like it could be printed”. My design isn’t perfect, the rotating section could be done better. But it works and it made things MUCH easier for me when I enlarged my machine and could no longer just reach across to hold a tape on opposite corners.

My vacuum nozzle with offset:

I just did this yesterday. I’ve been looking for a way to hook my shop vac to the vac table I’m building without having to drill a hole in my table. On his MPCNC (the one pictured in David’s post above) Curtis used a crevice tool to interface between his vacuum and vac table - I remembered seeing a customizer on thingiverse a few weeks ago for designing crevice tools…but it always made the nozzle centered. I wanted my nozzle offset so I could lay it flat on my table. So I made a few quick tweaks to the OpenSCAD and added an additional variable allowing the nozzle to be offset. It’s not perfect - the nozzle tapers in both X and Y at the bottom so the walls get very thin if you offset it too far…but it allowed me to print a nozzle that fit my needs.

Even though I’ve done a lot with my MPCNC already I still feel like I’m just barely beginning on the journey and look forward to a long list of projects and plans that are now within my reach due to this machine.

So once again big thanks to David for his needle cutter and promotion, and of course huge thanks to Ryan for designing this thing in the first place!

Now if the weather would just cool off so I can feel safe ordering more PLA and printing the new upgrade parts :smiley:

I was hoping you would show up around here. Thanks for your work buddy. I plan on throwing one of these together this winter and cutting out some planes!!!
Neil

Thanks, Jason and Neil, for the kind words. – David

Hey all, I posted this on the vicious1 FB page but figured I’d mention it here as well.

I wrote up an instructable about the needle cutter I built for my MPCNC and entered it into a few contestson there. Instructables picked the entry to feature on their FB page, in their weekly email and on their homepage :smiley: Figured I should share it here too since it wouldn’t have been possible without the MPCNC:

BTW - Voting in the CNC contest is still open through Jan 12th and the 3D printing contest is still open for entries until the 27th. Would be fun to see a few more MPCNC projects in there to compete against

Been playing with the needle cutter again lately. Thought I’d better update this here as well :slight_smile:

First off I made a few videos on how I use InkScape and Estlcam to prepare files for cutting:

[youtube]Preparing PDF plans for needle cutting - YouTube

After sharing that I realized that I left out how to re-arrange parts to use your material more efficiently, so did a follow up (and switched to using estlcam 10 where I found a few “new” features that it turns out were in 9 but I hadn’t noticed.)
[youtube]Re-arranging plans in inkscape for needle cutting - YouTube

And one showing me setting up the machine and doing a cut, I really need to edit this down and speed up the bits where I’m not talking. And my needle cutter is starting to have some serious vibration issues - so the sound it makes is worse than normal. My hats off to anyone who actually watches this one all the way through (the main reason I haven’t finished editing it is I can’t handle listening to it!)
[youtube]Cutting on the MPCNC with my needle cutter - YouTube

That last one is actually getting quite a few hits lately…and they seem to be coming from here. But I’m not sure why as I haven’t posted it yet and haven’t seen anyone else post it. If someone did share it I’d love to know were so I can join in any conversation :smiley:

Anyway…as you can tell from that last one my needle cutter has seen better days. After a year of use and about 2 cases of foam (close to 50 sheets!) the vibrations from it are really taking a toll. So I started working on an improved version. I’m switching to David’s original design with a balanced flywheel instead of the quick and dirty spring crank, and I’m incorporating a few other new designs people on the FT forums came up with.

[attachment file=38801]

[ul]

  • It's taller - so the needle doesn't flex as sharply
  • It has guide bearings so the needle is already moving in a straight line when it hits the guide
  • It's shorter so there's less of a lever arm on the needle which should also minimize vibrations.
  • I'm switching to a motor that can direct mount as I've had the bayonet style mount of my current motor come loose a few times and if I tighten it enough it doesn't come loose then it binds the motor shaft - I hate those mounts.
  • The new motor is much lower kv so I can run it off 12v and still have fine control over the RPM at the speed range I run it at
  • I modeled it in Onshape so it's a little more stylish. [/ul]

    This should give me a more stable and accurate tool that won’t wear itself out as quickly/badly as the current one has.

    Here it is next to my current one:

    [attachment file=38802]

    This is still very much a work in progress. I have to reprint it tonight with a few adjustments, some of the screw holes were slightly too large, and the guide bearings needed some standoffs. I also made a few cosmetic changes:

    [attachment file=38803]

    Can’t wait to get this printed and built up to see if my changes have the effects I hope they do!

  • 1 Like

    Is there a public parametric file for this cutter with the new style MPCNC mount?

    EDIT: I found it here: New cutter 525 mount

    I found the OnShape of the old-style mount

    and the Thingiverse link with an STL for the new style mount.

    I’d like to make a few tweaks to fit a motor and bearings that I already have, but updating the tool mount is a bit beyond my CAD skills.

    Is there any kind of wiki page with all the latest information?

    Parametric… not to my knowledge.

    I don’t know your CAD preference and how you plan to make those tweaks but when I need a tool to work with existing STLs, I find Tinkercad to be really handy to block out and merge existing STLs together. There are existing blank tool mounts for MPCNC out on Thingiverse but it’s a bit too slow to search right now. Or find a tool with the correct mount and “chop off” (union it with negative block) everything but the mount. Do the same with the needle cutter body… “chop off” the mount. Now bring together and align the desired mount and the needle cutter body and “group” (merge/union) the part together… and voila! A needle cutter with new mount.

    I just did that very thing a few weeks ago with the ERC TimSav needle cutter… you can see it here.

    – David

    Thanks David.
    I doubt my tweaks will be useful for anyone, but my version of the cutter is here. It uses 4x4x9mm bearings (because I had them already) and a blue wonder motor.

    I printed a needle holder from thingyverse, and drew a flywheel for my bearings and motor. The needle is about 6mm from the centre, so 12mm throw. I’m not sure if that’s more or less than other people are using.

    Today I had a go at cutting foam, with mixed success. I drew a small square, and used that to practice. At first I was caught out by the machine starting at 0 Z, but always stopping at +10, which confused me when my second cut was at the wrong height. I think I just need to switch on, rotate the flywheel until the needle is fully down, wind the machine down until the needle just touches the foam, then switch on (or reset all axis). I’ve got score cuts set to 3mm, which worked nicely. I tried 6mm and 8mm for through cuts. 6 didn’t always cut all the way, but 8 could go too deep. I broke one needle by hitting the base board and added a second layer of foam spoil board (i.e. 2 layers of spoil board, plus 1 work piece). Then I broke another one, I think from being dragged sideways too fast while cutting too deeply.

    What feed rate do you use? (I’m using 1200mm/min, just because that’s the default in estlcam)
    How far does your needle stick out from the MIG nozzle? Should I see any bend as it moves through the foam?

    The score so far is 1 good sheet, 1 that needed manual cutting on the back, and two failed because I moved too much when the needles broke. Tape didn’t seem adequate to hold the foam down, I’m thinking of adding wooden corner blocks. I was holding the foam down in the middle by hand, and moved it accidentally a couple of times.

    Oh, and after using Inkscape to trace the PDF plans, when I opened them in EstlCam, they were 4 times too big (i.e. needed to be resized 25%). Any idea what I did wrong?

    When it works, it’s great to see complex shapes appear. There’s lots to improve but not bad for my first day.

    Robin,

    I’m glad to hear you’re making progress with your needle-cutter. There’s nothing sacred/secret about it at all… there are many cutter shapes and sizes and your design looks reasonable. But what KV rating is your BlueWonder motor? A motor somewhere in the 1000-1200 KV range seems to work best in this application. The biggest mistake seen with new users is running too high rpms on the cutter… and if you’re not using a tachometer to find a good rpm setting, I’ll almost guarantee you’re running it too fast, especially with higher KV motors. A cutter speed in the 8000-8500 rpm (no load) range works well… and I personally use a “rule of ten” relationship for the feed rate for a given cutter speed; i.e. feedrate (mm/min) of ONE-TENTH the cutter speed, or 800-850 mm/min for my example. That insures 10 perforations per millimeter of linear travel and yields clean cuts in DTFB. This is much slower than the ERC TimSav folks are using but works well for the Adams foamboard commonly found here in the US.

    You have lots of questions so I’ll refer you to this post, and following posts, over on my long-running FT thread which shows how I set up a job to be cut. A different machine but setting the needle-cutter up for a job is the same for any machine. I’d also recommend using a vacuum-hold system for best cuts and depth control… the one in the video is easily fabricated using three sheet of foamboard (it’s also described in the post).

    There is a wealth of needle-cutting info in the FT thread and, though long, it’s worth a scan. Take a look and see if you can find the answers to a lot of your questions. I’ll be happy to explain further anything that’s not clear to you.

    Congrats on getting this far!

    – David

    1 Like

    Thanks again, that was just what I needed. I was actually only running about 4000 rpm (due to a poorly balanced flywheel) and far, far too much feed. Reduced to a quarter of the previous feed rate, it worked much better. (about 12 stabs per mm)

    I also copied your vacuum hold down table, plus some wooden blocks in the corners - and sharpened the needle.

    It took 50 minutes to cut one sheet, so I’ll revisit my flywheel and try to balance it better, but now I have a working machine.

    Is this the sort of speed control you use on your shop vac?

    I’m glad that helped. Actually my early cutters used brushed motors robbed from ink-jet printers and ran at about 4000 rpm… and I used 600 mm/min feedrate for the bluecore fanfold foam we used at the time. My late fishing/flying/golfing buddy and I built and flew lots of foam airplanes cut using those early cutters. For DTFB, 10-15 perforations per mm seems to work well.

    The DTFB vacuum pad really works nicely for holding your foam workpiece flat and secure. That router speed controller looks like it should work fine… I used a similar one for US power, of course. I usually “set” the vacuum stack-up initially with the shop vac at full speed and, after giving it a quick smoothing rub of the hand, then back it down to minimum speed/noise… and it still had plenty of holding power for the entire cut.

    1 Like

    Here’s a little bracket I made to clip my servo tester to the MPCNC rails. It’s pretty basic, but might save someone the hassle of drawing it themselves.

    https://cad.onshape.com/documents/01aa615b2a8c8fba84397606/w/c71fd1d4ee6bb96582c520ab/e/9aa67c123eb67c1ac9b6dc39

    Hey all, been working with my needle cutter and keep runnig into a common problem of the needle flying off. I’m currently using the ERC Timsav modified for the MPCNC. The problem, as I’m sure others have discovered is that it is difficult to get the loop of the needle the right size. It’s too easy to be too larger or too small.

    Looking around I saw this image.

    which looks like it would keep the needle from slipping off. But the discription is very short and does notd really show the assembly of how the needle is attached.

    Wonder if anyone has any more information on this and could share how it is assembled?

    1 Like

    You’ll find a bit more information and a few photos of that particular “slip-on” needle cutter and the machine it’s mounted on here…

    Far more information about the development of the “slip-on” flywheel can be found here…

    This printed flywheel had several advantages over the shaft-mounted versions… the motor/cutter assembly could be made shorter and more compact, it made for much easier needle attachment, and it was smoother running (easier to balance). The main disadvantage was that the printed flywheel needs to be a custom-fit (it’s a close friction fit) to the motor bell of whatever motor you’re using for your cutter. If you can 3d print and your printer is pretty well dialed-in, the fit is pretty easy to attain within a couple of tries and the print time is quite quick.

    I’m pretty much out of the needle-cutting business now (old, tired, retired, etc) and haven’t been keeping my ear to the ground as I once did but there have been a number of variations on a theme built by folks still actively needle cutting foam. The FliteTest thread referenced above is very lengthy but, if you’re determined/persistent, you should be able to find quite a bit more information that could be of help. I did put my FoamRipper alternative carriage design out on TV and it includes the last flywheel I developed for the CF2822 motor I was using. There is also a more recent design – EZ-Flywheel by @sirjaymz – that may be more suitable for ERC TimSav users… similar/better needle attachment but shaft-mounted.

    Hope this helps… and good luck! – David

    3 Likes

    @dkj4linux thanks for the info and links. these were reallly helpful.
    There are actually a few ideas I would like to explore in the near future.

    After I sent my post an idea came to mind. I ended up modifying the ERC timsave flywheel to accept a 3mm lock nut press fit into it. the m3 screw has the bearing sandwhiched between two m3 washers that are slightly wider in diameter than the bearing. this way I can easily remove the screw with washer and bearings to replace a broken needle if needed and the needle stays on.

    1 Like