during the last weeks my aim was to built a MPCNC without all these bearings and screws. The money saved from these should be invested in a better controller board: A Smart Ramps for Arduino Due.
After developing some 3D printed adapter files which replace most of the bearings I tested the machine with different controllers. The first one was a GRBL shield build on a breadboard. It worked.
So the adapters had to be improved and the second controller was a ramps 1.4 on an Arduino Mega with Marlin firmware. It worked better.
And again the adapters have been improved and the 3rd controller board is a Smartramps for Arduino Due with Repetier firmware…
and Hooray: It works.
Thanks. The machine was redesigned with 3D printing, lasercutting and maybe as a plotter and papercutter in mind. So you are totally right. Milling is a bad idea with this type of gliders, though it is untested yet.
I can’t wait to see it in action! That material is meant to be compressed a lot if I remember correctly. Hopefully the mounts give it enough pressure. If they do that should work really well, with the standard sized rails even for milling if you put a wiper of some sort on there to keep the crud out.
I would love to see a vid after you get a little time on it to see how it holds up. It would be so awesome to make a almost completely printed cnc, expesially for the guys not using it for a mill but a giant format printer/plotter/laser/foam cutter. (man we have added so functionality to this thing over the last year and a half)
So cool thanks for sharing
@vicious1 Normally I would not even try to get this thing running as a milling machine. But your post made me kind of curious. Maybe the gliders need some additional modification for that. Until know the design is kept as small as possible to get the gliders running smoothly with an accepatable time needed for 3d printing them.
So, thank YOU for sharing such a genious and professional design for this cnc/multitool. It is a lot of fun to work with these parts AND enables people with a small budget all over the world to make their own thing.
Thank you very much and
have fun.
@zrherbert Not yet. The current files are all in alpha state and had to be "polished and cut " by hand after printing. So they are not yet ready for the public domain. When they are ready they will be available on one of the platforms.
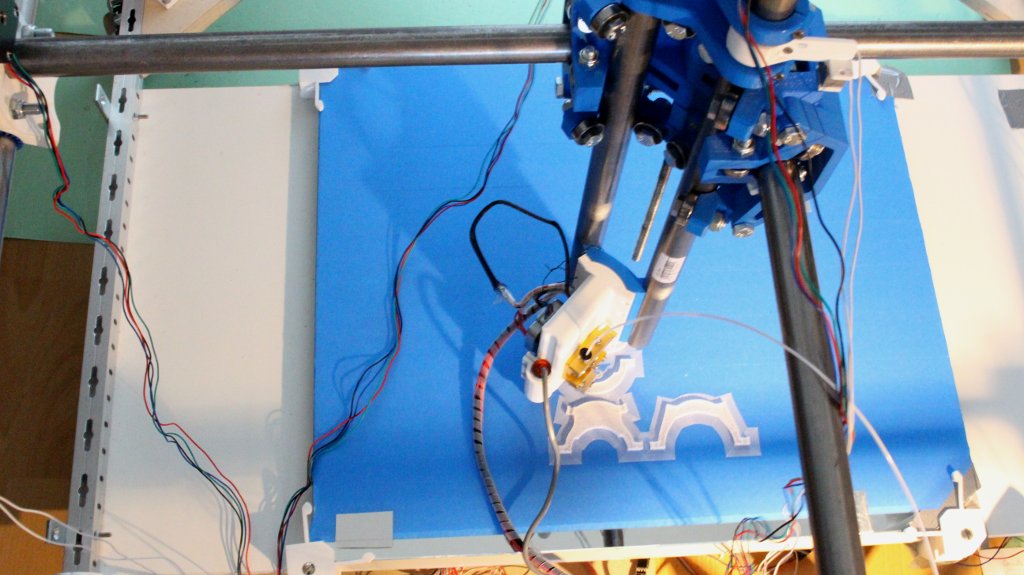
Some work and testing has been done. The machine prints 3D parts. The quality is still to be improved. But that’s fine-tuning.
So, here some details:
HW: - Igus style adapters for the X/Y rails to save 24 metal bearings. (Middle part adapters not working yet. uuhhhhhh!)
- Smart Ramps for Arduino Due (32 bit)
- Odroid-C1 running Repetier-Server to remote control the printer from everywhere via Ethernet or WiFi.
- Stabilizer to make the corner parts as rigid as possible (see video, please).
SW: - Cura for slicing.
- Repetier-Server https://blog.georgmill.de/2016/11/02/mpcnc-3d-printer-starts-printing-online/
you could increase PLA print quality, by running the extruder throat up as close to the drive gear as possible so the part cooling fan on the extruder mount will actually line up with the nozzle. that’s the way i designed it to work. don’t worry about the heater-block being too close to the PLA, it doesn’t affect it at all.
its too late since you already printed the previous version, but in the latest version of that extruder mount i also added cable tie points for better cable management.
The print quality is now quite acceptable now. After changing some values in the repetier firmware the machine is running fine so there is no need to change the hardware. The glasbed is attached with tape (!) and it works. If it is attached to the rest of the frame with screws the result should be perfect. Thanks for your very rigid MK8 extruder addon, Walter. It is perfect, too.
You gotta send me a link to those corner clips you’re using…
I was just messing with the new bed leveling options and was a little hesitant to report my findings until I had more time with it. but initial testing had been positive to say the least. I’m still waiting on a massive silicon heater. once I know the effect that the heater will have on my capacitive probe I’ll report back. glad to see someone else is having positive results as well.
Edit: whoa I just noticed you’re running your mk8 with no heat sink… you’re hardcore bro!
this is maybe what you are searching for -> http://www.thingiverse.com/thing:361307
I’m using a modified version of this thing to be able to attach the glasbed to an underlying surface that has the same dimensions as the glasbed itself. So there is no need to make holes into the bottom surface anymore.
Yes, I’m not using an extruder heatsink because it is simply not necessary. Yesterday tested with a big print over some hours. Everything is fine. You just have to finetune the steppermotors poti to have exactly the right current.
Allted described it very good how to do this for your MPCNC build here -> https://www.v1engineering.com/forum/topic/stepper-driver-current-limit-parallel-stepper-motors/
I have the same combo of Arduino Due, Smart Ramps and Display as you have, but I really can’t get the display to work.
I was hoping maybe you have a hint (or a repetier config
try this or similar and feel free to play with some of those settings. But do it one at a time to keep confusion away
25 or CONTROLLER_AZSMZ12864 AZSMZ 12864 graphic lcd

*/
#define FEATURE_CONTROLLER CONTROLLER_AZSMZ_12864

/* You can have one keypad connected via single analog pin as seen on
 some printers with Melzi V2.0 board, 20x4 LCD and 5 buttons keypad. This must be
 the analog pin number! */
#define ADC_KEYPAD_PIN -1

/**
Select the languages to use. On first startup user can select
the language from a menu with activated languages. In Configuration->Language
the language can be switched any time. */
#define LANGUAGE_DE_ACTIVE 1 // German
#define LANGUAGE_EN_ACTIVE 0 // English
#define LANGUAGE_NL_ACTIVE 0 // Dutch
#define LANGUAGE_PT_ACTIVE 0 // Brazilian Portuguese
#define LANGUAGE_IT_ACTIVE 0 // Italian
#define LANGUAGE_ES_ACTIVE 0 // Spanish
#define LANGUAGE_FI_ACTIVE 0 // Finnish
#define LANGUAGE_SE_ACTIVE 0 // Swedish
#define LANGUAGE_FR_ACTIVE 0 // French
#define LANGUAGE_CZ_ACTIVE 0 // Czech
#define LANGUAGE_PL_ACTIVE 0 // Polish
#define LANGUAGE_TR_ACTIVE 0 // Turkish

/* Some displays loose their settings from time to time. Try uncommenting the
auto-repair function if this is the case. It is not supported for all display
types. It creates a minimal flicker from time to time and also slows down
computations, so do not enable it if your display works stable!
*/
//#define TRY_AUTOREPAIR_LCD_ERRORS

// This is line 2 of the status display at startup. Change to your like.
#define UI_PRINTER_NAME "MPCNC"
#define UI_PRINTER_COMPANY "your company name"

/** Animate switches between menus etc. */
#define UI_ANIMATION 0

/** How many ms should a single page be shown, until it is switched to the next one.*/
#define UI_PAGES_DURATION 2000

/** Delay of start screen in milliseconds */
#define UI_START_SCREEN_DELAY 3000
/** Uncomment if you don't want automatic page switching. You can still switch the
info pages with next/previous button/click-encoder */
#define UI_DISABLE_AUTO_PAGESWITCH 1

/** Time to return to info menu if x milliseconds no key was pressed. Set to 0 to disable it. */
#define UI_AUTORETURN_TO_MENU_AFTER 30000

#define FEATURE_UI_KEYS 0

/* Normally cou want a next/previous actions with every click of your encoder.
Unfortunately, the encoder have a different count of phase changes between clicks.
Select an encoder speed from 0 = fastest to 2 = slowest that results in one menu move per click.
*/
#define UI_ENCODER_SPEED 0

// Set to 1 to reverse encoder direction
#define UI_REVERSE_ENCODER 0

/* There are 2 ways to change positions. You can move by increments of 1/0.1 mm resulting in more menu entries
and requiring many turns on your encode. The alternative is to enable speed dependent positioning. It will change
the move distance depending on the speed you turn the encoder. That way you can move very fast and very slow in the
same setting.

*/
#define UI_SPEEDDEPENDENT_POSITIONING 1

/** If set to 1 faster turning the wheel makes larger jumps. Helps for faster navigation. */
#define UI_DYNAMIC_ENCODER_SPEED 1          // enable dynamic rotary encoder speed

/** \brief bounce time of keys in milliseconds */
#define UI_KEY_BOUNCETIME 10

/** \brief First time in ms until repeat of action. */
#define UI_KEY_FIRST_REPEAT 500
/** \brief Reduction of repeat time until next execution. */
#define UI_KEY_REDUCE_REPEAT 50
/** \brief Lowest repeat time. */
#define UI_KEY_MIN_REPEAT 50

#define FEATURE_BEEPER 0
/**
Beeper sound definitions for short beeps during key actions
and longer beeps for important actions.
Parameter is delay in microseconds and the second is the number of repetitions.
Values must be in range 1..255
*/
#define BEEPER_SHORT_SEQUENCE 2,2
#define BEEPER_LONG_SEQUENCE 8,8

// ###############################################################################
// ##                         Values for menu settings                          ##
// ###############################################################################

// Values used for preheat
#define UI_SET_PRESET_HEATED_BED_TEMP_PLA 60
#define UI_SET_PRESET_EXTRUDER_TEMP_PLA   180
#define UI_SET_PRESET_HEATED_BED_TEMP_ABS 110
#define UI_SET_PRESET_EXTRUDER_TEMP_ABS   240
// Extreme values
#define UI_SET_MIN_HEATED_BED_TEMP  55
#define UI_SET_MAX_HEATED_BED_TEMP 120
#define UI_SET_MIN_EXTRUDER_TEMP   160
#define UI_SET_MAX_EXTRUDER_TEMP   270
#define UI_SET_EXTRUDER_FEEDRATE 2 // mm/sec
#define UI_SET_EXTRUDER_RETRACT_DISTANCE 3 // mm

/*
#define USER_KEY1_PIN     UI_DISPLAY_D5_PIN      // D5 to display (not used for graphics controller), change to other pin if you use character LCD !
#define USER_KEY1_ACTION  UI_ACTION_FAN_SUSPEND
#define USER_KEY2_PIN     UI_DISPLAY_D6_PIN      // D6 to display (not used for graphics controller)...
#define USER_KEY2_ACTION  UI_ACTION_SD_PRI_PAU_CONT
#define USER_KEY3_PIN     UI_DISPLAY_D7_PIN      // D7 to display (not used for graphics controller)...
#define USER_KEY3_ACTION  UI_ACTION_LIGHTS_ONOFF
#define USER_KEY4_PIN     -1
#define USER_KEY4_ACTION  UI_ACTION_DUMMY
*/

// ####### Advanced stuff for very special function #########

#define NUM_MOTOR_DRIVERS 0
// #define MOTOR_DRIVER_x StepperDriver<int stepPin, int dirPin, int enablePin,bool invertDir, bool invertEnable>(float stepsPerMM,float speed)
#define MOTOR_DRIVER_1(var) StepperDriver<E1_STEP_PIN, E1_DIR_PIN, E1_ENABLE_PIN, false, false> var(100.0f,5.0f)

/*
  You can expand firmware functionality with events and you own event handler.
  Read Events.h for more informations. To activate, uncomment the following define.
*/
//#define CUSTOM_EVENTS

#endif