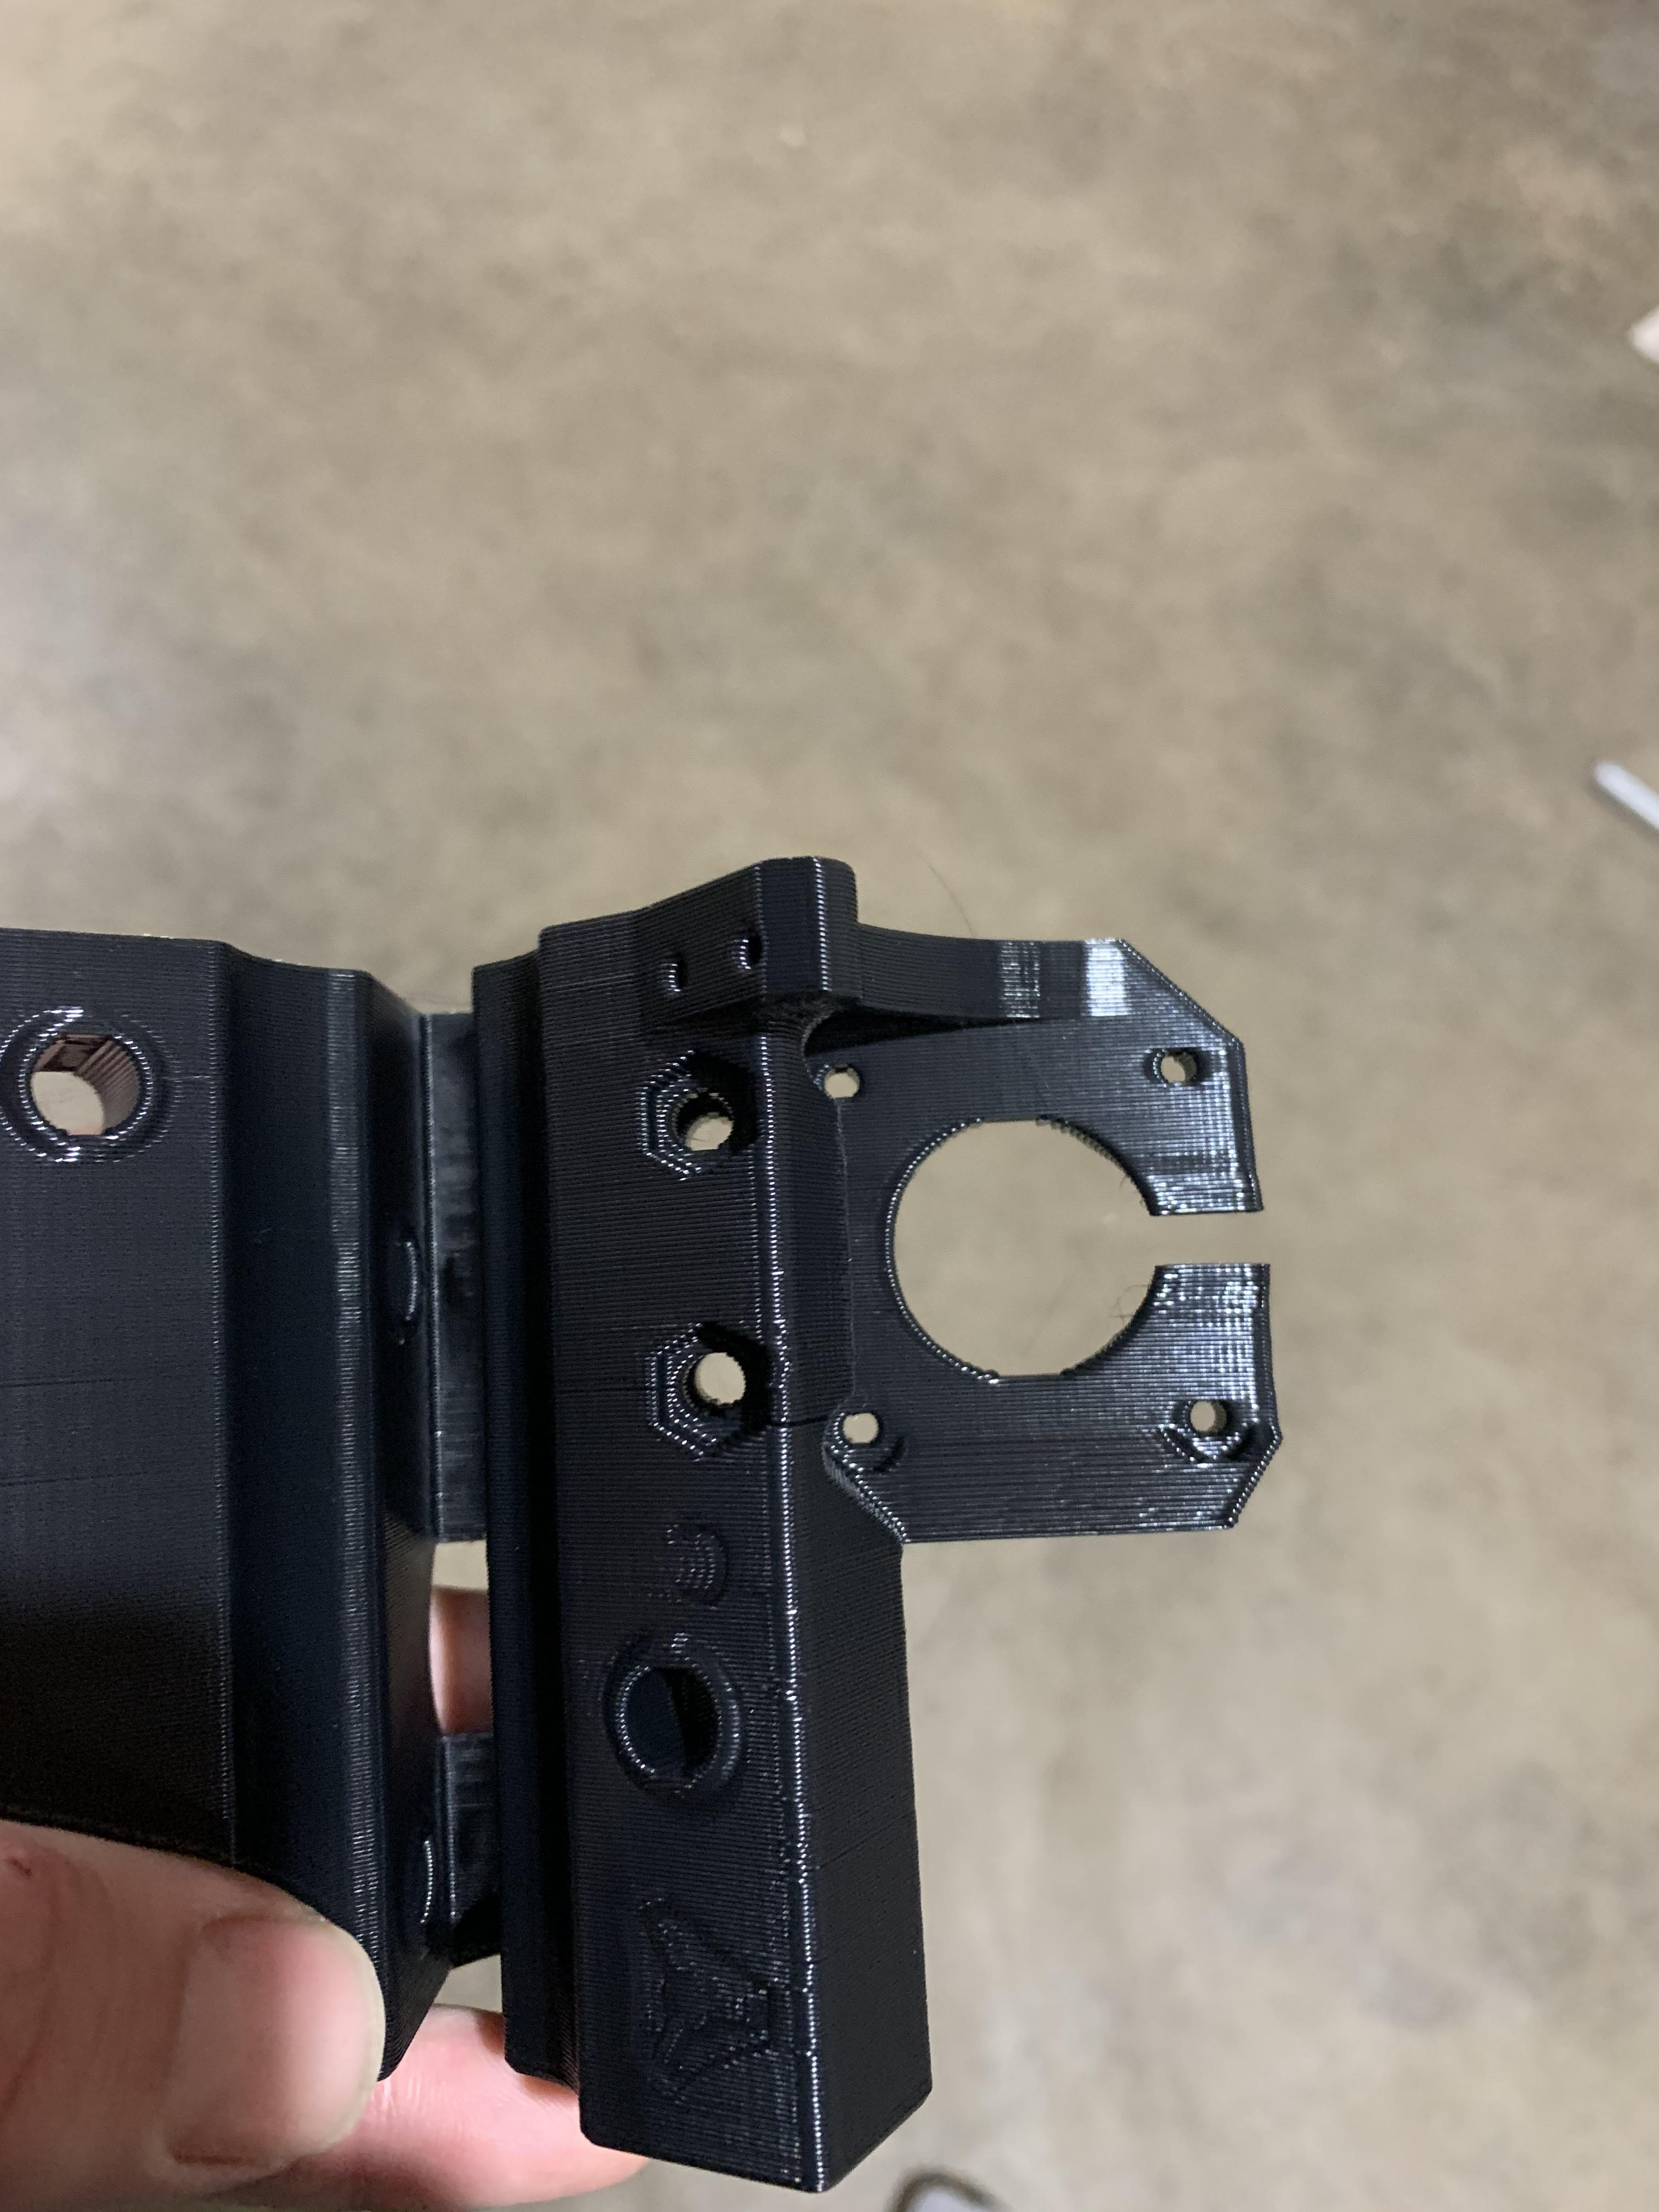
I’m starting an MPCNC build and am having issues with the Trucks not printing properly. The one spot by the stepper motor ends up brittle and has broken off on multiple parts.
I’m starting to wonder if I could “reinforce” that area with something and/or if the stepper motor itself is enough to not worry about it.
Any suggestions?
Thanks! I’m really enjoying this project and reading about what everyone is doing.
looking at the picture, it looks like you have a large nozzle.
.8/1 mm or your layer height is too high for the nozzle or temp is too low because I see some separation there also.
What is your:
nozzle size
layer height
number of perimeters/shells
print speed
material and temps?
What is your:
nozzle size : .6mm
layer height : .4mm
number of perimeters/shells : 4
print speed : 40mm/s
material and temps : PLA @ 205
Also had issues before I switched to the larger nozzle.
nozzle size : .4mm
layer height : .2mm
number of perimeters/shells : 4
print speed : 50mm/s
material and temps : PLA @ 205
I see the separation you’re talking about and it looks worse than it actually is. I’ve printed a total of 8 trucks thus far and have 3 that turned out ok from the .6mm nozzle and 1 that seems ok from the .4mm nozzle. It actually prints with that piece in tact, but it’s just really brittle and breaks out if you even touch it.
I’m wondering if I should up my temp to 210, though when I tested the filament it seemed to do better at 205.
for my printer,
I use a .6mm nozzle.
layer height is .24 your .4 is a little high. i’d do that with a 1mm nozzle.
perimeters is 4
print speed is 60 (not worried about how pretty this is)
my retraction length is 8mm also but you don’t have much stringing at all.
However, i’m at 235 C print temp on PLA with my .6mm nozzle.
it sounds high but it isn’t that far out of the temp range for PLA and it allows the filament to flow better with the bigger nozzle.
as long as you have decent cooling at the hot end.
I have a CR-10S. I also haven’t gotten around to upgrading any of the part cooling yet, but I could always throw a fan on the table next to it.
My printer honestly was in a box for over a year until I came across this project and decided to get it fired back up so I’m sure I could get it dialed in better.
I think I may try turning the temperature up a bit, though I’m still not convinced that the parts aren’t useable without that little section. It seems like the stepper itself would provide enough support.
I have a Chiron.
we are big printer mortal enemies I guess according to the intertubes…
dumb question, you have the infill set at 50-55% like suggested?
I do agree on what you said about the stepper providing the strength.
As long you can’t crush the print with your bare hands and not end up with multiple lacerations.
it should work
I also print using a 0.6 nozzle but at 205 and a bed of 70. Two issues I ran into were drafts (not good with the ceiling fan on) causing warping and the extruded stepper not able to push enough material. I didn’t notice until I was standing there and heard the stepper on the extruded clicking. Resulted in very rapid retractions and broken prints.
You haven’t mentioned what slicer you’re using, but when my friend Tom was printing my Primo parts, he noticed that they seemed heavier that he expected. He was using the Prusa slicer and the weight of the infill was much denser until he changed to a different style. The first style was 3DHoneycomb and the second was called Gyroid. (Those are names in the Prusa slicer). The difference was about 50% more plastic in the 3DHoneycomb!
In your case it might be that the style you using is not dense enough. I don’t know if that could be the cause, but it was certainly a problem with some of my parts (there was so much plastic cooling inside the parts that they warped and picked-up the edges).
Is seems odd to me that this print finished. Correct me if I’m wrong – but I believe that the top of the photo is the bottom of the print. So the gap in the motor mount would be an overhang. How did the printer start printing in mid air? Did the layers split? Any warping?
As noted above, the steel of the stepper case is going to be stronger than any printed plastic piece. Given where the break is I doubt you’ll have problems because of lack of strength. What will be important is that the holes get the stepper in the right place relative to the belt idlers.
I’m curious as to whether there is a piece missing from the example in the photo, or if it just “warped” open. If a chunk fell out there, I would glue it back in with CA (and maybe accelerator) after confirming that the holes still line up with the stepper motor. If the plastic is warped you may need to get it warmed up and moved back into place before you can get the holes aligned to the stepper. Clamps and a hair dryer/heat gun are the tools I’d reach for in this case.
If this was due to warping, and you were going to try printing the part again, I’d suggest trying to eliminate drafts around the printer by enclosing it. Warping is due to uneven forces emerging as the plastic cools. Even a basic cardboard box set over the printer might slow the cooling process down enough to eliminate the warping.
I’m using Cura and I believe the infill was “Cubic.” The part itself looked completely fine and doesn’t appear to be warped. That part was actually still in tact when I removed it from the printer, it just broke out with the slightest touch.
I think I’ll give it a try with the stepper and see what happens.
I agree with the comments above - if that section just snaps right out, the only explanation is that the layers were too cold, and couldn’t bond with each other. While different brands and even colors of filament will vary, I ran my PLA parts at 220 or 225, with a 0.6 nozzle, on a 60C (1st layer, 55C remaining) open air bed. Some were 0.4mm layer height, others were 0.3, depending on my whim for speed. Also as mentioned above, pretty is nice, but functionality is paramount.
If your extruder is clicking it’s a good sign your print temp is too low.
it’s struggling to push out the extra filament needed for a larger nozzle and that is because your heat block isn’t melting it fast enough.
with PLA and PET-G i’ve seen people put fans right next to their printers.
the faster it cools the better.
ABS needs to cool slowly to avoid warping.
I use a heat lamp over my printer to print low infill ABS but for something like MPCNC i’d need a heated chamber to keep it from cracking and warping.
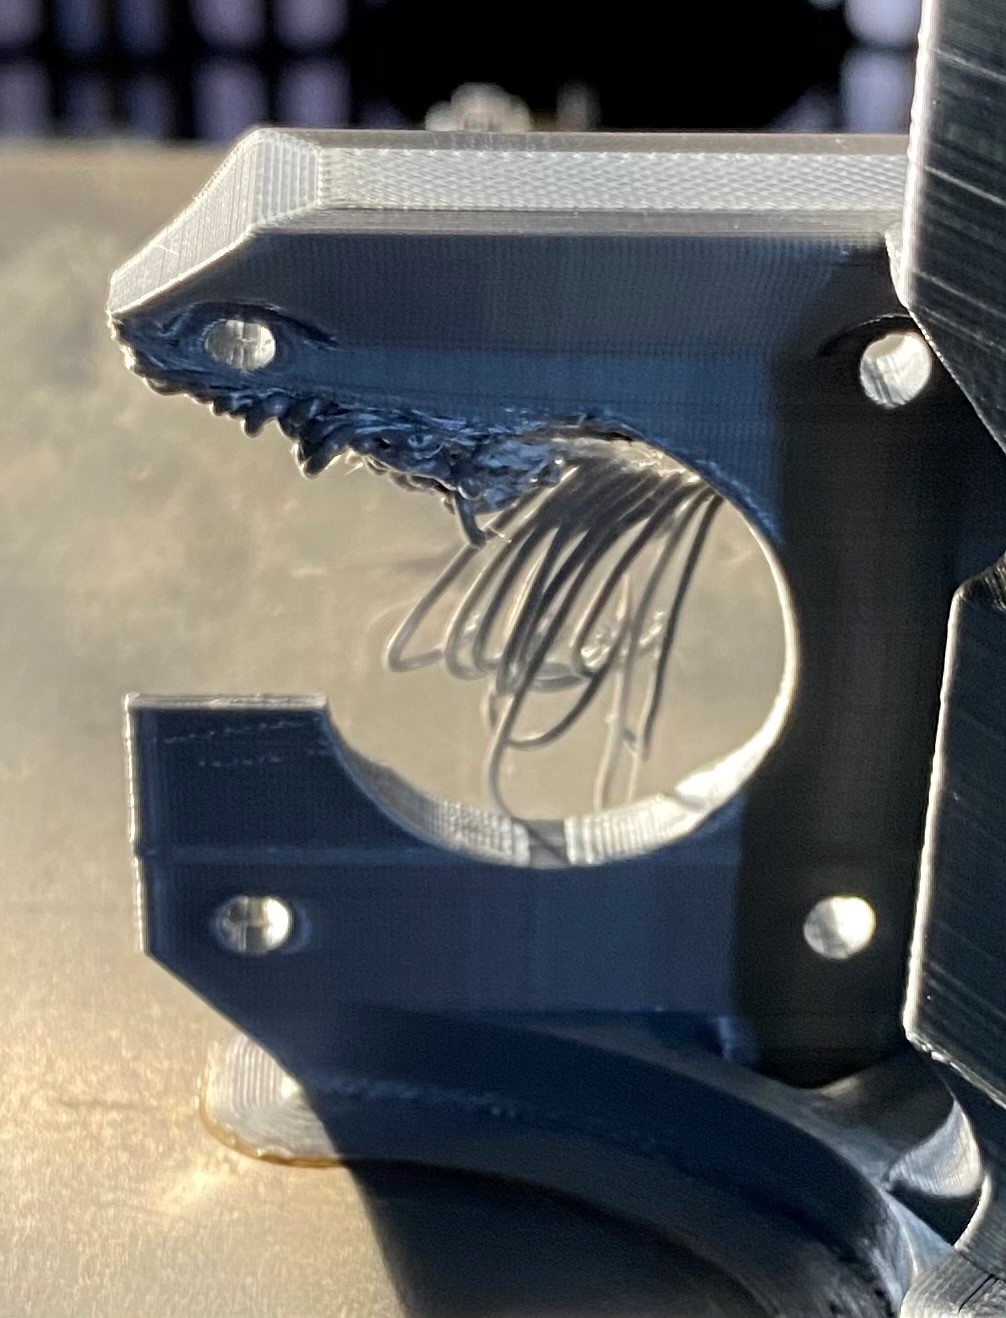
Sadly I am having exactly the same problem. 4 trucks printed, 4 failures. Breaking in exactly the same place.
I’ve tried different settings, 0.4mm nozzle, 0.2mm layer height, 0.6mm nozzle, 0.2mm layer height, then dropped it to 0.4mm nozzle and 0.12mm height (this is my favourite setting for appearance and has worked for all other parts including the Core piece).
I’ve tried using Triangle infill and Gyroid infill.
As a point of note, the room temp is 20°C, the bed is 55°C and the Extruder is set to 205°C.
As an update on my note yesterday, I printed this truck again last night and failed printing at that thin part again. These settings were 0.2 nozzle, 0.15 layer height, gyroid infill, 50mm/s with retraction. The fine part which is causing concern broke away during printing and the spaghetti that followed acted as a support for the rest but it’s dog
As long as the holes line up with the motor, I would clear out the spaghetti and use the part. The motor frame is much more rigid than the printed plastic in any case.
To be honest, I do not understand the reasons to print these parts with 0.2 layers or even less.
Additionally I do not understand, why you only look to the layer heights, print speeds and temps.
Infills: between 40% and 70% depending on the parts
Filling structure: doesn’t matter, results only in stability and amount of material that will be used
shells: 4 - 6
speeds between 30mm/s and 80mm/s (printing)
extrusion width: here I work with quite high parameters starting from 0.5 up to 0.9 (depending also from material) - you should have a look to it!
Also volume speed I work with higher parameters: between 10 and 15mm³/s - also here you can realize some huge differences!
Bed temperature : 60°C
Nozzle temp is depending on the material. I typically work with harded steel, stainless steel or titanium nozzles which mean that for the same material (PLA) you need to handle the temp which typically is higher than bress nozzles (various up to 10-15°C)
because other than the other factors which are suggested in the build i.e. infill at 45% and 75% for the core:
a) Layer Height: I like my prints to look nice. ALL the other prints have come out perfect. No reason for this to have failed.
b) Print Speeds: Machine and part size dependent. Again i’ve used what has worked for me previously with no problems. This has been set by flow and calibration etc.
c) Temps are important to the material you print with. I am using PLA and have been able to print perfectly fine with 190degC up to 220degC with exactly the same brand and colour choice. I have used bed temps between 45degC and 60degC. Bed adhesion is NOT the problem.
d) Infill structure: whatever flavour is advised as the strongest. What is the point on printing lines if it will be crushed by any amount of pressure applied.
e) Shells: 3mm. So whatever that works out to be.
f) Extrusion Width: Never looked at that previously, as previously i’ve never had to, my settings have always worked with no problems. It’s just THIS part.
g) At the temperatures of 3d printers, Brass, Titanium, Stainless of multiple grades has no bearing. Only on impact strength and wear resistance. As I only use PLA currently, Brass is perfectly fine and has a higher and more even temperature spread than the other metals mentioned.