I am wanting to use a NEJE A40640 laser with my RAMBo 1.4a board.
I see there is a post regarding the 1.4a board and laser control but it is old and I am not sure if there has been updates since this previous post.
I am new to a laser integration and I am sorry if I ask something that was asked before
My questions are:
Will the 1.4a board be usable for a laser and in specific the NEJE A40640 ?
I know Ryan said in an earlier post that all lasers are wired differently, but just fishing to see if anyone has used this particular laser.
I am also wanting to know if there are settings in estlcam to be able to turn on and off the laser, set power, etc.
If there is any other information I can read on the integration of a laser to the RAMBo 1.4a board on the V1 site that would be helpful.
That is the laser I’m running and Yes it work.
Pin=45 that is.
On my MP3DP "Repat Build Thread
You can see a Part that I cut using the laser on the MPCNC with a Rambo board
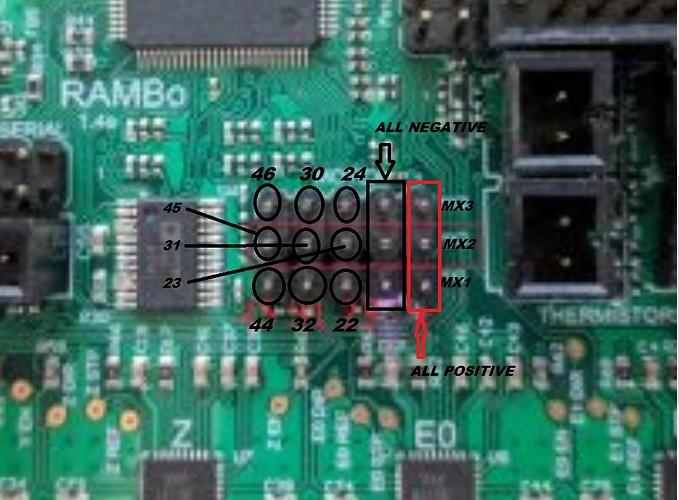
I run this laser with a full Rambo board. As long as you have a later version of the V1 maintained Marlin firmware installed, it is pretty much plug and play at this point . Around version 510, V1 enabled Marlin laser support for just the Rambo and SKR Pro boards…boards they sell and therefore could test. The laser connects to pin 45 on the board (left middle pin in this diagram) and any of the indicated ground pins:
This firmware and this pin will drive the laser using inline commands and M3/M5 commands.
As for software to drive the laser, I highly recommend LightBurn. It is a paid app ($60), but there is a 30-day trial. I’m sure you can get the laser to function with other CAM solutions, but doing laser jobs with them will be a slog. I found LightBurn to be a joy to use.
I’m a total newbie to a laser and would rather take a proven route that will allow me to adapt to the laser
I am more than willing to buy the software (I bought estlcam)
I just want to take the proven route
I’ll just have to verify the Marlin version I have.
The only firmware update I made was to add ends tops.
Not sure if this would cause trouble
I’m terrible with time, but I think laser support for the Rambo board was enabled late in 2020. I think I saw a post recently that someone has done yet another rework of the laser code in Marlin. If I understood correctly, this new laser support was not yet tested by V1 and therefore not yet in a V1 firmware release…but maybe soon?
I’ve only had my laser a few months. I’ve done a lot of cutting, but near zero engraving. I’m impressed with A40640 compared to other diode lasers.
I will only be doing cutting work of 3mm liteply plywood (3 ply poplar), no engraving.
I see you said you were using the full RAMBo, so the board are you using is not a V1 board I take ?
My board was purchased from V1 around three years ago. I used the term “full Rambo” since I don’t know if the board I have is the 1.4a version or an earlier one (not a home to check), but all the full Rambo boards, including 1.4a, use the same microprocessor, have essentially the same pin assignments, and successfully run the V1 maintained version of the firmware without changes.
Note the term “full Rambo” distinguishes this line of boards from the Rambo mini, which V1 has sold in the past.
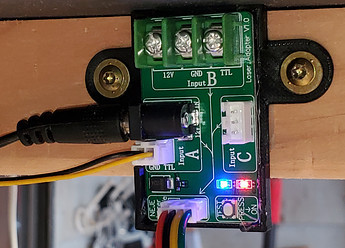
From the control board point of view you are all set. Looking at the laser control board:
The two wires coming out of the “A” connection go to your Rambo board. The yellow wire goes to pin 45, and the black to any ground.
There are some other things you will need to figure out. Your cutting will be greatly enhanced by using “air assist.” Most of the DIY rigs I see use an aquarium pump for air assist. As for the nozzle, @dkj4linux has kindly provided a 3D printed plate that replaces the red plate on the NEJE A40640 that includes a nozzle. I moved to his nozzle from my air assist solution, and I was very happy with the result. There are a couple of different versions. Read the last 3 dozen posts in this topic.
Consider also some metal to protect your spoil board, and something to lift your stock from the bed. Cutting is assisted by allowing some room for smoke and particles on the bottom side of your stock. There are commercial products for this task like this one. Search for the terms “aluminum honeycomb” and “laser bed.” But I see cheap DIY and household solutions as well. You don’t need much lift.
Also consider purchasing a decent and certified pair of laser glasses for the specific wavelength of this laser.
You are looking for certified glasses designed for the 445-450nm wavelength making them orange in color. The glasses I got with my laser module were uncertified and red. I purchased this pair from Amazon, but I cannot claim they are better than the many other pairs I found on Amazon that meet the above criteria.
In regards to turning the laser on and off is this all set in the gcode software
When setting up your machine in LightBurn, select “inline” as the method. Other software may not have this option, so M3 / M5 will be the choice. The g-code will handle the commands to turn the laser on and off.
Also, how is the laser run manually to figure out the power setting and travel speed
You will want to do test patterns to determine travel speed and power. LightBurn has the ability to vary the power output by shape. This makes it much faster to setup a test pattern. See this video. You can turn the laser on manually. If you are using a display with your Rambo board, note that the menu item for turning the laser on manually is confusing…at least for the version of Marlin I’m running. In the laser sub-menu turning the laser “off” puts it in manual mode. That means when you set it to “off” it will immediately come on at whatever power you’ve set. Turning it “on” means it will be controlled by g-code.
Note that LightBurn can be used as a g-code sender like Repetier-Host. There are some benefits (and probably come complexity) running it in this mode. Personally I have LightBurn generate the g-code and run my machine from the SD card. Also I have LightBurn setup so that it mimics the g-code from my other apps in that cutting is relative to the stock and there is no auto homing. This is not the default setting in LightBurn.
Edit: I’ve not made anything with 3mm plywood, but I did run some quick cut tests on some material that was billed as 3mm Baltic Birch. My spreadsheet indicates a single pass at 3.5mm/s at 100% power and two passes at 6.5mm/s and 100% power. These numbers indicate the outer edge of successful cutting where faster or less power failed to cut. In my cut library (part of LightBurn) I have two passes at 4.5mm/s and 90% power for 3mm plywood. Based on a couple of things I’ve read, I avoid running my laser at full power if the duration of the job is over 30 minutes. These values should give you a place to start to figure out your power and speed for your plywood.
With all the help from all of you and a firmware upgrade I got the NEJE A40640 Laser working with the RAMBo board and my mpcnc
I still have a few items to figure out and I’ll get them figured out shortly
All your help is greatly appreciated