Noob here, I am just starting out on this journey and will get my build thread underway soon. I have seen a lot of posts dealing with tubing for the MPCNC and I am having trouble sourcing suitable material in my own (small) town. I notice @Melcour is in the same country and I want to ask for the specs of the tubing you have used. I may have to order this remotely and it would help to have something specific to ask for. Thx.
Hi Selwyn,
Yay another Aussie. I printed the “J” version that is 25.4mm.
I had a hard time getting it from any of the metal suppliers within a 1 hour drive but ended up getting it from Bunnings.
https://www.bunnings.com.au/metal-mate-25-4-x-1-2-1m-galvanised-steel-round-tube_p1130448
Also comes in 3m lengths.
I believe the 1.2mm wall is a little smaller than recommended but I simply couldn’t source anything else while keeping it affordable.
A couple of the metal suppliers offered to do a special order but there needed to be a minimum purchase.
It appears the 25.4mm used to be popular in Aus electricians but is being fazed out.
Good luck with the build and let me know if I can help with anything else.
1 Like
Thanks for that. The galvanised conduit from the electrical supplier is supposedly 25mm but is up to +/- 1.5mm out of round and inconsistent, just junk. Bunnings here has chrome plated wardrobe hanger rail labelled 25mm and it measures 25.4 +/- 0.3mm with the saving grace that the out of round is consistent down the length so the bearing carriage would not see much variation over its travel. I’ll have to buy a piece to measure the wall thickness as the ends are rolled in a little and will need to be recut to get an accurate measure The local steel supplier said he had heard of DOM tube but that was as far as he could go :). It looks like the big green toyshop or a two hour drive to a regional centre.
Edit. Sorry that’s 25.4 ± 0.03 the gal conduit is reeally as bad as I said.
Thanks Ryan I’ll check that out.
For Australian builders, : I bought my tubing (polished stainless steel) all cut to length and neatly deburred from Luke at http://www.wellingtonenterprises.com.au shipping was $15.00 but I was curious to see what else he had so arranged a pickup. (Surely driving 350k’s costs less than $15.00?).
Luke’s a bit vague on the phone, but the service was good and the product first class - Oh it’s not budget material, but the extra bit you’ll spend is not a great percentage of your total build, and besides it’s shiny and you can see your face in it and… 
2 Likes
Care to share the description (OD, wall thickness, material and so on)? If I have to buy this by remote control I want to end up with the right stuff and get the print selection correct. Also apologies to @Melcour, I’ll stop hijacking your thread now.
Here’s one of his eBay ads - currently asking $14.00/m and worth every penny IMHO. Phone direct for cut to size. (I have no affiliation - have made one purchase and was happy with it.)
1"/ 25.4 x 1.6mm 316 STAINLESS STEEL MIRROR POLISHED TUBE MARINE GRADE | eBay
It seemed quite expensive at the time, but I have spent a lot more on mills and the tubing won’t break or go blunt.
1 Like
That’s alright @OFP it is good to have all the info out there and it may make it easier for the next person to find.
@bitingmidge I’ll save that one for when I decide to upgrade the tubing.
1 Like
Quick question for everyone.
What thickness of spoil board and what type of material are you using? MDF, Ply.
I am giving up on the GMC router and will purchase a Makita 710W trim router.
I’m wanting to find that happy medium between the spoil board thickness (protecting my nice table top) and not loosing too much work area height.
1 Like
I’m using 5/8" (16mm) MDF for a spoilboard on my Primo, and 3/4" (19mm) for my LR2.
In the case of the primo, the feet are sitting on strips of the same thickness, so even though I’m at minimum Z height for the build, I’m not losing any Z height. Note that I often find that I get better results working on thin, hard materials by placing the work material on top of a 2" (Actally some 2X4s placed flat) spacer, so that the work is as close to the core as possible. This seems to give me a slightly better edge finish and closer tolerances for finished size, probably means less router deflection.
For the Low Rider, its design should mean the opposite is true, and the lower I can have the Z plunge down, the stiffer the machine is, but I’ve never tested that.
1 Like
Edit: Host fails to connect to Windows - Repetier-Forum
Looks like it could be a bug in the Repetier Host. Dev has fixed for next release.
I’ll leave this here in case anyone else comes across this issue.
Hey folks here is an odd one that has popped up a couple of times.
I’ve been trying to find the commonality between them but nothing is jumping out to me.
Error in Repetier-Host. Appears after loading in the .gcode.
System.NullReferenceException: Object reference not set to an instance of an object. at RepetierHostExtender.basic.GCodeAnalyzer.arc(Single[] position, Single[] target, Single[] offset, Single radius, Boolean isclockwise, GCode code) at RepetierHostExtender.basic.GCodeAnalyzer.analyzeShort(GCodeShort code) at RepetierHost.view.RepetierEditor.fastLayerUpdate() at RepetierHost.Main.LoadGCodeOrSTL(String file)
I have 2 files this occurs on and I think it is something to do with my process of generating the gcode but it works fine on other files using the same process so I am at a loss.
Setup:
Windows 10, 32GB RAM, Xeon.
USB to RAMPS 1.4
Repetier Host 2.2.4
Gcode workflow
Inkscape → DXF → ESTLCAM (generate paths using engraving) → gcode.
Attached is one of the files that generate the error.
Birthday Card.gcode (80.7 KB)
Thanks for any help and further troubleshooting advice.
1 Like
Drag knife is due to be in my hands next week.
Working my way to the router but couldn’t help myself and wanted to try the drag knife first.
I have project in mind so will post up the results if all goes to plan.
2 Likes
Yay drag knife has arrived. Let the fun begin.
2 Likes
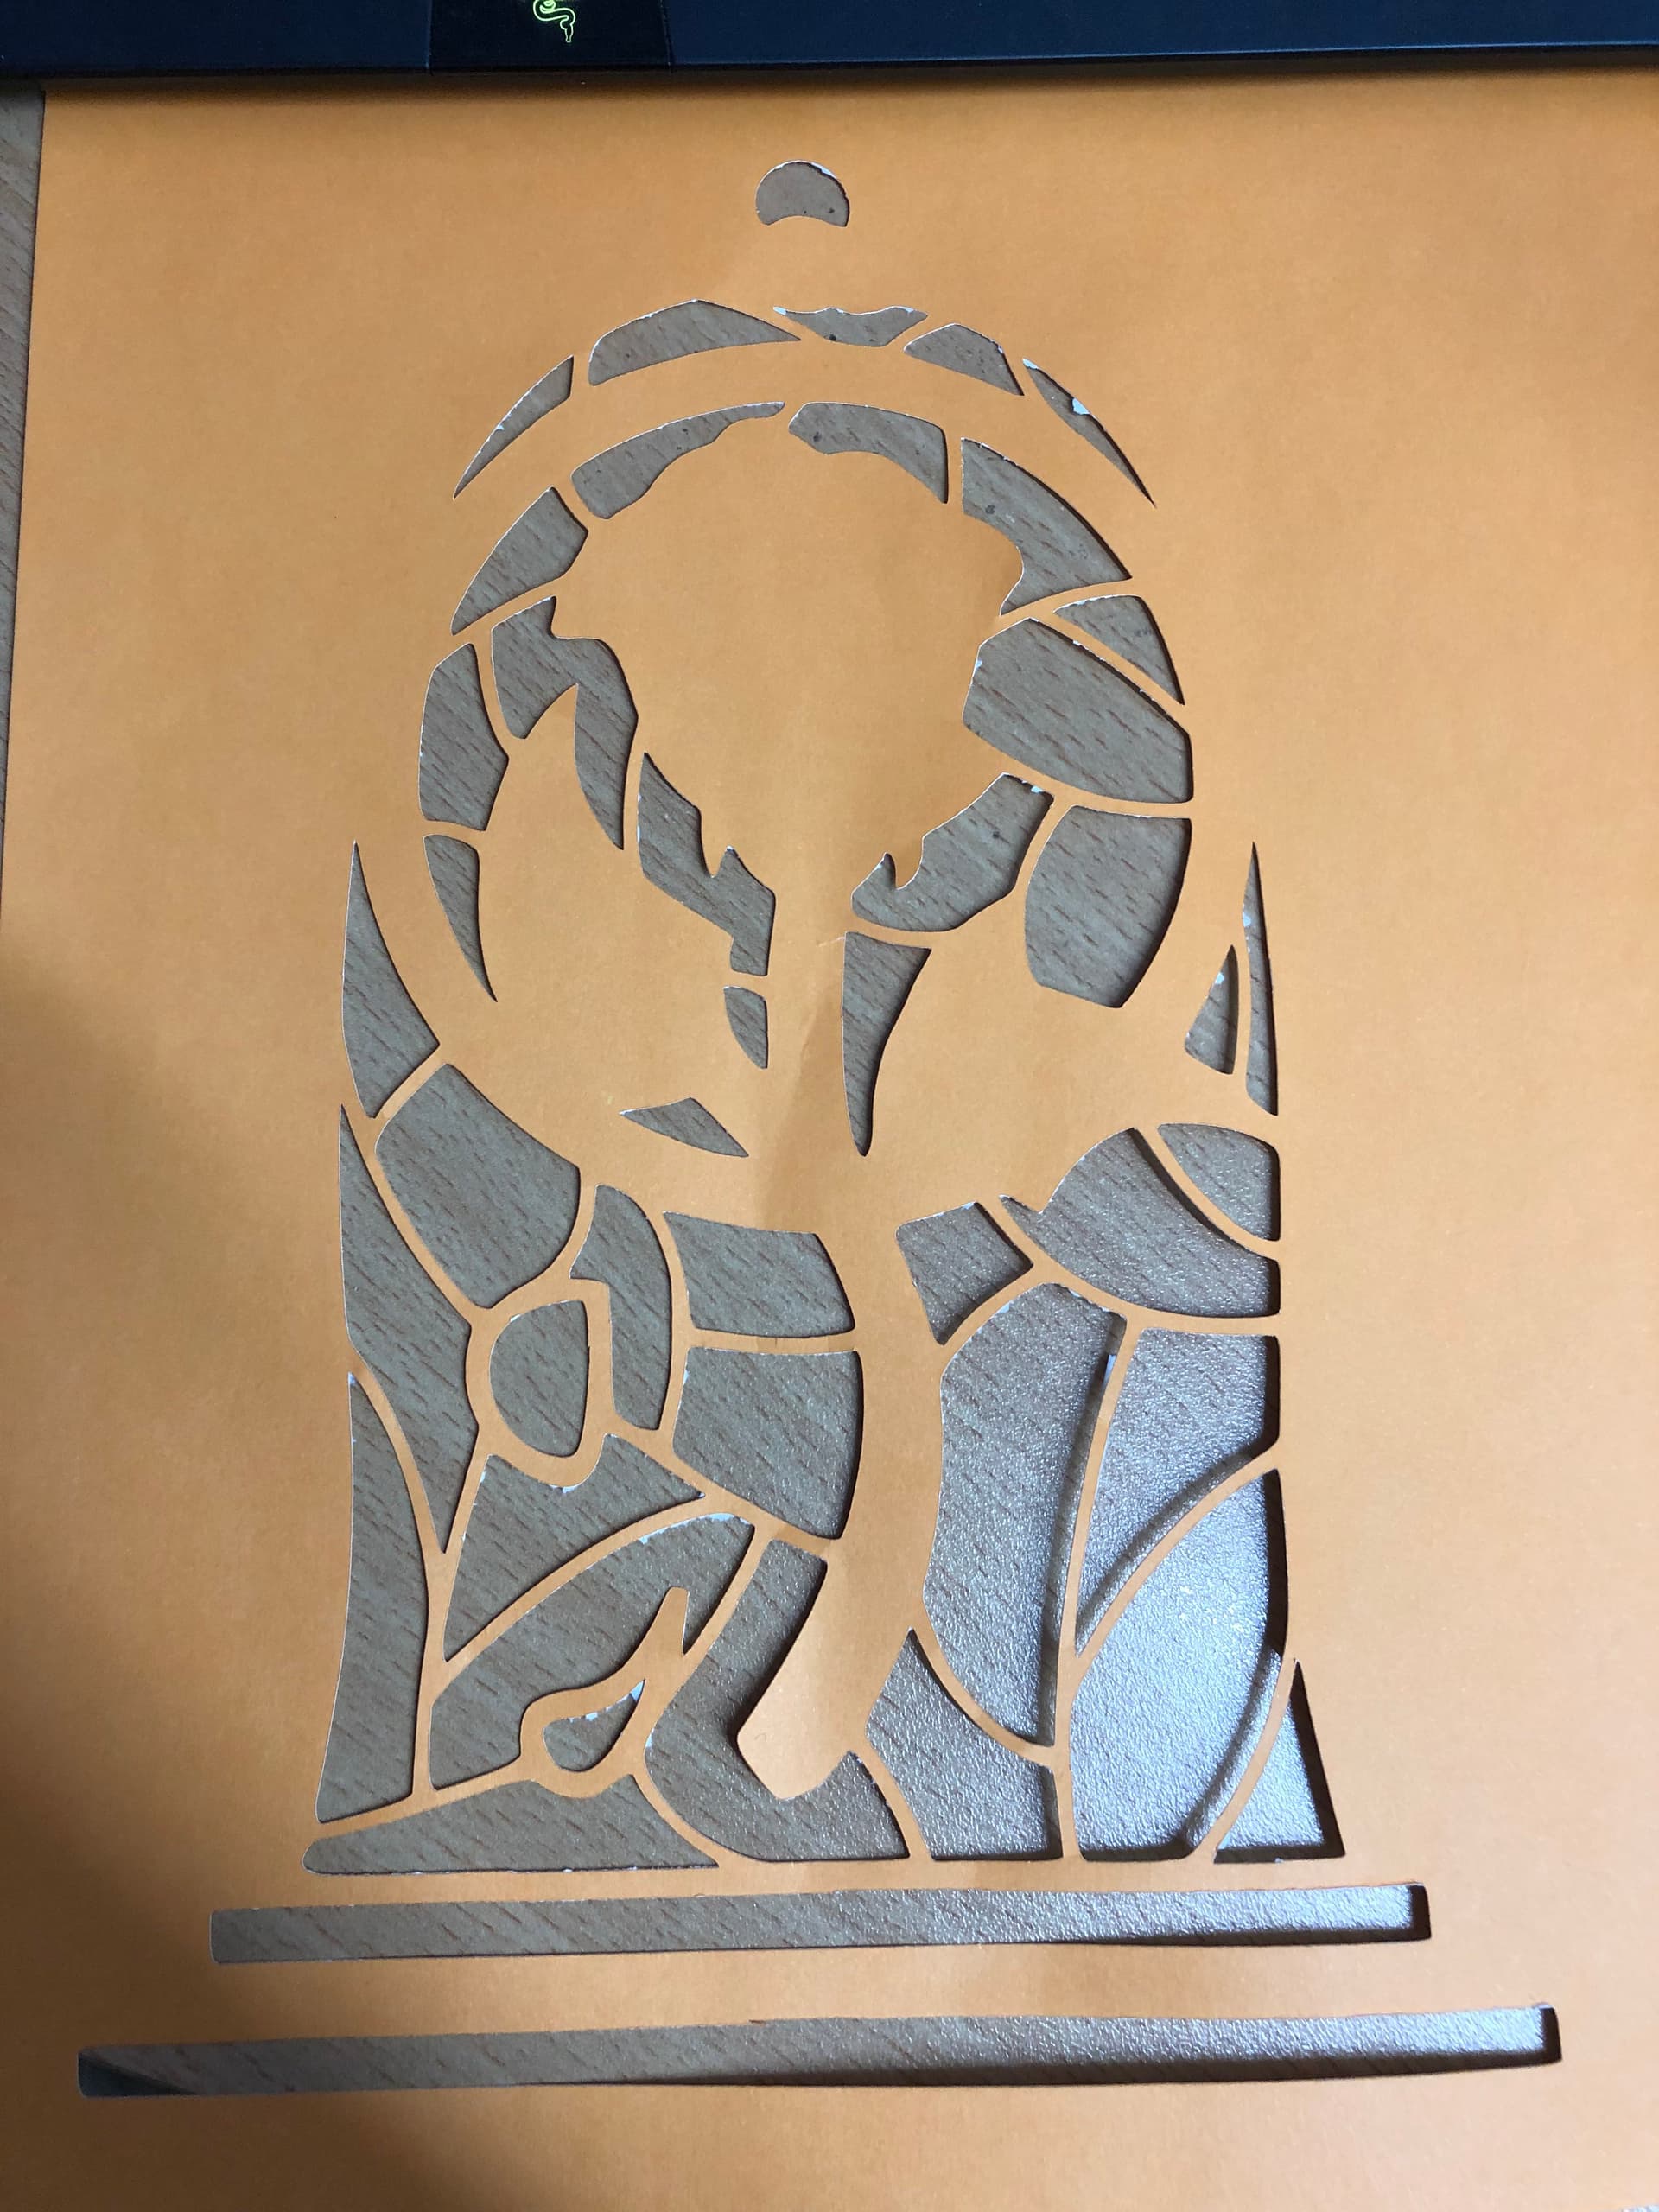
First test run using the drag knife.
Couple of little issues like dealing with sharp corners and changes of direction causing tearing.
Only other issue was testing with 80gsm A4 paper and the Cricut Matt being so sticky is tears when removing.
Thanks to @niget2002 for the idea.
Also if anyone has any tips that work for them I am all ears.
Absolutely loving this machine @vicious1 and the endless possibilities.
So far I think the results are great and a little fine tuning will make it even better.
5 Likes
Add a lead in and lead out on each section and it should get rid of that.
Thanks Ryan I was reading about that in the documentation so I’ll give that a shot.
1 Like
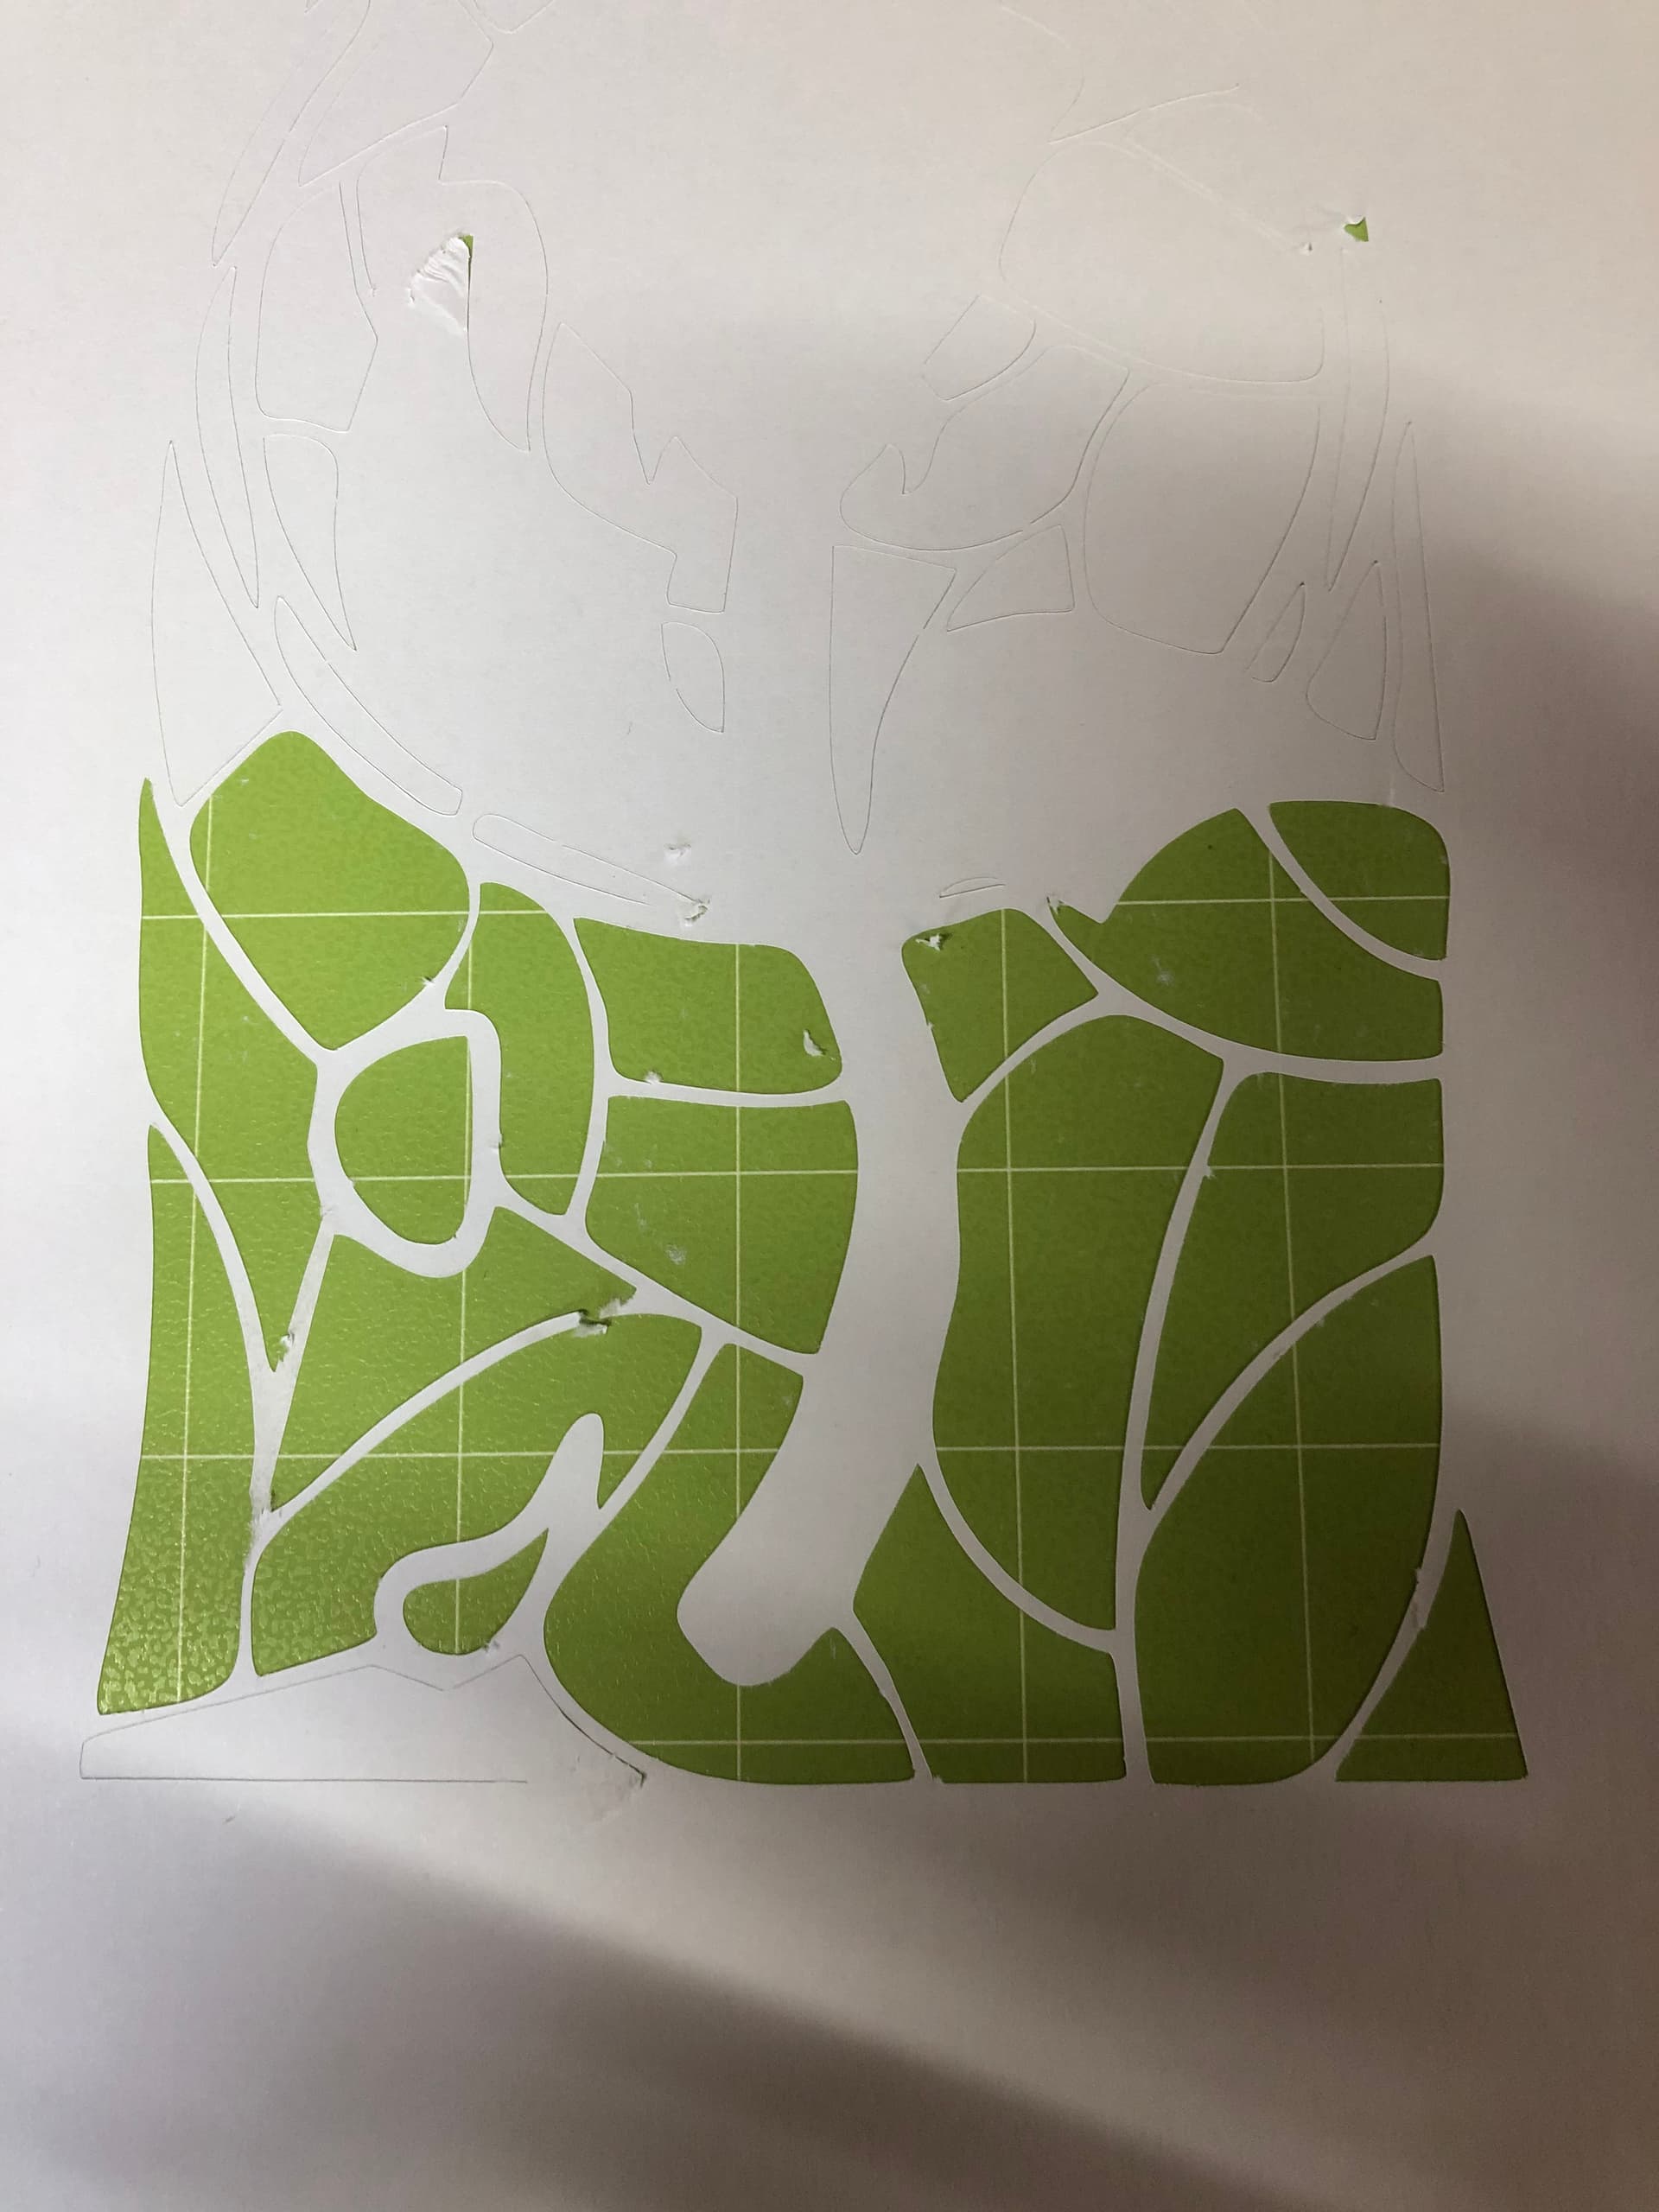
Latest test cut using lead in’s.
Also adjusted the file to increase the width between some sections to reduce the tearing when removing it from the mat.
Still getting some areas that are not fully cutting through but I think I’ll move forward and just fix these up with an xacto knife.
What is everyone else’s experience with the drag knife and paper? Is it reasonable to be expecting a consistent cut the entire way around?
I was also considering trying a different base instead of the mat to see if that helps.
My other thought was that it could be due to the blade orientation with dull side being used in some areas. I believe the lead in has improved this.
The bottom long rectangle cut fully on the bottom and left edges but only cut fully on part of the top edge.
But with saying all of that I am still very impressed with this machine and I am learning a lot about it, Inkscape and ESTLCAM.
I’ve been lucky and able to raid my wife’s old scrap booking paper supply.
2 Likes
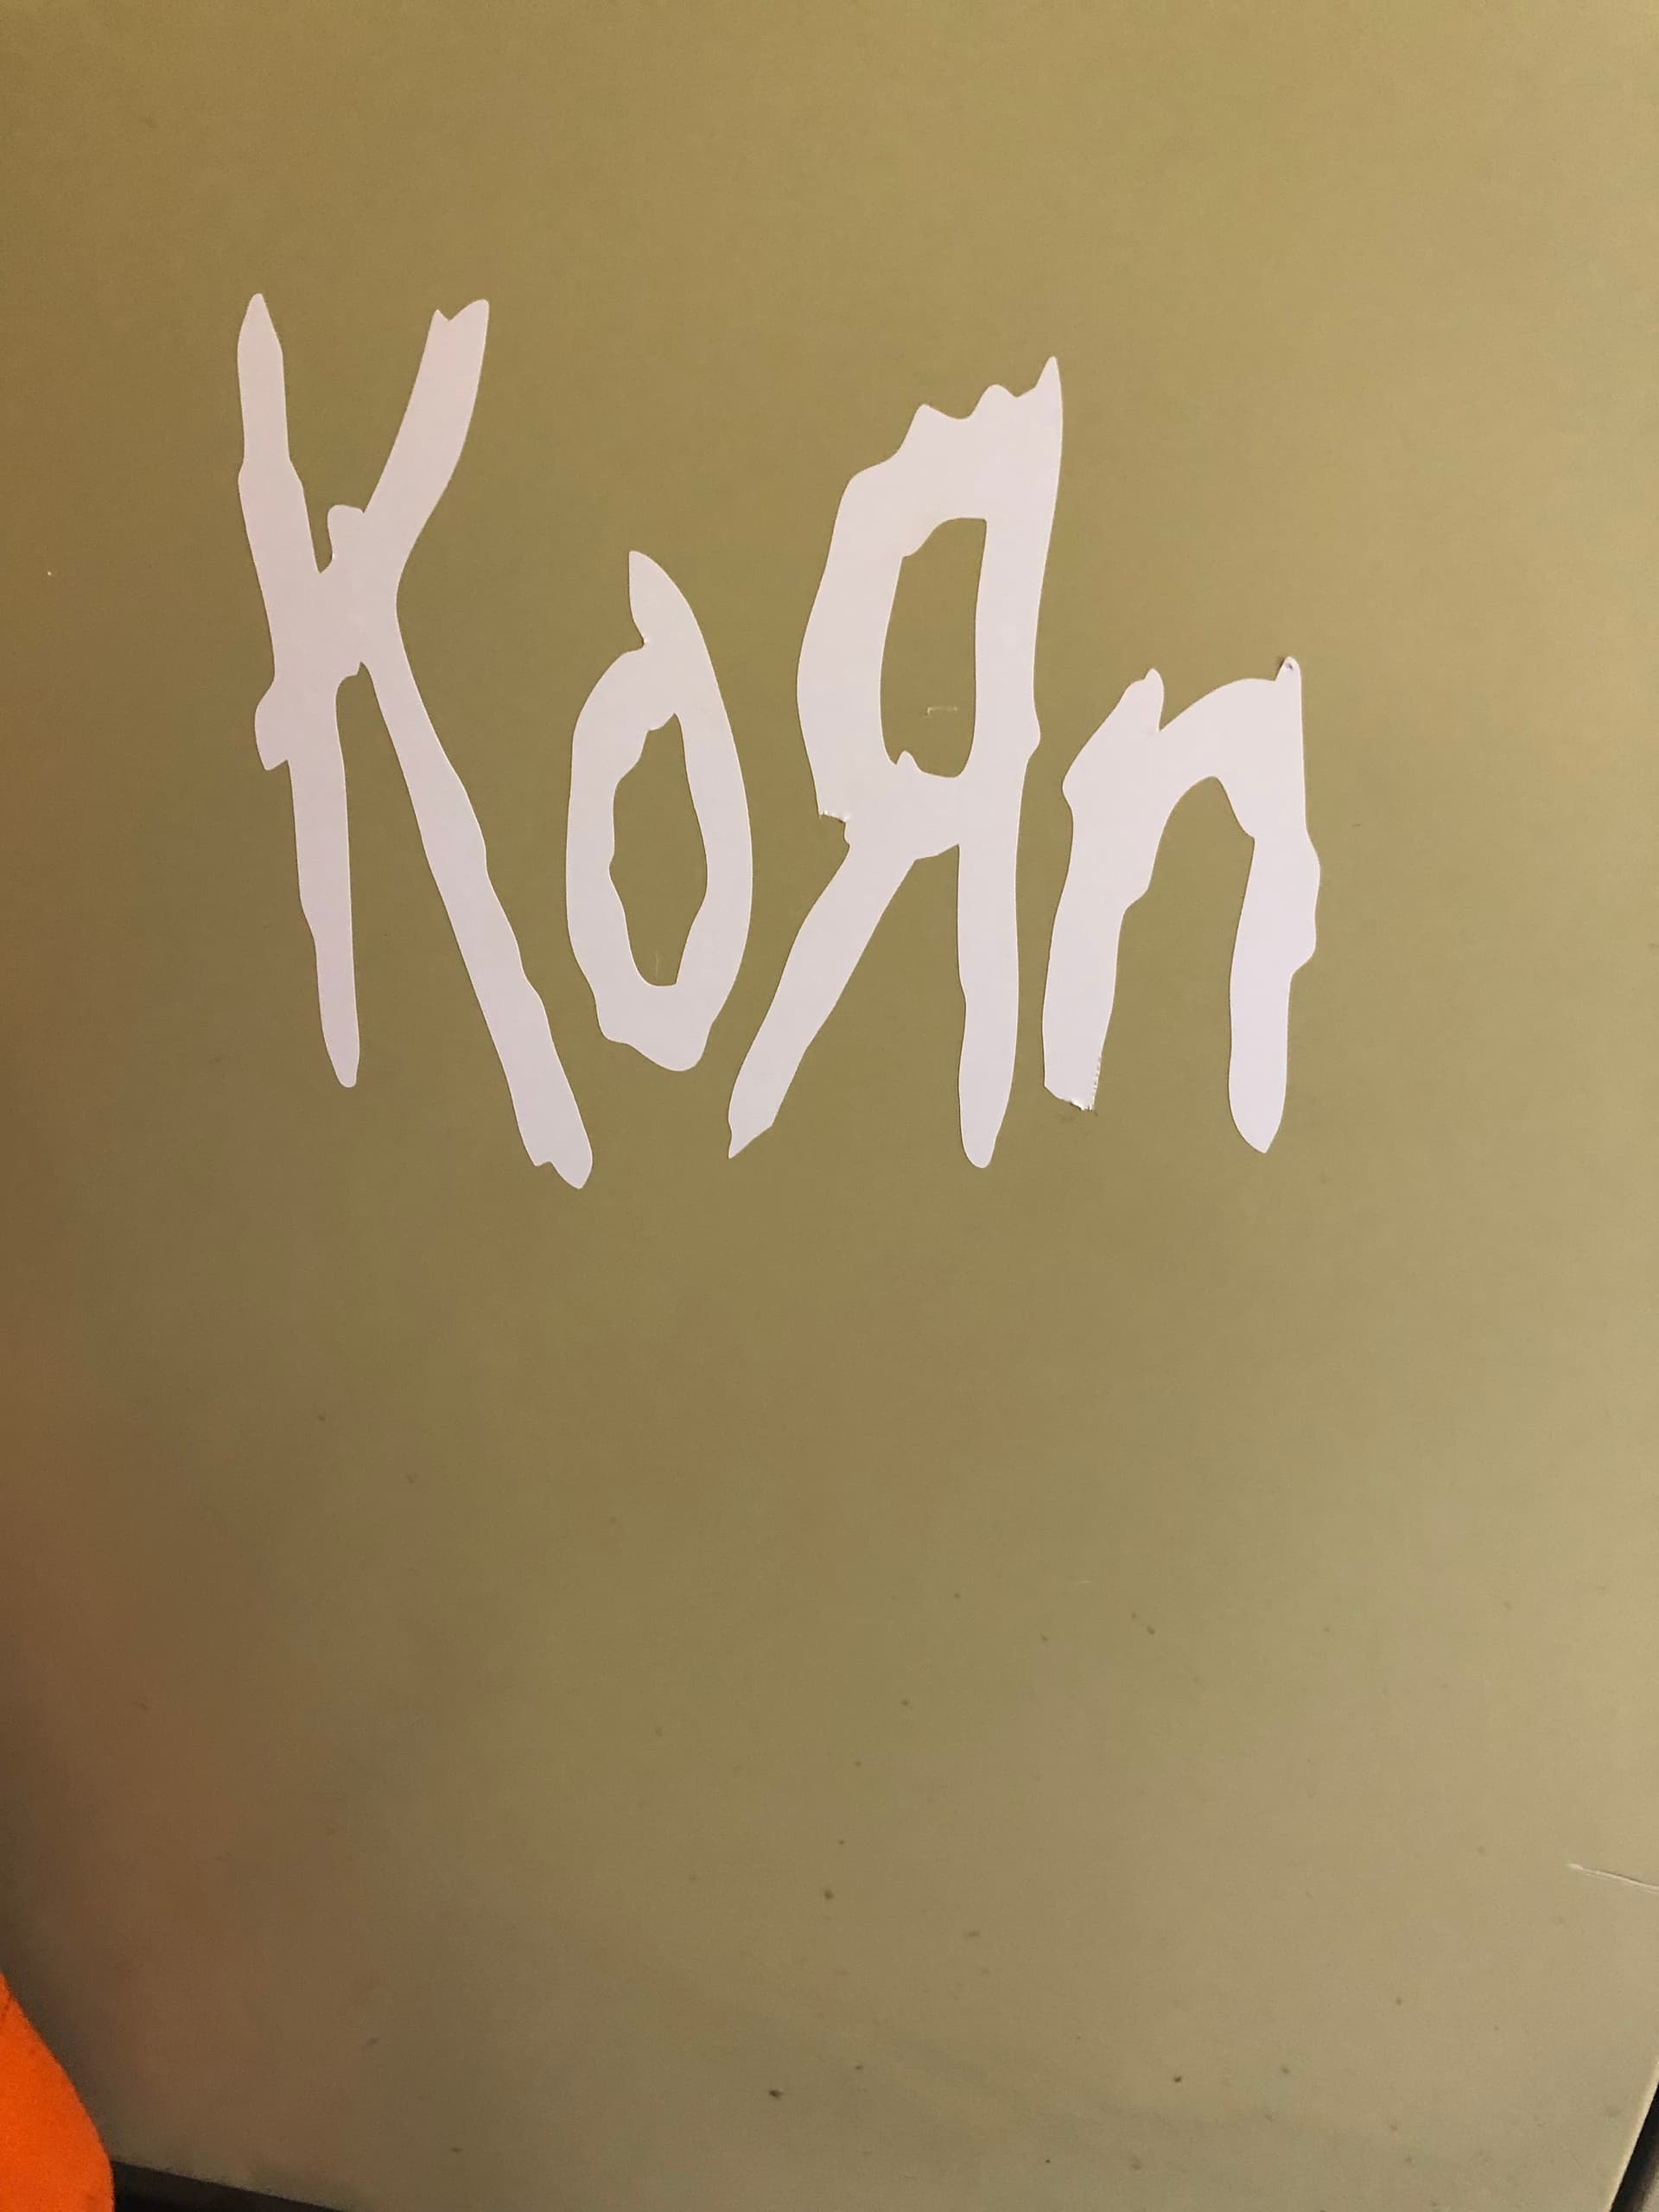
Decided to play around with some vinyl decal cutting.
Couldn’t be happier with the results.
This one is 170mm x 140mm on some generic ebay vinyl.
Done another one for my nephew to stick on his guitar that came out mint.
I thought the uneven letters of the Korn logo would be a great test.
@Ryan Using lead in’s is working a treat. Thanks for the tip.
4 Likes