Today’s progress was something that had worried me - getting Estlcam running on linux. It turned out easier than expected, and @jeffeb3 's instructions worked perfectly.
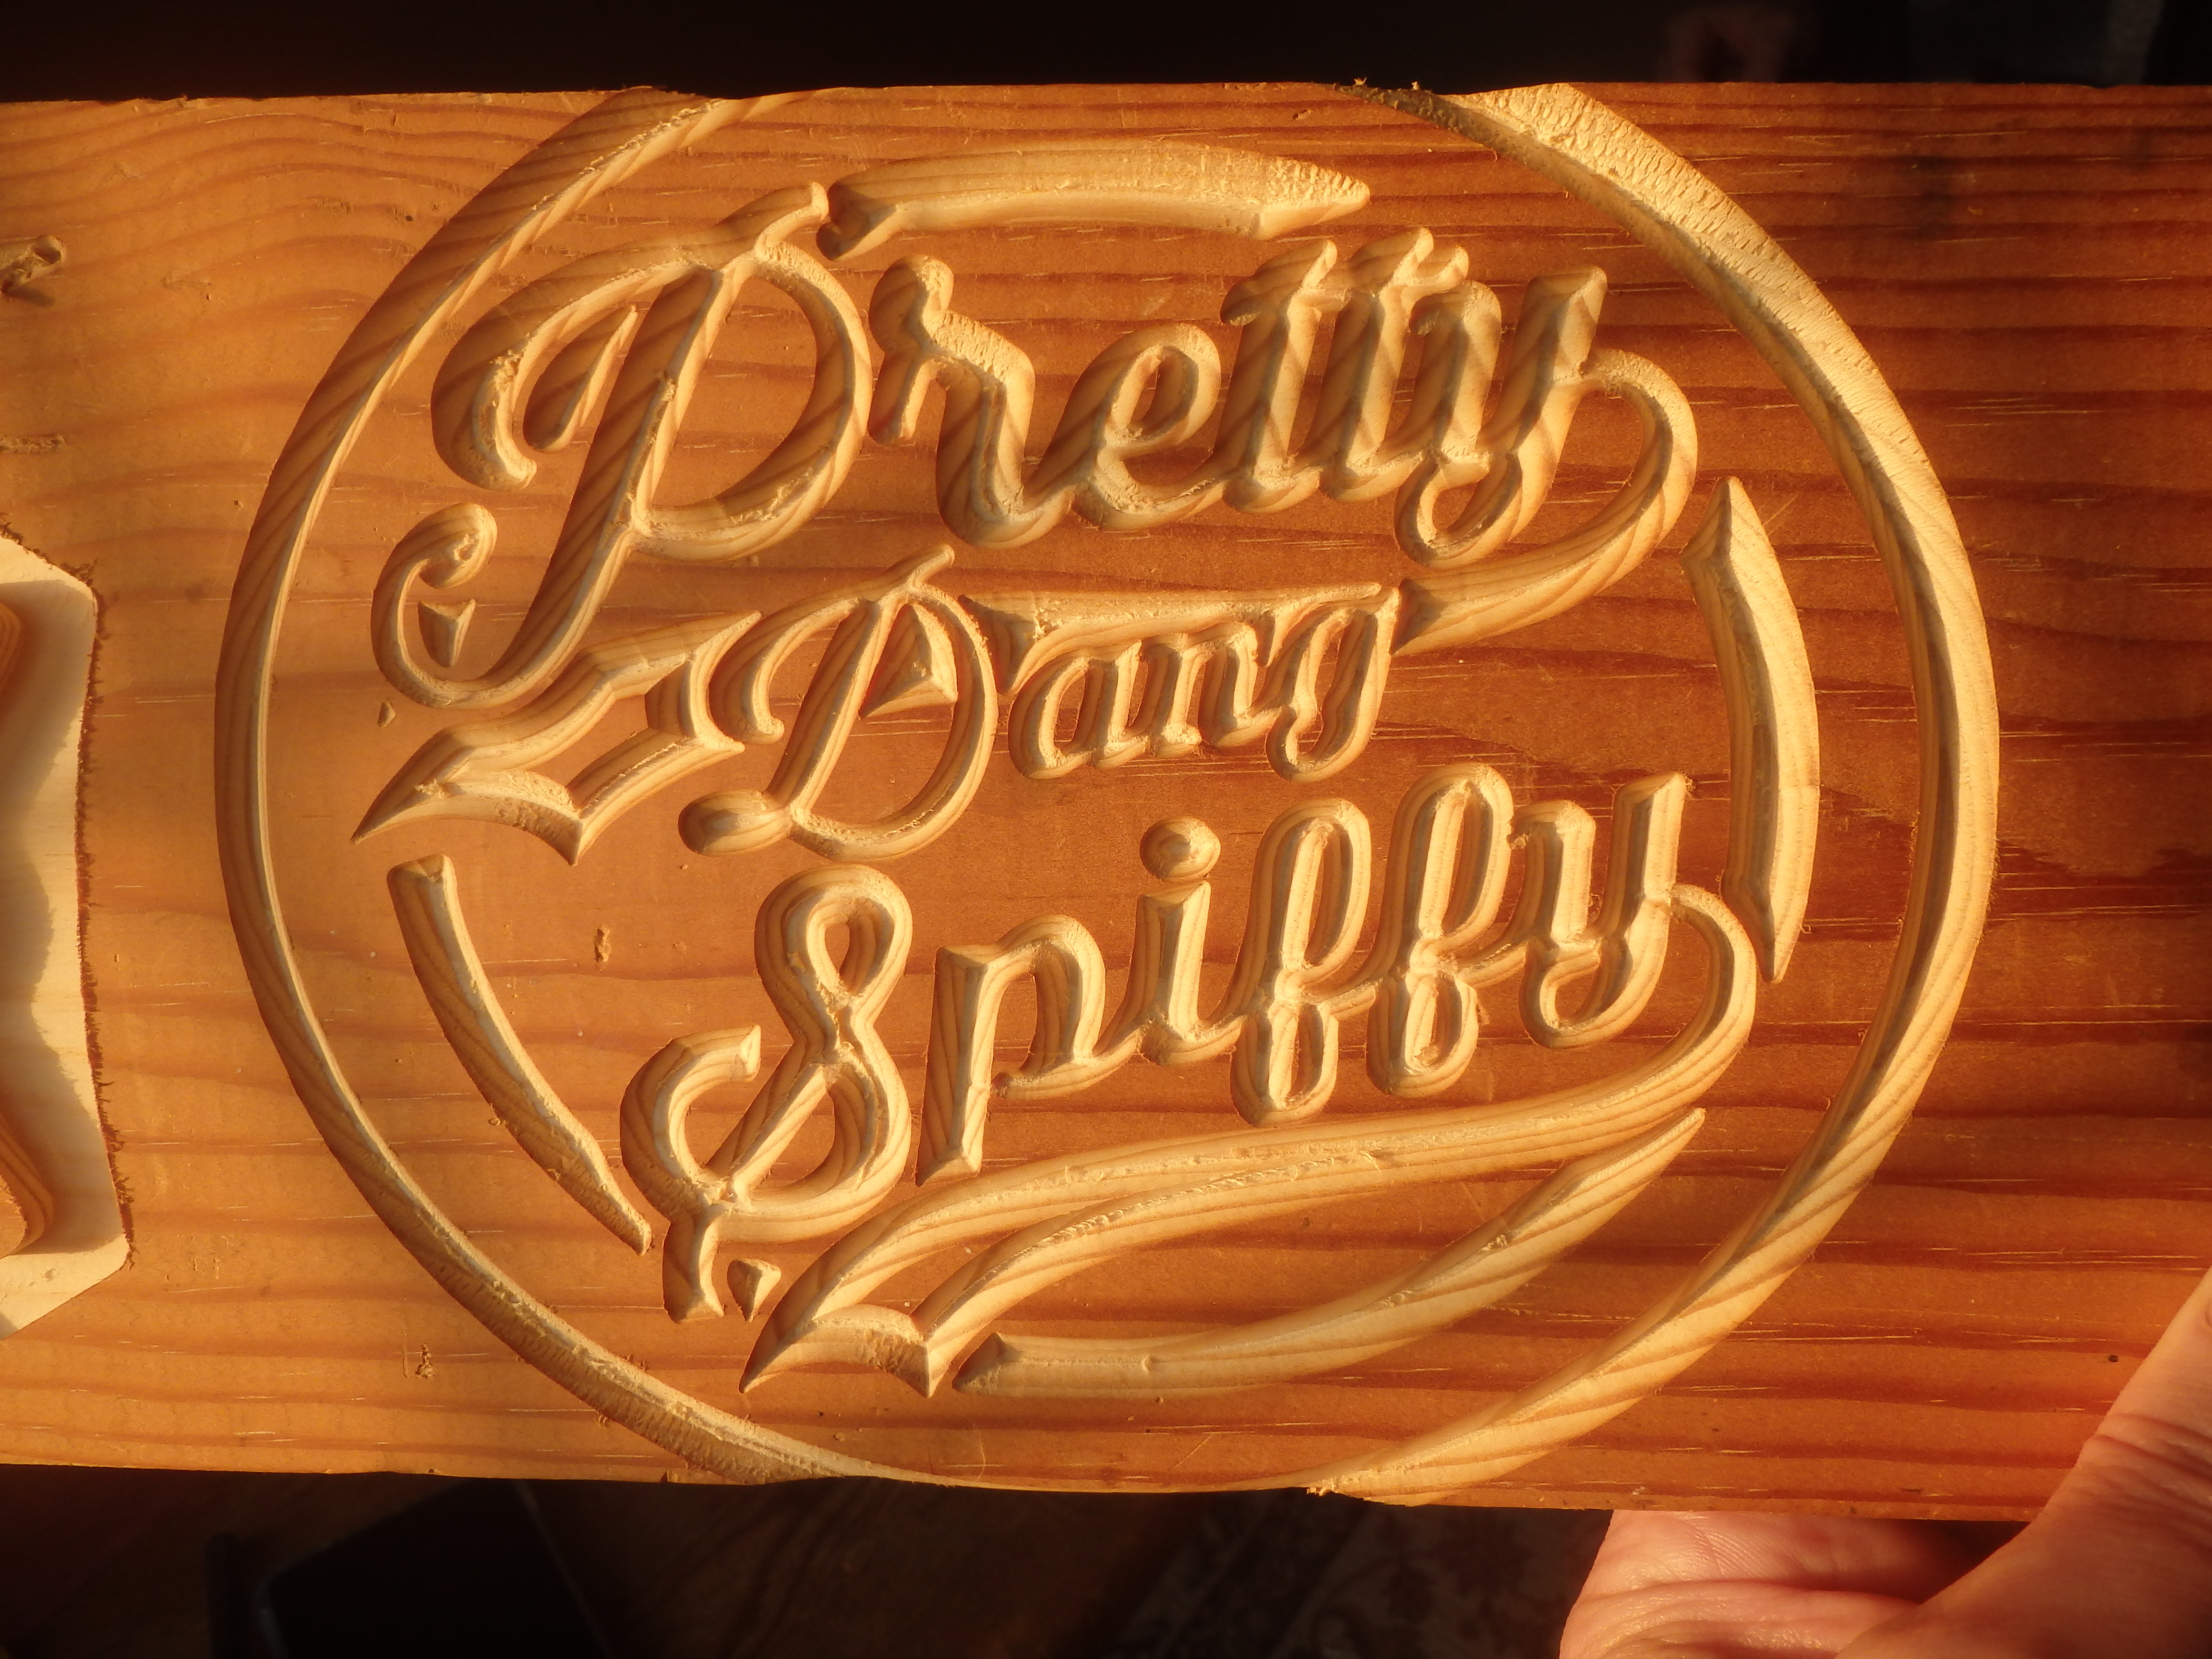
I followed some instructions for tracing an image in Inkscape (much easier than expected) and created a toolpath to ‘mill’ it. My first attempt was a bit rubbish, as I kept creating new tool paths when I wanted to select old ones, but the second attempt wasn’t too bad.
I was winding the Z lead screw up and down by hand, so I missed some of the moves. I’m looking forward to trying this again in a few days when it’s fixed. The image is from the Sail Life YouTube channel about an extensive and high-quality boat restoration.
I’m most of the way though printing the ‘Minion’ RAMPS case. This took quite a lot of ‘fettling’ to make it fit. Possibly my cheapo arduino and RAMPS aren’t quite the same dimensions as the author’s.
Also I’ve hacked up an old tape measure to make drag chains, which makes everything look a bit more ‘finished’. The only problem is where you can see the yellow (and markings) through the braid!
Any suggestions for finishing the ends of the braid? I tried insulating tape, but it doesn’t look great. I’ve seen heat shrink used, but can’t imagine tube large enough to fit over the 15mm braid shrinking down enough to fit around the wire - how do you do it? Would self-amalgamating tape work better?
BTW, what’s a good way to get 12v power for the fans in the RAMPS case? Do people use the heated bed, etc outputs for that sort of thing? If so, how do you turn them on, special G-code in Estlcam?
Replying to my own question here, in case anyone else ever needs to know:
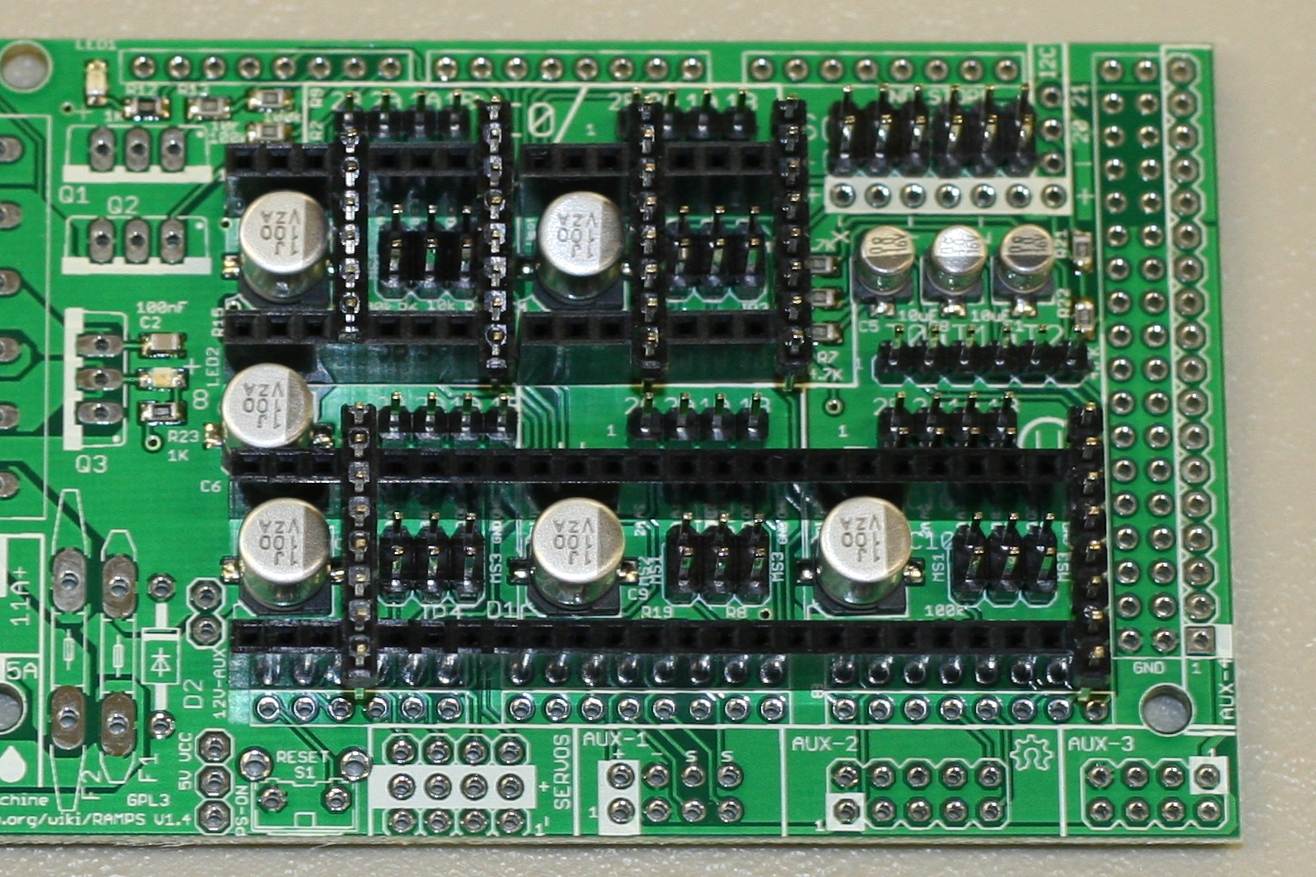
I found a pair of pins near the power connector, labelled ‘12v AUX’, just to the right of the ‘D2’ label in this picture, but clear enough. These pins appear to be connected to the power, after the 5a poly fuse, and work nicely for my fan (so far)
Use those pins with caution that just brings more power through the import molex. That is the second most common failure point after drivers on an import ramps. I only connect to the other end of the molex or even in the molex itself, but not after.
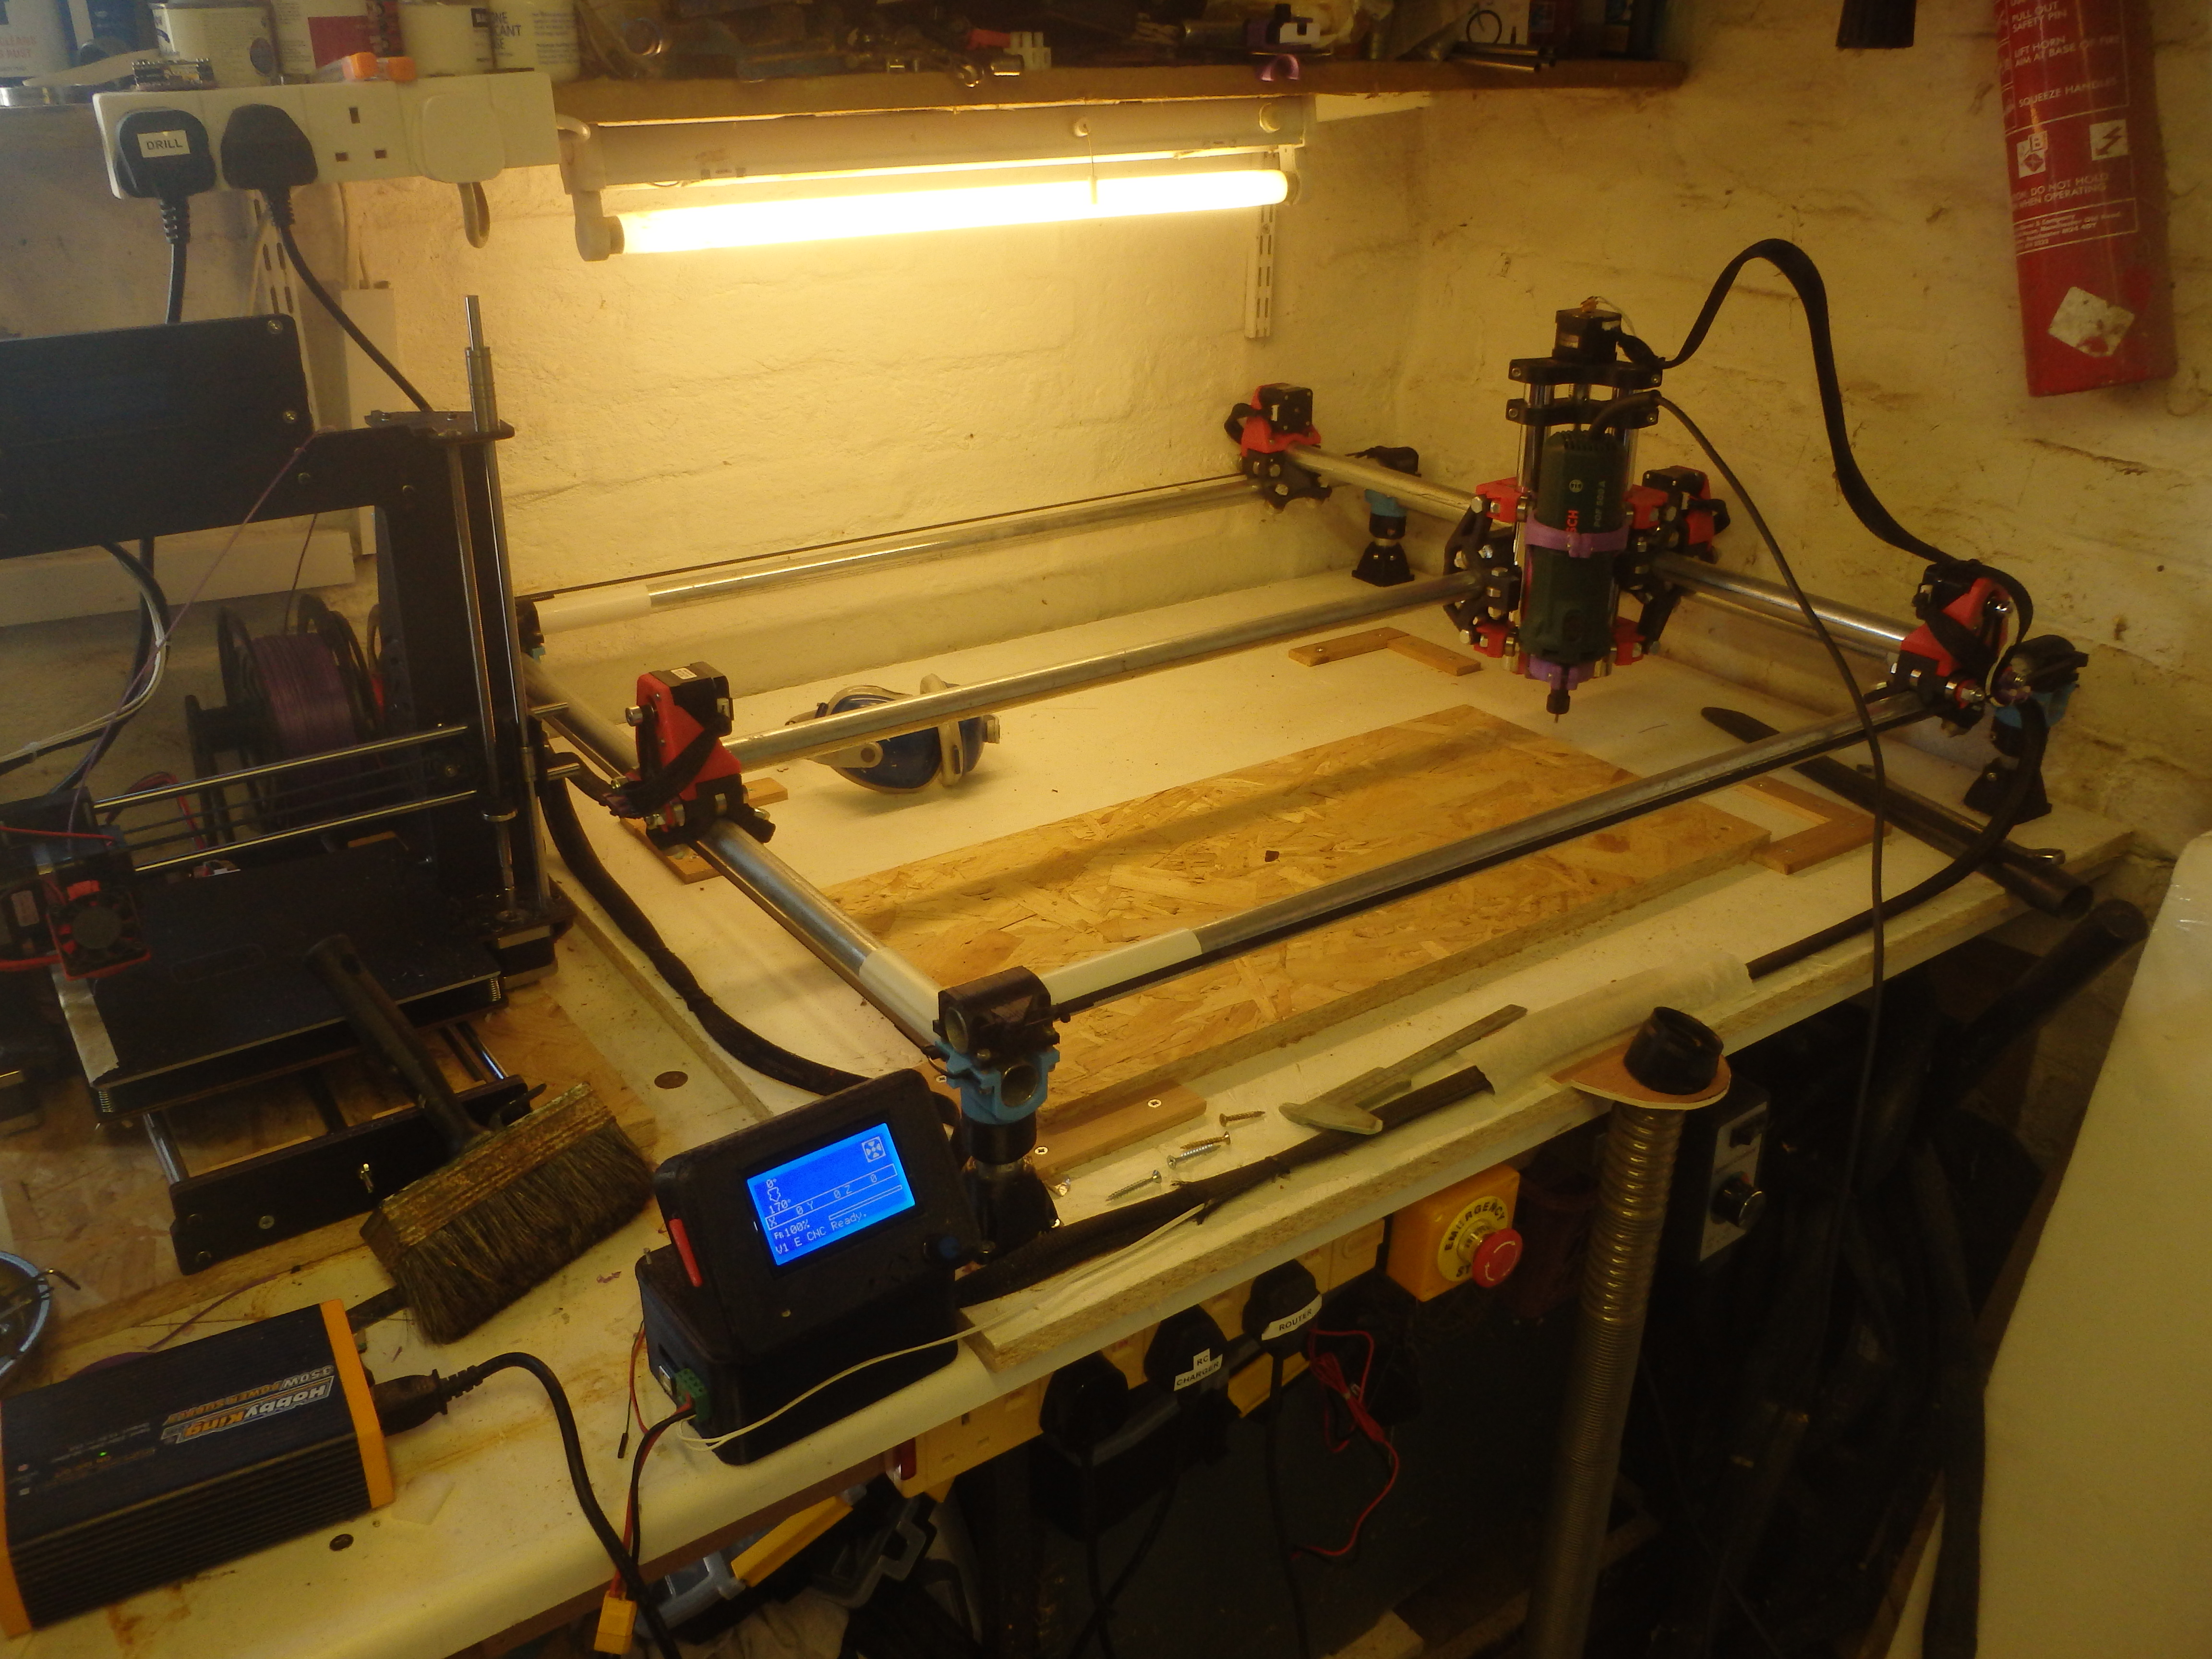
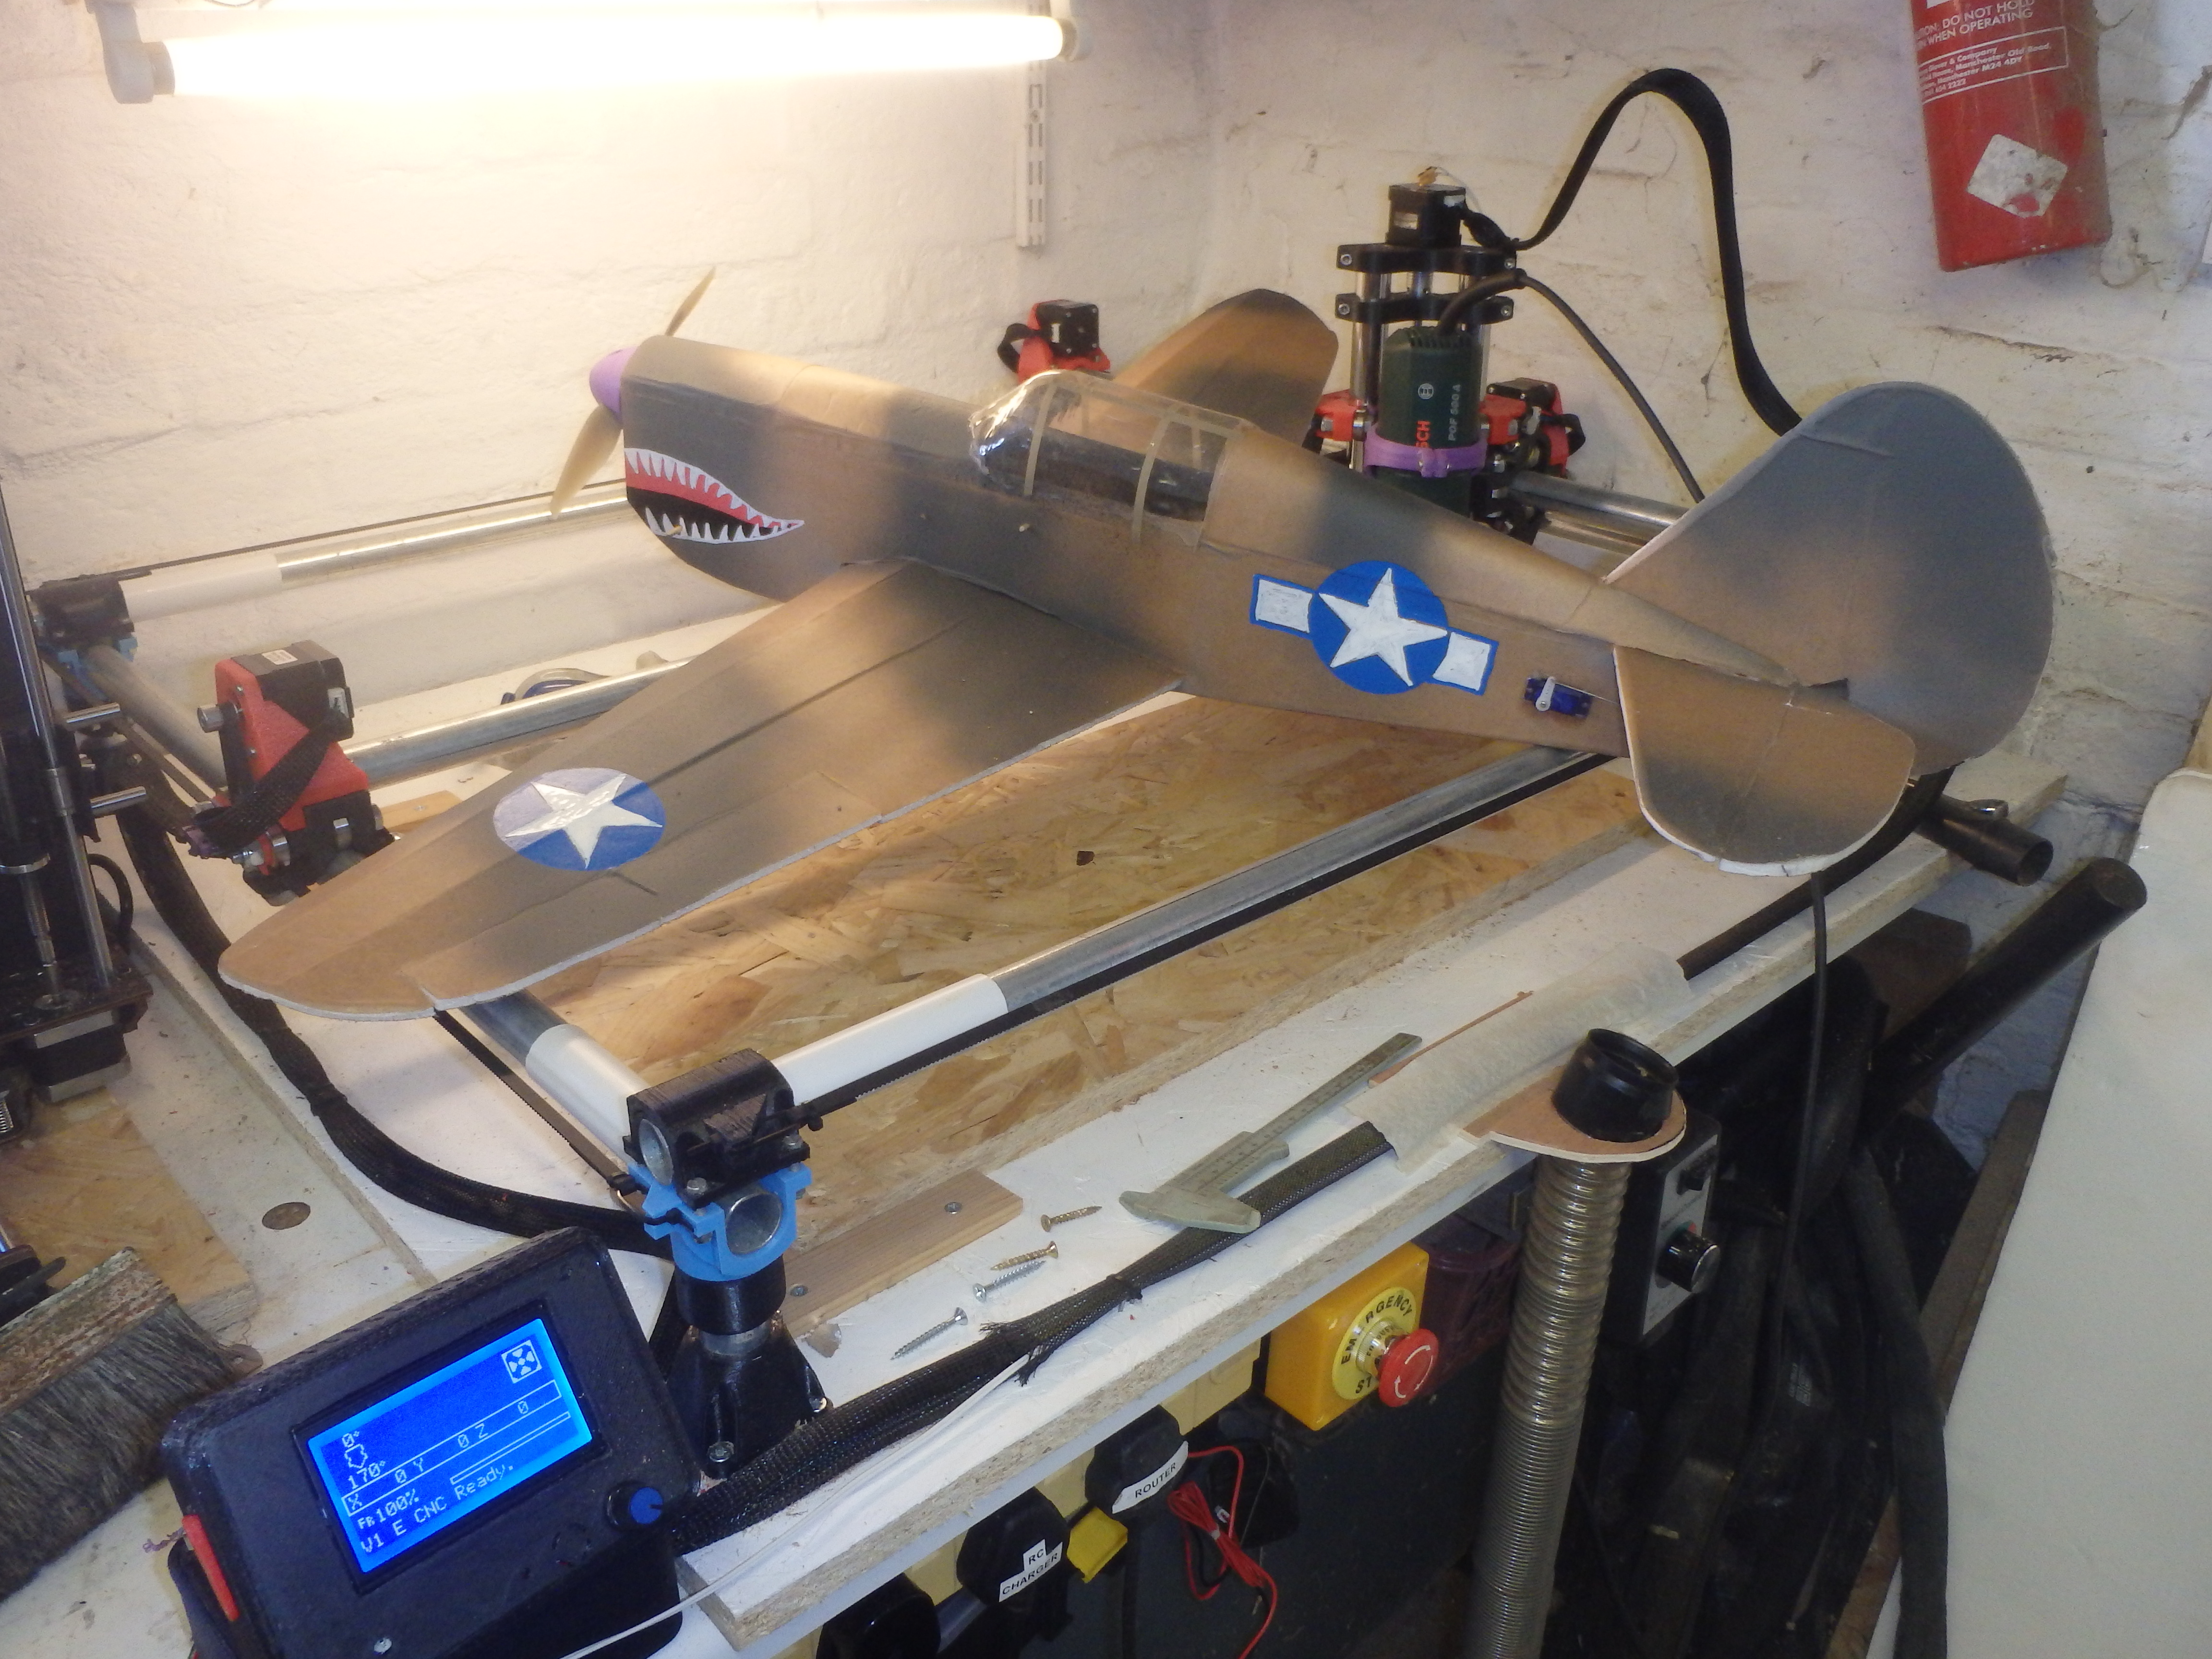
I can’t fly RC planes any more due to the lock down, and I’ve got a backlog of unflown planes, so my needle cutter is a bit pointless. Instead I ordered some Rennie router bits that was the only recommendation I could find for bits in the UK, and a 1/8" collet for my old Bosch router, printed a mount from Thingyverse and had a go at wood.
I got a bit confused in Estlcam and instead of five 1mm steps, it dug right in and cut 5mm in one go, but otherwise seemed fine. The edge was fairly neat, even before the finish cut.
There are slight marks on the bottom - is that normal, or does that mean my router is not vertical? Or deflecting as it cuts?
The marks at the top of the picture are where I was impatient waiting for the bits to arrive and experimented with an old countersink bit, just trying to cut a straight line. A 2mm depth of cut wandered all over the place, but a 1mm DOC was at least straight. The line under that was a test with the proper bit.
I have several but a) live too close to Gatwick to fly anything bigger 250g and b) it’s illegal to fly anything with a camera within 50m of anyone else’s house, so I can’t even fly the small ones in my garden. I can fly inside my house but flying the same course repeatedly gets boring with no one to race.
Actually, I’m not entirely sure that being inside my own house allows me to fly within 50m of my neighbour. The laws are quite poorly written…
I bought the shortest bits (8mm), on the assumption that I’ll probably do something dumb and break them soon enough. Overall they’re only about 40mm long, which leaves about 15mm sticking out of the collet.
Indeed, Rennie router bits are the best i could find locally, and being based in Stockport - Manchester means that i can get them on my way home from work!
Ive built both the Lowrider and the MPCNC, and those bits are the best i could find.
Thanks for the recommendation, it’s worked out well!
So now I’ve got it working with conservative settings, how do I know how far I can push it safely? I’ve read several reports where “it just went ‘ping’” with no warning - is that normal, or do you normally get some chatter or missed steps first?
I can’t claim any artistic input for this, I just found an image on line, turned it into a path in inkscape, then cut it.
The small F in the middle was actually slightly too small for the 3mm bit, and Estlcam wouldn’t cut the horizontal parts, but it wasn’t too hard to move the machine around by hand (with the steppers off) to cut them. Is there a better solution? (other than a larger piece of wood!)
The vacuum hose is positioned to hold sheets of foam down while needle cutting, but it’s actually quite convenient to slide up through the bracket for milling wood. Similarly the speed control is for the vacuum, which doesn’t need to be at full power to hold a sheet of foam, but I guess I could use it for it’s intended purpose at some point. Rather bizarrely it came with a belt clip on the back, and no way to screw it to the bench. What do people normally do with them?
Also, now I’m cutting wood, I should probably think about keeping the chips out of the electronics (and my printer!) - would a low fence work, or is anything less than a full enclosure a waste of time?
In Inkscape, after converting the image to a path, you could use the “Edit Paths by Nodes” tool (icon is a arrow with blue dot at the tip) to adjust the path to accommodate the tool diameter…
It’s designed to fit a 500x760mm sheet of foam-board (the stuff that plane is made from). The tubes are 800x1050, overall it’s about 50mm bigger so the wires clear the walls. The foam sheets fit inside the wooden ‘corners’ that you can see on the base board.
It’s quite easy to deflect the router a few mm when it’s in the middle of the table. The gantries bend slightly and the central assembly twists, magnifying the movement. This isn’t a problem for the needle cutter, which has almost no load, but I imagine it would lead to the bit wandering around if I tried to take a heavy cut in a large piece of wood.
I’m still not sure how deep a cut I can take with a carving bit, but 1mm z steps was definitely over-cautious - and I should have spent some time with the artwork making sure all the gaps were the same size!
I picked it because it was attached to the center assembly, not the z-axis, but I don’t like the flimsy 1mm thick tabs into the XYZ bracket, or that it limits both Y and Z travel.


