Actually, I had already swapped out for the flex one, I was just getting ready to insert the z axis and thought I’d ask while it would still be easy to change.
Now that I have all the pieces together and the belts on, I’m still seeing the wobble I asked about a few days ago. It seems to be worse on the Y axis, but both X and Y have some. Any idea what I might need to tighten up here? I’ve been reluctant to tighten the clamp bolts - there’s so many warnings against crushing the bearing risers - but maybe they’re just not tight enough?
While I was waiting, I thought I’d see if it was just that the clamps weren’t tight enough. Managed to crack one in two places. I had printed them on my Prusa with a .6 nozzle, but now I’m reprinting all of them on my d-bot with a .8 nozzle, 3 perimeters, and higher infill.
Still wondering what else might be causing that wobble, though.
Yessir. Just double checked - core_clamp_c_primo.stl.
I printed new ones overnight. I need to leave in a few minutes, but I’m going to swap one out and see if it fits better before I leave. Let me know if you have any other ideas on what I might check.
The other thing to do is swerve off of the instructions. You can put in the tension bolts to clamp down the core clamps first, then install them on the Core. Then loosen the clamp bolts and install the rails.
Okay, I’ve actually tried a bunch of stuff and I think I’ve got it locked down - at least, the wobble is greatly reduced.
Things I did:
Loosened the clamp bolts and tightened the tension bolts first, as Ryan suggested. That did have a big effect on one of the axes. I did a bunch of other stuff, but each time I reassembled, I tightened the tension bolts first.
One of the core clamps was upside down (facing the wrong way). Don’t know if it really matters, but I did flip it around, I also replaced all the core clamps with stronger ones (the ones I printed on the d-bot with .8 nozzle).
Swapped out the 5/16 x 1 1/2 inch bolts, which were not fully threaded, for the old 1 1/4 bolts from the Burly build, which are fully threaded. They do not fully engage the nylock and I’ll be replacing them as soon as the fully threaded ones come in from Amazon, but they did seem to also help with the wobble.
Everything seems better, so I’m going to start on getting it wired up. Thanks everyone for the help!
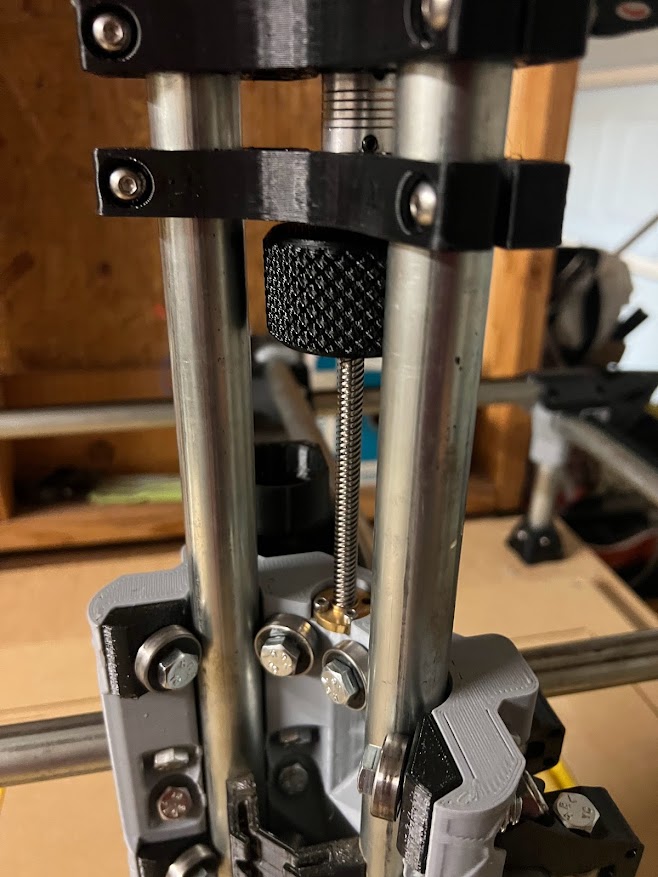
My old builds had a knob clamped on the all-thread, that made it easy to manually run the z axis up and down. Is there a design for something similar for the new lead screw?
Here’s a link to mine. I had to drill out the center with an 11/32 bit to get it to fit. This is probably because of printing thick walls with a .8 nozzle. Another printer or different slicer settings might get the hole dialed in better. Needs two 5mm square nuts and two M5x16 socket cap screws.
What could make a truck hang up like this? I’m putting steady pressure on the x axis, and this one truck starts and stops, like it’s binding and letting go. I’ve tried it while holding both trucks and applying equal force, and it’s only this one the starts and stops like this. The belts are installed on all trucks. Before the belts were installed, the trucks all moved freely. The belt that’s hanging is not tight at all - it’s pretty loose.
Most likely just the sides getting out of square while moving it by hand. Different tension on the belts will cause one side to move easier than the other side and they’ll bind. Once they’re driving under power it’ll go away.
Thanks everyone. I did try pulling evenly on both sides, and made sure no wires were touching, and got the same results. I’m going to ignore that for a bit wait to see how it performs once it’s moving under it’s own power.
Figuring out cable chain mounting and running wires now.