First of all, I’d like to say that I’m having alot of fun with this machine. Finally got over a few bumps and was able to print a 20 mm X 20mm cube and it came out pretty good (at least I think for a 30 x 40 MPCNC Pics attached). I built it basically for my hobby which is building RC aircraft, but I figured, what the heck, lets get a extruder as well. Now I have a problem! I want to build another one specifically for 3D printing (aka MP3DP- Milled/Printed 3D Printer) and I have to convince wife my that another hobby is a good thing !
Now for the serious stuff…
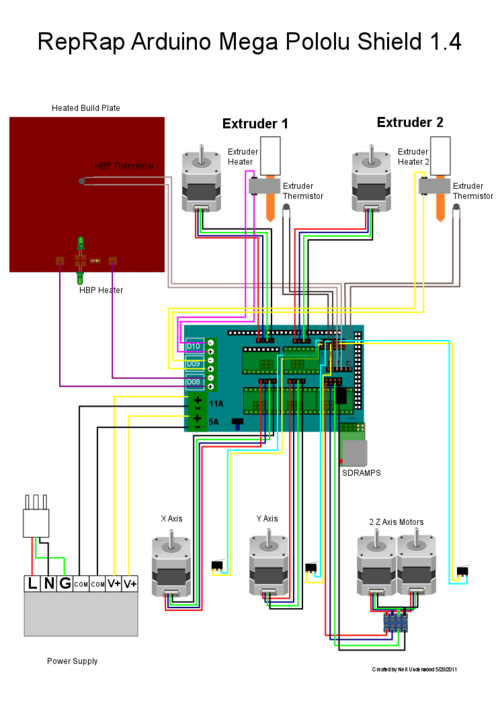
I’m about to upgrade the power supply for a heated bed. I found this wiring diagram (pic attached) and want to confirm that this is correct for a 360Watt 12 Volt 30Amp power supply. Also I have the following questions:
Do I need to change anything on the firmware for the PSU upgrade. My understanding is the ramps, that I purchased here, is already configured for a heated bed, but do I have to do anything else for the PSU upgrade?
The PSU I purchased can be adjusted for voltage. What Voltage do I set it to?
Where do I connect the the heated bed thermistor? I know that the heated bed power supply is connected to D8…correct me if I’m wrong.
Eventually I’m going to print a control box for housing the Ramps and LED (which I still need to connect). I want to add and 1 or 2 cooling fans to the control box. Would I just connect them in the same way the I connected the “always on” extruder fan?
I also purchased an Emergency Stop Button from here. How do I wire it…between the ramps and the PSU?
1)Yes, and no. You need to enable the bed in the firmware. Just make the bed thermistor 11 just like the first extruded is.
2)Adjust it to what you purchased, if you buy a 12v power supply run it at that. The ramps can handle a lot more.
3)Next to the hot end thermistor T1.
4)Yup, 1 should be fine, 2 is overkill
5)It can handle anywhere, most are uncomfortable with putting it on the power side. so the 12v side is fine. It is for emergencies so hopefully you never actually use it.
Prints look good the pointy one is freaking amazing.
Thanks for the response. This is probably a stupid question, but I’m not 100% sure how to go about editing the firmware. Do I launch the arduino software then plug the board into my laptop via the USB and edit it from there? Do I need to have the power supply plugged into the ramps board?
Hmmm, if you have’t flashed firmware before you need to install a library…Let me try and find a video…or just release the RC8 bug fix with the edits pre made for you.
Thanks for the response again. I ended up downloading the RC7_MPCNC_LCD_9916 firmware, made the edit and flashed the board yesterday. Seemed to work. I do have a LCD screen but have not attached it yet. If the RC8 bug has been resolved, can you send me the link? I get kinda confused as to which link to download from on the website.
Currently doing some more tests prints…here’s a thin wall column 20x20x150.
 !
!