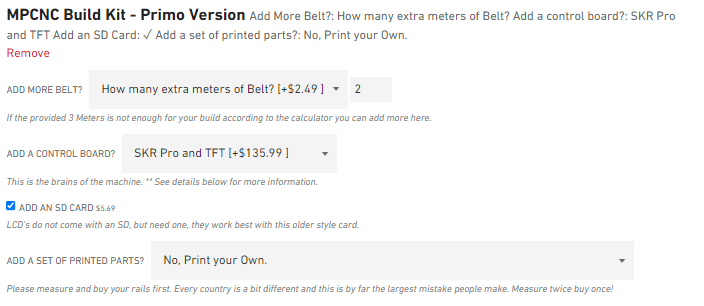
Since wiring is not in the kit, where and what do I need? What about end stops? I imagine there is a list somewhere that explains this, but I could not find it.
Also, what else am I missing that is required for this build (I have the pipe and printing parts as we speak)?
I appreciate any input. I am hoping to prevent ordering wrong parts and wasting a bunch of money!
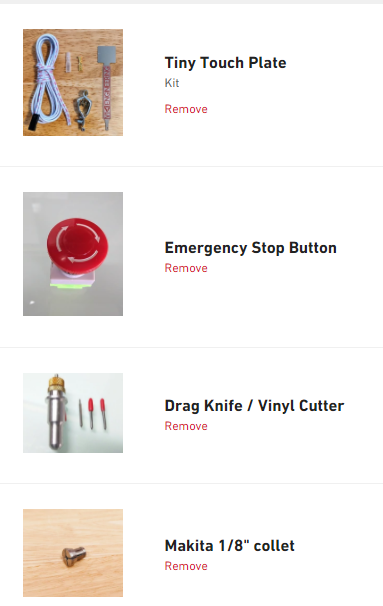
I had ordered the endstops and z touch plate too. Honestly, I haven’t put them on yet, nor set up the touch plate, but will get to it someday. Currently, I have hard stops set up that I hold the x and y axis up to when powering up. Then move the x and y to the origin of the material to run. Write down the x and y value before setting them to 0. If I have to restart a job, just bring the axis back to the stops then move x and y to the values previously written down for the material origin, then set them to 0. I haven’t had an issue restarting in the right spot after a tool change.
Again, someday I’ll put them on… just having too much fun making things right now!
If you want endstops, you need 4 switches. In addition, I advise four enstop plug wires. These will allow you to better match your stepper wiring to your endstop wiring.
I recommend snipping off one end of the plug wires and directly soldering to the switches. They should be wired normally closecd (NC).
I would advise against this emergency stop button. It is best if your emergency stop button interrupts the power to both the router and the control board, so you will be putting it on a MAINS (110V AC) line. Amazon sells similar buttons that include an enclosure that are UL rated for MAINS power for not a lot of money. In addition, a power strip mounted so that the off button is prominent will accomplish the same thing (though slapping the button when things go wrong is satisfying).
On another note, if there is any chance you will need more stepper wiring than is provided in the kit, I would purchase a second wiring kit. It makes the build plug-in-play and avoids a bunch of soldering to extend wires. Whether you need a second kit partly depends on the size of the machine, but also depends on how/where you plan to setup your control board with repect to your machine.
Thank you all for the replies. I will definitely find a MAINs Estop. I am not sure if I will start with switches or not, but I want to go ahead and get everything.
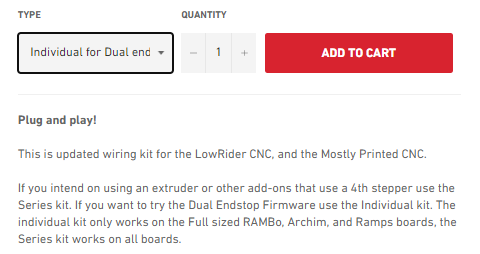
@robertbu thanks for the detail. I added the end stops and plug wires. I looked at the wiring kit and it seems with the SKR, I will need the series option which isn’t available. Is this correct? (I am a little confused as I thought the SKR gave option of dual end stops as well as a 5th stepper, but that is not what is said on the Wiring Kit page).
Series wiring is always an option, but the SKR will also support dual endstop wiring (Which can also be used without the endstops, if you don’t want them.) Only if you have a board that has fewer than five motor drives do you need the series wiring.
Thanks for the reply. I guess I am still a little confused on the wiring as to what is needed and what is “best”. Per the store page, the individual wiring kit does not support the SKR. Am I misunderstanding something?
That’s an interesting oversight in the shop. @vicious1 should probably edit that description.
For the record, I am using a dual endstop wiring kit with an SKR Pro 1.2 on my LowRider. The dual endstop kit will work on all boards that the V1 shop currently sells (Even the ones out of stock.)
Edit: I believe that the V1 shop used to sell the mini RAMBo, which only has 4 drivers, and could not use the individual wiring kits.
This looks good. One wiring kit comes with the MPCNC build kit. You may or may not need the second one. Personally, I had to extend my wires (30 x 24 working area), and I wished I’d purchased a second kit rather than having to do all the soldering. If you need it, you won’t need all four, but I did not find any comparable wiring (Dupont ends, longish, thicker gauge) from other sources.
The only other thing V1 sell that you will need is endmills. The ones he sells are good quality. My only hesitation is that I broke a notable number of bits during my early learning curve, and I wished I’d done my learning on a cheap 10 pack from Amazon and saved the higher quality bits that I purchased from V1 for when I was more experienced.
Thanks @robertbu . I appreciate the advise. To me, it is worth having extra just in case. Cheap bits makes sense to begin with actually. I looked at the V1 store, but honestly I have not looked into which bits I should start with. I have heard good things about Bits and Bits as they have a coating that is supposed to greatly prolong the bit life; however, getting started if I am breaking bits often, long-lasting is very useful.
I might grab a few V-bits and such here before I place the order.
This is getting into a whole different discussion, but I am not sure exactly what I need and what works the best with this machine.
-Single vs 2 flute?
-Downcut, upcut, or compression? (I understand the differences and have used a router before, but not sure which is easiest for learning or if it matters. Downcut will give me a better top surface, but also limits chip extraction? Compression is supposed to be the best of both worlds?)
-1/8" vs 1/16"?
I have no problem buying nice bits, but need an idea of which style to get. I assumed 2 flute gave a better finish, but I have read many people on this forum suggest a single flute.
Most my cutting starting out will be wood and plywood I imagine. In fact, my first project idea is to build an enclosure for my 3D printer using 1/2" plywood.
I built my machine a couple of years ago when the Primo was first released. Does this change in selling the series wiring kit mean this documentation needs updating? Is the series no longer the recommended way to do it? I have endstops I never used and would like to try to add them but I think I would need to change from series wiring to parallel, correct?
It depends on what you want to use the end stops for. If you only have one stop per axis to determine machine position you can continue to use series wiring. If you want auto-squaring, using the dual-endstop configuration, then you’ll need to change your wiring so that each stepper motor is connected to a dedicated stepper driver.
There’s nothing wrong with series wiring, just that as it currently stands, the V1 shop no longer carries any boards that don’t have at least 5 motor drivers, which means that there’s less need to choose series wiring.
The advantage is like running higher voltage power, in that you lose less motor torque at speed. Series wiring means that you get twice the back EMF from the motor speed, and each motor “sees” half the voltage. Individually wired motors, each with their own driver has greater potential, and rather than have custom made series wiring harnesses, simple straight through connectors are fewer different parts to stock in the shop, and fewer potential problems for those of us building the machines.
This does NOT mean that you need endstops. The firmware will be configured to be able to use them, but you do not need to.
These questions illustrate we need better docs. A big benefit of only selling one kind of wiring and shipping with one kind of firmware is that the user should not have to become an expert in the details of that choice.
You should feel confident that you don’t have to change anything though. Your setup is fine.
If you have a 5 driver board, then you can switch to the independent drivers for each motor. If you do that, you can also choose to add auto squaring. Either way, you can use your endstops to find the min position (but I recommend against that, since the 0,0 for CNC is the work piece, not the machine).