MPCNC Primo Tornado - Z Independent Dust Collection

Hey All,

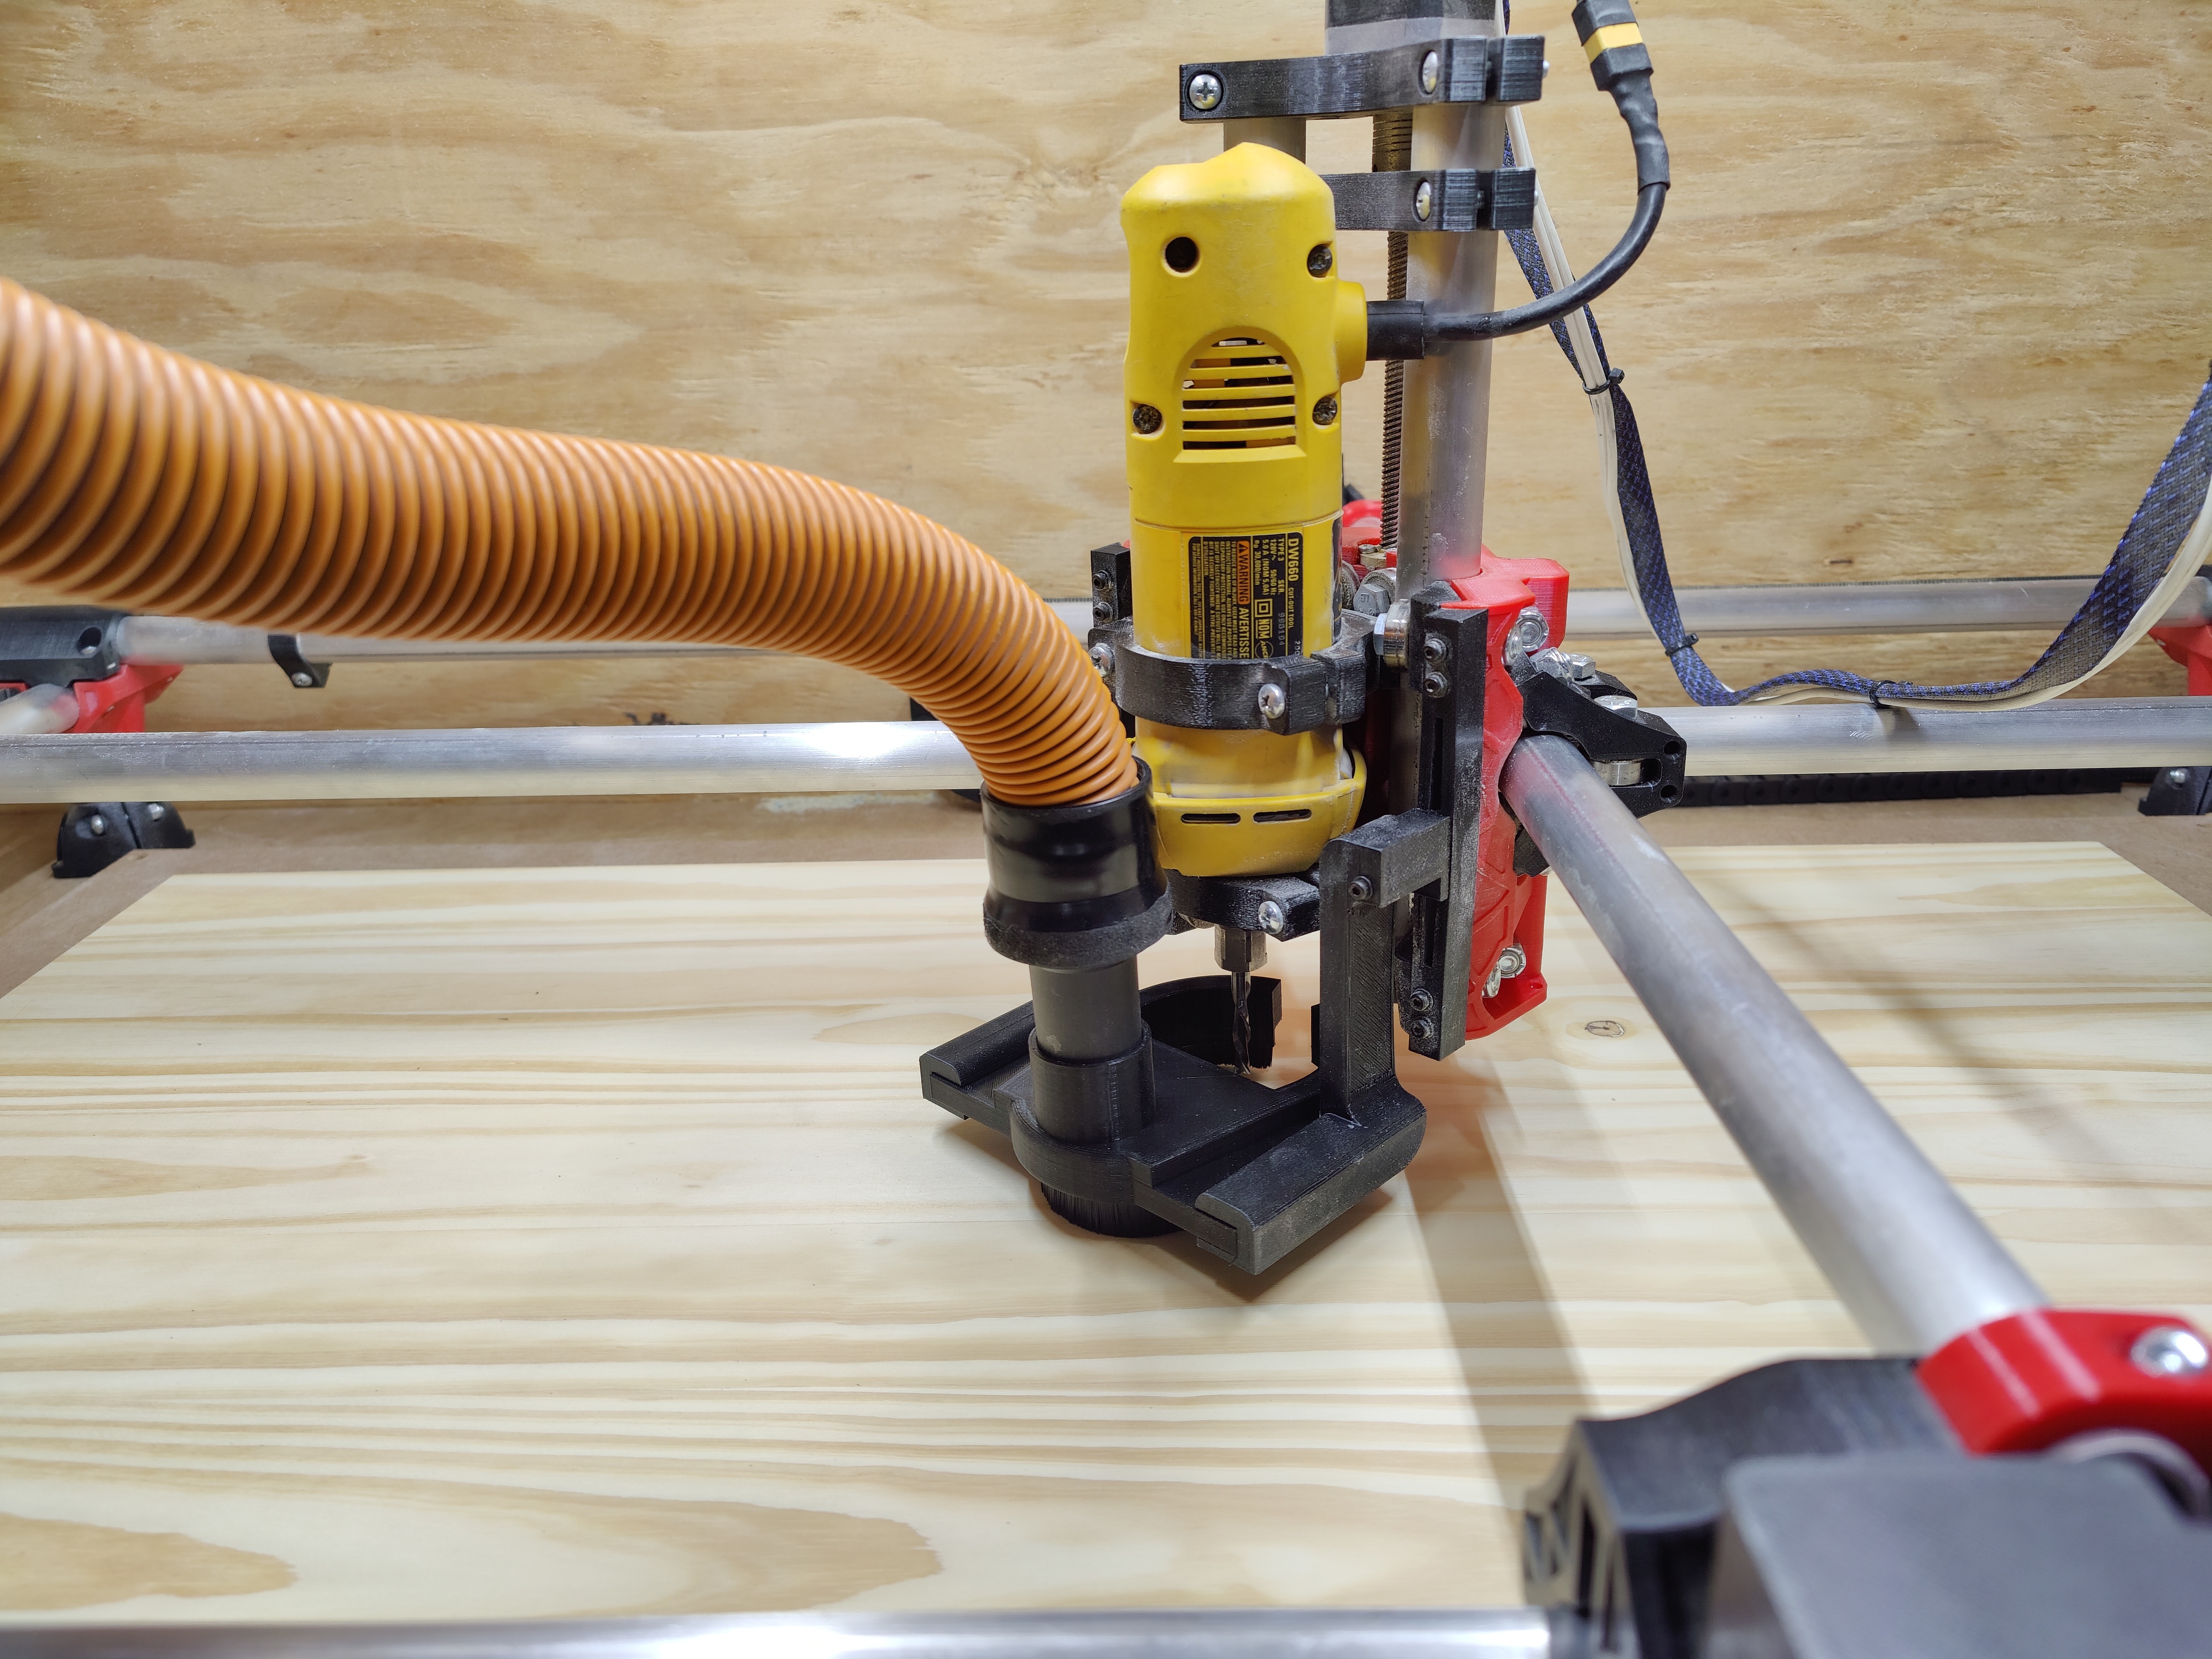
I recently was looking for a decent dust collection system that was Z axis independent.
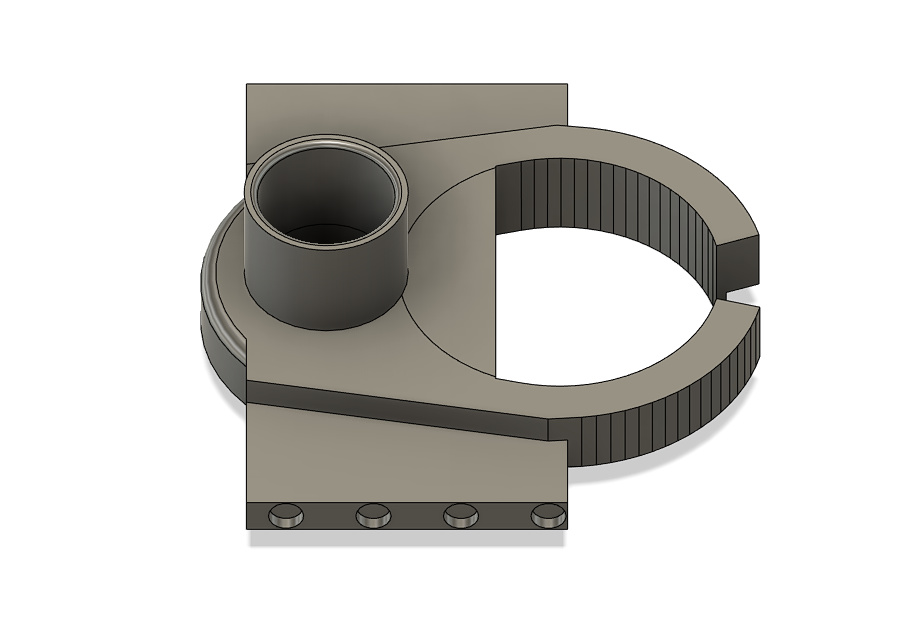
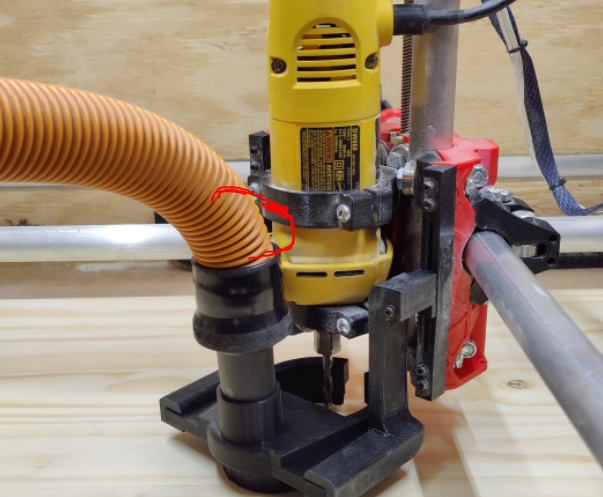
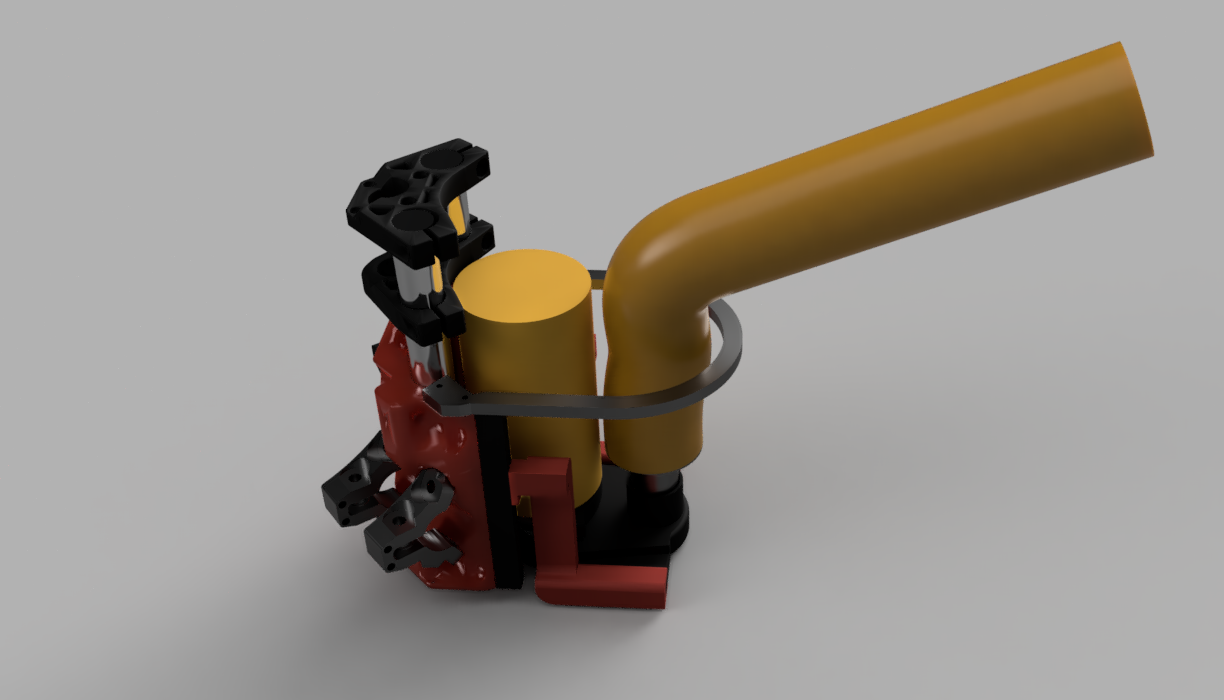
After a bit of digging, I determined I was going to design one up myself. This design allows you to set the height of the dust shoe and lock it in so it doesn’t move when running the CNC. The dust shoe is held in by 8, 8mmx3mm magnets and allows you to easily add / remove the shoe when setting up your work.

DISCLAMER: You will loose about 3inches of X Y cutting area, you will have to adjust endstops to account for this. I am trying to figure out a good way to work around this, if you have any ideas, I’m all ears.

Demonstration Video
Thingiverse Link (STEP File on thingiverse for remix / hose resizes)


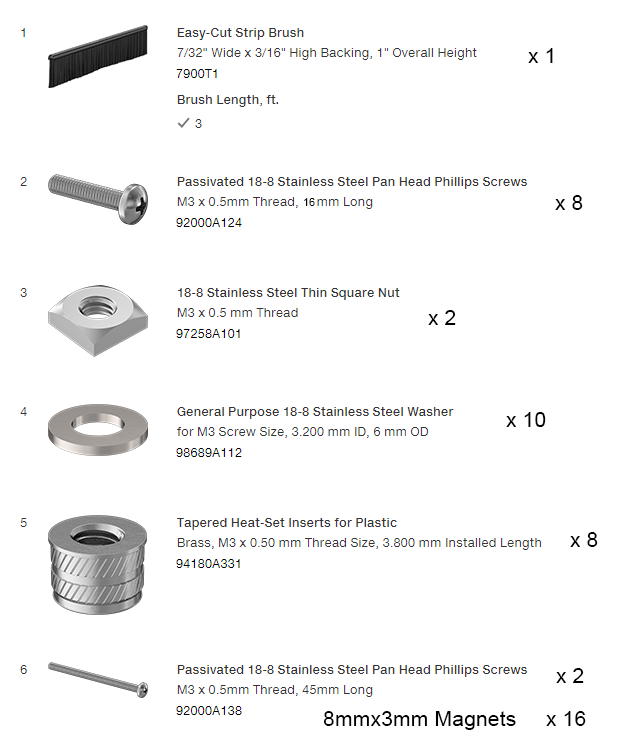
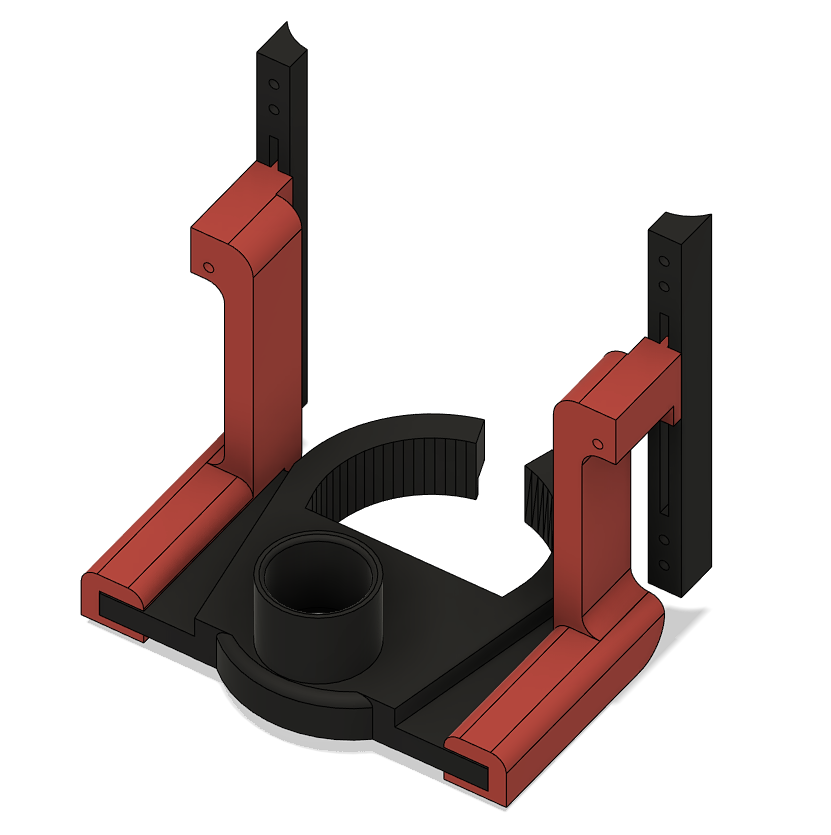
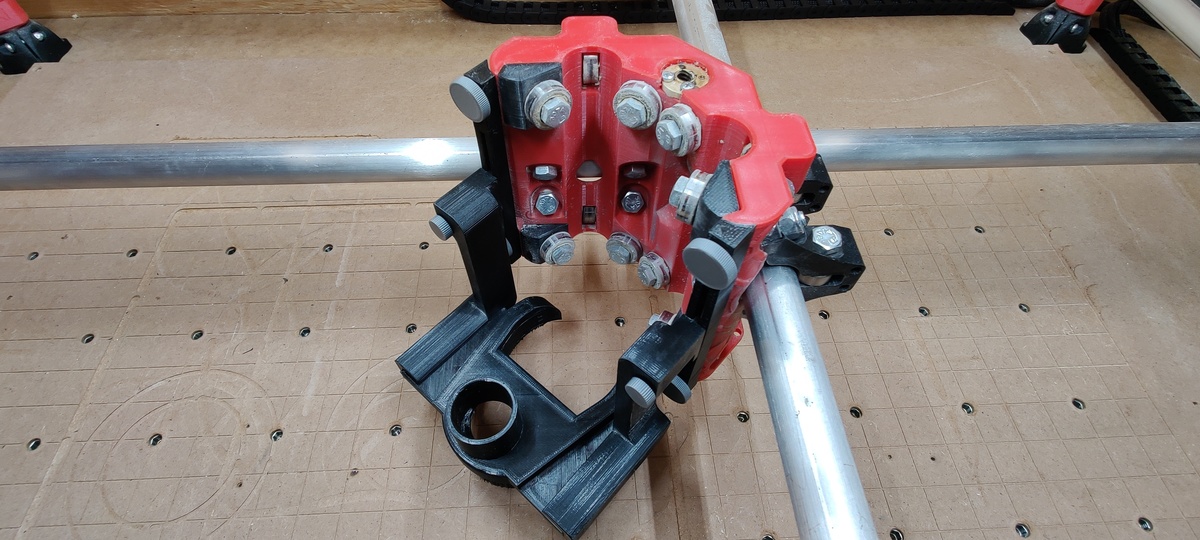
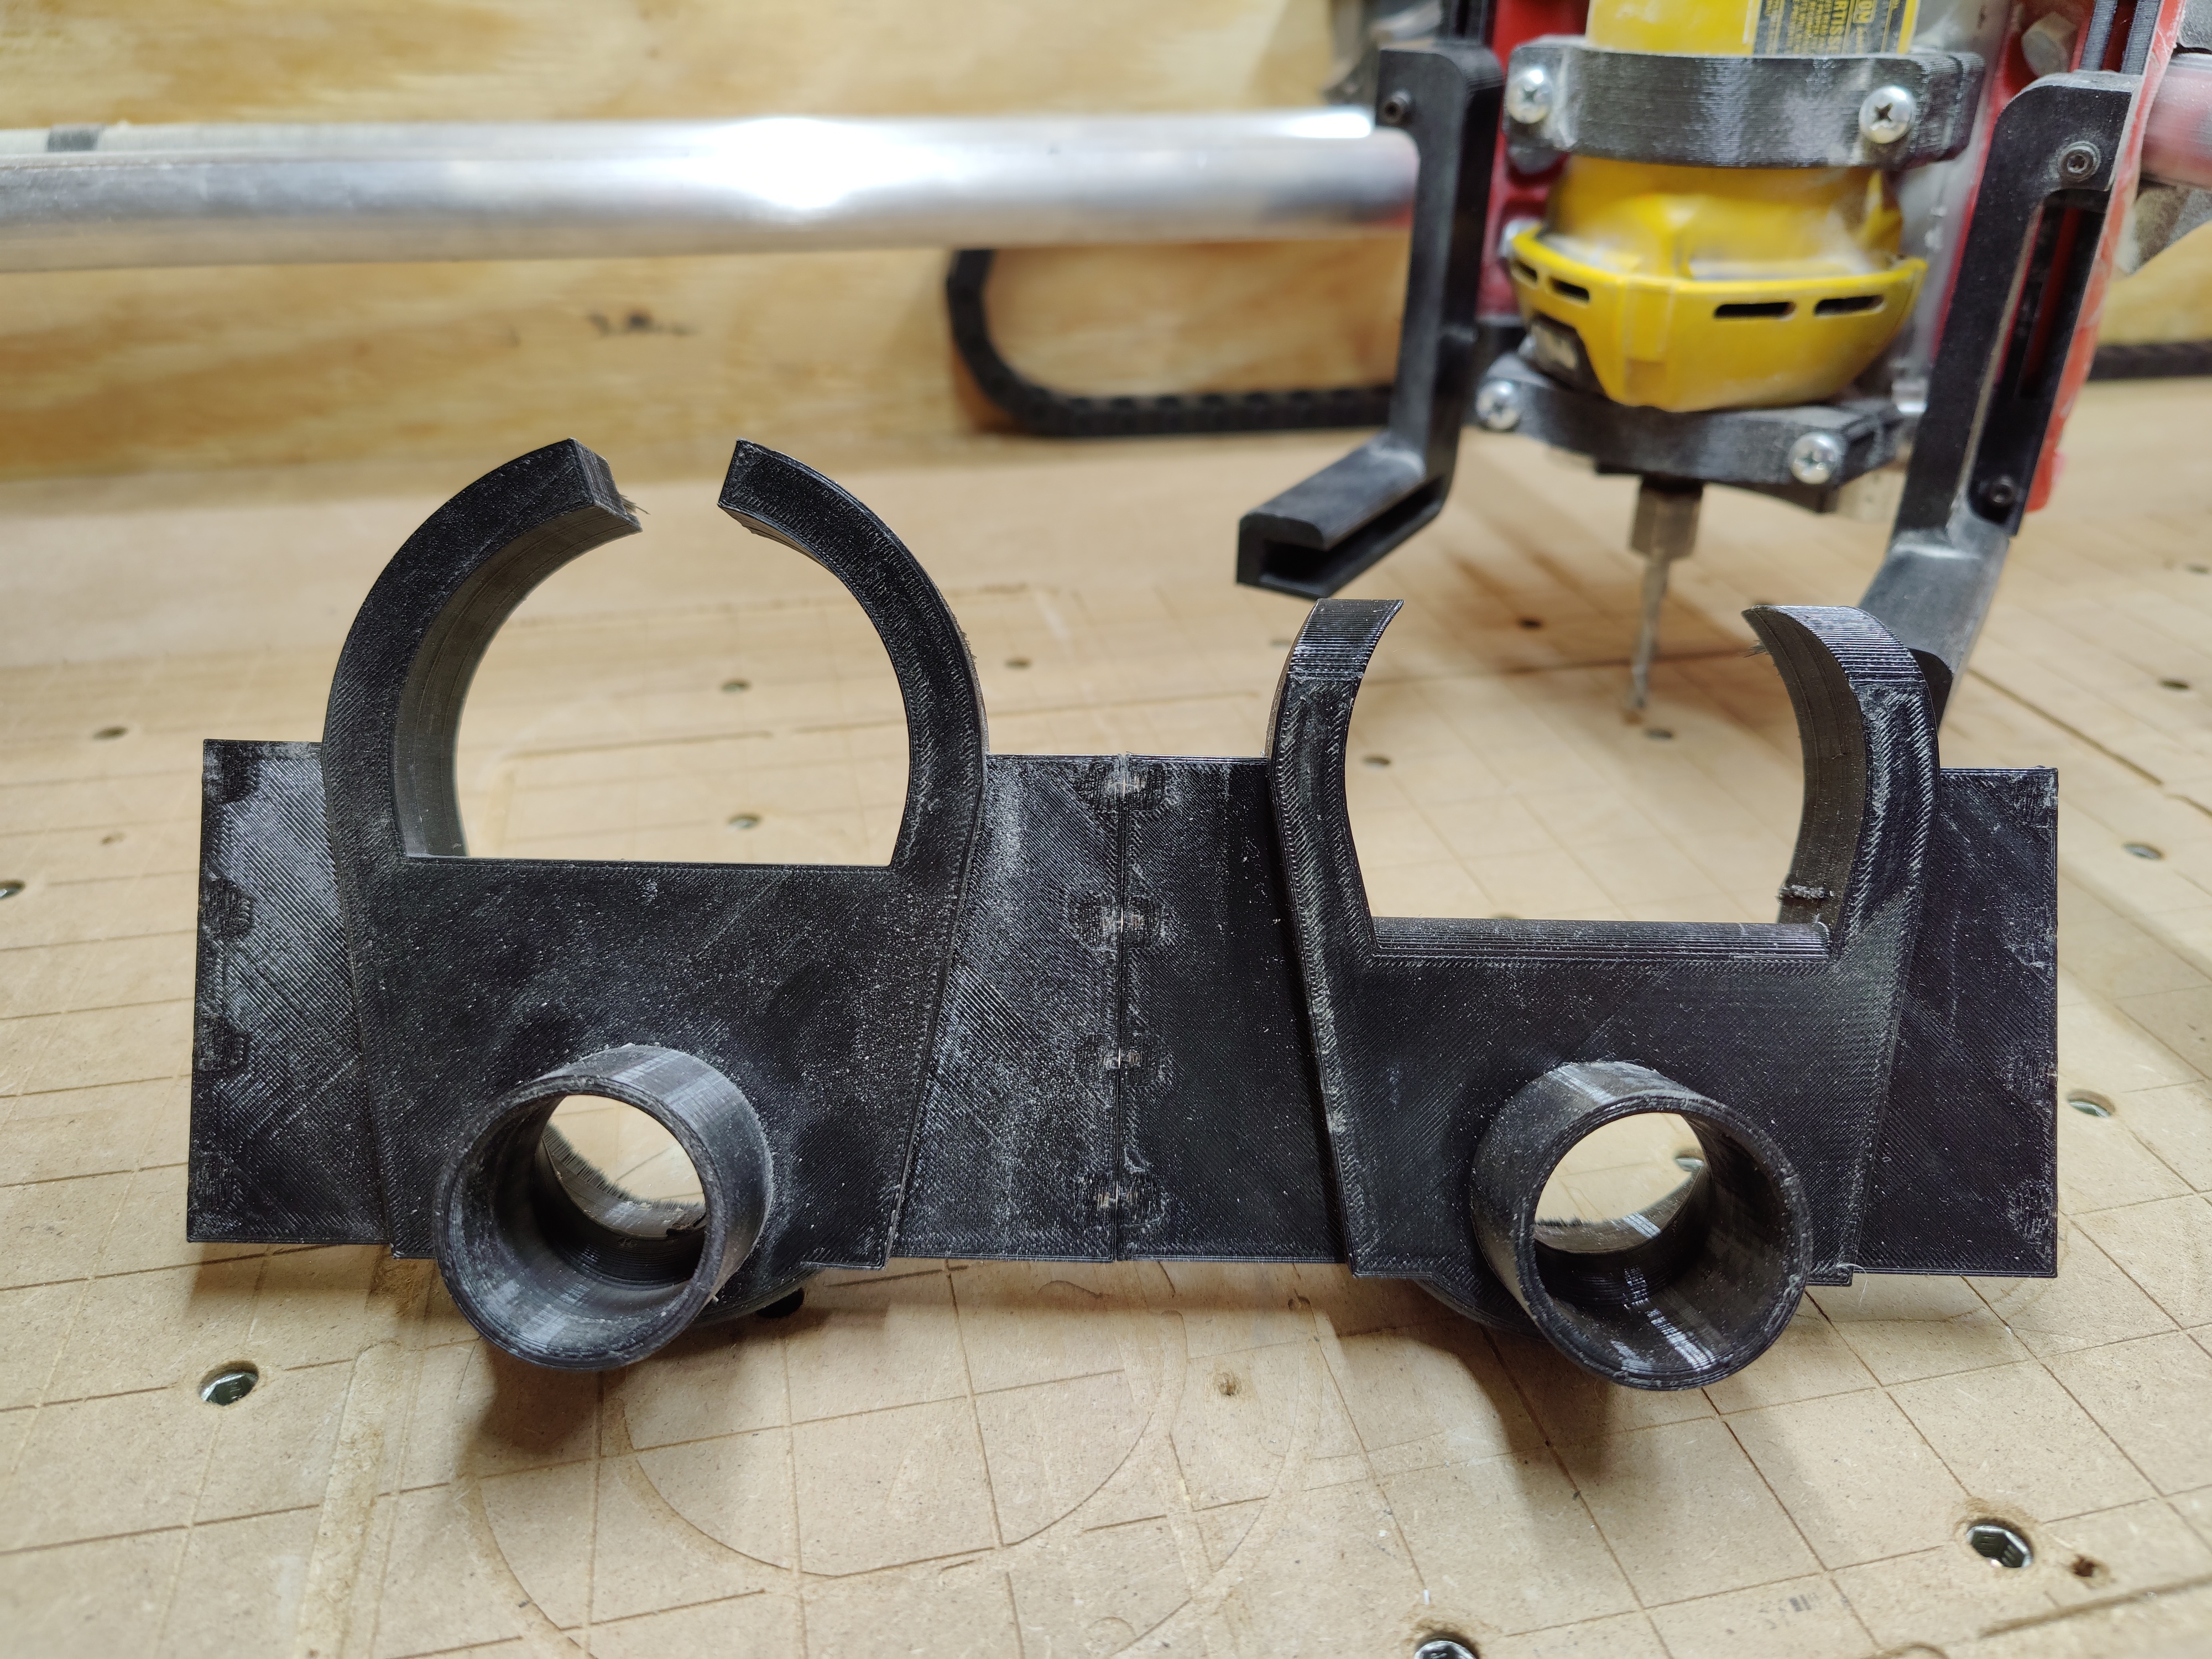
My design has two “rails” that attach to the core via M3 Heated Inserts and M3 16mm machine screws. The easiest way to figure out where to place the inserts is to hold the sliders up onto the core and then to take a pick and poke through the 8 holes on the slider to mark on the core where to drill.

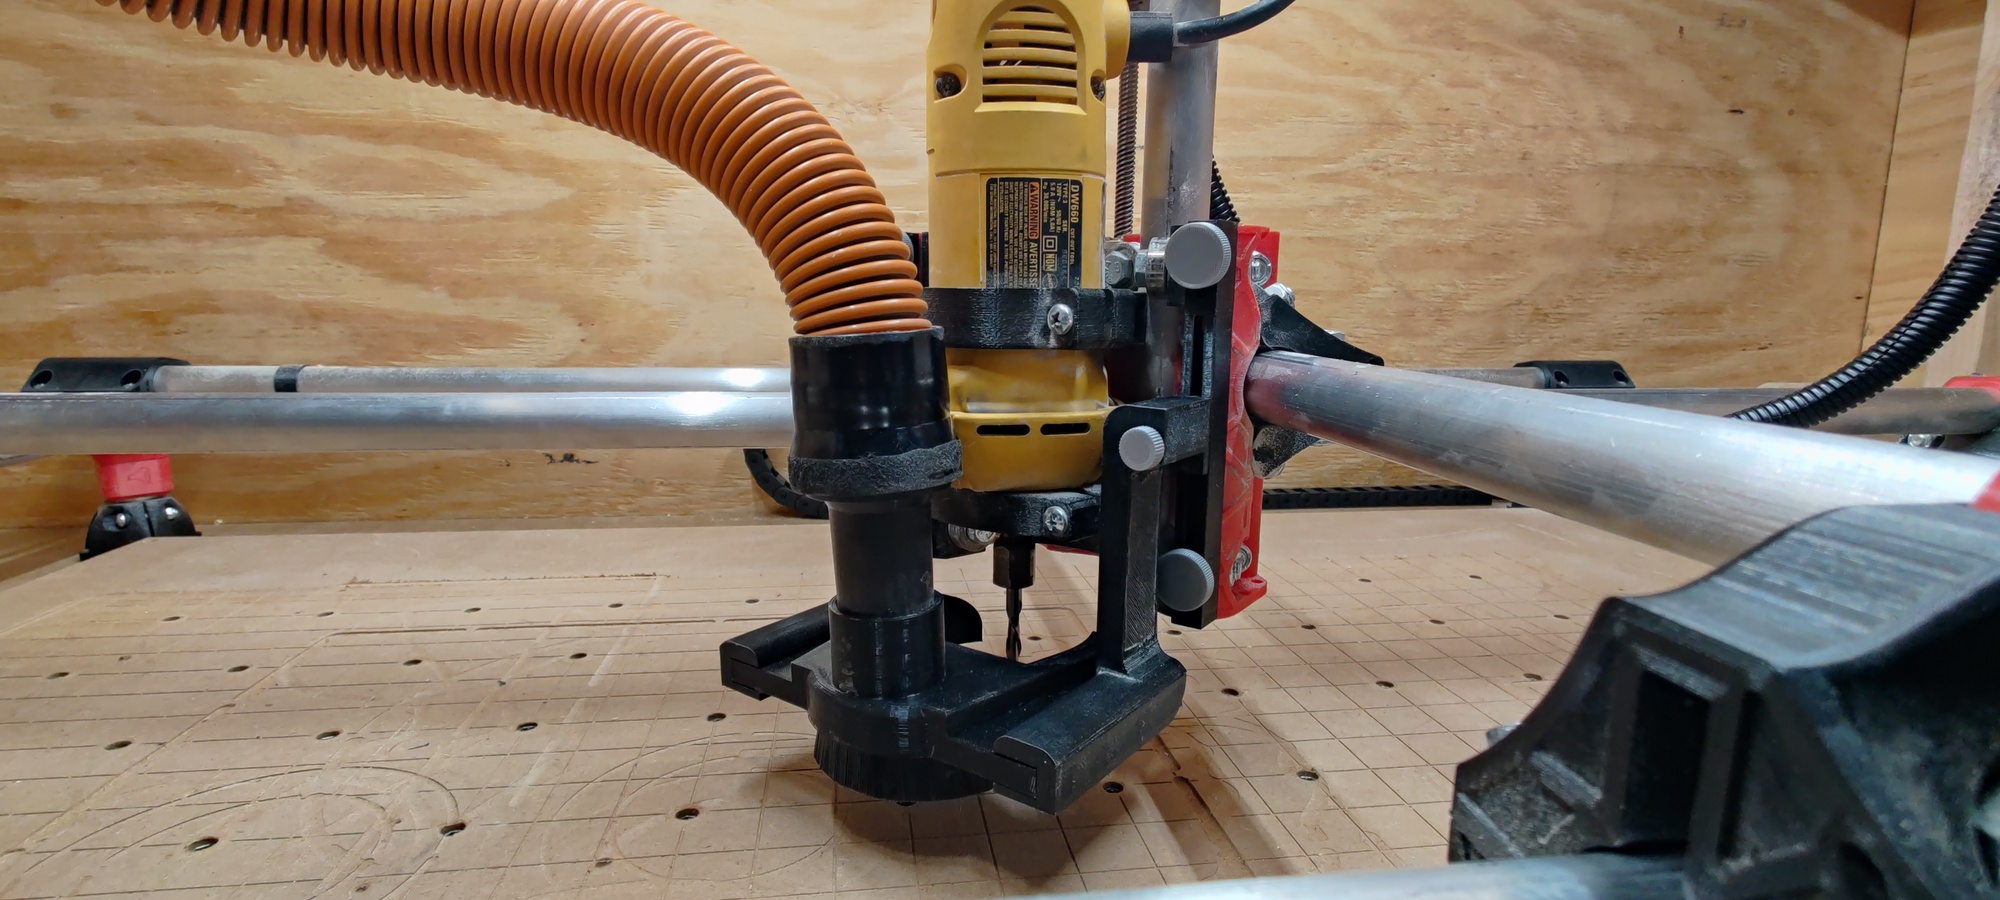
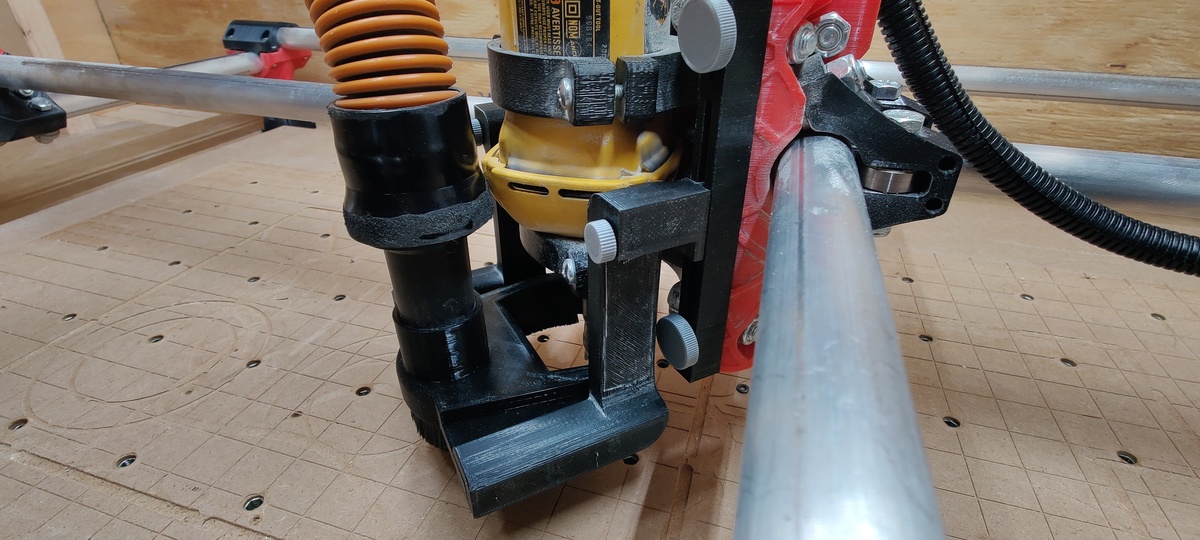
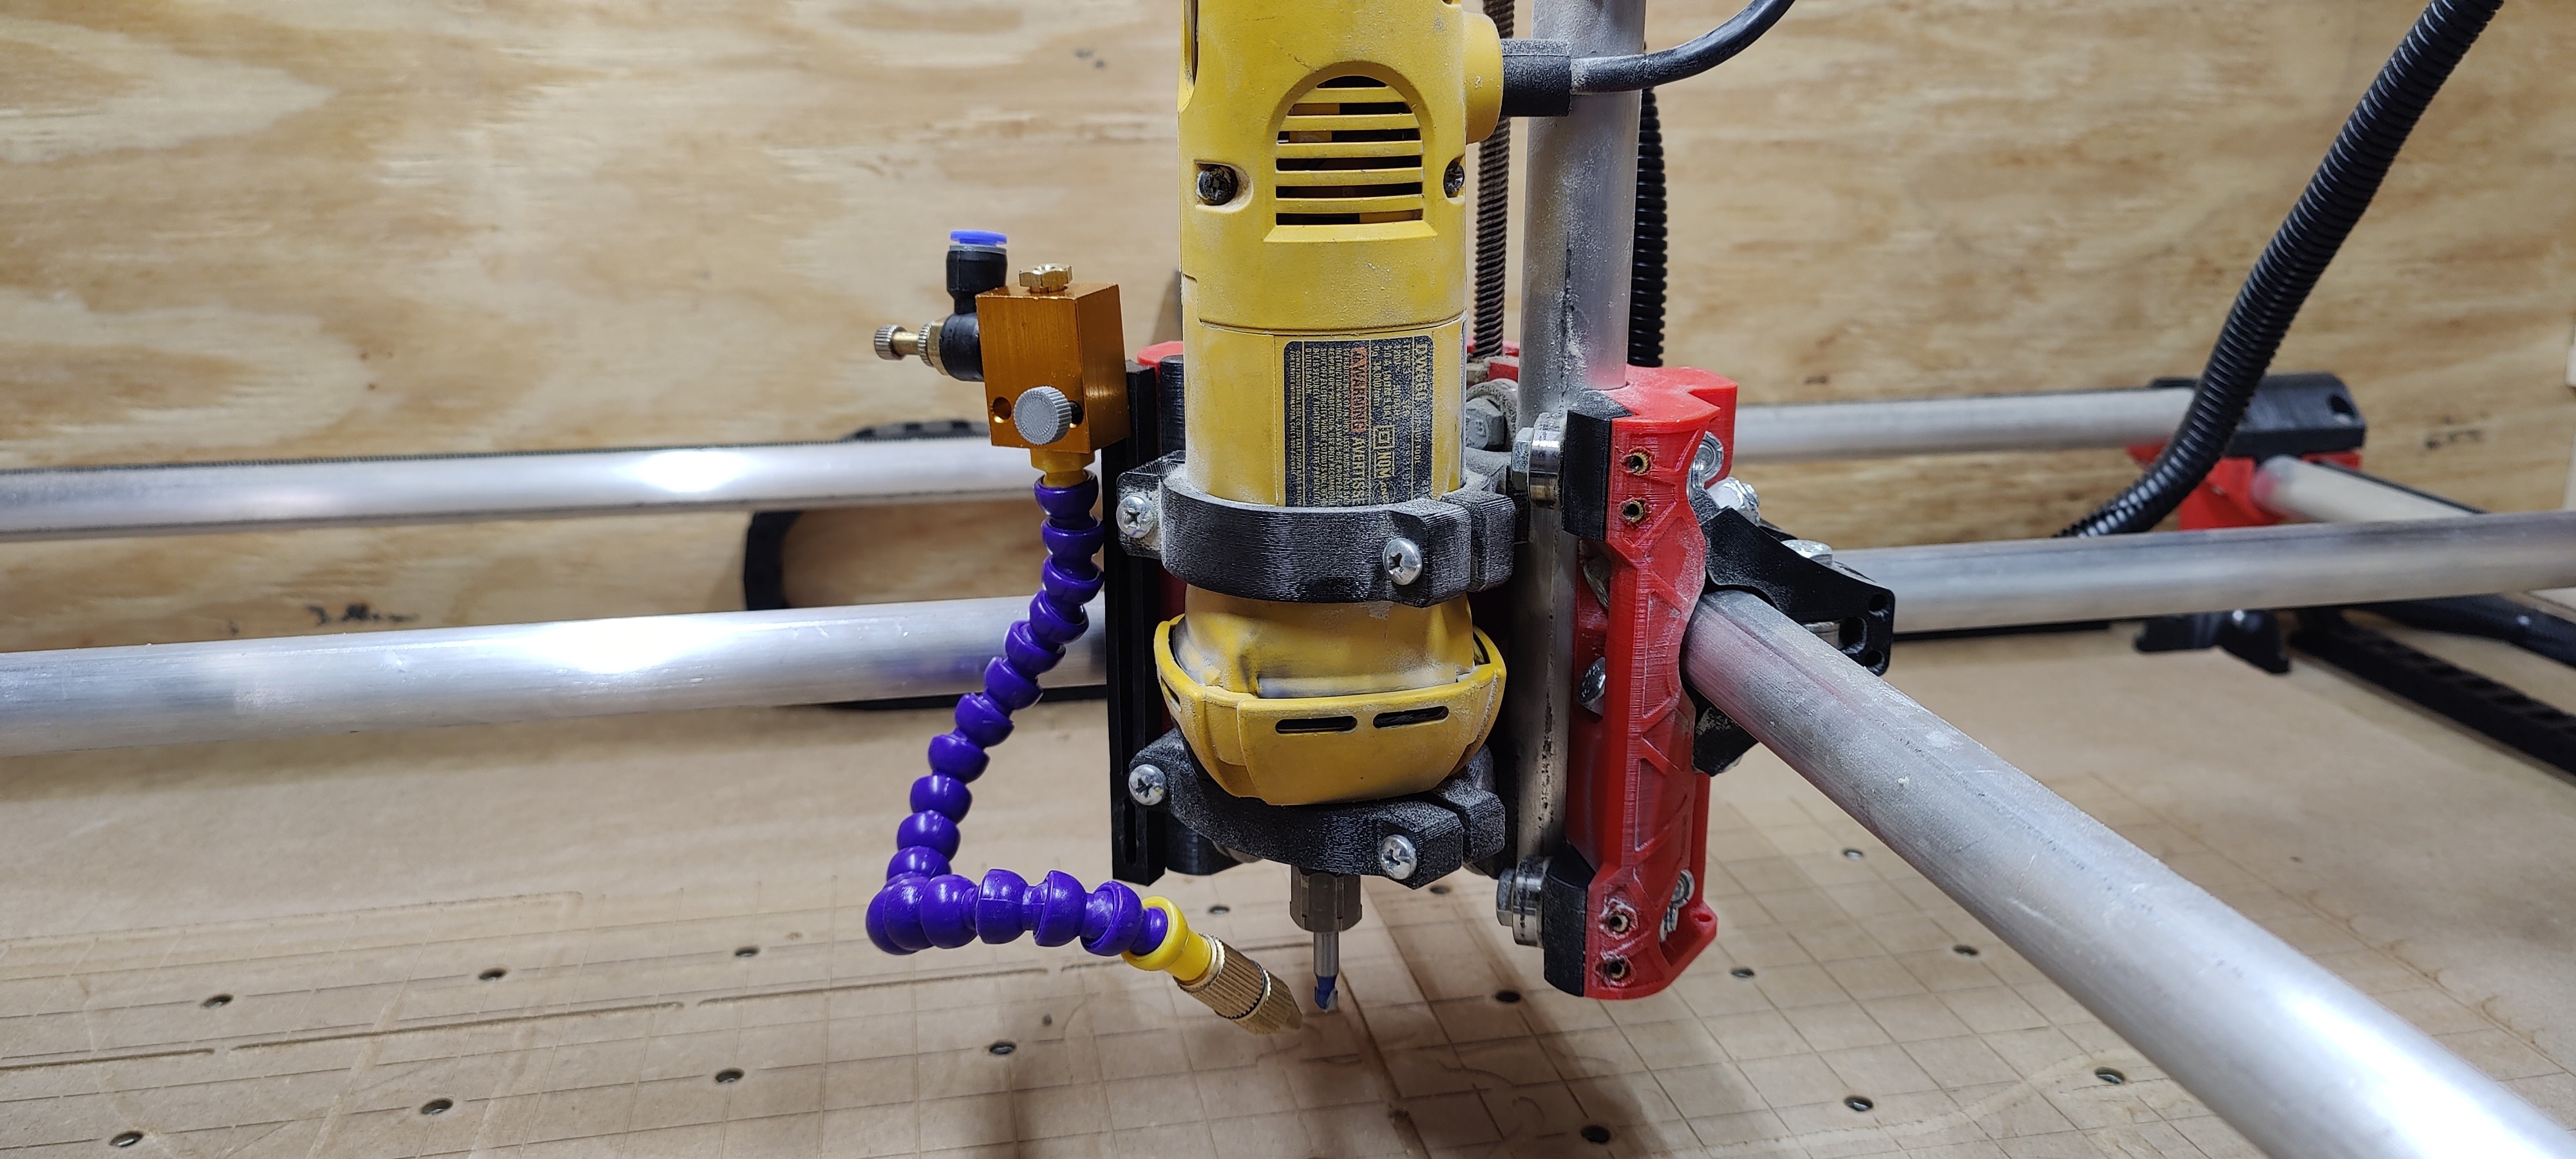
Once you have the holes, take off your router. I’d recommend just hand screwing the lead screw and taking the whole Z assembly off the core and setting it a side for now.

Then, take a drill bit that matches the size of the M3 heated inserts and drill into the core at the marked locations from your pick. At this point, we can take our inserts press them in using a soldering iron. I used 300C on my soldering iron to do this.

Next, take the M3 16mm screws and washers and attach the slider to the core.

You will want to go ahead and press in the magnets into the arms and dust shoe after attaching the slider to the core. (Make sure your magnets are in the correct orientation)

Once the magnets are in, take the square M3 nut and place it into the slot on the back of the slider rail. Take an arm assembly and an M3 45mm and washer and attach the arm to the core, don’t crank it down. Repeat for the other side.

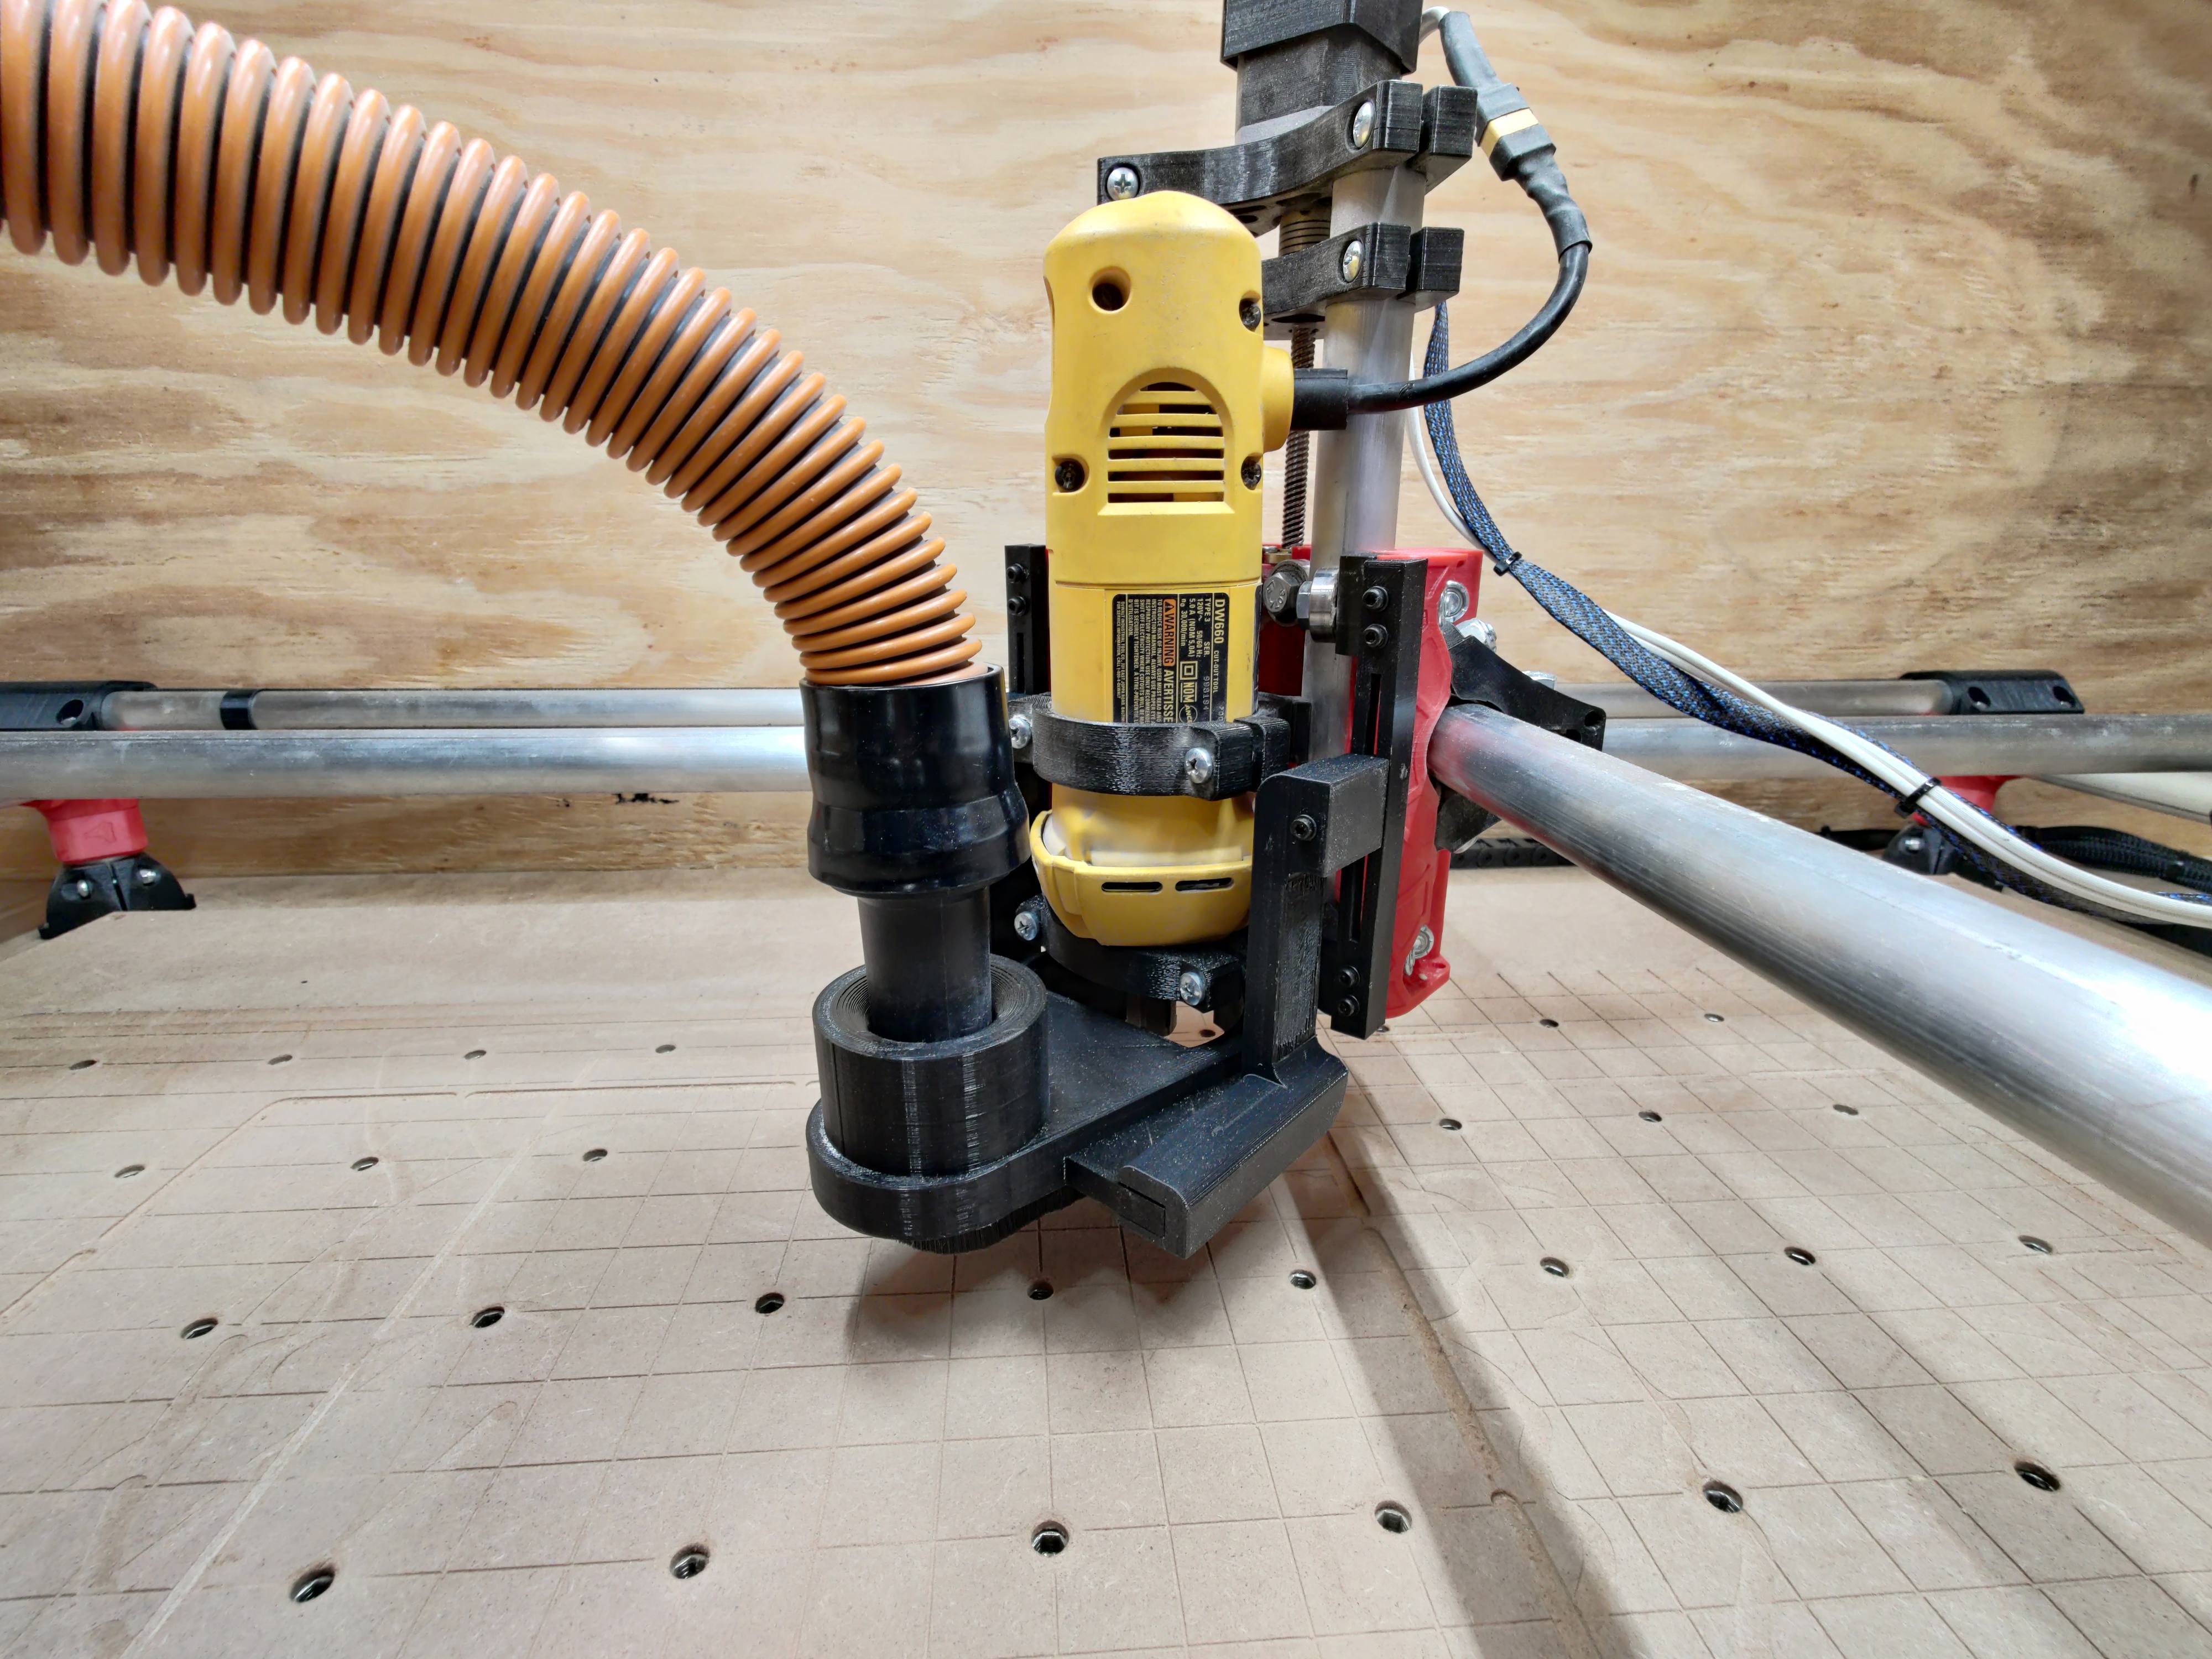
Finally, take your Easy Cut Strip brush and press it into the dust shoe. At this point, you should be able to slide it into the two arms and test it out.

I ended up cutting 3/4" MDF after attaching this dust collector and I was very impressed with how much it picked up. I’d say it got about 90% of the MDF dust.

Feel free to remix my design, I’m open to suggestions on how I can make this a better system.

7 Likes

Update: I’m going to try to alter this a little bit. I need to condense the shoe a little bit and move the hose inwards. Its a bit bulky. Will post when finished and update thingiverse with the new stl.

Alright, I think this condensed version of the dust shoe is going to be the next experiment. I’m loading up the printer now. Hopefully this saves some space.

OLD:

New / Condensed Shoe:

2 Likes

Had to move the vaccum inlet back a bit to clear the DW660 moving up/down.
Introducing V2.1

Condensed shoe. More clearance on the arms in hopes to avoid trucks when homed.

Files have been updated on thingiverse.

1 Like

V2.1 fits and works well!

Looks pretty good!

I would anchor that hose to the core clamps and you should have very little accuracy impact from it. Nice job!

Thank you! I was looking for a good way to secure the hose. As of right now, it appears to be fine kinda free floating but secured to the top of the enclosure but I was thinking about mounting it to the top dewalt mount.
Something like this… a half circle with a notch for a ziptie or something to hold the hose. Would that cause any issues?
image

Edit: now thinking about it… if the dewalt moves, the hose moves with it. I’ll have to come up with something else for that.

What do you think about something like this?
This would guide the hose along with the core instead of mounting it.

I really don’t want to use a zip tie mounting method as it would be a PITA every time I want to remove the dust shoe out of the magnetic arms. I’m thinking something that guides the hose would be better. Does anyone have any thoughts? :man_shrugging:

What about using velcro straps instead? I have some with hooks on one side, loops on the other made for holding wiring, hoses etc. out of the way when working on a car that have good holding power.

Velcro may work, I’ll give that a try.

It would be best to loop it around and use the two holes on the core clamps. Those screw holes are ideal for mounting things that add forces to the cutting head. Mounting it to the Z axis/router in anyway will impact the accuracy.

The amount of force hoses add are exactly why I have not ever made a dust shoe.

My plan for the primo was to 3d print most of the shoe (large print) below the rails, come in from behind the rails and under, the hose would be attached near the clamps.

Chunk of 1" pvc conduit a few feet long bent so the end is over the center of the table, then hang the vacuum hose off that.

I was looking into doing something that, mounted behind / under the rails but didn’t come up with a feasible solution.

V3 being tested out.
Even more compact dust shoe and ease of life adjustments for the sliders.

Alright, here it is. V3. Renaming this Project to “Tornado”, you can find it on thingiverse as “MPCNC Primo Tornado - Z Independent Dust Collection

I’m feeling really good about the current status of this project!

So some changes for V3.

Redesigned Sliders:

  • Sliders now hold the M3 Square nut in place, it will no longer fall out the back of the slider.
  • Sliders now have a slot for adjustment if the heated inserts are not perfect.

M3 Thumbscrews:

  • I designed up some thumbscrews as seen in the photos (gray circles). A dab of superglue and press into place, may even need to tap with a hammer to get it to set it right.
  • There are two sizes, the smaller ones on the arms to help clear the trucks, larger ones for the sliders for easy removal.

Condensed Shoe V3:

  • I was running into issues when using endmills with a smaller stick out where the shoe collided with the inner DW660 mount. This redesign chops a good portion of the shoe off to clear the inner DW660 mount.
  • This noticeably does not pick up as much dust as the V2 shoe, however, it does a fair job.

Shoe Comparison
In the Thingiverse package, I include all 3 dust shoes for you to pick which would be best for you.

  • Shoe V1: Biggest, has the largest surface area for vacuuming.
  • Condensed Shoe V2: More compact than the Shoe V1, allows homing of X Y axis after end stop adjustment. (Endmills with >1" stick out)
  • Condensed Shoe V3: Even more compact than Condensed Shoe V2. (Endmills with <1" stick out)

I have been switching between V2 and V3 shoe depending on what endmill I am using.

The STEP file is included in Thingiverse for modification / addons as you see fit. As always, I just ask that you post it as a remix on Thingiverse.

Tornado V3: Photos!

6 Likes

V2 Shoe on left verses the V3 Shoe on right.
I forgot to post this the other day when when I made the project update.

My final parts for the MPCNC are being printed as I type. They will be finished by morning. I will be using a DeWalt 611, as that is what I have on hand. Do you have any thoughts on whether or not this shoe would have enough clearance for that model? I do not have access to the 660 for comparison. Thanks in advance for any feedback.

I believe it will work out. I think that if you have issues with anything, it will be the shoe not clearing the 611 mounts.

I’m not too sure what the 611 bottom inside mount looks like. Are you able to take a few photos around the 611? I may be able to work the model if it doesn’t work out for you.

Doing some prototyping / thinking tonight on how to mount air assist onto the Sliders.
Once I have a solution, I’ll update the thread / thingiverse post with the STLs.

The nice thing about making a modular mounting system that integrates into the core is that I don’t have to redesign a new mount when attaching something. You can rather make an “accessory” for the Tornado.

1 Like