I am just posting a quick question here since I am not sure what’s happening. I tried cutting some aluminum today on my mpcnc and I broke 3 1/8" bits one after another. I didn’t know what was happening until I checked to see how deep the cut was and where the bit broke. I noticed that on my panel I would see -3.00 when the cut started, I decide to zero Z about 15mm above the starting point to be sure.
Once the print started I saw on the panel that it would go down to -3.00 even though I am telling it to only go down 0.10 - 0.50 its not doing that. Can anyone give me a suggestion on where to look to see why its doing this?
When I was cutting into mdf everything worked fine as that material is soft, whether it was going too deep or not I didn’t even notice because I didn’t break any bits. But since moving to aluminum I was not that lucky.
I have my setting like this to test but it doesn’t make a difference.
I played with the depth per pass down to 0.40, 0.30, 0.10 but it still plunges straight down 3mm.
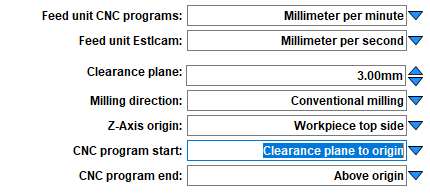
I’m only an occasional EstlCAM user, but when problems like this show up on the forum, usually it because the Basic Settings are setup something like this:
Or possibly you have CNC program start set to “Above origin.”
So the clearance plane is 3.00 mm above the stock, and the CNC program start is set to the clearance plane. That is, EstlCAM thinks it is starting 3mm above the stock, so it moves down 3mm to start cutting. If this is the case, change CNC program start to “At Origin.”
The clearance plane is the setting where it will pull the tool for rapid moves.
Also, are you setting Z=0 to be the top of the material.
Make sure that you are setting Z=0 (Or setting your Starting depth) to the top of the material. Make sure that your clearance plane is above this height. (Or is above the top of the material, if y ou are setting Z=0 to be the machine spoilboard.)
Thanks guys, I knew it had to be a setting but I wasn’t sure where to look and what to look for. When I get home I will check the settings to see what I have.
To answer the question, I do have my zero set to the top of the material and not the spoilboard. Once I set my Z to zero I move Z up about 2mm and then click print. My starting depth is always set to zero the default.
I will check and test when I get home and let you guys know.
I just checked my settings on my laptop and this is what I have, it looks like everything here is set correctly. I think this is how I set everything up when I was following the guide on building the machine,
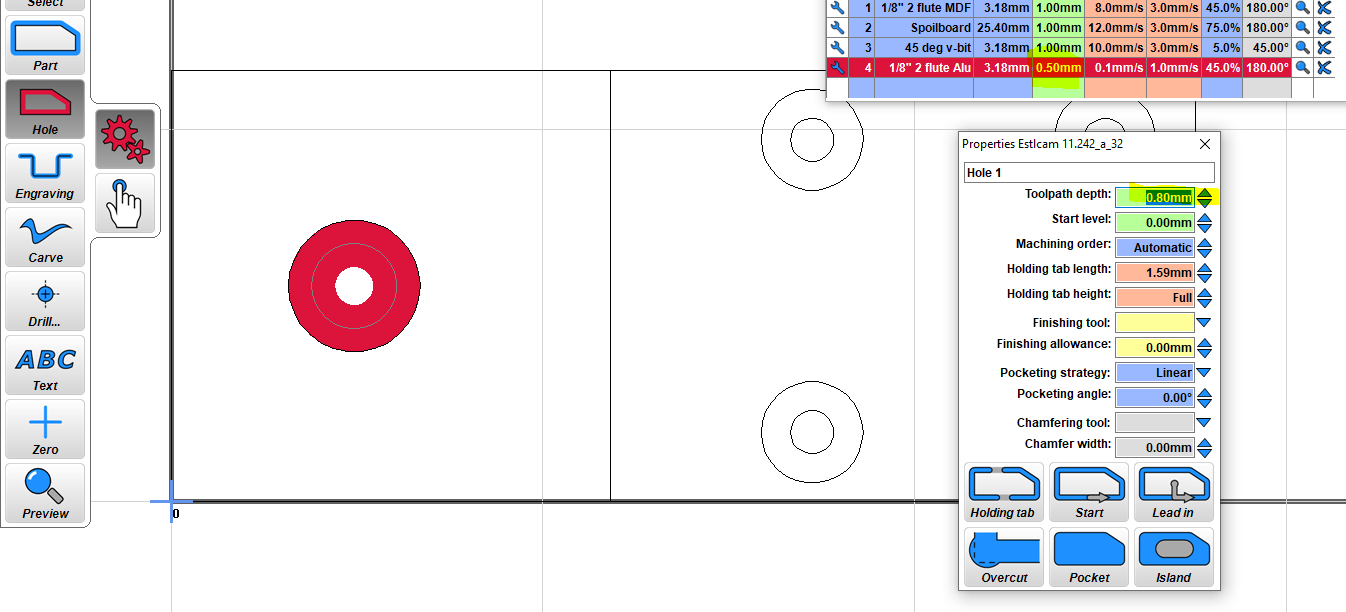
This is what I am seeing now. I know there was nothing with a ‘3’ in any of my settings so I started looking at my config to cut the material. I was under the assumption that the toolpath depth is how thick the material is. But once I changed that value to 1mm, then 0.8mm I noticed that when the job starts it goes to that number.
If I am using the program incorrectly then where do you tell the program that you only want to cut lets say 5mm out of a 10mm piece of stock.
All of my scripts are commented out in every area, I m glad you mentioned to look there as I was wondering why the spindle moved up 30mm after the job so I commented that out.
That is exactly what I thought when I set everything up according to the help tips that popup. I have re-flashed this rambo board because I thought something was corrupted in the eeprom. Nothing changed after that so it couldn’t be the firmware.
I really don’t know where to look anymore, maybe I just need to stick with wood cutting.
Here is the drawing I am working with in case anyone wants to take a look.
When you run that Slider-test.gcode file, are you saying it cuts down 3mm from the top of the material (which would be Z=0)?
That test file only cuts a total depth of .8mm and you should be able to “visually verify” that by previewing it in Estlcam as well as other free software such as Camotics.
What are you using to run the gcode file and communicate with your MPCNC - SD card, Repetier-Host for example?
Exactly, I had 3mm as my DOC and Z would plunge down 3mm into the stock and break the bit. The only place that I had a 3 was in the DOC. So I did a test to see if that had anything to do with it, once I changed the value to 1mm then Z went down 1mm when the cut started. I then changed it to 0.8 and Z moved down 0.8mm from the zero position. I am using Repetier-Host.
I have to agree with your findings. I just did a few tests and this is my experience.
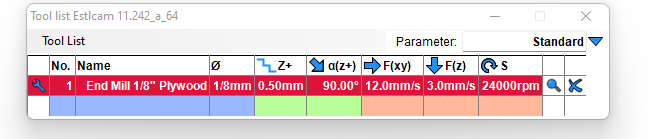
I set the hole parameter to cut 7mm along with a DOC of .8mm and then tried to save as gcode, I was then prompted for a cutting depth even though I already put in the cutting depth.
I looked at the gcode like you said and I could see that the tool settings that I assigned to the cut is not the one being utilized in the cut. I tried deleting the first tool on the list since it was pulling those values and it would not allow me to delete, it said something about the tool being used in the cut. I closed the program and once re-opened I deleted the first tool on the list. It seems like its still not taking the settings from the tool that I select since its still asking me what depth that I wanted when saving the gcode.
It seems that I have found my problem, once you pointed out those areas in the code where I should have those two values and they were not there, it looks like this is my issue. A new update to the EstlCam software was just released and I installed but that didn’t make a difference.
I don’t want to waste my time emailing the author because I have emailed him asking a couple questions weeks ago and have not received any responses.
Are there any other software packages that’s compatible with the hardware that we are using? Rambo board and Marlin.
Once it asks for the cutting depth and I put it in manually the gcode then reflects what I put in. I was checking to see what program the guys in the Sketchup forum uses to post their tiny videos so I can make one and you can see. I am testing this at work and I am seeing the same issue. Maybe I need to uninstall/reinstall.
I uninstalled the program, deleted all the settings left behind and re-installed. Its not prompting for the depth anymore and the gcode looks good. All that’s left is to test when I get home.


")