Hi All,
Hope everyone continues having fun with their builds or in making dust.
I recently added 5W banggood laser to my LR2.
If anyone interested in step by step video on how it’s done as a reference, here’s a link:
This forum discussions on the subject helped me a lot.
Cheers.
Hi Alex,
Thanks for the video. I’ve been trying to work up the courage to add a laser to my setup. Are you able to share the link to the laser that you purchased?
Thanks, Jake
On the topic of lasers, I am wonders which focus type would be best, I know you can get ones where the laser has to be almost touching, have you looked into those? Since the low rider likes riding low, what disadvantages would there be? All the comes to mind is if you have to engrave a curved surface like a bamboo stick with varying focal lengths, does the longer focus allow for more power at the various levels or does it matter?
As for air assist, would an airbrush like setup be the equivalent of the dual fans? How much air makes a difference?
Byron,
I’m not an expert on laser setups by any stretch.
I can’t tell much about options for air assist, I went with what what easy and inexpensive to get or what I had already available.
On the Lens side of things, I think you are correct: “longer focus allows for more power at the various levels”
Thanks for the video! I can’t wait to try it out! Out of curiosity, what program are you using to compile the code? That’s the main problem I foresee running into, especially since you are using the fan speed as the laser control. Maybe this is less of a problem than I expect but I want to cover all my bases before jumping in. Thanks!
Installing a laser has changed since May 2020 when this topic was created. Laser support has been rewritten in Marlin. Assuming you are using a Rambo or SKR Pro board and assuming your laser will handle 5V/3.3V PWM, and assuming you are running a later version of Marlin, it is plug and play to install a laser. The laser will be driven my inline commands or alternately by M3/M5 commands. There is a substantial quality improvement using inline commands vs. using fan g-code commands.
If you have a board other than a Rambo or SKR Pro, you will need to enable laser support and recompile the firmware. This involves changing seven lines in configuration_adv.h and recompiling. The build environment of choice is PlatformIO.
Thanks for the reply! I am actually going to be using a 12v laser. I’ve been trying to find the pins that the laser control on the HMI controls but I am not finding it on any of the pins. I am using the Rambo v1.4 and would have thought it would be one of the fans. Because this is a more recent board do I need to adjust the FW to control one of the fan ports?
So, looking around a little more I found that I am supposed to connect to pin 45(+) and one of the grounds. I don’t have the physical laser yet but when I connect my multimeter to these two pins and set the laser to 255 I still only get around 100mv. I bought my board last summer so I assume that it is a recent enough FW. Any advice for troubleshooting would be appreciated!
What version of the firmware are you using? Laser support was enabled by V1 for the Rambo 1.4 board around version 510.
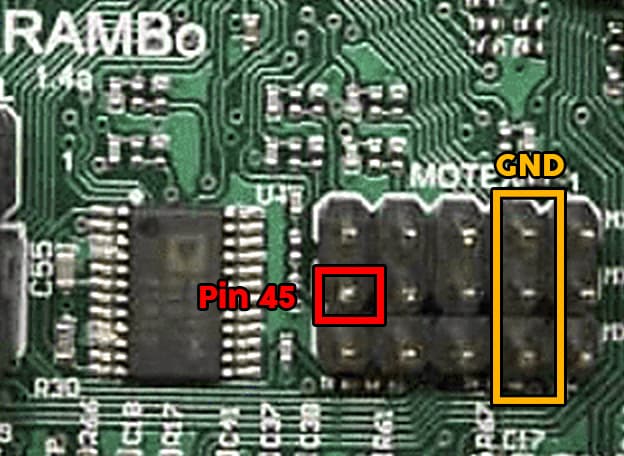
Here is a diagram of the pins to verify that you correctly identified Pin 45:
How are you turning the pin on? If you are using the display, the menu items are poorly worded. You have to turn the laser “off” to put it in manual mode. You can also turn pin 45 on directly using a M42 g-code.
I use a Rambo 1.4 board and a NEJE A40640 driven off pin 45. It was plug and play for me.
May i ask what laser you are usingn a link would be great. I am finding it very difficult to find comprehensive resources on wattage, speed, cutting/engraving capabilities of lasers.
I use the NEJE A40640. When I purchased mine (over a year ago), it did not come with the air assist extras that is in this pacakge. If you did not want to spend that much money, I’ve seen some good feedback on their 5.5W module. My module was plug-and-play wrt getting it up and running on the Rambo board with the V1 firmware.
I find the sales pages for laser modules a real cesspool of misinformation, bait-and-switch, and outright lies. I would recommend only purchasing directly from the manufacturer. I would stick to these five companies:
XTool
Atomstack
Ortur
Sculpfun
NEJE
Even the manufacturer websites for some of these modules are filled with lies, but similar $$$ get similar modules wrt to power. There are a number of laser comparison videos on YouTube.
In my mind, most of the laser module abilities boil down to optical or output power, and dot size. All the other numbers just mislead. It has been argued that for laser engraving, a less powerful module might produce superior results.
A diode laser will not do the things a CO2 laser will do, so you need to set your expectations accordingly. You can take a look at my posts in the “Things You’ve Made” category of this forum to see what I’ve been able to do with the NEJE module. A year ago, it was among the most powerful modules available. Now there are modules at nearly twice the power…unfortunately with a price to match.