Well I finally figured out the path to 32 bit Grbl success. I have 4 axis movement, runs under Grblgru and might also have Laser. I used a pre-prepared .Hex file from this guy:
Thanks Jim.
Unfortunately his Grbl settings are poor for my machine so I updated them all with Grblpanel. I haven’t made my own custom version yet since I will have to figure out Atollic but that will come. The laser wasn’t working properly with the first Hex he has avaiable but CNC with 4th axis works fine.
STM32 bit boards are cheap. FTDI boards are cheap. I got both off Amazon but they are much cheaper from China as usual.
ESP32 boards are faster but have fewer pins available.
Here are the steps if you are interested for flashing a .hex or .bin file to and STM32:
Need a STM32 ‘Blue Pill’ board, FTDI Serial to USB adaptor, Jumper wires, 2 USB cables (one for each board),
Download STMFlashloader Demo and the .hex file from the site above
Change the jumper on the FTDI board to 3.3V
Change the Boot0 jumper on the STM32 board to high (move the top one to the right). Mount on Breadboard.
Connect Gnd to Gnd, STM32 Pin 9 Tx to FTDI Rx, STM Pin 10 Rx to FTDI Tx. Dont need power
Connect the USB cables to your computer with the Windows Device Manager open to see which COM port is for which board
Start STMFlashloader Demo, pick the COM port for the FTDI adaptor
If that program says Target is Readable then move to the next steps. All of the EEPROM pages should be unlocked
On the page showing where to erase, write, etc select the .hex or .bin file from the browse menu – second line down - it defaults to something else but you can select the other kinds
Flash the file. If successful it will say so.
Unplug the boards, move the Boot0 jumper on the STM32 back to low (left two pins)
Connect the USB port to your computer and Grblgru should recognise it. I had a bad cable so it wouldn’t recognize the port but I sorted that out. The pinout is here:
Use the PA0, PA1, PA2, etc row.
13. Have some 32 bit fun
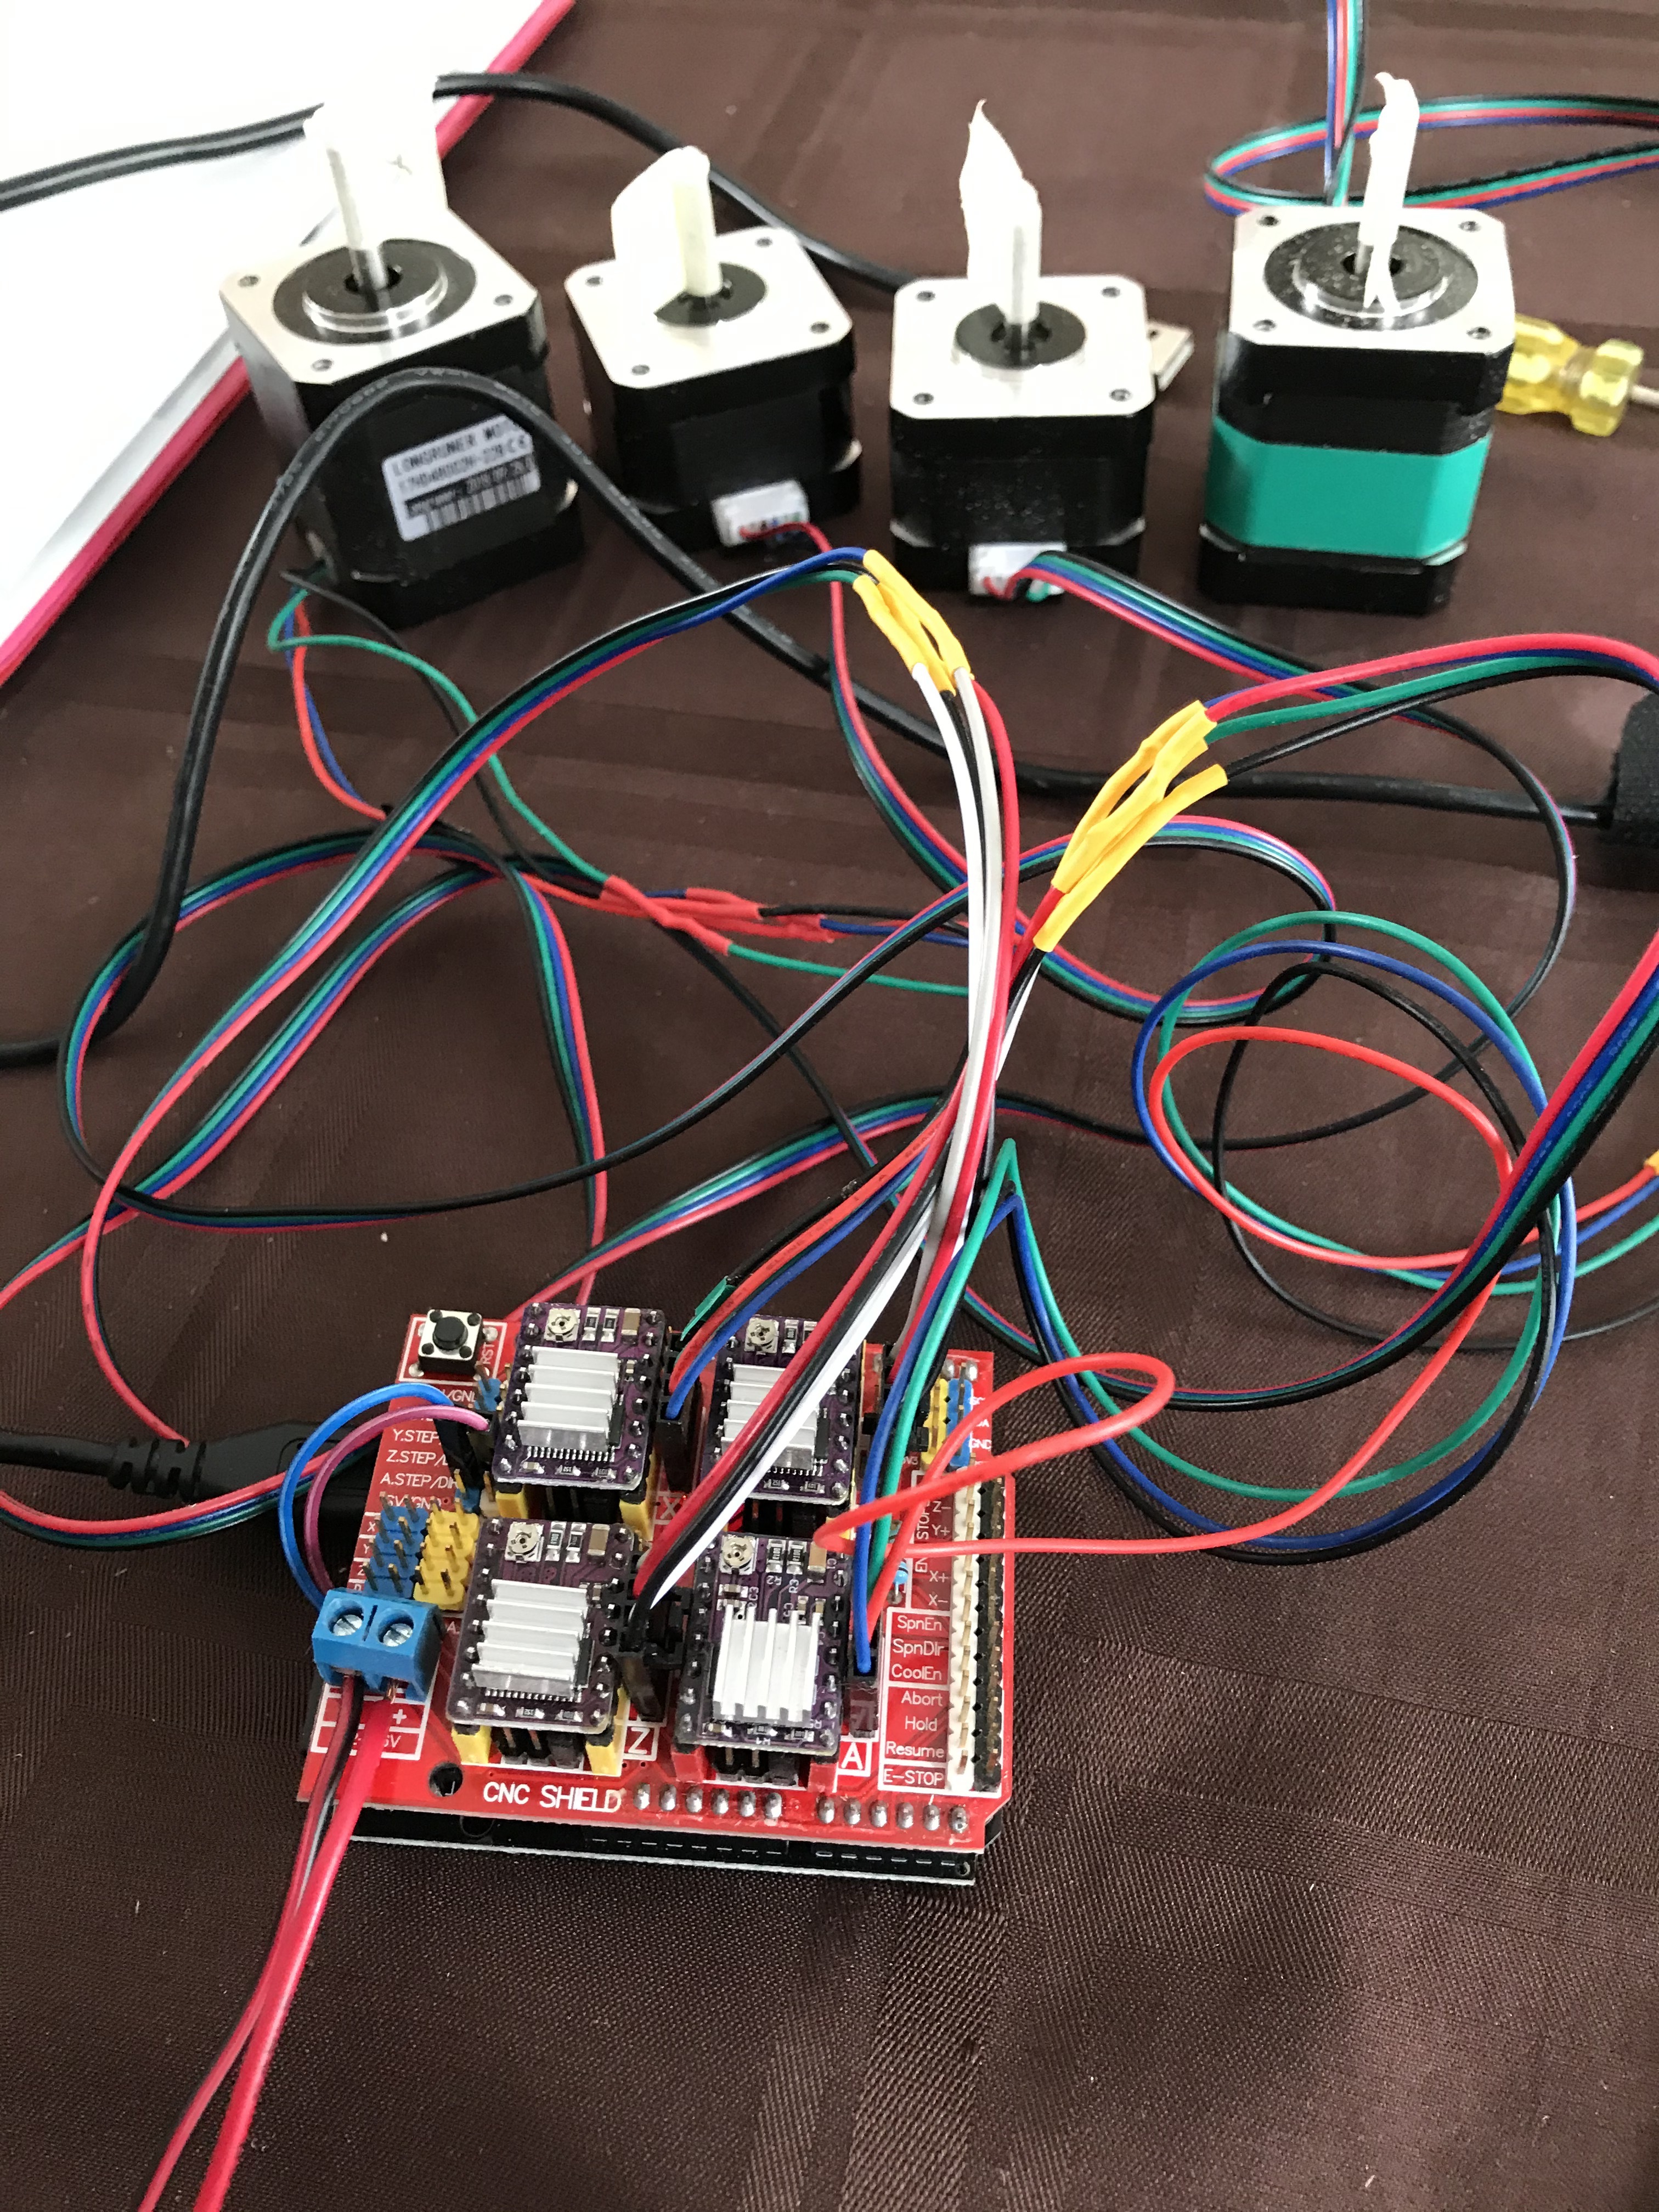
I plugged the STM32 board into a Breadboard. I ran the jumper wires to a couple of Arduino CNC Shields to the set of Input pins (X Step/Dir, Y Step/Dir, Z Step/Dir and used the second board for my 4th axis. I powered the CNC Shields from the STM32 chip to the 5V/Gnd pins below the Step/Dir pins. I connected 24 volts to the CNC Shield power inputs. Using A4988 Stepper drivers, I plugged the stepper motors into the CNC shields as usual. It worked fine on my test setup so I plugged my MPCNC Stepper motor cables into it and It works just fine. The laser doesn’t operate properly yet but I’m working on it.
So why would I bother? In a word, curiosity. Also I think the programmers are looking past 8 bit boards and moving to 32 bit boards. They are much cheaper and available now and have the usual wants: more memory and faster.
So what is wrong with:
Rambo + Marlin - Nothing. Works just fine for printing and CNC. Great to get started with. Thanks for your choices Ryan
Grbl-Mega-5x +/- RAMPS - Works perfectly for CNC and Laser, especially if you want Axes A, B, and maybe C. I especially like Grblgru for this one - simulation and/or machine control for free : )
Arduino + Estlcam - Works great for 3 axis CNC. Simple and intuitive. I like it for quick projects.
SKR v1.3/mini boards - great for printing. Not so good for CNC yet.
Re-Arm boards - Should be simple but I couldn’t get it to work with GRBL for CNC. Seems better suited for Smoothiware
ESP32 + Grbl - I haven’t tried this yet. Barton Dring adapted a version of GRBL for this and he seems to like it. Maybe next week, ha ha.
Arduino Due + G2Core or GRBL - I just couldn’t get this one working. Pinouts wrong maybe. Seems to work for other people using a custom stepper board. Too bad since I’ve read the movement mathematics are supposed to be better with G2Core.
I got around to the ESP32 earlier than I thought. It is Very easy to set up and alter in the Arduino IDE thanks to all the work done by Barton Dring and his associates. Since I want to use it with Grblgru I didn’t bother with the radio settings much. Tools for that are also described in the wiki.
I chose one of his preconfigured examples for a 4 axis CNC machine. He also has preconfigured examples for the MPCNC and Lowrider with separated stepper motors ie each stepper is assigned its own pin set.
It is slightly easier than the STM32 since an additional FTDI board is not necessary but the correct information libraries must be imported into Arduino IDE for it all to work the first time. After the first setup, which is very well described on the Github site, all is easy. Tailor the config.h and default.h files and get the pin map from cpu-map.h
I wired mine with a breadboard as above with the STM32. I’ll eventually solder it to a more permanent setup.
You need to read and follow all of the links particularly to the roadmap wiki
Another easy 32bit CNC upgrade path for those interested. I didn’t explore 3D printing here at all.
Found this grblgru project. Looks like very nice and promising all-in-one approach. Ofcourse not so powerful as industrial 3d CAM, but really interesting. Didn’t hear about it before. Thanks
I got both the STM32 and ESP32 working with my MPCNC. I am using Grblgru and Lightburn to run things. It took a bit of fiddling to convince my 12V TTL laser to work properly.
I ended up Uncommenting:
define# Use_Spindle_Enable_pin
define# Spindle_Enable_off_with_Zero_Speed
as well as changing the Max spindle speed to 255 and making sure Min was 0.
Interestingly, Grblgru works best with the ESP32 over Bluetooth and Lightburn prefer a direct USB connection. I don’t know why but since I have a workable solution for both programs I’ll leave it there. I did try a bunch of things in firmware and program options but all failed. Likely due to my lack of knowledge.
As a result of all this fun I can use my MPCNC with a 32 bit chip either over USB or BT for CNC milling with 3 or 4 axes. I don’t do any 3D printing with this machine.
Now I want to try a ESPduino/Canaduino board like this:
This board should hook up to an Arduino Uno CNC Shield. Bart Dring has a machine file in ESP32_grbl that looks suitable for this project.
I think there are a couple of pins in the center of the board that I can connect to the external A step/dir pins on the CNC shield so I can use the 4th stepper driver as a independent 4th axis. This should make a more compact and dust resistant package for my MPCNC.
So I got my Canaduino ESP32 board working with a Arduino CNC shield easily. I found it on both Amazon.com and Amazon.ca
I used Barton Dring’s machine profile for espduino.h in the Machines folder. I added a 4th axis, modified the Pin arrangement slightly so it worked better for my Laser and Probe. I don’t use a Spindle, just a Router so a pin is freed up. I had to do two ‘hardware things’. I soldered a couple of wires to the Canaduino board and removed a resistor (beside the Endstop pins) from the Arduino CNC Shield. It was interfering with the bootup and removing it caused no issues with an ESP32 type board. The two wires were plugged into the CNC shield A Step and A Dir pins.
To control the machine I am using Grblgru and sign on as Grbl 1.x
My MPCNC moves normally under either USB or Bluetooth. The Laser and Probe work properly. I wired XYZ Max Endstops as well.
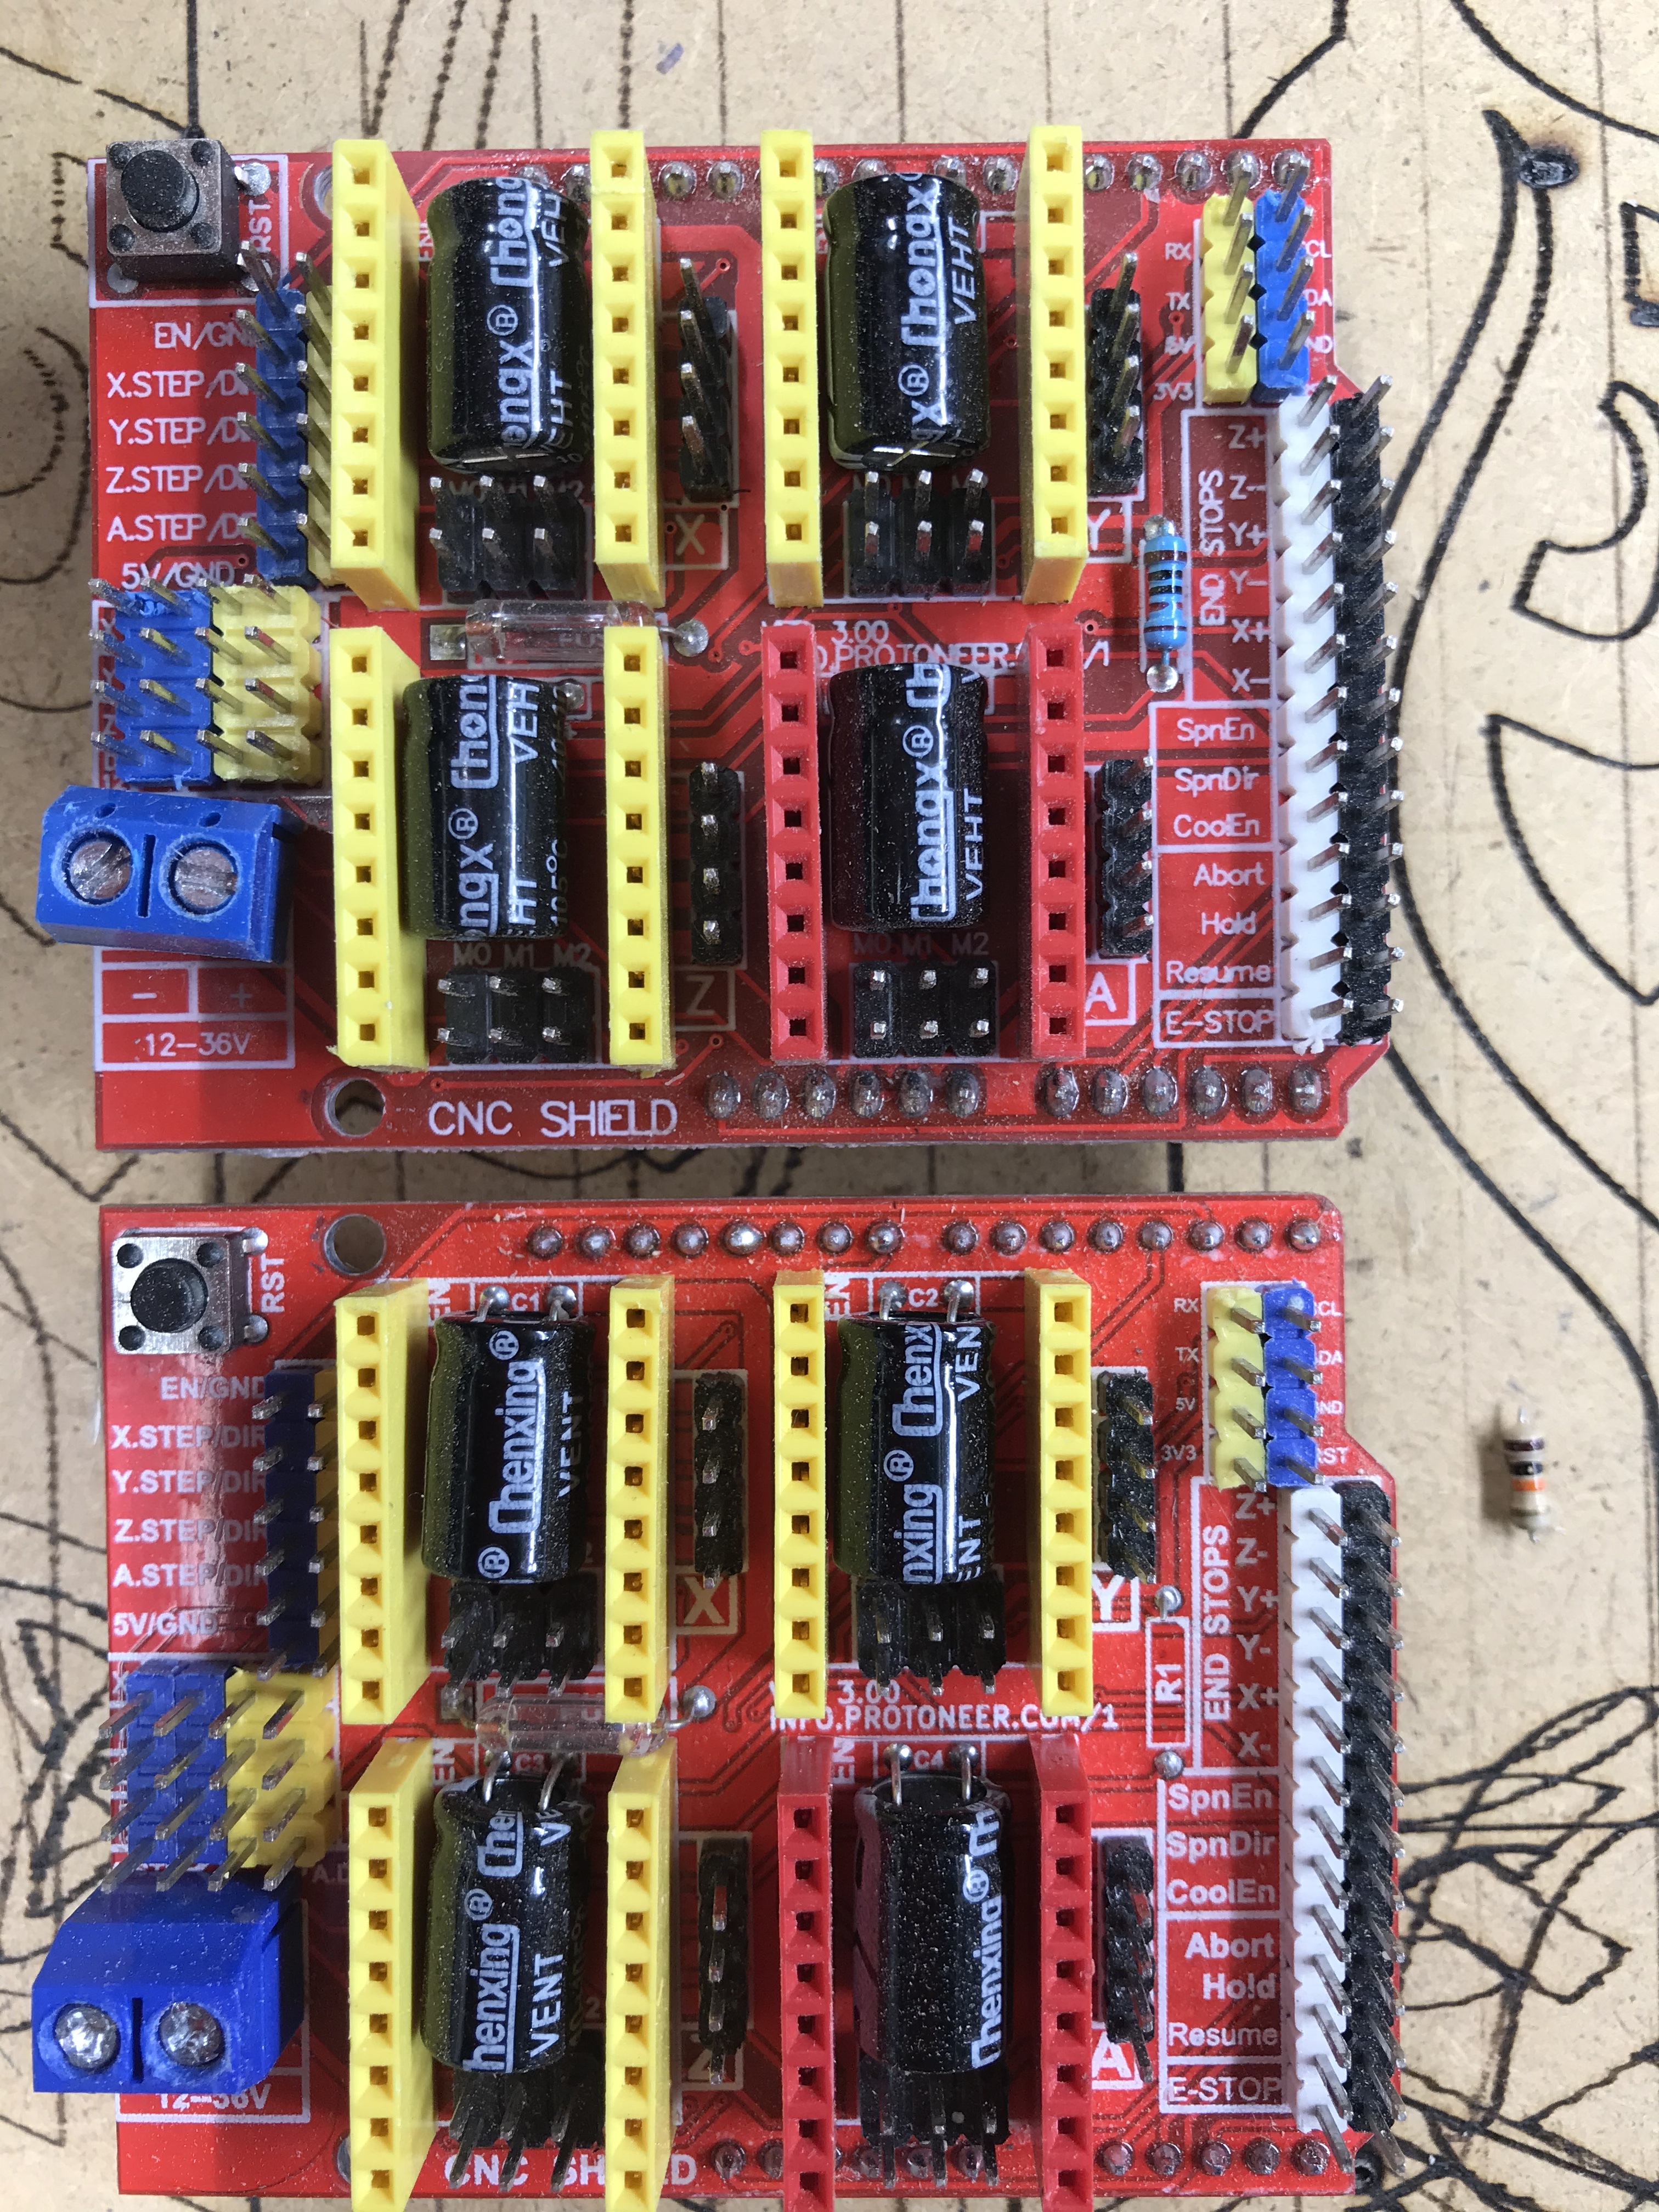
The ordinary Arduino CNC Shield needs a quick modification to run with the Canaduino ESP32 board. There is a resistor near the Endstop pins that needs to be removed. It doesn’t affect the board function otherwise. Removing it locks the stepper enable On but ESP32 looks after that anyway. This allows the Canaduino ESP32 to boot up properly.
The resistor is the little blue one on the top part of the photo beside the Endstop Pins. It’s gone and a box saying R1 is left in the lower photo. You can unsolder it or just snip the end wires with a sharp point wire cutter.
Hi JeffH. This as been some time that anyone posted anything here regarding stm32 or esp32. I have some Blue pills boards and i was thinking on using then for cnc control with grbl. All that i can find are .hex or .bin files to upload for the stm32. I have found some firmware of grbl for compiling in arduino but i always get some library errors. Have you managed to find some tutorials on how to compile and upload grbl for stm32 in arduino IDE ? I can’t find any information that get’s me any results.
Honestly, I moved past the Blue Pill board I was using to the Canaduino board (ESP-32 type) I’ve described elsewhere here. It is easier to program using the Arduino IDE and Bart Dring has done a great job on the software:
This is just a better 32 bit type of board for playing as it also adds wifi and bluetooth for fun. I’ve described the setup elsewhere here. A ‘regular’ type ESP-32 is also suitable. I just preferred the Canaduino type since I can use an Arduino Uno CNC shield with it to drive the stepper motors = simpler for a lightweight CNC machine.
Cheers
I loved your topic. A question that escapes a little because I don’t know these signs. I have a co2 laser that I reformed with arduino uno, since here in Brazil we have few options for plates and the currency is weak, do you think it’s worth studying to change to the STM32? I never had contact with the board and I have very little budget ^^
I don’t think it is worth doing since the Arduino, if it’s an Uno, is probably enough to do the job. Better to invest your money in Lightburn software since it’s really great for laser. The ESP32 Canaduino I described earlier in this thread is a better 32 bit option than the STM32 and quite inexpensive. There are cheap copies available on AliExpress.
+1 for using Lightburn along with the CNC Shield/Arduino controller and grbl firmware. Works very well on my modified K40. I use a relay and small aquarium air pump for air assist controlled by the “coolant” pins. Lightburn makes this configuration easy to manage as well as controlling the laser intensity with PWM.
I am also building my milling machine on ESPDuino-32 (analogue of Canaduino) and CNC Shield v3.0 and I am interested in your experience.
I see you are using NEMA17 and DRV8825, but I want to use NEMA23 2.8A with TMC2209 v1.2. I have several power supplies - 200W/24/8.3A, 60W/12/5.0A and 40W/12/3.3A. WeMos has an input current of 3.3A and was advised to use a 40W power supply, but I have not tried it yet. Can you tell me which power supply do you use and which power supply do you recommend for me? I would be very grateful for your answer.
Hi Igor. Here’s a long answer to a short question. I am no expert on this but I suggest adding up the number of Nema motors to determine the maximum amps you are drawing and size the power supply from there (amps x volts = watts). I’ve done a lot of building since I explored the 32bit chips options. The ESPDuino I described is great for the MPCNC and Lowrider using Nema17 motors. I use an Uno shield on the ESPDuino with ESP32 Grbl by Bart Dring. The 8825 drivers are cheap and work well. Quietness is irrelevant in a CNC application since the router/spindle and associated vacuum dust extraction is really noisy. If you fry a driver somehow, they are cheap to replace. Remember they have to be calibrated for a tolerable amperage. That is described elsewhere on this site.
When I switched to Nema23 motors for other machine builds I started using external stepper drivers because a decent sized Nema23 needs more amps than most little on-board stepper drivers can handle.
The easiest cheapest path for these is to use an Uno or Mega2560. They are 5volt input and output. Even though they are 8 bit, for CNC use they are fine and easy to program for Grbl. I have read in many places that much beyond 1/16 micro stepping in a CNC application does not improve precision. Going to 1/256 microsteps just loses a whole lot of torque for the CNC. A 3D printer doesn’t need torque, it needs precision so the finer microsteps are great for that application. 3D printers also need to be quiet, so many of the cool new microstepping drivers and boards are great for printers but not so great for CNC machines IMHO.
The Step and Direction signals can be wired from the board pins to the stepper drivers and then those to the stepper motors. The Enable pins are not necessary. Use a common negative ground for all the drivers making sure the control board is grounded too.
If you are determined to use a 32bit board, they need a 3.3v power supply. The step and dir pins output only 3.3v. The input pins also need to be 3.3 volt if using powered limit switches.
Most external stepper drivers want 5 volt inputs. Most powered limit switches are 5 volt so these may be bad for your 32bit board.
3.3 v outputs may work ‘most of the time’ with the stepper drivers, but do you want to take a chance, especially on an expensive project? The solution is a 3.3v to 5v converter put between the 32bit board and the external stepper drivers and powered limit switches. This adds a layer of hassle and complexity many people don’t want to bother with. Bart Dring markets a ESP32bit based board on Tindie that addresses all of this.
I suggest for CNC work staying with a simple Uno with shield, and wiring the external pins to external stepper drivers for the Nema23s. Size the power supply for the Nema23 motors plus board. I’d suggest a 24v 20amp supply since the motors run cooler at a higher voltage. 36v is even better but a separate 12v power supply will be needed for the control board/shield (and laser). If you are determined to spend more money (and be even more cool) get some closed loop stepper drivers and motors off AliExpress. These have finally come out of the stratosphere with prices and add a real dimension of precision for a CNC since there are no lost steps.
Regardless there is still a lot to learn. Your wallet, your choice ; )