I recently picked up the JTech 2.8W laser kit plus the additional shroud and thought I’d share my new post processor for VCarve/Aspire in case anyone else finds themselves in need. I’m aware there was a much older version hanging around in this forum, but it does not have the ability to adjust the laser power from the CAM software, and this has some additional updates.
VCarve/Aspire laser commands (M106/M107):
Just a quick note: The Z axis should be zeroed at the appropriate firing height, not the work piece height. I did this since different lasers may have different firing heights, and this should work for everyone.
Marlin_mm_Slow_Z_with_Laser_Commands.pp
I have also updated my other VCarve post processors with comments to make things easy to understand and some additional tweaks, while removing some extraneous commands from the original test files. Also, there was a unit discrepancy on one of the feed rates which has now been accounted for. Everything is on DropBox, so these get updated automatically when I make new changes if you feel like following along.
VCarve/Aspire default spindle commands (M03/M05):
Marlin_mm_Slow_Z.pp
VCarve/Aspire custom spindle commands (M106/M107):
For use with a voltage triggered power relay.
Marlin_mm_Slow_Z_with_Custom_Spindle_Commands.pp
Now for the fun stuff…
Tool settings:
The spindle speed can be adjusted from 0 to 255 depending on the material and type of work (cutting vs. engraving). The woods I sampled generally produced the best results at somewhere between 30/255 and 60/255 power at a feed of 200mm/min. But I have found that each material has its own sweet spot for engraving and this is simply something you will have to test on your own. It will also depend on how “burnt” you want things to look, as I feel this is subjective.

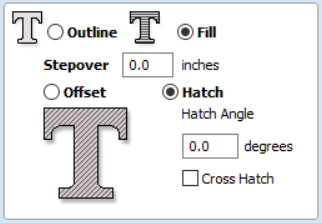
Hatch fill:
Hatch seems to work best for larger areas that do not require tight, rapid changes in direction.
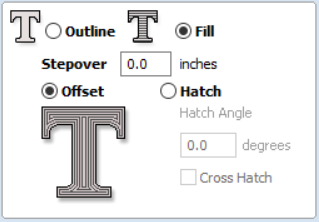
Offset fill:
Offset seems to work best for tight/thin areas, as this prevents the laser from getting stuck in one spot when moving back and forth across fine detail, which can ultimately cause hot spots.
Rig and testing:


There is certainly more testing and tweaking to do, but I thought I’d share my progress in case anyone is looking to jump in with this laser. Overall, I’m very pleased with the kit and since I’ll be focusing on engraving over cutting, 2.8W seems to be more than enough power for me.
I hope this helps someone!
