This may sound stupid and there are probably better ways to solve this but,
I’m having issues carving softwood during the long operations. At some point, the machine is shifting the coordinates, probably due to my poor CAM skills. I’m not sure exactly what could be causing it but during a pocket clearing operation, the second (2/3) depth cut was slightly off, ruining a 7 hours operation, not to mention the wood.
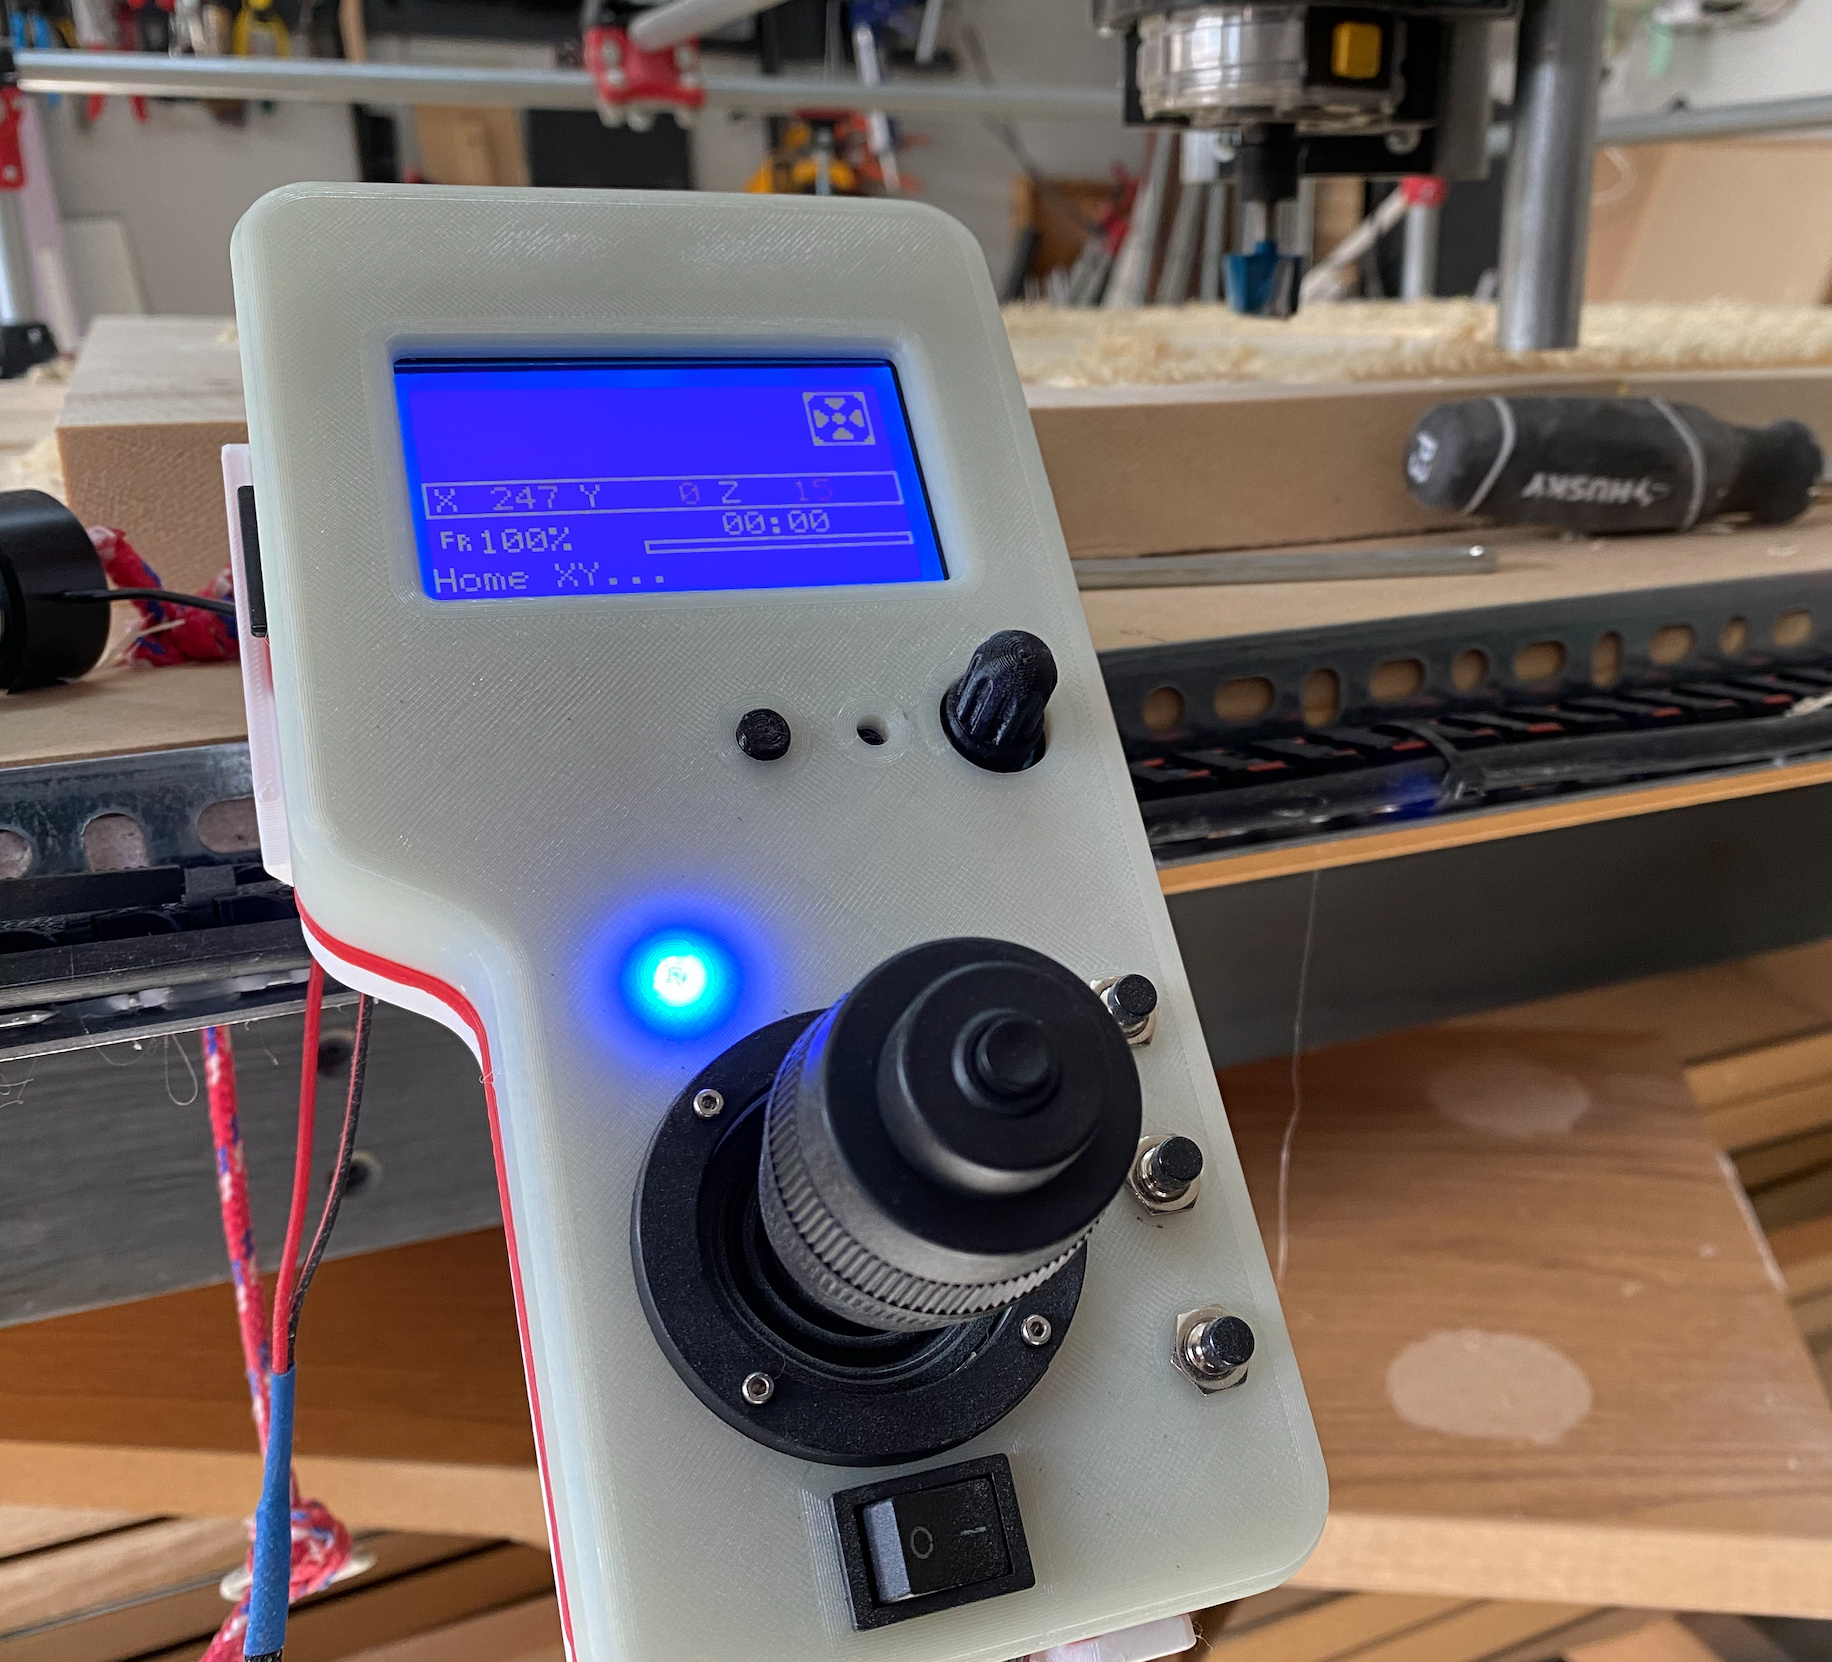
I use a Raspberry Pi connected to the Rambo 1.4 running the Octoprint (the image provided by jeffeb3). I also implemented the hybrid solution for the joystick (by jamiek) and the Arduino for extra buttons by dseebauer.
I was wondering if homing X and Y in the middle of the carving would solve this issue, at least after some critical operations. Perhaps something I could manually add to the G code or even a custom command from the Octoprint control panel. Something like:
Well, to answer the question directly, I think you can do what you want a little more manually. I’m not sure how to save a value with a variable in marlin, or even if you can (actually I don’t know how in grbl either, lol, but at least I think it’s possible), but you can certainly punch it in.
That said, unless you manage to home right where you’re losing steps, then some of your cut is going to be wrong anyway. Whether or not it ruins your workpiece is going to be a crap shoot.
A dull cutter is a somewhat common cause of skipped steps, and on a long job like that I can imagine a cutter going to crap with only a slight mistake in feed/speed, especially on the cheap Chinese tools I like to use sometimes (looking at you hss).
If you think that might be the issue and want to get this knocked out before trying to figure out whether you can CAM better, consider breaking the job into parts and just replacing the cutter every few hours. You’ll need a way to reliably set your z between parts.
Another cause could be overheating drivers. I’m not sure how long it takes, but it’s reasonable that it happens more on longer jobs I think. You might test that by turning the stepper timeout off and letting the steppers sit for several hours. They draw current to hold position so that should get everything warmed up and you can test a smaller faster cheaper job to see if you lose steps. Maybe somebody can give a better suggestion, though, because that doesn’t seem like a comprehensive test to me. Pretty smart people in here, somewhere.
Do you have these problems on shorter jobs?
First, it is highly likely that the coordinate slippage is mechanical in nature. Perhaps you have a collision in your CAM, or maybe the grub screw is loose on one of the pullies and the pully is slipping, or you are hitting a clamp. If you are using Fusion 360, recent changes result in the Z axis being driven at high speeds that can cause some problems.
As for saving and restoring positions(s), there are a couple of approaches. As long as you don’t turn off the electronics, you can use G60 and G61 to save a position and return to that position. Note that the g-codes for saving and returning to a position are not enabled by default. You need to edit/enable this line in Configuration_adv.h and then re-flash the firmware:
//#define SAVED_POSITIONS 1 // Each saved position slot costs 12 bytes
A second way of saving and restoring a position is using workspaces. It is a bit more complicated to describe a workspace solution. Your global machine is one workspace, and the home relative to the stock can be in another workspace. You can home in your global workspace at any time and the offset to the workpiece workspace will remain unchanged. If you decide you to use workspaces, I’ll be glad to write out how I believe you can use them to save a position. Workspaces have one benefit…they can be saved to the EEPROM so that they can be restored even if the electronics are powered down.
Note that I’ve not used either of these two methods. I’ve just bumped into them solving problems for my own issues. If you have an Arduino inside that pendent in your picture, a third method would be to save the position to the EEPROM of the Arduino in the Pendant. This is my solution for saving positions.
I feel like the first suggestion (G60/G61) is a little more attractive to me. If that work I could actually use on of the o arduino button on the pendant for the script.
I’ll give that a try. Thanks!
If you skip steps, it sounds like gears are chewing on teeth. I notice the sound right away. If a clamp is loosening, or a grub screw is loose on the pulley, it won’t make that noise. If a diver is overheating, that usually looks like one axis or at least one motor just giving up for 30 seconds. If you can figure out which one of those problems it is, we can help make that better.
If you have an Arduino as part of your pendant and you wired up the tx on the Rambo to the rx on the Arduino, you can request the current position from Marlin using an M114 g-code. Since your Arduino is storing the value, you can elect to save it in the EEPROM so that it will survive a power cycle. This makes it useful beyond the current problem. The only downside is that the position comes in as text so it has to be parsed and converted to be used.
If you have your material fixtured at 0,0, this code will work, but with most projects the home position is relative to the stock. This means that your G0 X50 Y50 will be relative to the stock rather than relative to the global coordinates. Note you can fix your “halts if I home from far away from zero” issue by changing the following in Configuration.h
// The size of the print bed #define X_BED_SIZE 200 #define Y_BED_SIZE 200
You need to set the size to your spoil board’s top right coordinate as measured from the home position. That will allow you to remove your G0 X50 Y50.
Edit: No this will only work if you are not resetting your home position relative to your stock. The G60 S0 will be storing the relative coordinates which get reset when you home. The way I do it (for different reasons) is to 1) home the machine, 2) navigate to the home position relative to the stock, 3) save the position, 4) reset the home position relative to the stock.
Then when I need to restore, 1) home the machine, 2) move to the saved position, 3) reset that position to (0,0) to set home relative to the stock.
Note the issue will only occur if you are resetting the home position relative to the stock. Most but not all people do set a home relative to the stock.
Edit 2: Now that I see exactly what you are trying to do, workspaces might be a better fit if you are using coordinates relative to your stock for your carving. What tool are you using to generate your g-code, and are you using relative coordinates?
Since is a large project I actually position my end-stops for the job. So it is fine to use the global coordinates.
I tested the code a couple of times today without engaging on the material. It seems to be working fine. I’ll probably test it today on the real one.
I generate the g-code on fusion 360.
Edit: I just tested the code and it worked beautifully. In this case, it wasn’t shifted so it returned to the exact location. Thanks for the bed size tip. That will be the next change.
As long as your home position of your work stock is at global 0,0, then your solution will work. If you want to generalize your solution for a relative coordinates, see the g-codes G54 - G59. You would do your global moves including homing in the G54 workspace. Your work piece would live in G55 workspace with the home position relative to the stock at 0,0 in that workspace. So you could rehome in G54 and then switch to G55 and move to 0,0 to return to the home position of your work piece. It is not as complicated as it sounds. I still think you have some sort of mechanical issue. If you are confident in your machine, look for collisions when you simulate your tool path. You can set “Stop on Collision” when you simulate or take a look at the bar at the very bottom of the window. Any red lines will be a collision.