5 X 10' Full Sheet Build Tampa Florida

This will be my second cnc from V1 my first being the MPCNC. My frame of mind while building the MPCNC was “do it as cheaply as possible cause there is no way its going to work anyway what with all the 3d printed parts.” It’s hard to point to a time I’ve been quite so wrong.

I did an absolutely terrible job building my MPCNC (bad tolerance on my prints, low quality bearings, hilariously unsquared table) and yet its turned out some incredible pieces and paid for itself multiple times over. So it’s time to step up and at least do a mediocre job building a far larger machine. I have a pretty decent need for a machine that I can drop full sheet goods into and let it rip so im going to bite the bullet and go full 5x10. I am however making design provisions for being able to reduce that size in the future if I find my full sheet need dwindling.

One of my biggest stumbling blocks on the MPCNC was a lack of a plan going into the build. Turns out I’m pretty terrible at thinking on my feet out in the garage. To that end I decided to make myself some accurate CAD files of the Low Rider so I could properly check for interference or make modifications I needed before proceeding to 3D print.

I will be adapting a Paulk style torsion box work surface as this provides a nice tradeoff between weight and stiffness. It also features removable sawhorse style legs. I’m going this route because my primary goal is to be able to hoist this up onto the wall for storage when it’s not in use. From my calculations this whole setup weighs just under 200lbs which should be pretty easy to crank up onto wall with a winch of some kind and then lock into place.

Just need to design the winch and wall mount system and I can start buying material.

10 Likes

What a great background story. Look forward to seeing the build take shape. Especially interested in this size of build.

2 Likes

All of that makes me feel wonderful! Glad you like it…pro tip, you have a cnc now, use it to cut the new table!

1 Like

Time for a bit of progress update. Put in orders for a bunch of parts from amazon and what with the current COVID19 situation it was less than a smooth experience. Im pretty sure if I build a 3rd machine Ill probably just do a bulk order from the V1 store. At least then I can be confident all the parts will be correct and I wont end up with rolling suitcase wheels instead of proper roller blade wheels :expressionless:

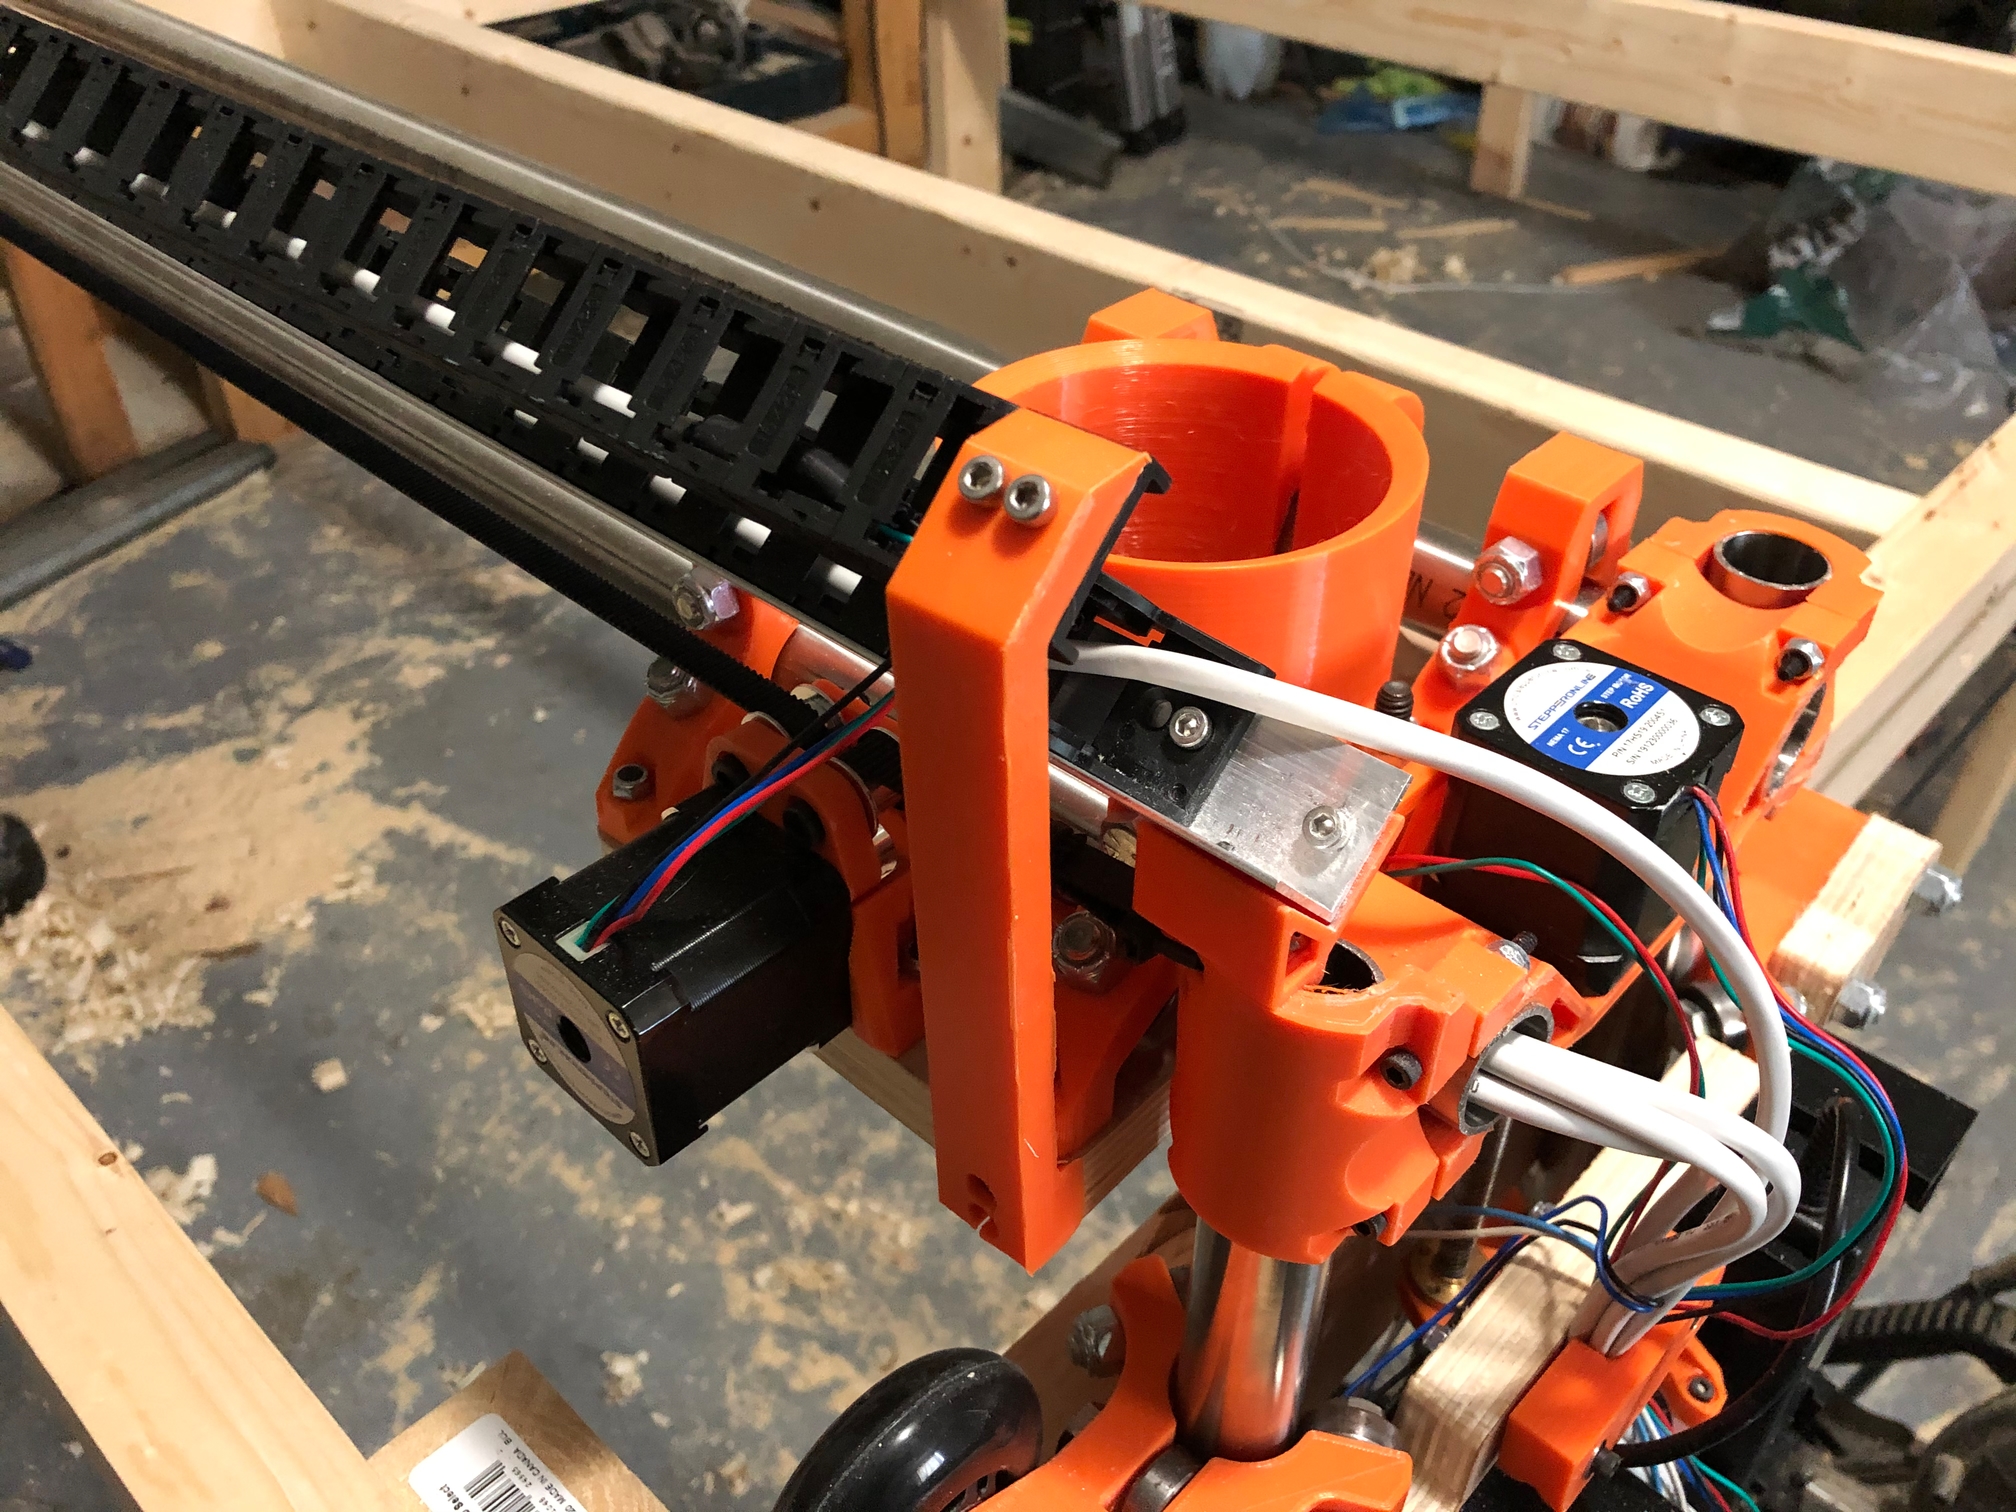
One large change was the color. I saw some high voltage orange filament on sale and couldn’t pass it up. Going to switch from a blue motif to an orange and black. :fire:
This is where my first improvement over my MPCNC is. I used PETG for the MPCNC which is a fine filament. I decided to use PLA this time and the difference is incredible the PLA just works so much better. Its easier to print and get accurate parts and so far its plenty strong enough.

I made a few modifications, first of which being a mount for my very much too big router. Its the router I have so its the router ill use for now

Its about as stout as I could possibly make it. Having the CAD model of the LowRider let me wrap the mount around the X-Rails with no interference.


Another change I made was a result of my MPCNC build.

NO PHILLIPS SCREWS!

Their use in the MPCNC is exactly the right design decision as they help limit applied torque and can keep you from cracking a print. I hate them though so I decided to go all black oxide socket head cap screws.

Another user pointed out that they can foul the Y belt on the Y motor mount so I recessed two of them a little to give clearance

Its amazing what a difference a “correctly” calibrated 3d printer makes. This assembly is going so much smoother than it did for my MPCNC. Parts are almost snapping into place

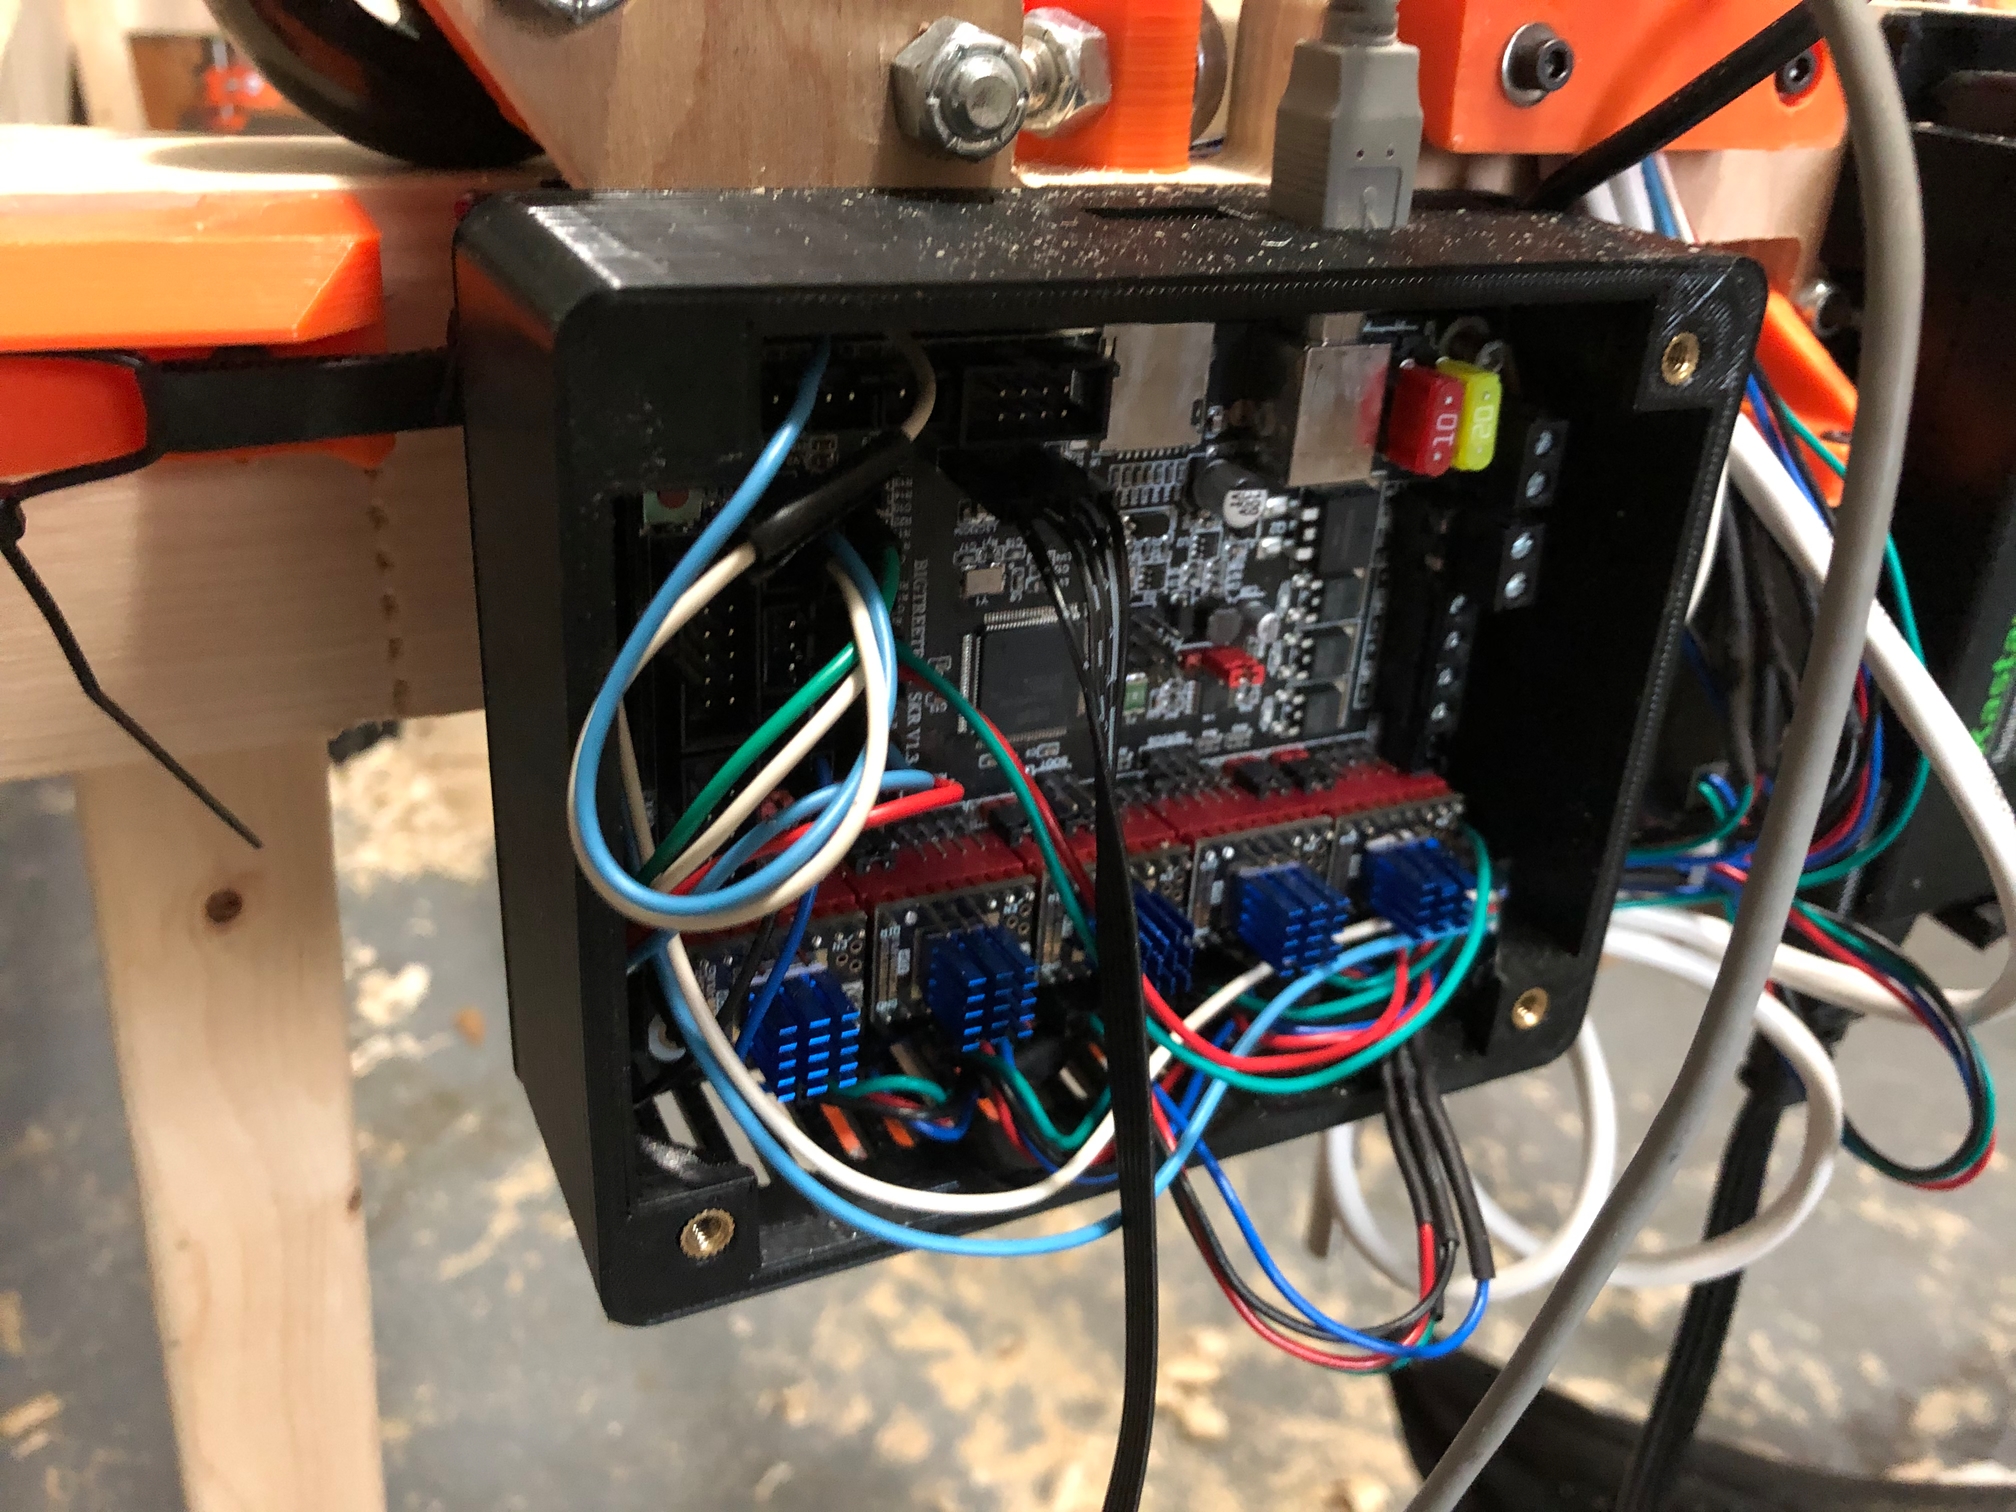
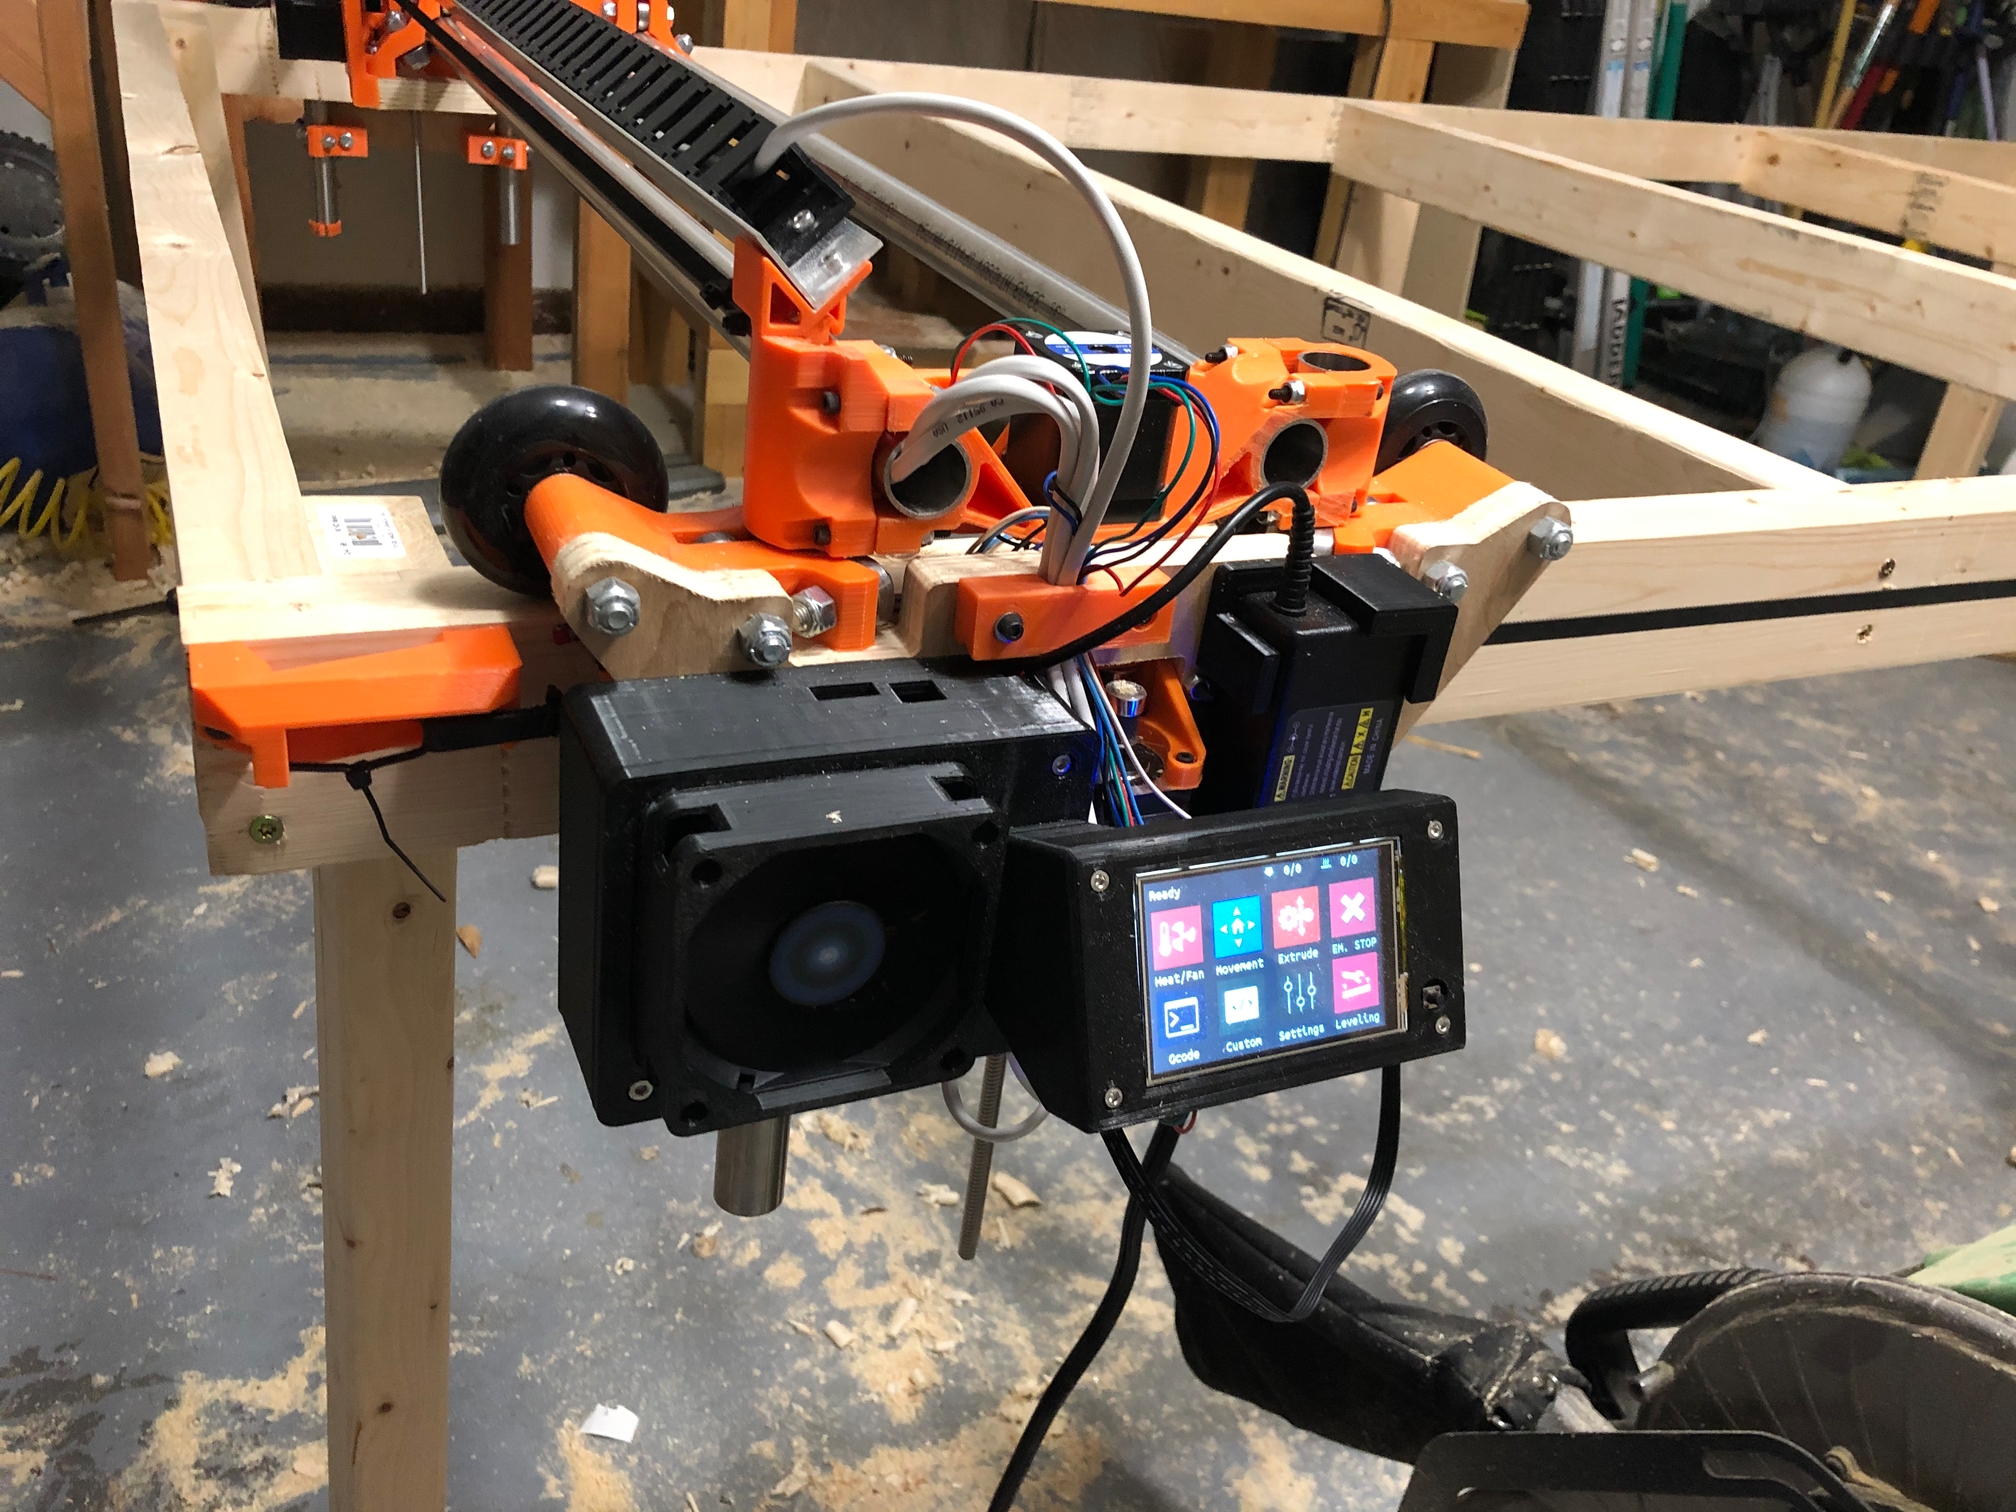
Something that isnt going very smoothly at all is the electronics. I was wooed by the flighty temptress that is 32 bit (because one time out of the 100+ jobs ive done on my MPCNC I had some buffer stuttering :grin:) and ended up going with a BigTreeTech SKR1.3 board with Trinamic2208 and a TFT35v2.0 screen as ive never been a fan of the regular Marlin clicky wheel navigation.

HOOOOOO MAN what a PAIN. Its not an issue of not enough documentation its an issue of WAY WAY too much poorly maintained conflicting garbage. The firmware on their github straight up doesn’t work. As a result ive configured Marlin 2.0 from scratch and im proud to say I have it working quite well at the moment.

That picture is the result of literally dozens of hours of watching tutorials and reading blog posts. Overall at this point I would NOT recommend the Big Tree Tech boards.

Something big ive found that’s at least news to me is that Marlin now accepts EXTRUDERS=0 as a valid configuration and allows E0 to be used as a second axis motor driver with no problems. So no more need to mess with the pins and do the E0 → E1 → E2 pin shuffle thing to get the dual axis dual motor configuration working.

Running zero extruders makes the TFT35 get a little angry and I had to dig around and comment out all mentions of M221 to get an error to go away and if i bring up any of the extruder related menus it panics about not having any to modify. This hopefully wont be a problem for long because…

At the moment im attempting to learn how to modify the TFT35 menus to make it much more relevant to CNC work rather than 3D-Printing. So far ive added different movement increments because jogging down a 3048mm table 10mm at a time wasn’t exactly going to cut it. Im going to try to implement switching of work coordinate systems G55-59 as well as being able to zero these independently. Having at least another work coordinate system would be nice, and I figure if i can implement switching to one adding the others wouldn’t be much harder. Whether I can actually figure this out is up in the air, my C is pretty rusty.

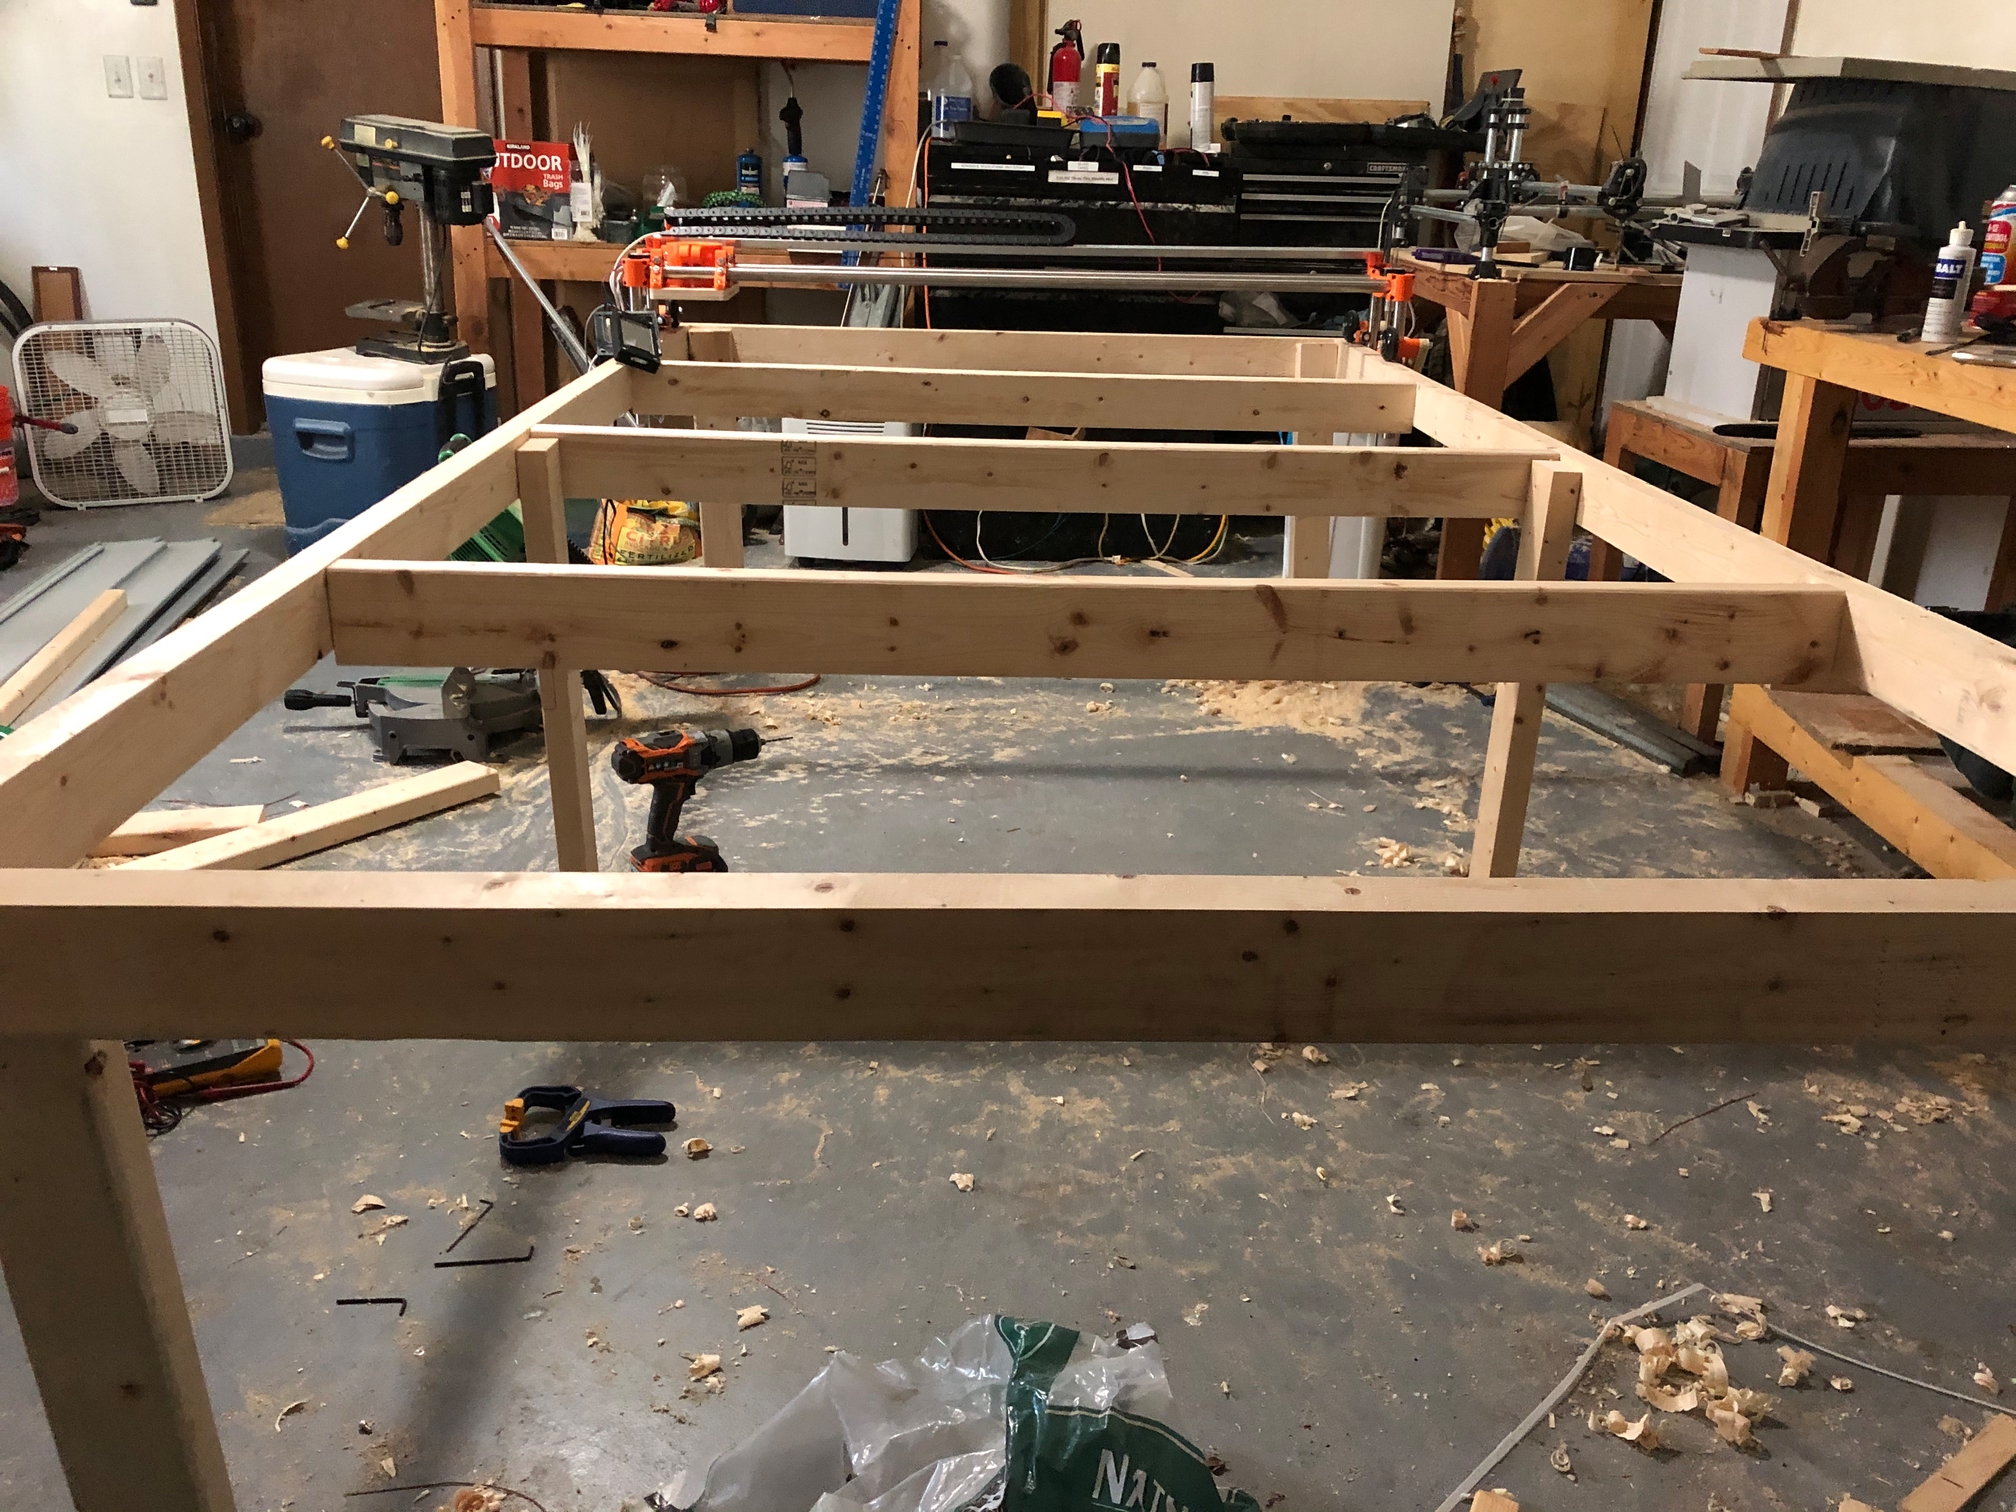
Thats pretty much it for now. Im nesting the pieces of the table to see how much stock I need and I can start actual assembly. I have an idea for using the LowRider to build its own table but well see if that happens.

I hope everyone out there is healthy and safe.
-Adam

5 Likes

Build looks good so far.
Those boards and that screen are far too over complicated for what they actually do. You do have it ready to go now so you should not have to deal with it too often.

1 Like

Any chance you still have the CAD files for the lowrider? I’m planning mine out right now and would love the option of being able to verify the setup better in Fusion 360 and have a nice rendering of the complete setup.

I do have them and I appreciate your interest, but they aren’t something I can really share. If I had made vast changes then I would consider releasing them under some kind of license but I reverse engineered Ryans STLs to within a few thousandths so for all intents and purposes they are just copies of Ryans work in a new file format. Ryan has made it known in other threads that he doesn’t intend to distribute the CAD files for reasons hes detailed. So I wont either.

Hope you understand
Adam

3 Likes

Ah! I hadn’t seen that. No problem! I respect @vicious1’s decision and will progress on my own :smile:

2 Likes

Thank you for the info and incite. I am also attempting to build using a BTT SKR 1.3 but with a BTT TFT35 V3 and looks like I have a long road ahead. Any chance you would be willing to share your Marlin file with me?
Thanks from a fellow Floridian (Clearwater) now residing in Washington state.

Hey, ive been kind of waylaid these days and haven’t had much time to tinker so my Marlin file “works” in that it doesn’t immediately crash the machine or throw an error but isnt what i would call finished. Ill be happy to share it down the road if your config matches mine. In the meantime if you need any troubleshooting help ill assist if I can.

Thanks for getting back to me and sorry for the slow reply. I had some problems with my printer and it was cheeper to get a new Ender 3 than it was to get parts for the A8, at lease that’s what I convinced my wife. I’m back to printing parts again! Can I ask for your help when things get a little further down the line? Thanks!!

1 Like

Sure I’ll help if I can. I’m not by any means an expert at any of this.

@scholarch Nice to see someone from Tampa Bay on here. I’m in Riverview, also with an MPCNC that I use frequently and an LR2 that I hope to make the first real chips with this coming weekend.

I’m up in land o lakes. I actually just had my first real moves with this LR2 and will be updating the thread soonish. Got the very temp table cobbled together and got all the wiring run, would say I’m about 95% to making chips atm.

1 Like

Making progress. A bathroom re-model has been stealing some time but im just about ready to make first chips.


Shown above is the VERY temporary table. Its not even getting a top skin. Its only purpose is to support some plywood while it gets cut into the real table. Im using the crossed string method to get it flat enough. Wood Whisperer Flatten Work Bench I used the method here (jump to ~10:00) to flatten the work bench seen in the back and its surprisingly effective.


10ft is a lot bigger in person than in CAD haha. You can see my first MPCNC hanging out in the corner. Still debating if that one is getting chopped down and turned into a small rigid Primo for metal work.


In my MPCNC I never got around to proper cable management for the gantry and didnt want to repeat the problem here. Got some cable chain and printed a little arm bracket to hold it. Right now it causes some interference one of the wheels if the Z is all the way down and the Y is homed. A new one will be fitted soon.


Not sure why I constantly undersize my enclosures. But ive managed to get everything in and routed while still allowing for some nice airflow.

)
The screen has a nice tilt and is easy to use. Or it was


The screen took a short drop and a sudden stop off the table and sheared part of the flat cable right off. One nice thing about Big Tree Tech stuff is its actually pretty cheap and available on amazon prime so I already got a replacement.

1 Like

Calibrating steps/mm and testing repeatability

aiming for 3.937

LR2 Repeatability

Ill take it haha

2 Likes

Nice!

Hey @scholarch, how’s your LowRider build going? Curious how your winch assisted hoisting for wall storage worked out? Looking to do something similar. Any pics/details you’re able to share would be appreciated.

Cheers!

2 Likes