Or batarangs.
6 Likes
I never did the benchy, instead I did some couple owls…
Yes, this part and the end clamps, also if u r melting the fine details either more heat and faster. If the plasma is maxed out, then kinda all u can do…
1 Like
I’ve since tuned my machine config up a bit more and realized some cam settings were out of spec on that cut, I really should do that crown test again.
1 Like
Here at the V1 Teknikul Technical School of Enjunearing Engineering, we let you rework your dissertations until they’re correct… No extra class fees needed*.
*Medical costs are the sole resposibility of the student, and are in no way the fault of V1 or any of its staff, volunteers, hangers-on, or general riff-raff in the forums**.
**Same for property damages
3 Likes
Converting the base LinuxCNC milling configuration to a plasma configuration
Follow up to my post from Jan 17
These are the steps I needed to get from the Base configuration earlier in this thread to a cutting with a plasma torch using the PlasmaC component of LinuxCNC:
-
Fire up the terminal and type the following command and click ‘New’
-
This window will open, give new new configuration a name
-
Click inside the ‘INI file in existing working config:’ textbox and dialog will popup where I navigate to the base machine’s configuration directory and select its’ ini file. The configuration directory should be located in [user’s home directory]/linuxcnc/configs/Base
-
Do the same for ‘HAL file in existing working config:’
-
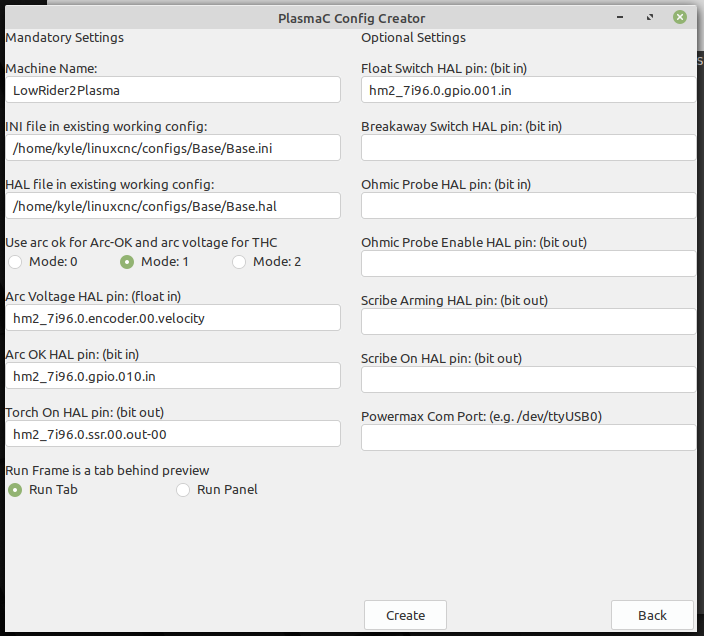
Now I need to enter the pins that I’m using for a controlling the plasma machine per the wiring diagrams posted earlier. This screenshot is what mine looks like.
Reference: http://linuxcnc.org/docs/devel/html/plasma/plasmac-user-guide.html#_configure
-
Click the ‘Create’ button on the bottom of the PlasmaC Config Creator window
-
After running the configurator tool it will create a new directory in the ~/linuxcnc/configs directory with the Machine Name given in the tool. Open up this new config directory and open the [machine name]_connections.hal file. The following three lines have to be added in order to get the thcad (torch height controller) to work
Reference: http://linuxcnc.org/docs/devel/html/plasma/plasmac-user-guide.html#_mesa_7i96_config
-
After I’ve saved those changes I launched linuxcnc from the terminal. Just type ‘linuxcnc’ and hit enter
-
Find the new configuration, check ‘Create Desktop Shortcut’ and click ‘OK’
-
I needed to give LinuxCNC some calibration values for my torch height controller. Each Mesa THCAD card is individually calibrated at the factory and shipped with a sticker on the back with those values. I created this online calculator to convert these sticker values to values that PlasmaC will understand: https://jscalc.io/calc/NTr5QDX6WgMThBVb
Reference: http://linuxcnc.org/docs/devel/html/plasma/plasmac-user-guide.html#_calibration_values -
Finally, give these calibration values to LinuxCNC. In the LinuxCNC machine go to the Config tab and set the Voltage Scale and Voltage Offset values to the ones just calculated and click Save


Now the machine should be ready to start burning some metal!
I’m using a Hypertherm Powermax45 XP and SheetCam for my CAM. I’ve copied all of the feed & speed and torch height control settings from the Hypertherm manual into an excel spreadsheet that I could then export to SheetCam and PlasmaC configuration files. I’ll attach it here for anyone who’s intersted. If you do use it please let me know if you find any errors
Hypertherm_Powermax45_XP.zip (46.4 KB)
Reference: https://forum.linuxcnc.org/plasmac/39927-hypertherm-powermax45-xp-sheetcam-tools-and-plasmac-materials
And here’s a link to the PlasmaC post processors that have been developed so far https://forum.linuxcnc.org/plasmac/38438-plasmac-post-processors
5 Likes
Thank you for this 
1 Like

High-chair buckle for race-car enthusiasts?
3 Likes
Jeanious.
1 Like
I NEEEEEED a plasma cutter now!
2 Likes
Kyle,
What an amazing build, I plan on building very similar. I’m planning on purchasing the lowrider 2 kit off the site. Are there any recommendations you would make in adding or changing aspects of the kit?
Obviously I’ll have to add THC and I’ll look for a computer with a parallel port. I would have rather gone USB but that may not be possible.
Linux CNC shouldn’t be an issue as I used to be a server admin back in the day.
Thanks!
2 Likes
No changes come to mind for me. @darxide had trouble with the xz part breaking on his plasma, he theorized something to do with the UV and/or faster speeds causing issues. He’s got a resigned part you may look at.
Are you planning on using THC? The cheapest, and best performing, option is the Mesa THCAD card. But I don’t think you can read it’s output with a cheap parallel b.o.b. but I could be wrong. I used an ethernet b.o.b. above, but Mesa makes other types of cards too. But at the end of the day I think the ethernet board is the simplest approach. You can get a stand alone thc but the cheapest one I know of is the Proma but it alone costs more than all the Mesa cards and doesn’t integrate into linuxcnc’s planner.
(Edit)
Maybe one thing id look into is different belt tensioner parts. I’ve had so much aggravation with the standard config with zip ties. Probably user error and not specifically plasma related but just thought I’d throw that out there. I remember seeing someone adapt the primo tensioner to the lowrider, that would be nice.
1 Like
Thanks for that, yes the mesa THC looks great, I’ll look deeper into options and probably mirror what you did. 
Thanks, I appreciate your help!
I did see that concern on the UV. If I have a similar issue perhaps I’ll spend the money to have someone print his new design but lacking a printer myself I think I’ll stick to the ones I can buy with the kit for starters.
i now think my parts were failing do to high speeds and acceleration needed for plasma. i also added the 2nd x motor which adds another belt which means ur asking more of the XZ main and clamps. i have no vids of it working as my phone is… needing replacement but its night and day… i also opened the spread 40mm, added the ability to track the y axis (this made a big diff for the speeds i require… 1.25 x tubes and 23s for y and z ( my cut times halved with the faster Z due to all the probing) i will b upgrading the electronics to mesa stuff soon. PLASMA lowrider re and re
3 Likes
Um, wow! That’s quite the overhaul!
The need for speed… can lowering the current (of the cutter) lessen the need (perhaps along with lower current consumables)?
What sort of speeds did you run before and after the mods?
Deff can lower the current… I use my machine to make a large chunk of my living now… speed is important to me. I have also found that my plasma cuts best at around 45plus amps I cut 10ga at like 3000mm 16ga at 6000 and have my rapids around 12000. Z is like 2500mm now which prob made the biggest diff for speed
2 Likes
Instead of just adding larger steppers you can re-gear them and increase your usable power/speed. Larger steppers, extra steppers, and all that extra hardware just needs more power to move it around and change speed. The other thing you can do is very carefully set your accelerations, a vast majority of issues happen during acceleration (+ or -).
I have purposely geared and accel tuned for max power at ~10-15mm/s or less almost no power left above 35mm/s.
Have a look at a stepper torque vs RPM curve, and power supply voltage. I would do my best to decrease weight and tune the rest.
1 Like
I am also running 36v for the motors and cut up too 100mm sec I weighed to parts also all in around 37lbs, torch holder everything. My router table is completely stock and I abuse it… no parts break everything works fine.
1 Like