Appreciate that.
I have it printing. I have a dust collection hose adapter that connects a 2.5” flex hose to any 2.5” ID port. Im sure itll work. If not, I can model up and print an adapter
Thanks
Appreciate that.
I have it printing. I have a dust collection hose adapter that connects a 2.5” flex hose to any 2.5” ID port. Im sure itll work. If not, I can model up and print an adapter
Thanks
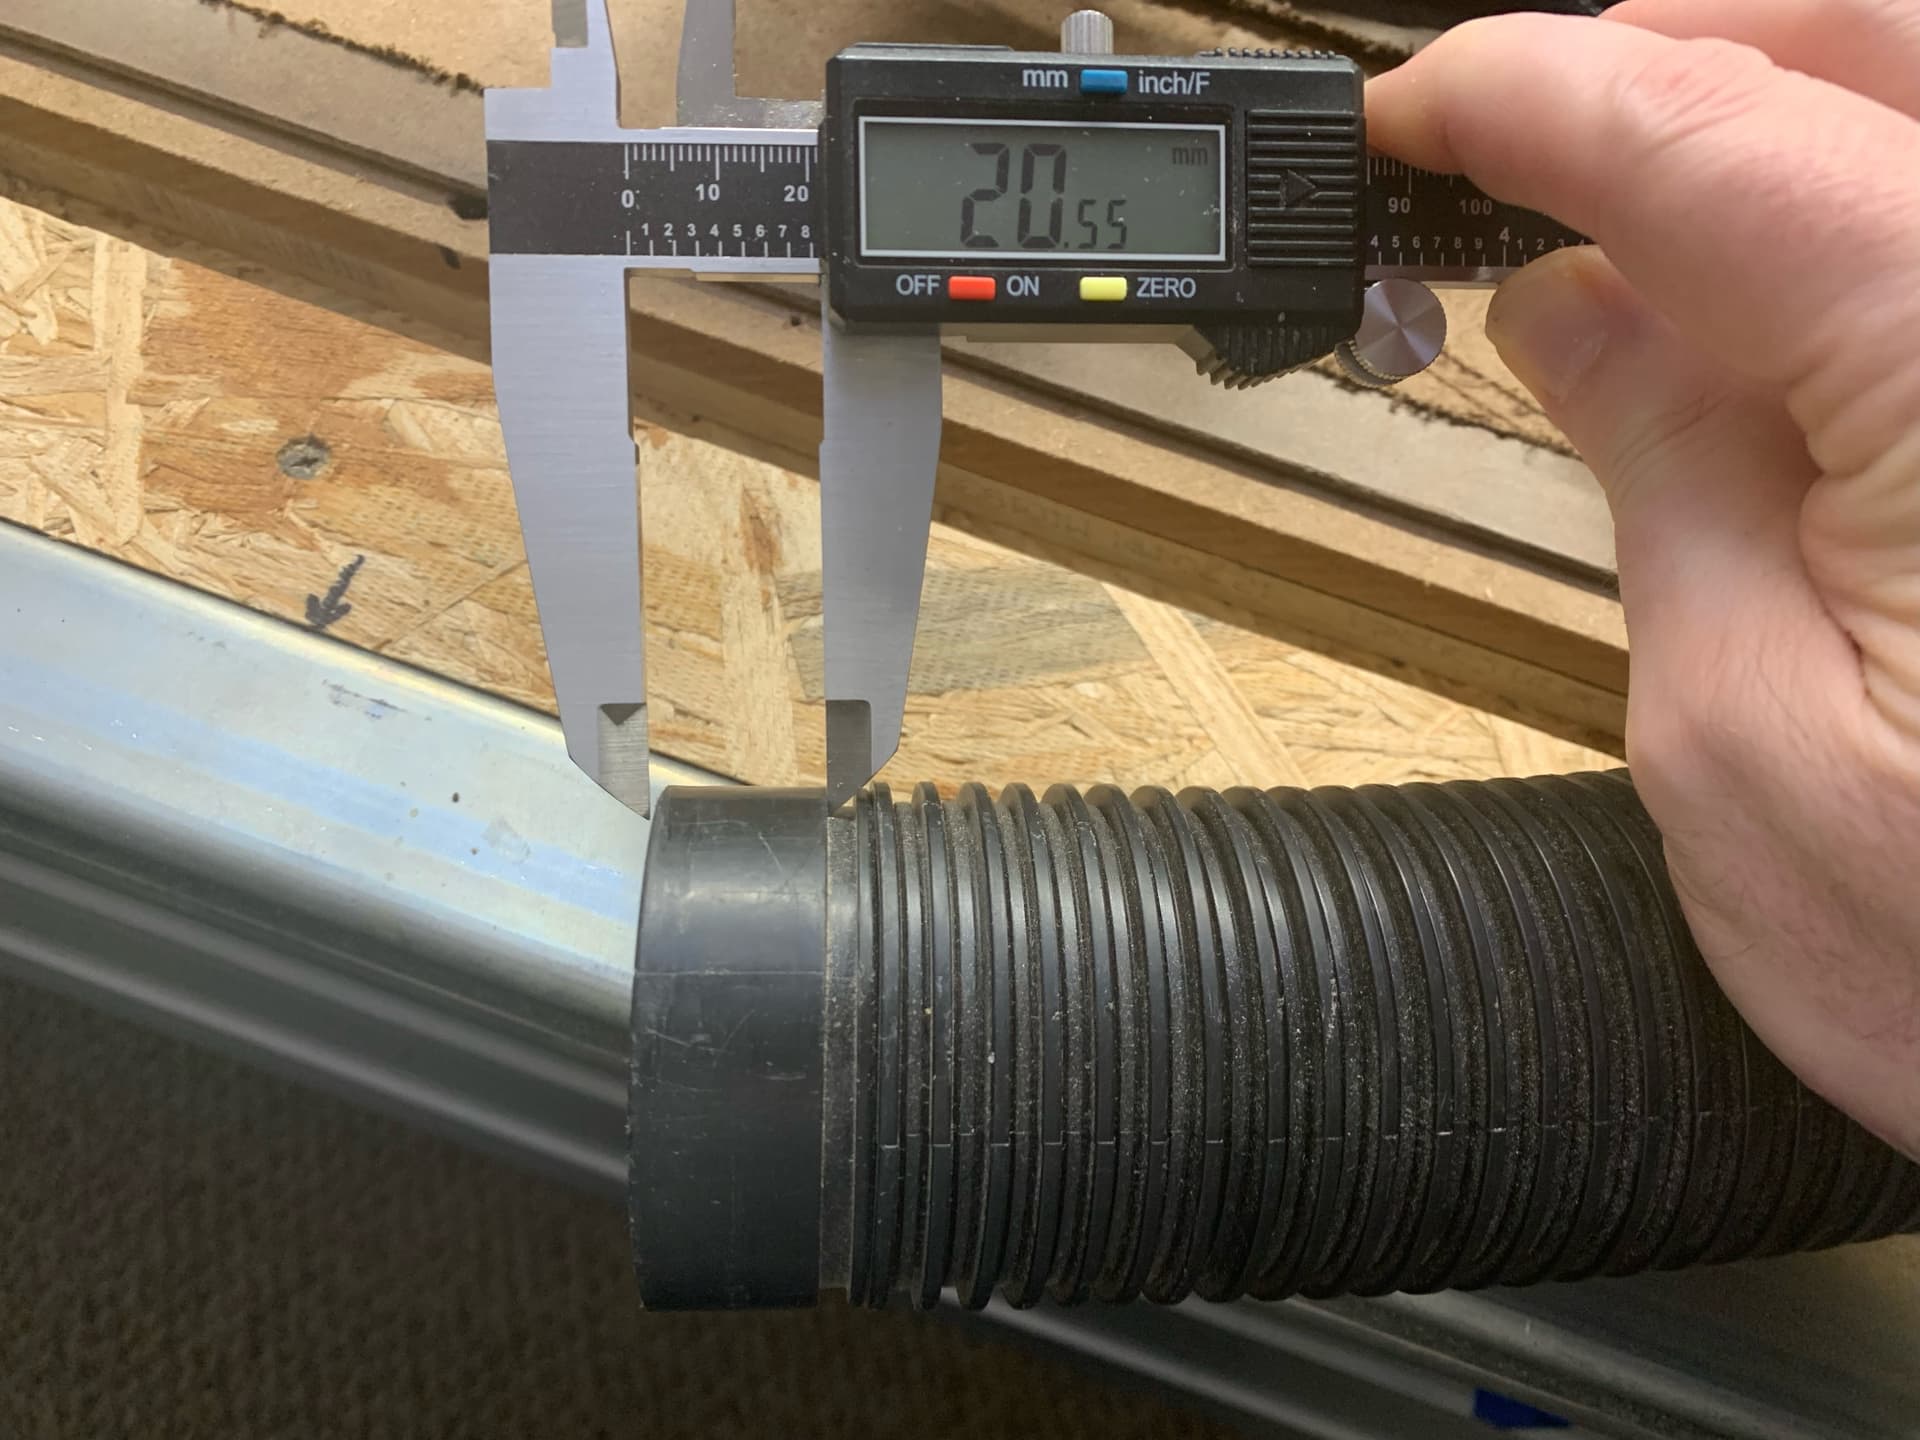
OK, so 2.5" converts to exactly 63.5mm.
The OD of the end on my Vacmaster shop vac hose measures somewhere between 61.6 and 61.9 (plastic circle is deformed, so, taking average it’s likely supposed to be 61.75 or such). So it’s technically a little smaller than 2.5."
The ID of the dust shoe I designed is 62mm. As you can tell, it was designed to fit my specific hose. If it comes out a little small for yours, that’s why.
Let me know!
I have added the following questions and answers on the “Printables” download page for the remixed dust shoe:
Q: Did the Tool Mount “ring” get changed from the original?
A: Yes. All three parts underwent changes in the remix. If you look closely at the Tool Mount, you will see that (1) the portion that the hose zip ties to, is protruding from a different position on the ring, (2) the protrusion has a little “cut out” to make sure you can still get a tool into the left side screw for attaching the mount, and (3) the curvature of the protrusion is edited to fit the larger diameter of the 2.5" hose.
Q: Do I still need to print two of the Tool Mount “rings” like with Ryan’s V1 original?
A: Yes. As mentioned above, quoting Ryan, “Two Tool mount prints, one of each Top and Lower.”
Q: What inside diameter (ID) is the opening (hose port)? What outside diameter (OD) of hose end will fit?
A: The opening (hose port) is 62mm (ID). My Vacmaster shop vac hose (nominally 2.5") is approximately 61.75mm and fits perfectly. The actual conversion of 2.5" to millimeters is 63.5mm. Actual dimensions of hoses vary by brand. Measure yours first to know for sure. You may need to remix this to make it fit your hose, or design an adapter for it.
Great info, thanks!
Turns out my hose adapter is 2.25” OD. So it’s about 6mm off. I have so many adapters etc for my dust collection I misremembered the size
I’ll need to get time to model and print a reducer- thinking just a simple ring, 10mm thick, 57.2 ID, 62mm OD, that I can glue into the shoe, and the adapter can slip into
Thanks
All of my hose ends begin smaller than nominal and taper out to at least nominal. I doubt that your dust shoe port is deep enough to meet the nominal size.
@tgm022861
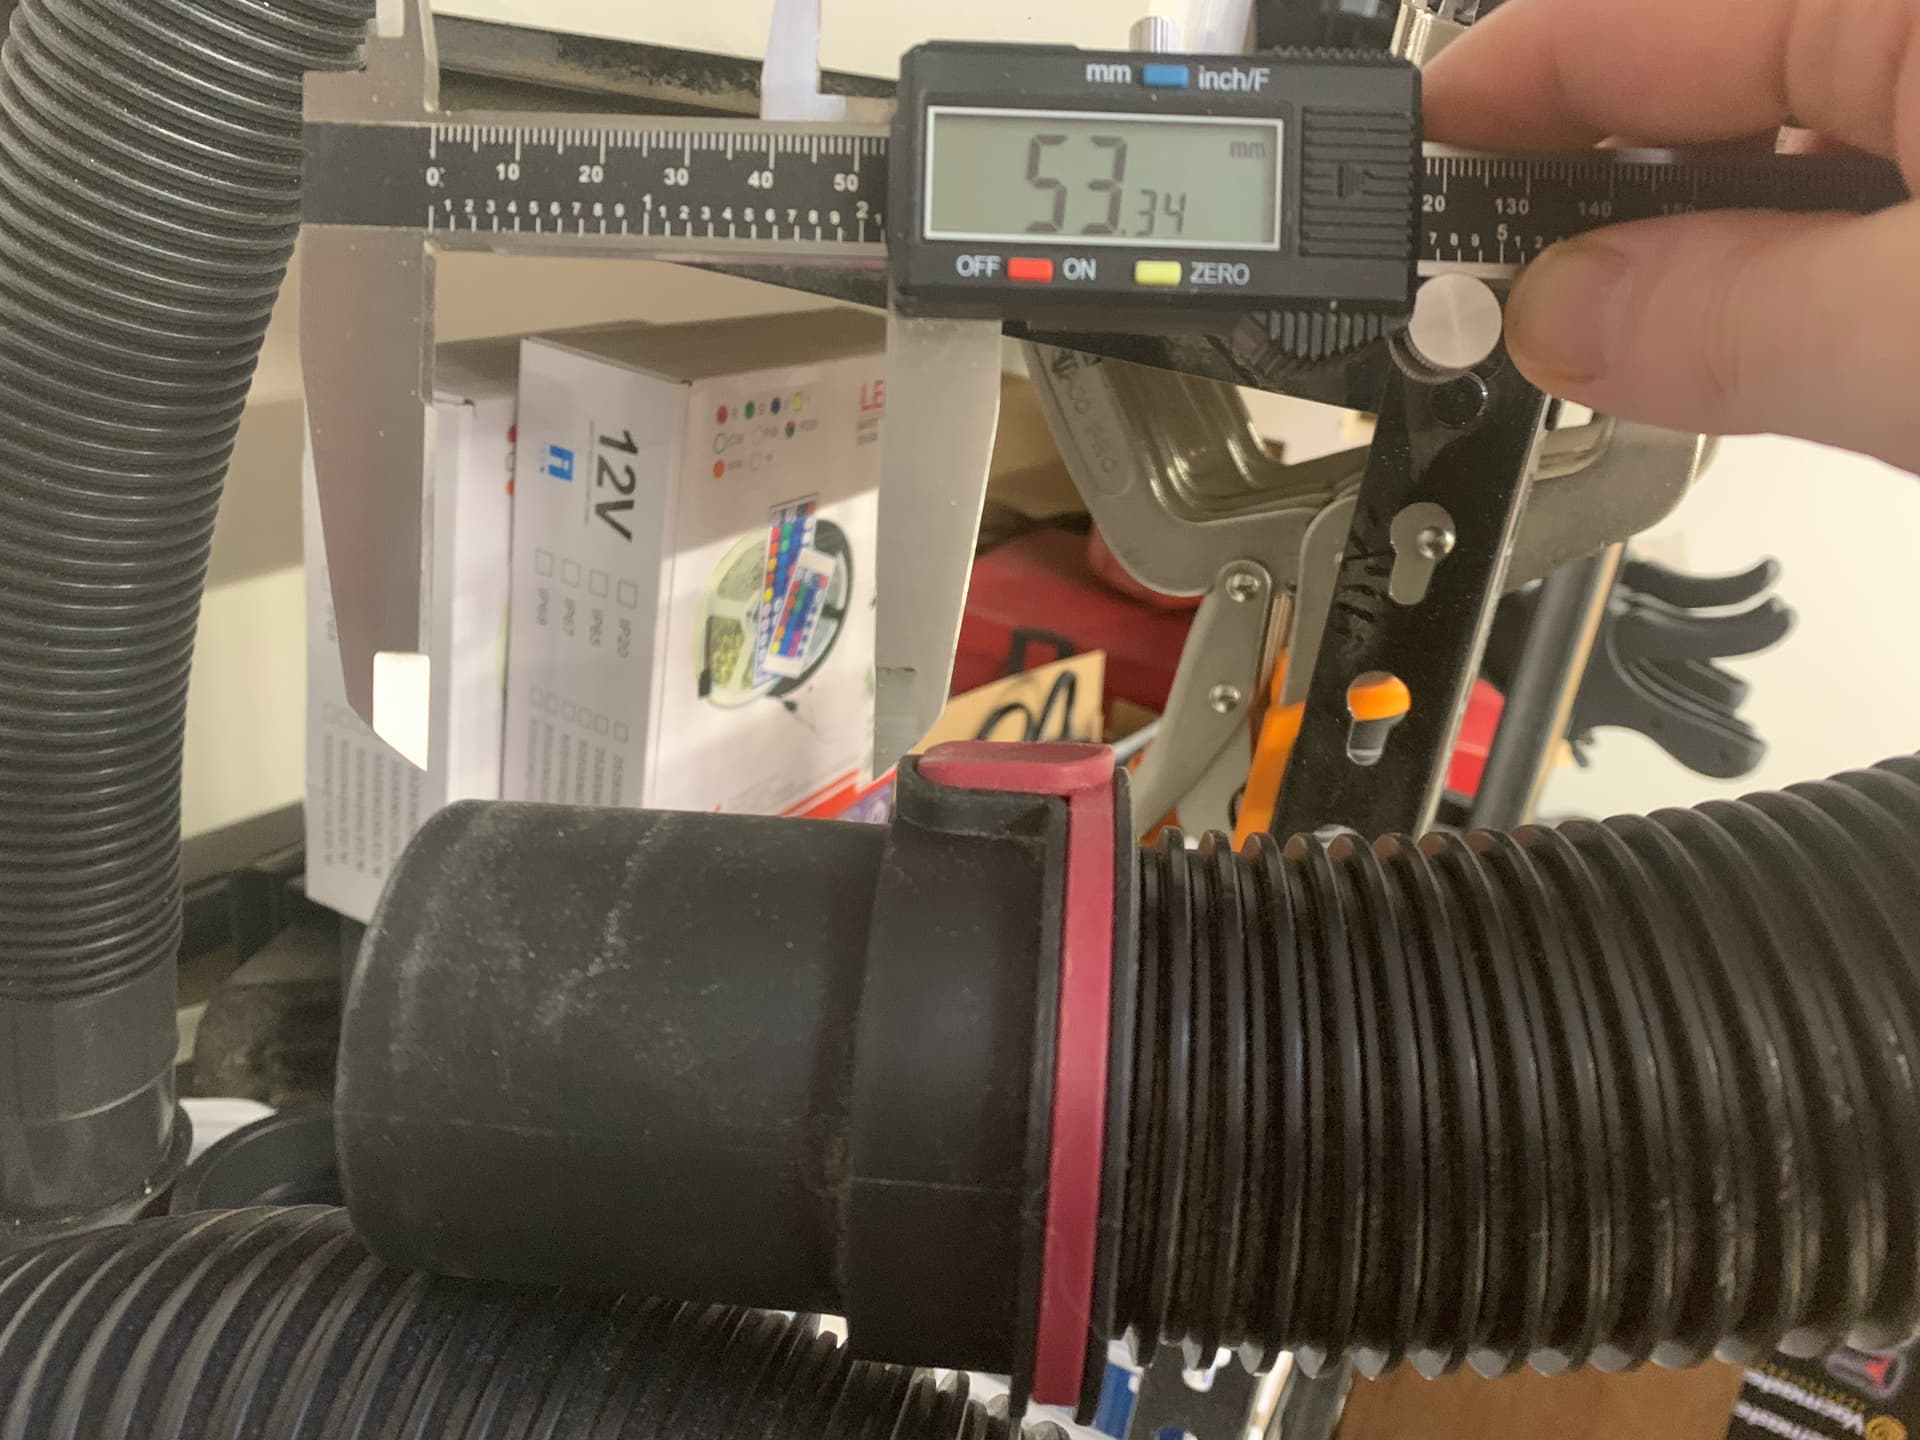
My Vacmaster hoses come with two different styles of ends: one of them is short, not tapered, and fits. Another one is long, tapered, as does not fit. Attached are pics:
This hose end is short, not tapered, and fits this remix without need of adapter:
This hose end is long, tapered, as does not fit this remix without need of adapter:
Please note: the caliper readings in these photos are not highly accurate, but provided merely for a sense of scale. Whole holding two items with one arm and hand (hose and calipers), and another item in the other hand (phone), I was not able to get it highly accurate.
Also note: the depth of my remix’s port matches pretty closely to Ryan’s original, so his design must have been intended for the shorter hose end as well.
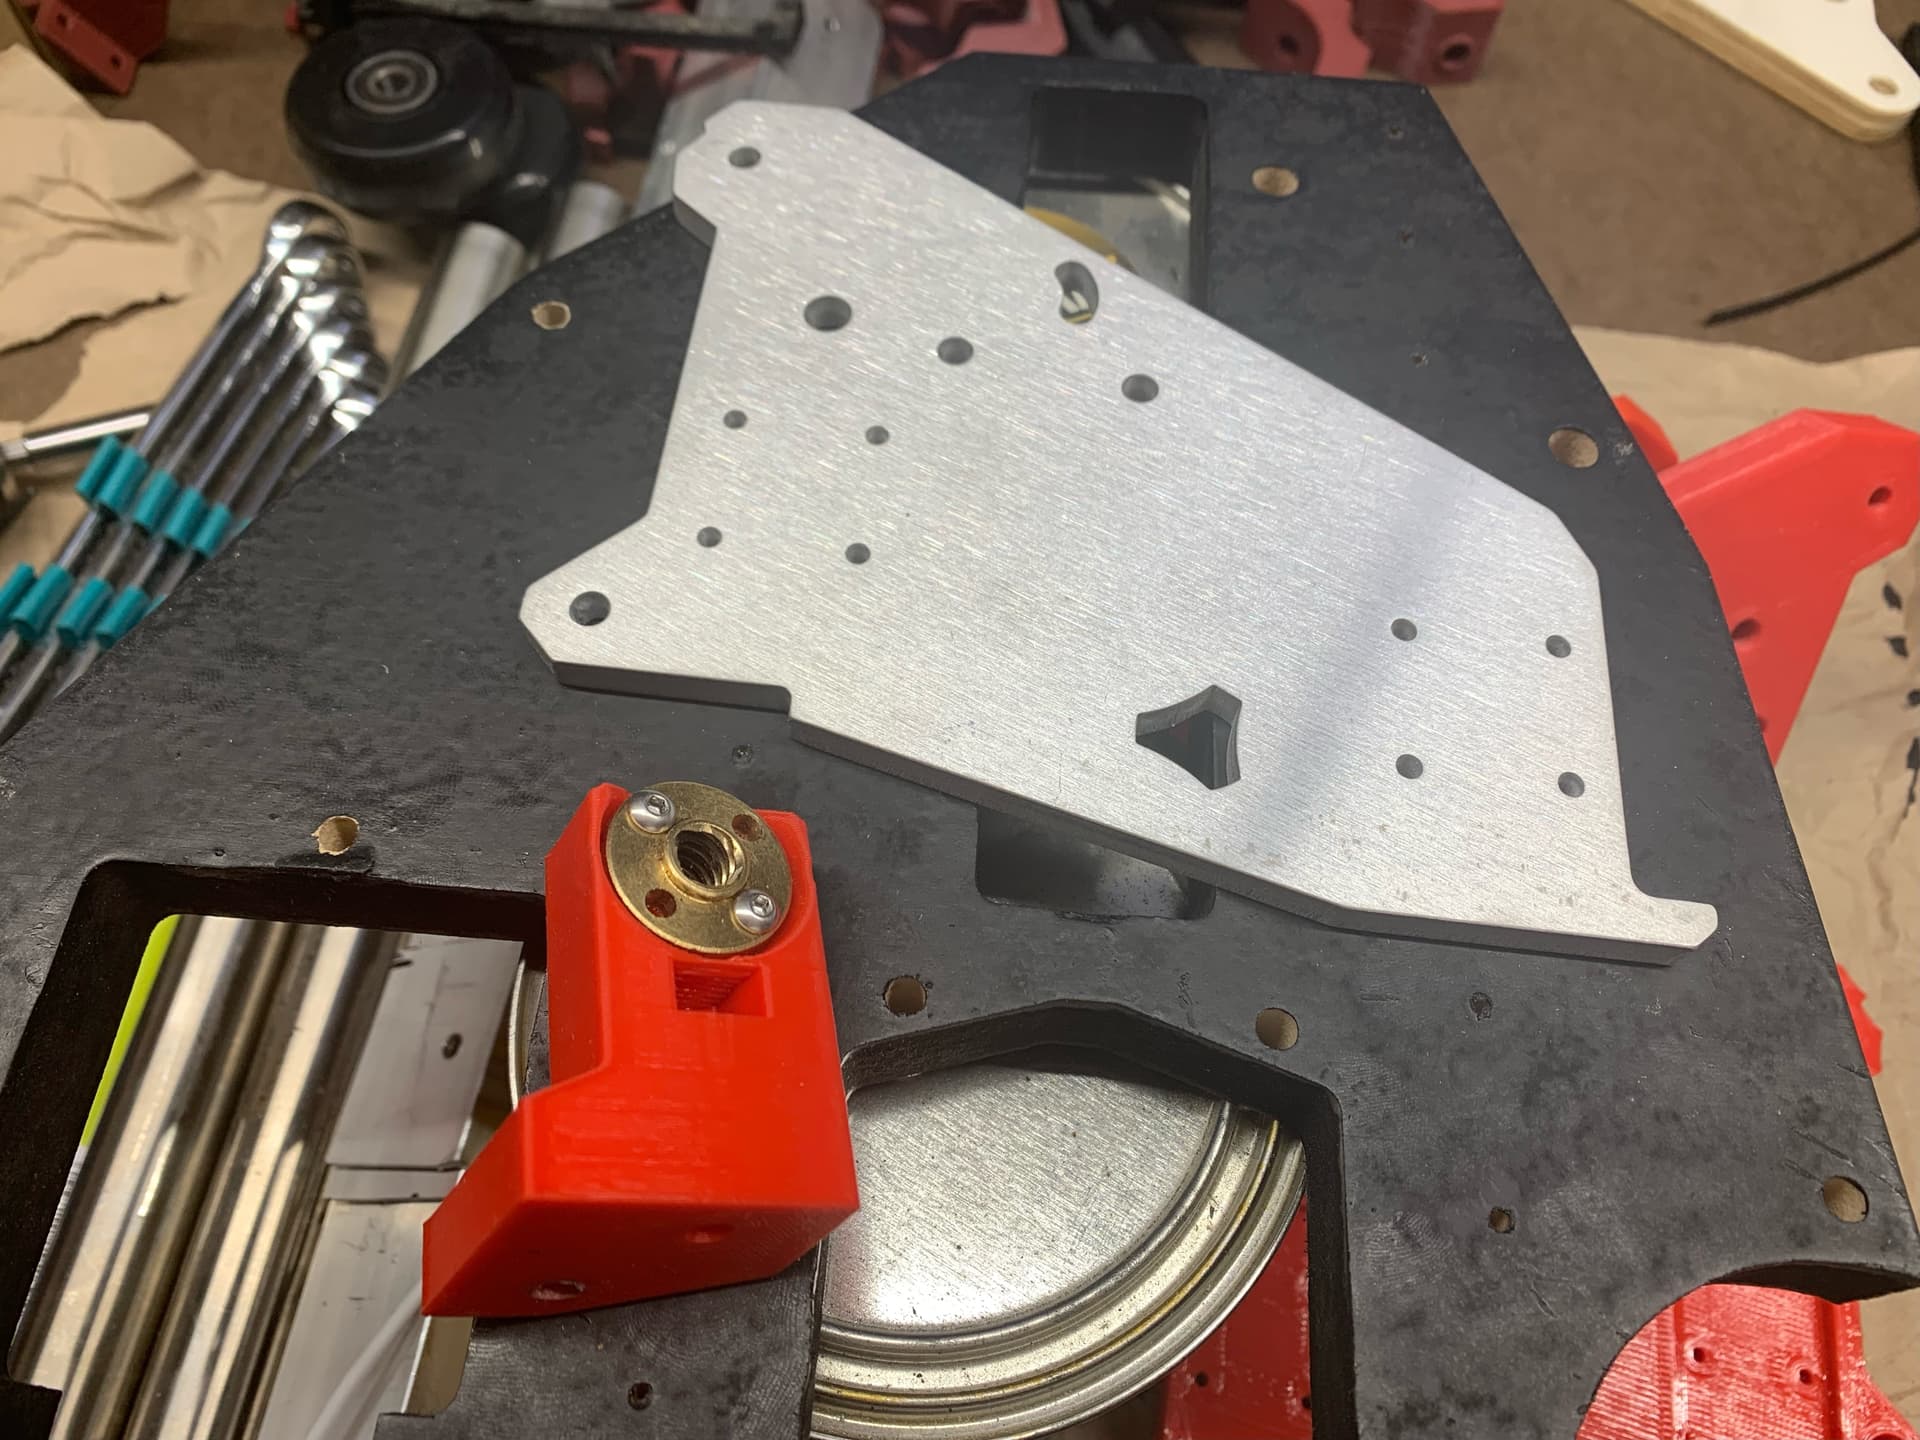
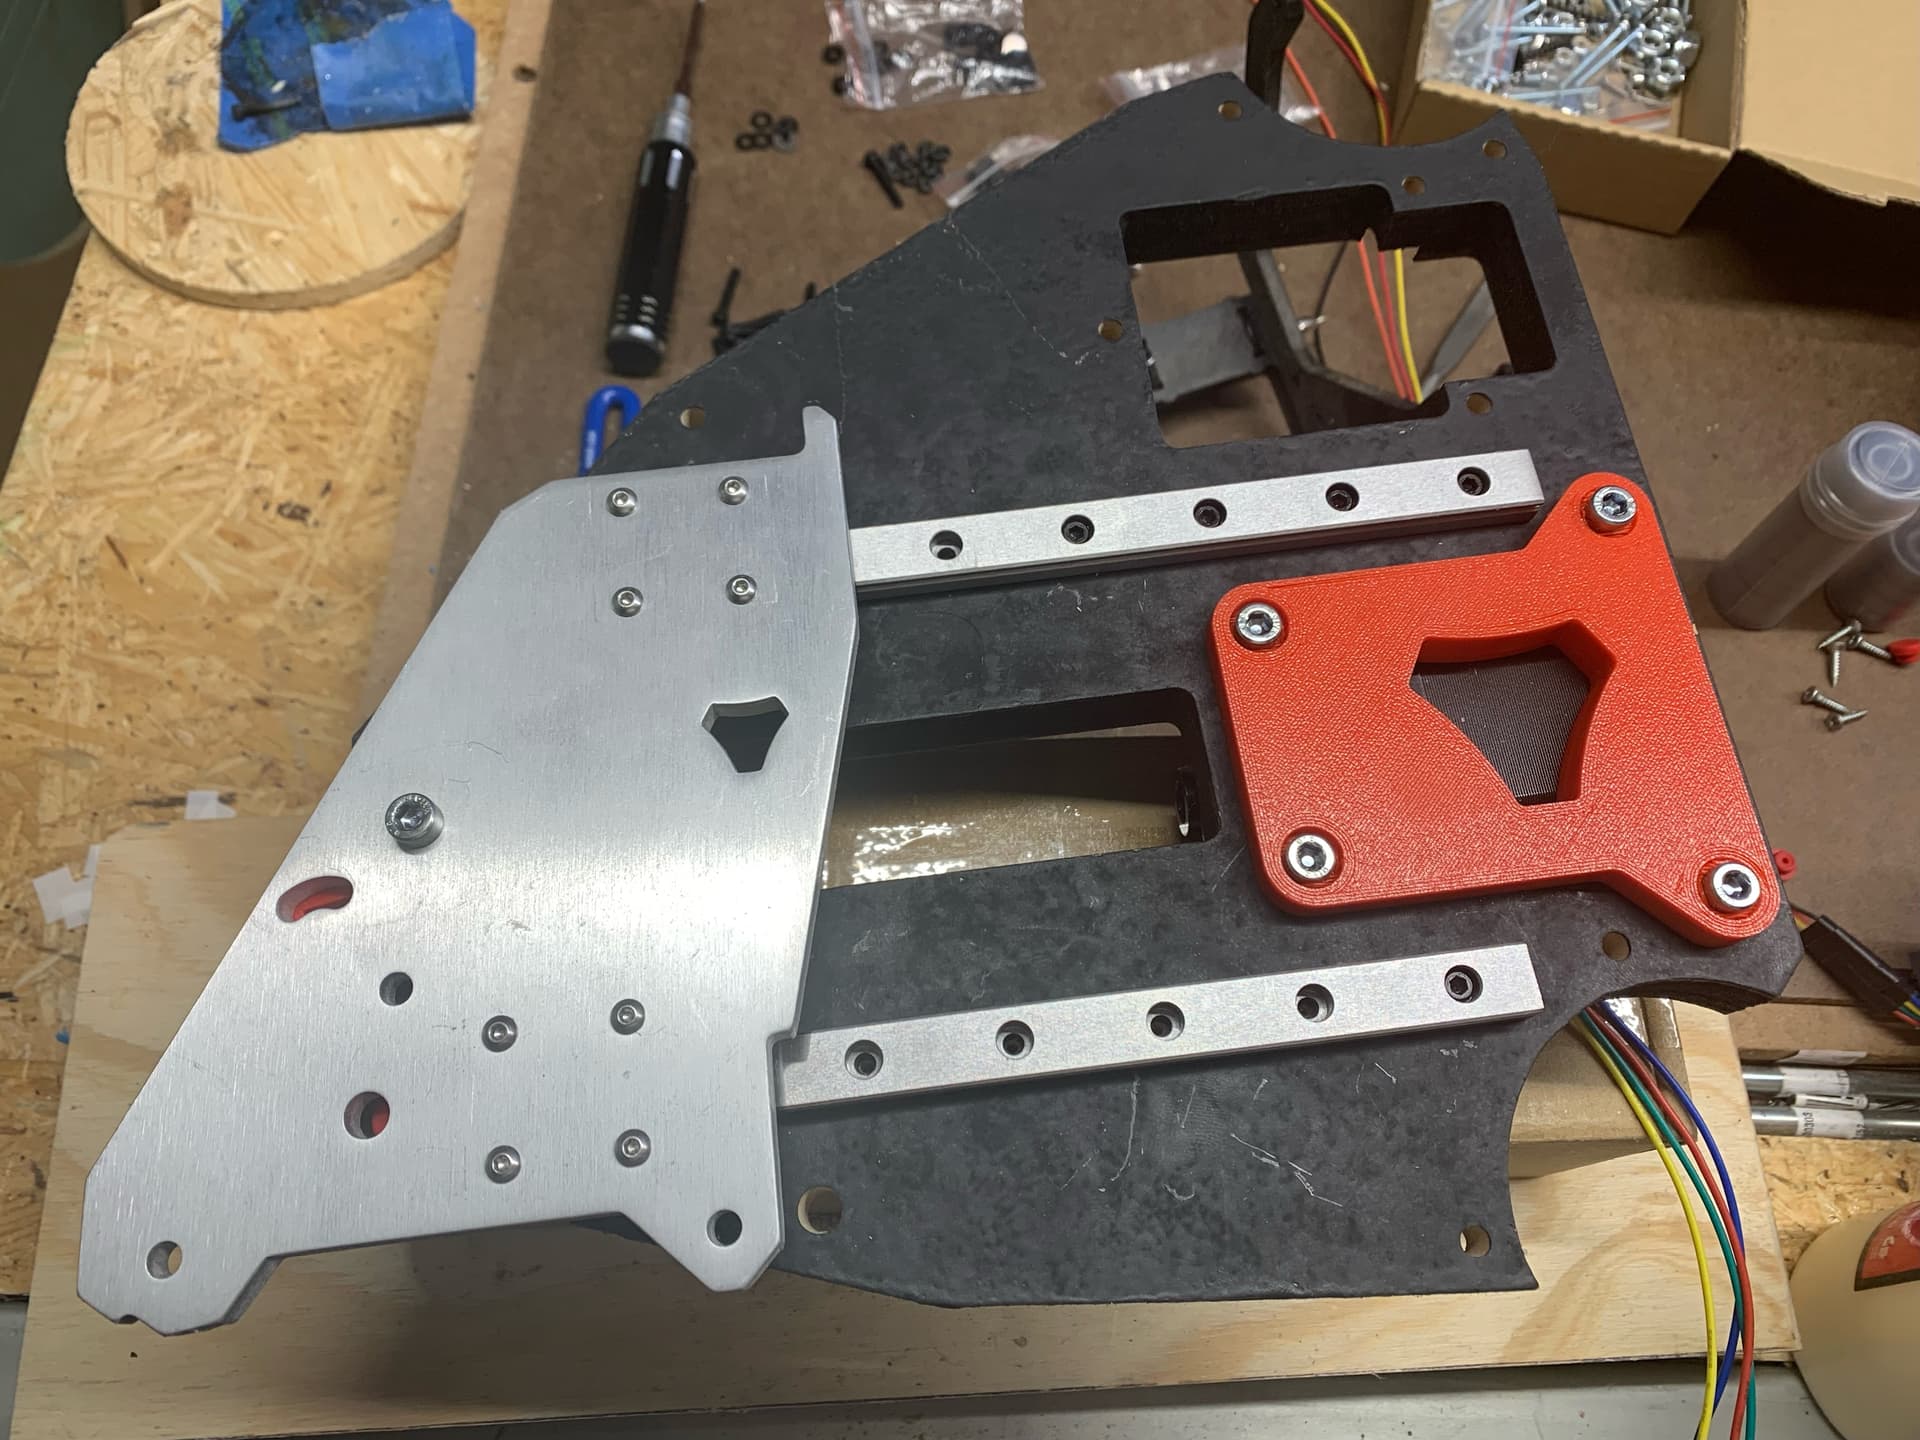
Well, this is exciting. My LR3 parts/supplies from V1 arrived today, and also other LR3 parts/supplies sourced from Amazon arrived today! I now have two gorgeous, milled aluminum XZ plates, as well as my linear rails, endstop switches, bolts and nuts that were needed, etc. I’m thankful to Ryan for the lightning fast shipping dispatch of my order! I’m also thankful that Ryan added descriptions and instruction step details on the “Assembly” section on the LR3 doc! Stocked and moving forward!
About halfway through the picture descriptions. Still have a lot to go. Just trying to balance this well and not burn out on LR3 stuff. So taking a little break and try to go get in the water for a bit today.
If anyone deserves breaks it’s you.
Any chance you’d be willing to share which parts you sourced and which you got from Ryan?
I’m not sure I can swing $450 in a single
Purchase and want to break it up, but also want to support Ryan and V1.
Ryan- how does buying through Amazon affiliate compare to buying through you directly?
If you can save money feel free to do so. Most important thing to me is you get a build done. Affiliate links are a wonderful option, unfortunately they frown upon me encouraging their use in any way.
@Neilp
Are you building a LowRider for the first time, or upgrading an existing previous version?
I’m upgrading so my list of items to buy was pretty short.
Its an entirely new build, but Ive been following for a couple years. i recently moved and am now in a position to build one, and was super excited to see the LR3 was in Beta.
Yeah, I either need to find a way to spread the spend, or wait a couple months. But i cant guarantee ill get the time to revisit. I did the same with the LR2 and then we ended up moving, and its taken me a while to get my shop squared away enough to dedicate to a project. i came buy a LR2 kit and saw the beta and teasers for the LR3 so ive been holding off for a month.
Thanks Ryan
Many, many thanks to Ryan (@vicious1) for helping me solve an issue getting the lead screws properly aligned!
Hint: If you’re using auto bed leveling, then your printer may be compensating for a bed that is not trammed properly (not parallel/coplanar to your X axis cross bar and perpendicular to your Z axis height bars), and it may be unnoticed, undetected, not a problem for nearly every print, but if you check with a precision square, you may find your prints’ sides are not square to your base layer. On printing the optional stubs for the optional milled XZ plate (and probably also an issue with a printed XZ plate), it does not take much misalignment (out of tram) on your printer to cause alignment issues for your LowRider 3 lead screws. If you are not very, very certain your printer bed is “trammed” properly, then get out a level (tested and known right) and get your printer and its bed leveled and trammed. (Auto bed leveling is really only supposed to be compensating for dips and mounds, not an out-of-tram bed.) I was stuck, and Ryan pointed out that might be an issue, and it seems it was. With all that said…
I am excited to share with you all a very short video showing both Z assemblies powered and working!

A level won’t help tram your bed.
Whoa, that is wild. We have our first random FAQ. Lets hope this does not pop up too much. So glad it was solved with such a small part.
So now when building your beam be sure to use the tops of your braces as your outer connecting surface to the XZ plate. This will prevent toe in, toe out issues.
Sure it can. Check your table for level, check your printer base for level, check your X axis bar for level, and your Z axis bars for plumb. Then level and tram your bed. If you don’t check for level as a starting point, you can do false Z height checks on a bed that is askew from aspects of the printer frame. If one does not reference a starting point against which everything can be compared, you really don’t know what you’ve got.
PS: just because one can tram a bed without a level, using some other reference point (such a printer base that is flat and trustworthy for shooting comparisons at multiple places) does not mean a level cannot help tram a bed.