Well, it’s called a TF card which I guess is due to size? And no change in slicer. What gets me is I resliced the Primo X Motor and it was like the first time, ~ the first 3mm were poor yet the little test piece I tinkered was fine both times I printed it. And the printer did stop several times before printing anything for unknown reasons.
Something’s wacky, RH tells me a file that actually prints is corrupt and unreadable, it’s the Primo Z Motor file that printed lousy for about the bottom 3mm. The little test piece file begins with with the M190 and M109 commands. What I don’t understand is how do I scan a ‘drive’ that in reality is a USB port? I’ve tried searching in Windows with no joy.
Well, maybe I’ve made some progress. The warning of something wrong with the D drive was a pop-window that quickly disappears, it had a difficult to see ‘auto-play’ printed that was apparently a link, I hit it and time and got another window asking if I wanted to fix/repair D drive. Trying another print to see how it goes.
Look at the acceleration and jerk numbers on your printer. It’s taking too long to slow down for the corners, while still extruding, hence the extra filament deposited. Do you have a part fan on your printer that turns on when things are likely to get hotter because of the slow speed?
Can’t say I know where to find those settings or what to do with them but, one of many things I don’t understand is why when I printed the Primo Z Motor, the first 3mm or so was really lousy but above that for the most part OK?
That piece in the photo on the right isn’t that bad. But since you asked what you can do to help with that seem here are some ideas.
In your slicer you can adjust the location of that seem. For mechanical parts I usually use corner but random might be a good option to spread the seems across the entire piece.
I would also suggest you adjust linear advance settings for this print.
Video to explain.

1 Like
And the little test piece I drew up on the left prints consistently very well yet the piece at the top, the Primo Z Motor, consistently prints like crap for the first 3mm or so. Thanks for the video, at this point I’ll look at anything, it seemed to be doing pretty well and then not so good, and I didn’t change any settings.
Well, I found this little test https://www.thingiverse.com/thing:277394 and printed a number of cubes changing the jerk and acceleration values. While some are better than others, not one has as clean bottom layers as the little test piece I tinkered up which is basically half of a thick-walled tube. I just don’t know where I should be looking to learn why I get a far better result on a semi-circle than in a straight line?
Changed the nozzle, no joy. The bottom layers of things that printed fine before now look like crap printed at the same, previous settings.
If you can get your hands on a dial indicator or any other measuring device, I would set it up on the far end of the gantry (the power supply side) and raise the bed manually, .1 or .2mm at a time.
Measure if the Z axis is ACTUALLY raising starting from the very first .1mm ordered after zeroing.
This is how I did it. Note, this reading I think was after ordering two moves of Z + .1mm (so, .2mm = .008"), and the reading was just over .001. This was causing the exact layer issue you are having (where it clears up once I get high enough)
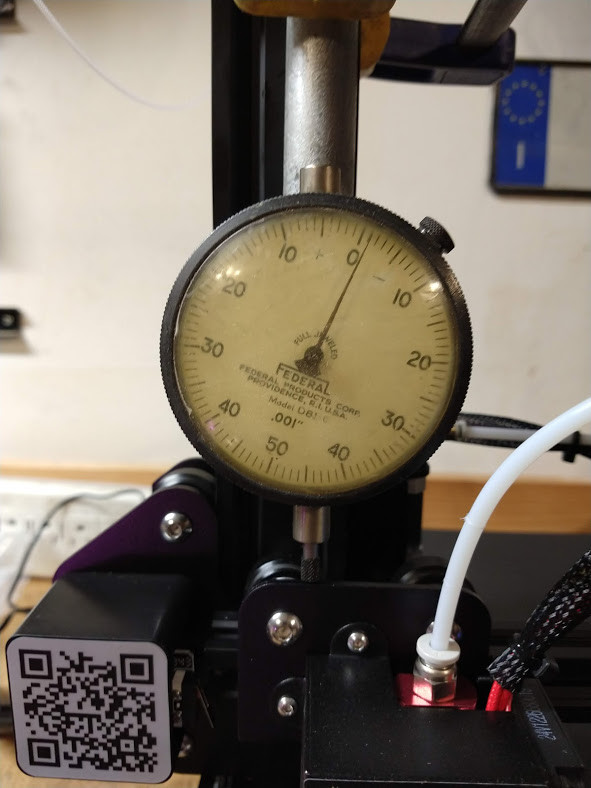
No problem with the dial indicator, I have a couple from years of playing with cars/motorcycles, just have to figure a way to mount to the gantry but two questions, one dumb and one maybe not so dumb.
-
How do you raise the gantry .1mm at a time?
-
How did you correct the issue?
And of course it makes me wonder what caused the problem as it’d been working pretty well until it wasn’t.
And I have to wonder why I’m able to consistently print the little test-piece I tinkered up with no bottom layer issues?
- you can use the LCD interface. Go to prepare–>move axis–>z axis–>0.1mm. then every click of the knob will move the axis by that much.
Your can also do it with something like octoprint, if you are using that.
I just used a small bar clamp to secure the dial to an upright.
- this was being cause by loose rollers for me. I know you said you checked them, but I believe I had this exact issue with the bottom print layers and this fixed it.
Why that one test piece works? No clue
1 Like
Thanks for this!
Must be my day for DOH! moments, I was looking in control->motion to move the axis DOH! and thinking how to clamp the indicator to the crossbar rather than an upright DOH!.
Gotta bunch of stuff going on today but will get to it later today/tomorrow.
1 Like
Well, I took care of a few other projects around the house and got back to this. I screwed an indicator to a piece of wood which I clamped to an upright, I’m satisfied it’s quite rigid. It seems as though there’s backlash in the system. If I lower the gantry a bit, zero the indicator, and call to raise it .1mm at a time, the first click it raises only .001", it may do that for another click or two, then give me .003" before giving the expected .004". Back it down and do the same routine and it consistently repeats. This is on the right side of the gantry. The Z connector grub screws are tight and I’m clueless as to where else I should be looking?
I’m not sure how tight the lead-screw nut should be screwed to the frame?
I suspected that result. Same as mine. This is almost certainly what is causing your lower layer issue. The question is why.
Make sure your rollers on the Z rails are snug. You should not be able to push up and down on the gantry and have it move WITHOUT the rollers beginning to roll a bit. I tightened the eccentric nut on the INSIDE roller on both sides of the gantry.
Take a look here:
They seem quite snug to me, none of the rollers can be easily turned with my finger while it sits . But still get the small initial movement as if it needs to take up slack somewhere before moving the correct distance.
I added the lead screw nut to my reply above, not sure how tight it should be screwed to the frame?
I would think there should be no play in the lead screw nut either. Snug it down. If the nut is allowed to move away from the frame it could be inducing backlash. (First few turns raises the nut until it hits the screw heads, THEN the rest of the gantry starts moving)
I think they address lead screw issues in that link I posted.
They did, I just read it. I’m gonna try the first 3-mm of a print that’s been a problem.
Just another data point, at least for the Ender 3:
If I go Prepare, Preheat PLA, the bed and extruder both heat at once, if I go print form TF card, one heats before the other.
Well. no joy, first layers are nasty. What gets me is how consistent the movement is after lowering the gantry and then starting to raise it. The first command to rise .1mm consistently yields .001" and it takes 3-4 more commands for .1mm movement before moving .004".
I’ll play with it over the weekend, with a boatload of people being uncaged after the pandemic heading for the beach it’ll be a good place for me to avoid this weekend.