At the request of my son-in-law I’ve created a camera slider that borrows from my experience(s) with MPCNC. With Ryan’s okay, I’ve chosen to call it Mostly Printed CamSlider… as it originally used the entire Z-axis lead-screw assembly from MPCNC. It was slow and noisy, however, so it’s been converted to belt-drive… but it was inspired by MPCNC and still uses a couple of MPCNC parts in its construction. Though not RC-related, it’s been an interesting side-project on my increasingly eclectic Flitetest forum foam needle-cutter thread. Check it out on
Oh man, I wanted to do something like this for my Dad. We both love those timelapse landscape shots. I have the “Delight” plugin for chrome, which puts timelapse landscapes from guys like http://www.jonathanmitchell.co/ in new tabs.
I’m making a MP3DP, and I’m hoping my dad will take my main printer to his house, and I’m going to try to convince him to try this project.
I bet we could figure out a way to quick join/break the conduit so that he can pack the whole thing into a backpack, and then set up a 4 foot timelapse somewhere in the mountains.
Print something like the nut trap but a full tube about 4 or 5 inches long. Then you can just leave half sticking out one tube and use the other side for your joining tube. Keep the screws on the bottom and the bearings won’t hit them.
Almost three years later, I’m looking closely at this again. December 19th is a good deadline for me. I could gift it to my dad then. I did find a pretty neat, newer project, but it uses 8mm rods and another chunk of aluminum, and I want to make this work with conduit because… It’s neat. The software/display here is pretty cool though:
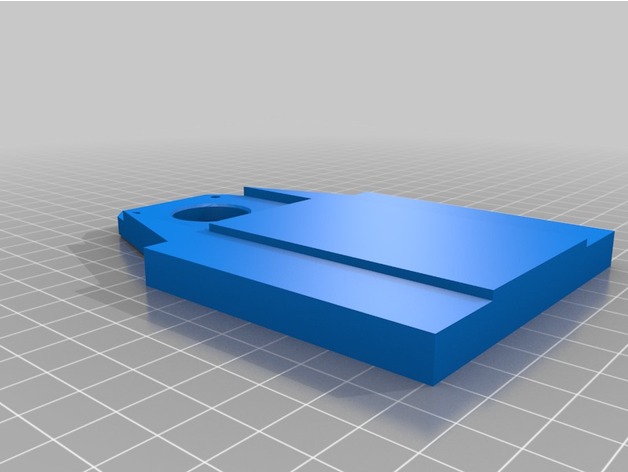
I’m looking closely at your files, and I think there is something missing between the big gear and the slider platform. Did you manually drill a hole or glue on the turntable parts?
I like Barry’s idea for breaking down the pipes in the middle. I also would like a way to bolt the middle underside to a tripod. But I’ll build it to your spec too.
I just started making a cam slider (MCMPCNC - mostly cut on MPCNC). It uses 1/2 inch conduit for the rails and center pan rod. I haven’t decided if I am going to have bearings roll on the pan rod or just have a loose fitting printed sleeve. There won’t be any weight on it and it just needs to turn the upper turntable as it slides. I printed the dolly wheels, inserted the bearings, and sprayed a light coat of tool dip on the outside and it rolls pretty smooth and quiet. Still a work in progress. The hard part for me will be programming the Arduino.
If you’re talking about my still WIP CamSlider (https://www.thingiverse.com/thing:1984162)… I’m sure you can do better. I just reused a couple of early XYZ parts IIRC. The slider top plate eventually incorporated the lower section of that little turntable and the large gear the upper portion IIRC… though there seems to be a “disconnect” somewhere in the following photos
[attachment file=117109]
[attachment file=117110]
I just cobbled together enough stuff to give a rotational axis sitting on the linear axis… and I thought the herringbone gears looked cool IMO (though a belt driven setup would probably be smoother).
I had most fun with the Arduino code. It’d been a few years since I’d last done any programming, so it’s pretty crude. Just trap the key codes from a IR remote (there are cute little Arduino sketches to do that) and then set up start and end points, with a fast preview run to insure it does what it’s supposed to.
Sitting at daughter’s table, using their internet right now… mine won’t be set up until tomorrow afternoon. Should be quite the upgrade… going from 10Mbps (fastest I could get at my old place) to 250Mbps (fiber).
I’ll look forward to see what you (a real “pro”) come up with… please keep us up to speed with your progress.
I don’t know. There’s a lot of stuff you’re doing that I don’t see anyone else doing. The IR remote is great. The rotational axis is great. The using a bunch of parts I already have is great.
When you say “cobbled” are talking about in CAD or with glue and screws? The part I’m trying to get looks like it’s your camera_slider-platformm.stl with the bottom of the turn table attached. The camera_slider-platform.stl doesn’t have that base on the top:
I’m starting at the camera and working my way down to the base. I’m perfectly willing to drill a hole and glue on the bottom part of the turn table.
Cobbled together in CAD. I don’t think I incorporated the actual turntable… but the bearing IIRC was housed in the large gear and the bolt runs through the part you show (shown bottom side up)… so yeah, there’s a hole and small boss (or separate bearing washer) added (I did it in CAD?) to the part you show to provide clearance so the bearing can freely rotate.
Gonna be out of pocket the rest of the day probably… will check back when I can.
I have been poking at the software some. I think I have all the CAD parts made, but I had to consume my ZXY for parts, so I’m waiting until I get the right ones to do the “first draft” assembly.
I decided to use an ESP32 and a web browser. It’s currently connecting to my home network, but I imagine it doing the aphost thing later, when I take it somewhere for some video.
I found this library, which seems like a much more robust method than I’ve used on other ESP projects, and although it’s not very flexible, it builds a web page really quickly from just a couple of lines of code:
Here is the result (from my computer):
[attachment file=120501]
The mobile looks similar, but it adjusts things to there’s basically one button wide and they are all in series.
The use is similar to the remote. You can jog the length and angle adjustments, save a start location and and end location. Input the amount of time you want the track to take, and then hit play.
I am using the same AccelStepper library you did.
I’ll post the .ino file to github or TV. But it’s really very simple.
Fantastic! I really didn’t think anyone would be interested in what I thought was just a fun Arduino project for my own edification and re-familiarization… I like it! But, of course, I’ll need to see some hardware and movement before I can fully believe you’ve actually spent time improving this rather over-blown/engineered, camera-mover, thingee
It’s very janky ATM. The angle per mm is wrong, and the manual feedrate is too high so it continues after I let go for a couple seconds.
I am printing something that will hopefully let me attach it to a tripod and I bought some smaller motors. Then I need to somehow attach a battery and the electronics.
I have started researching different camera sliders after looking at this thread. Have you seen this one that also does Pan/Tilt? He has a lot of wood in his project which looks like could be made from plastic or metal.
That looks pretty awesome. It seems like it’s one axis (tilt) away from being what I’ve got. I have the tripod mount finished. It is very heavy and overpowers on acis of my tripod, so I might steal his idea of the leg support. Adding another axis wouldn’t be too hard. It thought pan was probably overkill though.