TL;DR: They are neat, and require a lot of work! The FYSTEC ones especially.
If you don’t know what a TMC2130 driver is, then check out this:
and (sponsered video for them):
https://toms3d.org/2017/12/09/tmc2130-guide/
I was excited to try something new (DRV8825s are just not fun anymore, they just work!) and I’m working on a new 3D printer (the MP3DPV2) so I thought this might be a fun thing to play with.
There are several variants, the watterott’s are made in Europe, or by a company in Europe, I think. I bought mine from AliExpress, and they claim to be a “FYSTEC” brand. They can be used in standalone mode, or you can communicate with them via SPI. I bought the FYSTEC ones, and I didn’t mess with the standalone mode for more than a few minutes.
First off, why would I want them? Features I like for a 3D printer:
- Quiet, which gives me a sense of calm, and I can hear problems with the printer’s motion easier.
- StallGuard, which lets me use the motors themselves to detect endstops. Useful only for X and Y.
- Software configurable current limits. No more messing with potentiometers.
- Maybe better thermal dissipation, due to the heat sinking through the PCB, instead of through the die.
- Error feedback, if a cable comes loose, they can monitor that, and report an error (and reset Marlin).
- 1/256 microstepping. The signal from Marlin is still 1/16th steps, but the driver interpolates 16x more than that, which could be smoother, or maybe quieter, IDK.
Things that don’t matter for the CNC stuff:
- StallGuard, Unless you’re using dual endstops, there’s no point in endstops
- Quiet, I can’t hear anything when my CNC is running, besides the vac and the bit, and sometimes the router.
Negatives compared to DRV8825s:
- They are a lot more work to set up, especially if you buy the FYSTEC ones.
- The require soldering, electronics, and software skills.
- On paper, they can’t sustain as much current as the DRV8825s. I haven’t done any experiments with this. They will do plenty for a 3D printer, but they have a sustained max current of 1.2A, and peak current of 2.5A (I think). We usually set the DRV8825s to 0.7V, which is 1.4A. That’s about the most they can handle. So on a CNC machine, we’ll need some good, scientific experiments to tell which works better. My gut is that they will both work, and they will both sometimes fail when you jam the bit into the work.
- They require a lot more wires running across your controller.
- The rambo/mini-rambo doesn’t come with them, and those are two awesome boards.
The FYSTEC rework:
The ones I bought came already soldered in stand alone mode. I have a decent “rework” station (it costs about $150, and has hot air, adjustable temps, and different solder tips). There are several things you have to do to get these into working order:

- You have to remove all the pins from one side. This requires heating up all 8 solder points at once, and pulling them out while they are still hot. It’s a little easier to just destroy them, and pull them out one at a time, but you can damage the PCB when you go destroying them. I found the best thing that worked for me was clamping the board down, hot air in the left hand, and fat-tip soldering iron in the other. I would try to heat the pins with the soldering iron, and keep them molten with the air, and I used the solder iron tip to push the pins out.
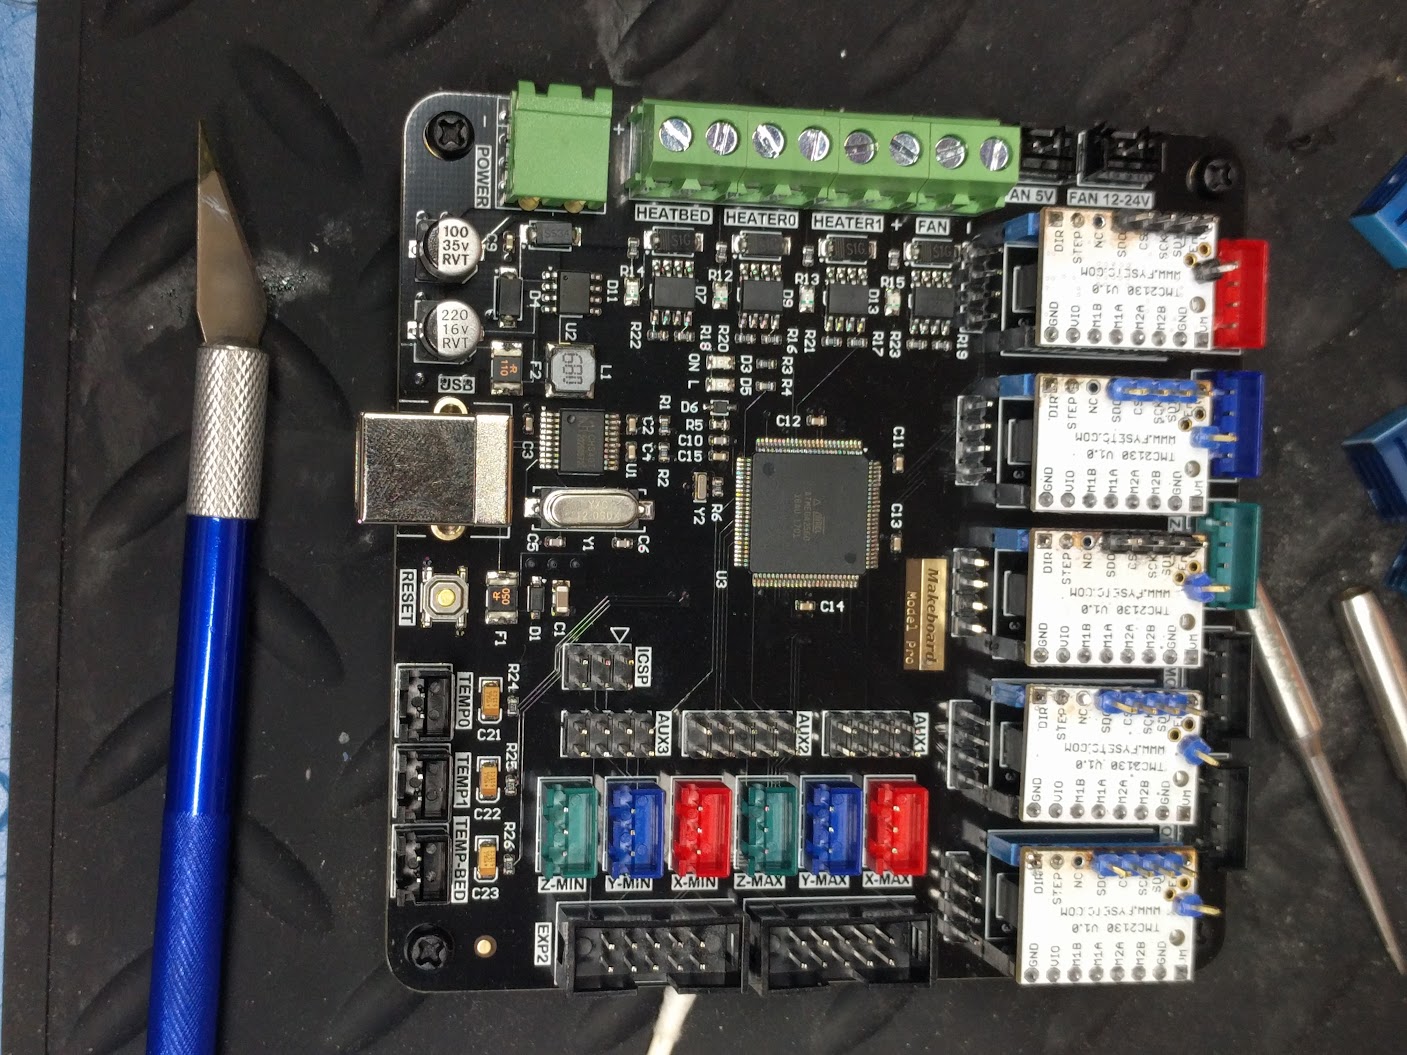
- You have to remove a small SMD resistor that makes it standalone (The blue box in the image above). This is easiest to do when you have those pins removed.
- You have to short two little configuration pins (the green and red boxes above). This was the hardest part. I could heat them up, get plenty of solder on there, but when I removed the iron, the solder would just come with the iron. Also, they are super small. I have pretty good eyes, so if you don’t some magnification is required. Also a small small soldering iron tip is needed.
- You solder on some of the pins downward, some upward, and one extra pin on the diag1 hole, which is the one closest to the potentiometer.
I bought a 5 pack, and I did this to all of them, even though I only wanted the endstops on two, and I only ended up installing 4.
I don’t think I saved enough money to justify that much work, but hey, it’s a hobby, it’s supposed to consume hours, right? The watterlott ones won’t have that rework, the pins even come loose.
The story with SPI:
SPI is pretty neat, the arduino is the master, and it chooses which thing to talk to by select it with the CS pin. The MISO, MOSI, CLK are all common for everything that uses SPI, including the LCD. All these need those pins joined together, and connected to the right spot on the RAMPS board.
The CS or chip select pins, however need to have one digital pin on the arduino for one motor driver. There are a few spares, ones like D40, D42, D44, and if you’re not using E1, there is an enable, step, and dir pin there. If you don’t use D53 (which IIRC, is for SD card support), then you can still use our bittersweet REPRAP_FULL_DISCOUNT_ALL_CAP_BIG_DISPLAY_WITH_A_CRAPPY_ENCODER. I didn’t look for hours, but I couldn’t find 5 spare pins without cutting into the display pins, so I decided to not use E1 with Z2, which gives me 3 more pins, and requires one less CS.
So, I don’t have the permanent wiring set up, but I have the SPI pins all jumpered, and that little thing took close to an hour to do. I hate soldering wires to wires. Someone would make me really happy to just sell me a cable that does that for like $10. The CS pins and endstop pins are just female/female premade wires for now.
The weird thing is that now that there are SPI cords all over the place, I’m worried that this improves thermal dissipation is going to go to crap, because the air can’t get to the heatsinks with all these cables all over the place.
<TODO get a pick of my beautiful wiring.>
Software/Marlin config:
Oh god, Just look through the Configuration_adv.h and see what you want to turn on. I used STEATHCHOP, the monitoring and X/Y stall guard. I am not messing with Hybrid at all, yet. Tom’s video is a pretty good overview. Also, this is a moving target. There is a flag that lets you do M122, and that is awesome.
M122/Debugging:
M122 prints a table with a bunch of stats about the drivers, and the most useful is, at the bottom, it prints the registers for each driver. If it’s 00:00:00:00:00, then you don’t have the SPI right, and it’s just reading zeros. Mine were something like 80:00:C0:00:00 or something like that. It also prints things like the mode, the sensitivity and the current, if you are worried the settings aren’t making it to the driver.
Monitoring:
If you turn on the monitor feature, and you have a single coil disconnected when the driver tries to move, it will set a flag, and Marlin will see that, and abort the print. It will have a warning message on the screen telling you that you need to reset, and at least the serial port will tell you which coil on which motor is busted. I would love to have this on my CNC machine for that rare time when something comes loose, and you are wondering why did it fail, and you wished it hadn’t just trashed your workpiece.
StallGuard:
I spent the most time trying to figure this one out. The first problem was that I didn’t solder those super tiny jumpers. The second thing was that I wasn’t getting SPI communication (00:00:00:00:00) and the third thing was that one of the motors I had (I was testing on my desk by just grabbing the axle) stalled as soon as it started moving. But, it’s pretty cool when it’s working. I don’t know why, but I really like the idea of fewer switches, and fewer cables on my printer. That’s really the only reason I care.
For the record, I am pretty sure this feature trips when the steppers are about to lose steps, and it doesn’t actually lose any steps.
Installed on the printer:
I installed this new control board, and all 4 drivers on my MP3DPV1, and it’s working quite well. I had to adjust the sensitivity of X because this version can stretch X a little if it jamms in. And I’ll say again that I was able to use the LCD, without changing it’s pinout, just by remapping the pins_RAMPS around to get the CS pins to unused spaces.
Summary:
I didn’t print anything, because I took my Z probe off for another project. :(. But I will be using these on my MP3DPV2, because I’ve already invested so much time.
They make the printer feel smoother, and after working with steppers for so long, I really like the idea that they know when there are open coils, or when they skip steps. It is measurably better than the DRV8825s.
But they are a lot of work, and smashing them into a ramps board is a pain, and it ends up looking ugly. The skills required to do this means it’s still probably an advanced technique, until someone comes up with a rambo like board with them and Ryan takes the time to configure Marlin for you.
If I knew then what I know now, I would probably still do this, but if they give me trouble in a few months, after the honeymoon has warn off, I’m taking them out. If you’re on the fence, don’t sweat it.
